[转载]在Asp.net MVC使用thickbox实现调用页面的Ajax更新 – 打造可持续发展的事业 – 博客园.
在MVC模式中,通常都是Controller处理请求并生成数据,选 择一个合适的View来显示结果给用户。虽然ASP.NET MVC已经有非常丰富的ActionResult来满足不同情况下的需求,但是有了Ajax的利器,我们希望有更流畅的交互方式。我们希望能够在一个界面完成列表的显示,编辑或者新增,并完成 刷新。借助JQuery的一个扩展thickbox我们能够达到这个效果。
本文的灵感来自于一篇博文:MVC AJAX Form with Ajax.BeginForm() and JQuery Thickbox(http://geekswithblogs.net/michelotti/archive/2009/08/31/mvc-ajax-form-with-ajax.beginform-and-jquery-thickbox.aspx)
和该文的差异在于thickbox中提交后,他更新的是thickbox中的内容,而不是加载thickbox的页面(即thickbox后 面的那个页面)。
我演示的场景如下
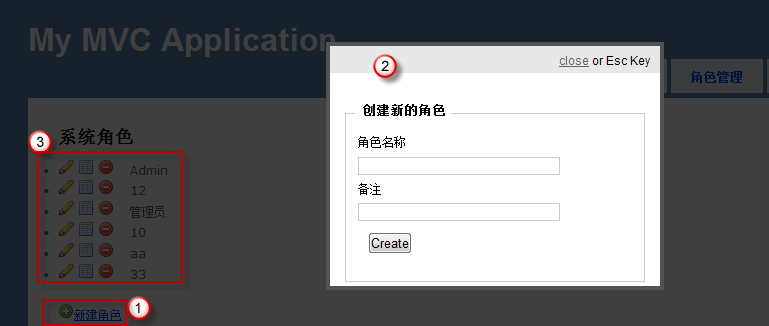
点击“新建角色”①弹出一个新建的角色thickBox输入窗口②,填入相 应的信息后,将利用Ajax更新角色列表③。
假设你已经非常了解ASP.NET MVC了。
这里我们不讨论MVC中的Model层, 假设Model数据可以通过Service层获取。
在这个例子里,我们需要3个View:RoleList.aspx,RoleNameList.ascx和RoleCreate.ascx。后两个PartialView。
RoleController需要处理以下几个请求:
[get] RoleNameList():显示Role列表,返回RoleNameList.ascx这个PartialView.
[get] RoleCreate():显示Create的输入界面RoleCreate.ascx等待用户输入相关的信息。
[post]ReleCreate(Role role):处理Create的提交,并返回RoleNameList.ascx。
看看代码
<%@ Page Title=”” Language=”C#” MasterPageFile=”~/Views/Shared/Site.Master” Inherits=”System.Web.Mvc.ViewPage
<asp:Content ID=”Content1″ ContentPlaceHolderID=”TitleContent” runat=”server”>
RoleList
asp:Content>
<asp:Content ID=”Content2″ ContentPlaceHolderID=”MainContent” runat=”server”>
<div id=”rolenamelist” class=”LeftPanel”>
<% Html.RenderPartial(“RoleNameList”, Model.allRoles); %>
div>
<div class=”RightPanel”>
div>
<div class=”clear”>
asp:Content>
RoleNameList.ascx
<%@ Control Language=”C#” Inherits=”System.Web.Mvc.ViewUserControl
<h2>
系统角色h2>
<ul>
<% foreach (var item in Model)
{ %>
<li>
<%=Html.ActionLink (“RoleEdit”, new { id = item.Id })%>
<%=Html.ActionLink( “RoleDetail”, new { id = item.Id })%>
<%=Html.ActionLink (“RoleDelete”, new { id = item.Id })%>
<%= Html.Encode(item.name) %>
li>
<% } %>
ul>
<div id=”SamDiv”>
div>
<p>
<%= Html.ActionLink(“新建角色”, “RoleCreate”, new { height = 200, width = 300, modal = true }, new { @class = “thickbox” })%>
p>
其中RoleList.aspx
其中将最后一个ActionLink的class设置为thickbox,thickbox将 会自动以ajax的方式请求到相应链接的内容并显示在一个类似于弹出对话 框的层里面。
结合参考的文档,我曾经天真地想,是不是在RoleCreate.ascx,将UpdateTargetId置为父窗口的相应DIV ID即可。如是
<%@ Control Language=”C#” Inherits=”System.Web.Mvc.ViewUserControl<RealMVC.Data.DO_RoleInfo>” %>
<% using (Ajax.BeginForm(“RoleCreate”,“Role” , new AjaxOptions { HttpMethod = “post”, InsertionMode = InsertionMode.Replace, UpdateTargetId = “rolenamelist” }))
{%>
<fieldset>
<legend>创建新的角色</legend>
<div class=”editor-label”>
<%= Html.LabelFor(model => model.name)%>
</div>
<div class=”editor-field”>
<%= Html.TextBoxFor(model => model.name)%>
<%= Html.ValidationMessageFor(model => model.name)%>
</div>
<div class=”editor-label”>
<%= Html.LabelFor(model => model.comment)%>
</div>
<div class=”editor-field”>
<%= Html.TextBoxFor(model => model.comment)%>
<%= Html.ValidationMessageFor(model => model.comment)%>
</div>
<p>
<input type=”submit” value=”Create” />
</p>
</fieldset>
<% } %>
你可以试一下,这时候会出现问题,thickbox不会关闭,更谈不上更新后面的页面。
如是我试图将AjaxOptions的OnBegin设置为tb_remove试图先关闭thickbox但是产生 错误,无法正确执行AjaxForm产生的代码。究其原因可能是tb_remove返回了false,浏览器终止了后续的请求,于是我修改了 thickbox代码。
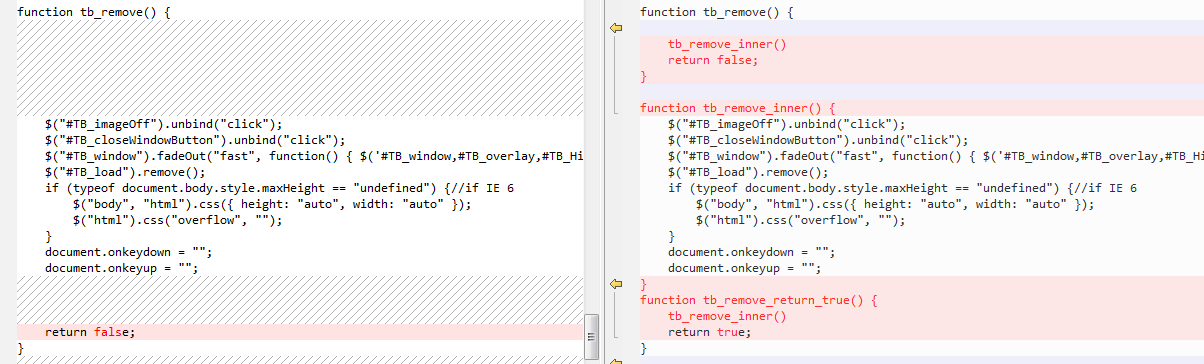
右边是我修改之后的代码。
这个时候RoleCreate.ascx代码如下:
<% using (Ajax.BeginForm(“RoleCreate”, “Role”, new AjaxOptions { HttpMethod = “post”, InsertionMode = InsertionMode.Replace, UpdateTargetId = “rolenamelist”, OnBegin = “tb_remove_return_true” }))
再附上RoleController中对这个Ajax请求的处理方法:
[AcceptVerbs(HttpVerbs.Post)]
public ActionResult RoleCreate(DO_RoleInfo role)
{
try
{
// TODO: Add insert logic here
RoleService.Save(role);
if(Request.IsAjaxRequest())
return PartialView(“RoleNameList”,RoleService.ListAllRoles());
else
return RedirectToAction(“RoleList”);
}
catch
{
return View();
}
}
总结一下:
l 先阅读MVC AJAX Form with Ajax.BeginForm() and jQuery Thickbox(http://geekswithblogs.net/michelotti/archive/2009/08/31/mvc-ajax-form-with-ajax.beginform-and-jquery-thickbox.aspx)
l 创建链接ActionLink,将class设置为thickbox,以便在thickbox中显示RoleCreate View。
l 在Create的View中使用AjaxForm,设置OnBegin调用tb_remove来关闭thickbox。
l 关键是重写一个tb_remove使其返回一个true而不是false。