[转载]Android 分享两个你学习android 平台开发必须碰到的几个知识点的组件【天气预报、日期】View 组件 – Terry_龙 – 博客园.
本篇文章将分享两个VIEW组件,一个天气组件和一个日期组件,这两个组件本来是一个App Widget 后来,我看着好玩,将他们弄成一个VIEW的组件,可以像使用Windows Phone 7 的用户控件一样拖放到你想要的项目中。本篇将演示这两个组件的编写过程,工程文件如下:
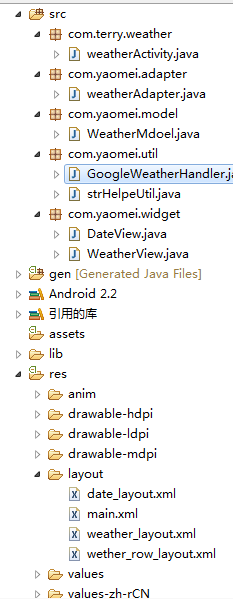
包名介绍:
- com.terry.weather 程序的入口包
- com.yaomei.adapter 天气预报组件使用到的数据源
- com.yaomei.model 天气预报使用到的模型包
- com.yaomei.util 获取天气信息的工具包
- com.yaomei.widget 天气预报组件、日期组件的存放位置
从包名可以看出,编写一个天气预报所需要的代码量比编写一个日期VIEW所需要的代码量要多得多 ,那么我们先把天气预报的一些实现思路跟大家讲讲。
首先,本实例使用的天气预报是一个可以自己国际化的天气组件VIEW,可以看上图,将所需要的URL都放入Android 自己的国际化文件夹里面,比如中文的话就这样写:
<![CDATA[http://www.google.com/ig/api?hl=zh-cn&weather=]]>
</string>
那么是英语环境的就只需要在默认的VALUES里面的string.xml这样写即可:
<![CDATA[http://www.google.com/ig/api?hl=en&weather=]]>
</string>
这是本篇一个要注意的一点,另外还有需要注意的是,这个天气组件提供可供用户选择更新频率,这里比如我们使用3个小时更新一次,那么当用户退出 程序时,再打开是否还要再去Google 上面读天气呢?答案是NO,因为既然用户选择了更新频率,那么在一定的时间内,我们最好不要自动去更新,除非用户自己点击更新才去执行。那么要如何得到之 前的数据呢?
这里使用到的是SharePreference 将一些天气的信息保存进去,连同天气的图片也一并保存。保存天气图片是将google 天气的图片使用Base64转成字符串,然后保存进Sharepreference ,如果更新频率条件未满足则进去SharePrference 将天气预报数据取出来 。因为Android 并未提供将图片转成字符串的API,这里使用到的是apache 的一个Jar包,可在这里下载:点击这里
思路上面给出了,下面给出天气预报组件VIEW的核心代码,其他附属代码可在后面的附件下载得到,代码如下:
import java.io.ByteArrayOutputStream;
import java.util.ArrayList;
import java.util.Calendar;
import java.util.List;
import java.util.Timer;
import java.util.TimerTask;
import org.apache.commons.codec.binary.Base64;
import android.app.Activity;
import android.content.Context;
import android.content.SharedPreferences;
import android.content.res.TypedArray;
import android.graphics.Bitmap.CompressFormat;
import android.graphics.drawable.BitmapDrawable;
import android.graphics.drawable.Drawable;
import android.os.Handler;
import android.os.Message;
import android.text.Html;
import android.util.AttributeSet;
import android.view.LayoutInflater;
import android.view.View;
import android.widget.GridView;
import android.widget.ImageView;
import android.widget.LinearLayout;
import android.widget.TextView;
import android.widget.Toast; import com.terry.weather.R;
import com.yaomei.adapter.weatherAdapter;
import com.yaomei.model.WeatherMdoel;
import com.yaomei.util.strHelpeUtil; public class WeatherView extends LinearLayout { private static final String Hour_COMPARE = “hour_compare“;
private static final String DAY_OF_WEEK = “day_of_week“;
private static final String LOW = “low“;
private static final String HIGH = “high“;
private static final String CONDITION = “condition“;
private static final String IMAGE = “image“;
private static final String DATE_COMPARE = “date_compare“;
private static final String CITYNAE_SHARE = “cityNameShare“; private ImageView iv_weather;
private TextView tv_state, tv_position, tv;
WeatherMdoel model;
GridView gv;
Timer timer;
Handler handler = new Handler() {
public void handleMessage(Message msg) {
if (msg.arg1 == 1) {
if (weatherList.size() > 0) {
gv
.setAdapter(new weatherAdapter(getContext(),
weatherList));
init();
} else {
Toast.makeText(getContext(), “查询不到数据“, 1000).show();
}
// msg.recycle();
}
};
}; /**
* 自动加载天气
*/
private boolean autoLoad = false; public boolean getAutoLoad() {
return autoLoad;
} public void setAutoLoad(boolean isLoad) {
this.autoLoad = isLoad;
} /**
* 城市名称
*/
private String cityName = “”; public String getCityName() {
return cityName;
} public void setCityName(String cityName) {
this.cityName = cityName;
} /**
* 设置每几小时更新一次
*/
private int updateHour; public int getUpdateHour() {
return updateHour;
} public void setUpdateHour(int hour) {
this.updateHour = hour;
} public WeatherView(Context context) {
this(context, null);
// TODO Auto-generated constructor stub
} public WeatherView(Context context, AttributeSet attrs) {
super(context, attrs);
int resouceID = –1;
TypedArray tyedArray = context.obtainStyledAttributes(attrs,
R.styleable.WeatherView);
int N = tyedArray.getIndexCount();
for (int i = 0; i < N; i++) {
int attr = tyedArray.getIndex(i);
switch (attr) {
case R.styleable.WeatherView_AutoLoad:
setAutoLoad(tyedArray.getBoolean(
R.styleable.WeatherView_AutoLoad, false));
break; case R.styleable.WeatherView_CityName:
resouceID = tyedArray.getResourceId(
R.styleable.WeatherView_CityName, 0);
setCityName(resouceID > 0 ? tyedArray.getResources().getText(
resouceID).toString() : tyedArray
.getString(R.styleable.WeatherView_CityName));
break;
case R.styleable.WeatherView_UpdateHour:
setUpdateHour(tyedArray.getInteger(
R.styleable.WeatherView_UpdateHour, 3));
break;
}
}
View view
= LayoutInflater.from(getContext()).inflate(R.layout.weather_layout, this);
tv
= (TextView) view.findViewById(R.id.tv_temperature);gv
= (GridView) view.findViewById(R.id.grid);iv_weather = (ImageView) view.findViewById(R.id.iv_weather);
tv_state = (TextView) view.findViewById(R.id.tv_state);
tv_position = (TextView) view.findViewById(R.id.tv_position);
timer = new Timer(); if (getAutoLoad()) {
startLoadWeather();
}
tyedArray.recycle();
} /**
* 开始加载
*/
public void startLoadWeather() {
timer.schedule(new TimerTask() {
@Override
SharedPreferences share
= getContext().getSharedPreferences(“weather“, Activity.MODE_PRIVATE);
long time = System.currentTimeMillis();
final Calendar mCalendar = Calendar.getInstance();
mCalendar.setTimeInMillis(time);
String tempDate = mCalendar.get(Calendar.YEAR) + “–“
+ mCalendar.get(Calendar.MONTH) + “–“
+ mCalendar.get(Calendar.DAY_OF_MONTH);
if (share.contains(DATE_COMPARE)) {
if (share.getString(CITYNAE_SHARE, “”).equals(cityName)) {
int time_cop = mCalendar.get(Calendar.HOUR)
– share.getInt(Hour_COMPARE, 0);
String date = share.getString(DATE_COMPARE, “”); if (time_cop >= getUpdateHour()
|| !date.equals(tempDate)) {
saveWeatherList(mCalendar.get(Calendar.HOUR),
tempDate);
}
else if (time_cop < getUpdateHour()) {weatherList = new ArrayList<WeatherMdoel>();
for (int i = 0; i < 4; i++) {
WeatherMdoel model = new WeatherMdoel();
model.setWeek(share.getString(DAY_OF_WEEK + i,
“”));
model.setLowTemp(share.getString(LOW + i, “”));
model
.setHighTemp(share.getString(HIGH + i,
“”));
model.setConditions(share.getString(CONDITION
+ i, “”));
String image = share.getString(IMAGE + i, “”);
byte[] base64Bytes = Base64.decodeBase64(image
.getBytes());
ByteArrayInputStream bais = new ByteArrayInputStream(
base64Bytes);
model.setImageUrl(“”);
model
.setImageDrawable(Drawable
.createFromStream(bais,
“weather_image“));
weatherList.add(model);
}
}
}
saveWeatherList(mCalendar.get(Calendar.HOUR), tempDate);
}
}
else {saveWeatherList(mCalendar.get(Calendar.HOUR), tempDate);
}
// 把必要的操作放在于线程中执行,不阻塞UI
if (handler.hasMessages(1))
handler.obtainMessage().recycle(); else {
Message msg = handler.obtainMessage();
msg.arg1 = 1;
msg.sendToTarget();
}
}
}, 0, getUpdateHour() * 3600 * 1000);
} /**
* 第一次或者另外重新加载
*/
void saveWeatherList(int hour, String day) {
weatherList = new ArrayList<WeatherMdoel>();
weatherList = strHelpeUtil.searchWeather(Html.fromHtml(
getContext().getResources()
.getString(R.string.googleWeatherApi)).toString(),
getCityName());
SharedPreferences.Editor shareEditor
= getContext().getSharedPreferences(“weather“, Activity.MODE_PRIVATE).edit();
shareEditor.clear();
int i = 0;
for (WeatherMdoel model : weatherList) {
shareEditor.putString(DAY_OF_WEEK
+ i, model.getWeek());shareEditor.putString(LOW + i, model.getLowTemp());
shareEditor.putString(HIGH + i, model.getHighTemp());
shareEditor.putString(CONDITION + i, model.getConditions());
/**
* 将图片存入
*/
ByteArrayOutputStream baos = new ByteArrayOutputStream();
((BitmapDrawable) strHelpeUtil.loadImage(model.getImageUrl()))
.getBitmap().compress(CompressFormat.JPEG, 50, baos);
String ImageBase64
= new String(Base64.encodeBase64(baos.toByteArray()));
shareEditor.putString(IMAGE + i, ImageBase64);
i++;
}
shareEditor.putString(DATE_COMPARE, day);
shareEditor.putInt(Hour_COMPARE, hour);
shareEditor.putString(CITYNAE_SHARE, cityName);
shareEditor.commit();
} /**
* 初始化组件 信息
*/
void init() {
model = weatherList.get(0);
iv_weather.setImageDrawable(model.getImageUrl() == “” ? model
.getImageDrawable() : strHelpeUtil.loadImage(model
.getImageUrl()));
tv_state.setText(model.getConditions());
tv_position.setText(getCityName());
tv.setText(getContext().getResources().getString(R.string.temp_format,
model.getLowTemp(), model.getHighTemp()));
} /**
* 释放对象
*/
public void releaseTimer() {
timer.cancel();
weatherList = null;
}
}
学习这个类,你能够学到的知识点为:为应用程序添加属性,编写组件,SharePreference 的使用,Timer和Handler 异步处理UI等知识点。
日期VIEW显示VIEW组件,是一个显示当前系统时间的组件,当第一次运行时,得到当前的秒数在以60秒减去当前秒,得到第一次运行时下一次 运行需要的秒数,当这一次更新完毕后,下一次每次60秒更新一次时间,这个组件也是以分更新UI的操作,学习本类,你可以学到两个Handler 是如何协作处理UI,代码如下:
import java.util.Date; import android.content.Context;
import android.os.Handler;
import android.util.AttributeSet;
import android.view.LayoutInflater;
import android.view.View;
import android.widget.FrameLayout;
import android.widget.TextView; import com.terry.weather.R;
import com.yaomei.util.strHelpeUtil; public class DateView extends FrameLayout { private TextView tv_date_time, tv_week, tv_date; int second;
Handler handler
= new Handler() {public void handleMessage(android.os.Message msg) {
init();
handler.sendMessageDelayed(handler.obtainMessage(), 60 * 1000);
};
}; public DateView(Context context) {
this(context, null);
} public DateView(Context context, AttributeSet attrs) {
super(context, attrs);
//this.setBackgroundDrawable(getContext().getResources().getDrawable(
// R.drawable.date_background));
View view = LayoutInflater.from(getContext()).inflate(
R.layout.date_layout, this);
tv_date_time
= (TextView) view.findViewById(R.id.tv_date_time);tv_week = (TextView) view.findViewById(R.id.tv_week);
tv_date = (TextView) view.findViewById(R.id.tv_date);
init();
final Calendar calendar = Calendar.getInstance();
second = calendar.get(Calendar.SECOND);
handler.sendMessageDelayed(handler.obtainMessage(),
(60 – second) * 1000);
} void init() {
java.text.DateFormat df = new java.text.SimpleDateFormat(“HH:mm“);
tv_date_time.setText(df.format(new Date()));
tv_week.setText(strHelpeUtil.getWeekOfDate(new Date()));
strHelpeUtil str = new strHelpeUtil(getContext());
tv_date.setText(str.toString());
}
}
上篇运行效果如下:

由于没有为其提供背景颜色,使用的同学可以自己为它们加上一个好看的背景颜色,效果会更加。
上面的天气组件,其实可以使用AsyncTask也是起到同样的效果,AsyncTask使用起来会觉得优雅一点,这里也顺便把一些AsyncTask在使用上一些注意事项跟大家谈一谈:
- 在doInBackground 里面不要直接操作UI,比如设置UI的可见性操作。
- 在doInBackground 所在的操作只负责帮你得到数据,然后把UI处理都放在onPostExecute 里面。
- 同时启动几个AsyncTask 注意线程加锁,使用synchronized
- 必须每次都创建一个新的AsyncTask 对象,否则会提示“a task can be executed only once” 的错误信息。
本篇的所有源码下载地址:组件