[转载]MVC中的扩展点(七)视图及视图引擎 – xfrog – 博客园.
我们知道在MVC框架中,最终通过ActionResult来生成应答内容。上一篇中我们介绍了MVC中默认的结果类型,本章我们将详细介绍ViewResult及PartialViewResult,了解MVC是如何通过视图来生成应答内容的。
MVC默认的视图被称为Web Forms视图引擎,原因在于它的视图文件使用与ASP.NET Web Forms相同的文件类型(.aspx .ascx),并且使用ASP.NET的页面解析器来解释视图文件内容。也在于,我们在编写视图文件时,可以完全像编写aspx页面文件一样,使用智能提 示功能及内联代码等。
与传统ASP.NET页面一样,在运行时内建的页面编译器会将我们的aspx或ascx文件转换为标准的.NET类,假设我们的视图内容为:
<%@ Page Language="C#" Inherits="System.Web.Mvc.ViewPage" %>
<div>
<%=Html.Label("Hello World!") %>
<%
using (Html.BeginForm())
{
}
%>
</div>
页面编译器会将此视图转换为类似以下的类:
public class views_home_index_aspx : ViewPage, IRequiresSessionState, IHttpHandler
{
private void @__BuildControlTree(views_home_index_aspx @__ctrl)
{
this.InitializeCulture();
@__ctrl.SetRenderMethodDelegate(new System.Web.UI.RenderMethod(this.@__Render));
}
private void @__Render(System.Web.UI.HtmlTextWriter @__w, System.Web.UI.Control parameterContainer)
{
@__w.Write("\r\n<div>\r\n");
@__w.Write(Html.Label("Hello World!"));
@__w.Write("\r\n");
using (Html.BeginForm())
{
}
@__w.Write("\r\n</div>\r\n");
}
}
.codearea { color: black; background-color: white; line-height: 18px; border: 1px solid rgb(79, 129, 189); margin: 0pt; width: auto ! important; overflow: auto; text-align: left; font-size: 12px; font-family: “Courier New”,”Consolas”,”Fixedsys”,”BitStream Vera Sans Mono”,courier,monospace,serif; }.codearea pre { color: black; line-height: 18px; padding: 0pt 0pt 0pt 12px ! important; margin: 0em; background-color: rgb(255, 255, 255) ! important; }.linewrap pre { white-space: pre-wrap; word-wrap: break-word; }.codearea pre.alt { background-color: rgb(247, 247, 255) ! important; }.codearea .lnum { color: rgb(79, 129, 189); line-height: 18px; }
根据此类,生成的页面HTML源代码如下:
<div>
<label for="Hello World!">Hello World!</label>
<form action="/" method="post"></form>
</div>
.codearea { color: black; background-color: white; line-height: 18px; border: 1px solid rgb(79, 129, 189); margin: 0pt; width: auto ! important; overflow: auto; text-align: left; font-size: 12px; font-family: “Courier New”,”Consolas”,”Fixedsys”,”BitStream Vera Sans Mono”,courier,monospace,serif; }.codearea pre { color: black; line-height: 18px; padding: 0pt 0pt 0pt 12px ! important; margin: 0em; background-color: rgb(255, 255, 255) ! important; }.linewrap pre { white-space: pre-wrap; word-wrap: break-word; }.codearea pre.alt { background-color: rgb(247, 247, 255) ! important; }.codearea .lnum { color: rgb(79, 129, 189); line-height: 18px; }
显然,在转换时,编译器将非代码内容转换为Response.Write(…)的形式,即直接将内容写入Response,将<%=表达式%& gt;转换为Response.Write(表达式)的形式,即将表达式的返回值写入Response,将<%表达式%>中的表达式直接按代 码写入,即直接执行代码,不写入Response。
从技术上讲,ASP.NET中的aspx是通过PageParserFilter抽象类来控制类代码的生成,在MVC中,MVC实现了自己的解析 器:ViewTypeParserFilter,通过它控制将视图文件转换为标准的.NET类的行为。MVC不使用ASP.NET默认解析器的原因在于默 认的解析器不支持泛型,即aspx不能从泛型基类中继承,而ViewTypeParserFilter解除了此限制。当我们生成一个MVC项目后,在 Views目录下包含了一个Web.config配置文件,从中可以看到MVC已经通过pages的pageParserFilterType项将此目录 下的默认页面解析器指定为ViewTypeParserFilter。
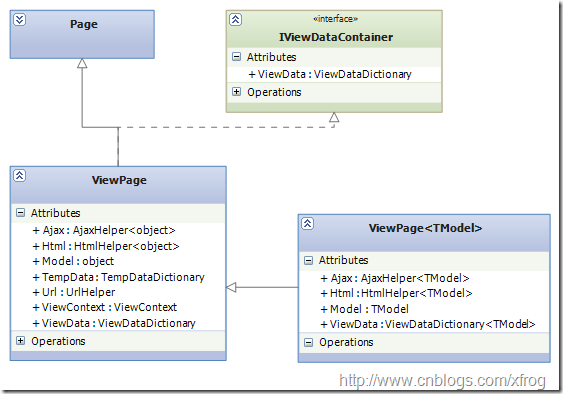
另外,视图文件与传统的aspx页面文件的一种重要不同点在于,传统页面从Page类继承,而视图是从MVC框架中的ViewPage类继承,本质上 ViewPage从Page继承,并在Page类基础针对MVC进行了扩展,这也是我们为什么可以在视图中使用模型对象、Html、Ajax等辅助类的原 因:
ViewPage<TModel>是ViewPage的泛型,在创建视图时,通过指定TModel的类型,从而实现强类型的ViewPage。
MVC视图引擎架构
视图引擎的执行方式很简单:通过ViewEngines.FindView根据当前的ControllerContext找出适当的视图引擎及视图,然后调用视图的Render方法生成应答内容,最后通过视图引擎的ReleaseView方法是否视图资源:
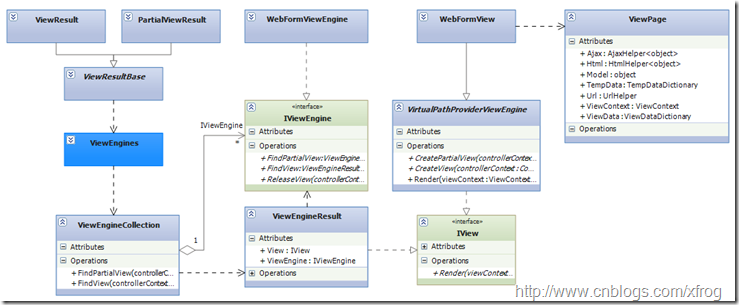
MVC默认的Web Forms视图引擎类图如下:
IView、IViewEngine、ViewEngineResult是视图引擎的核心,IView接口负责视图的渲染,IViewEngine负责找出合适的视图文件,ViewEngineResult是对IView和IViewEngine的封装。
ViewEngineCollection表示一个IViewEngine集合,MVC提供向集合添加视图引擎的方法,并提供FindView、 FindPartialView方法,从集合项中找出与当前ControllerContext匹配的ViewEngineResult。
ViewEngines是一个静态类,其内部封装了一个ViewEngineCollection,构成了MVC框架默认的视图引擎集合,默认下,该结合仅包含一个Web Forms引擎。我们可通过视图引擎集合上的方法向其添加自定义的视图引擎。
WebFormViewEngine是IViewEngine的一个实现,表示一个Web Forms视图引擎。
WebFormView是IView的一个实现,表示一个Web Forms视图,其内部Render方法,将实例化一个通过视图aspx文件转换而来的类型。通过该类型将试图文件渲染为最终的应答结果。
第三方视图引擎
MVC视图引擎有不少开源项目,比较完善的有以下几种:
1、Spark View Engine:
官网:http://sparkviewengine.com/ 下载:http://sparkviewengine.codeplex.com/
2、NHaml View Engine
官网:http://code.google.com/p/nhaml/ 下载:http://code.google.com/p/nhaml/downloads/list
3、Razor:
此引擎有MVC同一团队开发,官网:http://www.asp.net/mvc 或者 http://www.asp.net/WebMatrix
每一个视图引擎都有自己不同的语法规则,对此本文不做介绍,请参考官方文档。另外,关于这几个引擎的粗略介绍,可参考以下博客:http://blogs.msdn.com/b/coding4fun/archive/2010/10/04/10070953.aspx
下面以Spark视图引擎为例,简要介绍第三方视图引擎的使用步骤:
1、下载Spark视图引擎并解压
2、新建一空的MVC项目,并添加对Spark.dll及Spark.Web.Mvc.dll的引用
3、修改Global.asax.cs,在Application_Start过程中想默认视图引擎集合中添加Spark视图引擎:
protected void Application_Start(){AreaRegistration.RegisterAllAreas();RegisterRoutes(RouteTable.Routes);ViewEngines.Engines.Add(new SparkViewFactory());}.codearea { color: black; background-color: white; line-height: 18px; border: 1px solid rgb(79, 129, 189); margin: 0pt; width: auto ! important; overflow: auto; text-align: left; font-size: 12px; font-family: “Courier New”,”Consolas”,”Fixedsys”,”BitStream Vera Sans Mono”,courier,monospace,serif; }.codearea pre { color: black; line-height: 18px; padding: 0pt 0pt 0pt 12px ! important; margin: 0em; background-color: rgb(255, 255, 255) ! important; }.linewrap pre { white-space: pre-wrap; word-wrap: break-word; }.codearea pre.alt { background-color: rgb(247, 247, 255) ! important; }.codearea .lnum { color: rgb(79, 129, 189); line-height: 18px; }4、添加一个HomeController:
{{{ViewData["products"] = products;return View();.src_container { background-color: rgb(231, 229, 220); width: 99%; overflow: hidden; margin: 12px 0pt ! important; padding: 0px 3px 3px 0px; }.src_container .titlebar { background-color: rgb(212, 223, 255); border-width: 1px 1px 0pt; border-style: solid solid none; border-color: rgb(79, 129, 189) rgb(79, 129, 189) -moz-use-text-color; padding: 3px 24px; margin: 0pt; width: auto; line-height: 120%; overflow: hidden; text-align: left; font-size: 12px; }.src_container .toolbar { display: inline; font-weight: normal; font-size: 100%; float: right; color: rgb(0, 0, 255); text-align: left; overflow: hidden; }.toolbar span.button { display: inline; font-weight: normal; font-size: 100%; color: rgb(0, 0, 255); text-align: left; overflow: hidden; cursor: pointer; }.src_container div.clientarea { background-color: white; border: 1px solid rgb(79, 129, 189); margin: 0pt; width: auto ! important; height: auto; overflow: auto; text-align: left; font-size: 12px; font-family: “Courier New”,”Consolas”,”Fixedsys”,courier,monospace,serif; }.src_container ol.mainarea { padding: 0pt 0pt 0pt 52px; margin: 0pt; background-color: rgb(247, 247, 255) ! important; }.number_show { padding-left: 52px ! important; list-style: decimal outside none ! important; }.number_show li { list-style: decimal outside none ! important; border-left: 1px dotted rgb(79, 129, 189); }.number_hide { padding-left: 0px ! important; list-style-type: none ! important; }.number_hide li { list-style-type: none ! important; border-left: 0px none; }ol.mainarea li { display: list-item ! important; font-size: 12px ! important; margin: 0pt ! important; line-height: 18px ! important; padding: 0pt 0pt 0pt 0px ! important; background-color: rgb(247, 247, 255) ! important; color: rgb(79, 129, 189); }ol.mainarea li pre { color: black; line-height: 18px; padding: 0pt 0pt 0pt 12px ! important; margin: 0em; background-color: rgb(255, 255, 255) ! important; }.linewrap ol.mainarea li pre { white-space: pre-wrap; word-wrap: break-word; }ol.mainarea li pre.alt { background-color: rgb(247, 247, 255) ! important; }5、在Models下建立一个Product类
{.src_container { background-color: rgb(231, 229, 220); width: 99%; overflow: hidden; margin: 12px 0pt ! important; padding: 0px 3px 3px 0px; }.src_container .titlebar { background-color: rgb(212, 223, 255); border-width: 1px 1px 0pt; border-style: solid solid none; border-color: rgb(79, 129, 189) rgb(79, 129, 189) -moz-use-text-color; padding: 3px 24px; margin: 0pt; width: auto; line-height: 120%; overflow: hidden; text-align: left; font-size: 12px; }.src_container .toolbar { display: inline; font-weight: normal; font-size: 100%; float: right; color: rgb(0, 0, 255); text-align: left; overflow: hidden; }.toolbar span.button { display: inline; font-weight: normal; font-size: 100%; color: rgb(0, 0, 255); text-align: left; overflow: hidden; cursor: pointer; }.src_container div.clientarea { background-color: white; border: 1px solid rgb(79, 129, 189); margin: 0pt; width: auto ! important; height: auto; overflow: auto; text-align: left; font-size: 12px; font-family: “Courier New”,”Consolas”,”Fixedsys”,courier,monospace,serif; }.src_container ol.mainarea { padding: 0pt 0pt 0pt 52px; margin: 0pt; background-color: rgb(247, 247, 255) ! important; }.number_show { padding-left: 52px ! important; list-style: decimal outside none ! important; }.number_show li { list-style: decimal outside none ! important; border-left: 1px dotted rgb(79, 129, 189); }.number_hide { padding-left: 0px ! important; list-style-type: none ! important; }.number_hide li { list-style-type: none ! important; border-left: 0px none; }ol.mainarea li { display: list-item ! important; font-size: 12px ! important; margin: 0pt ! important; line-height: 18px ! important; padding: 0pt 0pt 0pt 0px ! important; background-color: rgb(247, 247, 255) ! important; color: rgb(79, 129, 189); }ol.mainarea li pre { color: black; line-height: 18px; padding: 0pt 0pt 0pt 12px ! important; margin: 0em; background-color: rgb(255, 255, 255) ! important; }.linewrap ol.mainarea li pre { white-space: pre-wrap; word-wrap: break-word; }ol.mainarea li pre.alt { background-color: rgb(247, 247, 255) ! important; }
6、修改web.config,在configSections下添加spark配置节:<section name="spark" type="Spark.Configuration.SparkSectionHandler, Spark"/>7、在web.config中配置spark(如默认的命名空间引用):
<spark><compilation debug="true" defaultLanguage="CSharp" /><pages automaticEncoding="true" ><namespaces><add namespace="System"/><add namespace="System.Collections.Generic"/><add namespace="System.Linq"/><add namespace="System.Web"/><add namespace="System.Web.Mvc"/><add namespace="System.Web.Mvc.Html"/></namespaces></pages></spark>8、在Views下创建Home目录,并在此目录下添加Index.spark视图模板文件:
<viewdata products="IList[[Models.Product]]"/><div each="var product in products"><h2>${product.Name}</h2></div>.codearea { color: black; background-color: white; line-height: 18px; border: 1px solid rgb(79, 129, 189); margin: 0pt; width: auto ! important; overflow: auto; text-align: left; font-size: 12px; font-family: “Courier New”,”Consolas”,”Fixedsys”,”BitStream Vera Sans Mono”,courier,monospace,serif; }.codearea pre { color: black; line-height: 18px; padding: 0pt 0pt 0pt 12px ! important; margin: 0em; background-color: rgb(255, 255, 255) ! important; }.linewrap pre { white-space: pre-wrap; word-wrap: break-word; }.codearea pre.alt { background-color: rgb(247, 247, 255) ! important; }.codearea .lnum { color: rgb(79, 129, 189); line-height: 18px; }
说明:本例仅演示如何使用第三方视图引擎,如果想详细了解Spark视图引擎,请访问官方网站。
 Mikel
Mikel


