[转载]Build CRUD Application with edit form in expanded row details – jQuery EasyUI.
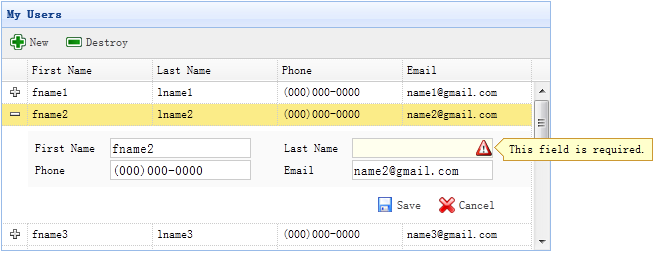
When switch the datagrid view to ‘detailview’, users can expand a row to show any details below that row. This feature allows you to provide any possible layout for its edit form that placed in detail row panel. In this tutorial, we are using datagrid component to reduce the space occupied by the edit form.
Step 1: Create DataGrid in HTML tag
- <table id=“dg” title=“My Users” style=“width:550px;height:250px” url=“get_users.php” toolbar=“#toolbar” fitcolumns=“true” singleselect=“true”>
- <thead>
- <tr>
- <th field=“firstname” width=“50”>First Name</th>
- <th field=“lastname” width=“50”>Last Name</th>
- <th field=“phone” width=“50”>Phone</th>
- <th field=“email” width=“50”>Email</th>
- </tr>
- </thead>
- </table>
- <div id=“toolbar”>
- <a href=“#” class=“easyui-linkbutton” iconcls=“icon-add” plain=“true” onclick=“newItem()”>New</a>
- <a href=“#” class=“easyui-linkbutton” iconcls=“icon-remove” plain=“true” onclick=“destroyItem()”>Destroy</a>
- </div>
Step 2: Apply Detail View for DataGrid
- $(‘#dg’).datagrid({
- view: detailview,
- detailFormatter:function(index,row){
- return ‘<div class=”ddv”></div>’;
- },
- onExpandRow: function(index,row){
- var ddv = $(this).datagrid(‘getRowDetail’,index).find(‘div.ddv’);
- ddv.panel({
- border:false,
- cache:true,
- href:‘show_form.php?index=’+index,
- onLoad:function(){
- $(‘#dg’).datagrid(‘fixDetailRowHeight’,index);
- $(‘#dg’).datagrid(‘selectRow’,index);
- $(‘#dg’).datagrid(‘getRowDetail’,index).find(‘form’).form(‘load’,row);
- }
- });
- $(‘#dg’).datagrid(‘fixDetailRowHeight’,index);
- }
- });
To use the detail view for datagrid, include the ‘datagrid-detailview.js’ file to your page header.
We use the ‘detailFormatter’ function to generate the row detail content. In this case, we return the empty <div> that the edit form will be placed in. When users click the row expand button(‘+’), the ‘onExpandRow’ event will be triggered and we can load the edit form via ajax. Call ‘getRowDetail’ method to get the row detail container, so we can find the row detail panel. Create the panel in row details and load the edit form that returned from ‘show_form.php’.
Step 3: Create Edit Form
The edit form is loaded from server.
- <form method=“post”>
- <table class=“dv-table” style=“width:100%;background:#fafafa;padding:5px;margin-top:5px;”>
- <tbody><tr>
- <td>First Name</td>
- <td><input name=“firstname” class=“easyui-validatebox” required=“true”></td>
- <td>Last Name</td>
- <td><input name=“lastname” class=“easyui-validatebox” required=“true”></td>
- </tr>
- <tr>
- <td>Phone</td>
- <td><input name=“phone”></td>
- <td>Email</td>
- <td><input name=“email” class=“easyui-validatebox” validtype=“email”></td>
- </tr>
- </tbody></table>
- <div style=“padding:5px 0;text-align:right;padding-right:30px”>
- <a href=“#” class=“easyui-linkbutton” iconcls=“icon-save” plain=“true” onclick=“saveItem(<?php echo $_REQUEST[‘index’];?>)”>Save</a>
- <a href=“#” class=“easyui-linkbutton” iconcls=“icon-cancel” plain=“true” onclick=“cancelItem(<?php echo $_REQUEST[‘index’];?>)”>Cancel</a>
- </div>
- </form>
Step 4: Save or Cancel editing
Call the ‘saveItem’ function to save a user or ‘cancelItem’ function to cancel the editing.
- function saveItem(index){
- var row = $(‘#dg’).datagrid(‘getRows’)[index];
- var url = row.isNewRecord ? ‘save_user.php’ : ‘update_user.php?id=’+row.id;
- $(‘#dg’).datagrid(‘getRowDetail’,index).find(‘form’).form(‘submit’,{
- url: url,
- onSubmit: function(){
- return $(this).form(‘validate’);
- },
- success: function(data){
- data = eval(‘(‘+data+‘)’);
- data.isNewRecord = false;
- $(‘#dg’).datagrid(‘collapseRow’,index);
- $(‘#dg’).datagrid(‘updateRow’,{
- index: index,
- row: data
- });
- }
- });
- }
Determine what is the URL to post to first and then find form object and call ‘submit’ method to post the form data. Collapse and update the row data while saving data successfully.
- function cancelItem(index){
- var row = $(‘#dg’).datagrid(‘getRows’)[index];
- if (row.isNewRecord){
- $(‘#dg’).datagrid(‘deleteRow’,index);
- } else {
- $(‘#dg’).datagrid(‘collapseRow’,index);
- }
- }
When cancel the editing action, if the row is new and not save yet, delete the row directly, otherwise collapse the row.