来源: Fiddler 4 中如何post数据 – kunpengku – 博客频道 – CSDN.NET
关于这个问题的 解决 参看
http://stackoverflow.com/questions/7075125/check-post-request-with-fiddler
关键 是要在 头部 增加
Content-Type: application/x-www-form-urlencoded
这里有个坑
http://jingyan.baidu.com/article/dca1fa6fa07000f1a44052f6.html
百度经验的这篇文章, 最后说 要加 ContentType:application/x-www-form-urlencoded, 你如果仔细看, 会发现 少了一个 横杠, 坑啊。
Tutorial: Using Fiddler to Compose HTTP SOAP Requests to the AppFxWebService.asmx
This tutorial will guide you through the steps to create and execute an HTTP request with Fiddler. According to its website, Fiddler is a free web Debugging proxy for any browser, system or platform. Fiddler logs all HTTP(s) traffic between your computer and the Internet. Using Fiddler you can also compose your own HTTP requests to run through Fiddler. It’s a great tool for experimenting with HTTP Requests to the Blackbaud AppFx Web Service (AppFxWebService.asmx).
SOAP stands for Simple Object Access Protocol and it is one way to format XML messages to allow Internet based communications between two programs.The SOAP protocol is most commonly used in conjunction with HTTP(s). Together, SOAP and HTTP provide some strong advantages:
- Communication is allowed through firewalls
- Allows communication between applications running on different operating systems since HTTP and XML is OS independent
- HTTP is supported by most modern programming languages which include their own flavor of libraries or classes which implement the client side of the HTTP/HTTPS protocols.
Learning how to compose HTTP SOAP Requests to the AppFxWebService is a great way to learn how our API works. What you learn here will easily translate to your own programming language. Let’s get started!
What we will build
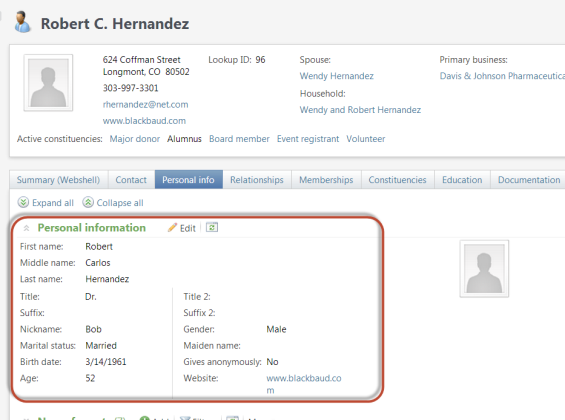
We will use the built in AppFxWebService documentation to call a simple feature such as a View Data Form. We will use the Individual Biographical View Form (system record id of 48cefdc3-a719-4fef-bd61-3108a5971d2b) to pull some data from the Infinity database. View Data Forms are used to retrieve data for display within Blackbaud CRM/Research Point. But they are dual purposed as they can also be used to programmatically retrieve data. This particular view data form pulls data from the CONSTITUENT, CONSTITUENTJOBINFO, and DECEASEDCONSTITUENT tables for a given constituent id. You can see this view data form within Blackbaud CRM versions 2.94 or 3.0 (I haven’t check earlier versions) within the Constituent page’s Personal info tab:
Prerequisites
The tutorial continues the discussion of Crafting HTTP Requests to the AppFxWebService.asmx. If you have not already done so, go back and read this content and related materials before attempting this tutorial.
If you are new to working with the APIs related to Infinity-based products, you may want to review the following content:
Step by Step Tutorial
Step 1 – If you have not already done so, download and install Fiddler .
Step 2 – Start Fiddler. To capture traffic from the IE, Chrome, or Safari browser, make sure that Capture Traffic is enabled in the File menu. This tutorial uses Google’s Chrome web browser. To capture traffic from Opera, start Fiddler before starting Opera. For other browsers, such as Firefox see Configure Browsers in the Fiddler online documentation.
![]()
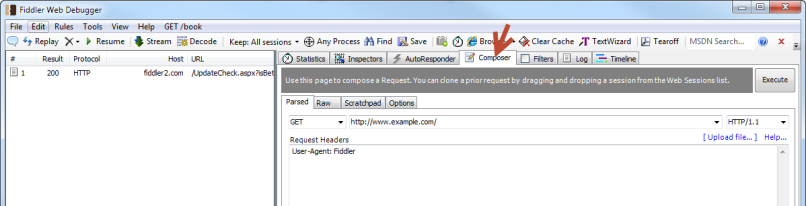
Step 3 – Next, click on the Composer tab on the right side of the program. The Composer allows you to craft custom requests to send to a server. For more information see Fiddler’s online documentation for Creating a New Request using Composer.
Step 4 – Set the HTTP verb to `POST`, and enter the full URL to your instance of AppFxWebService.asmx.
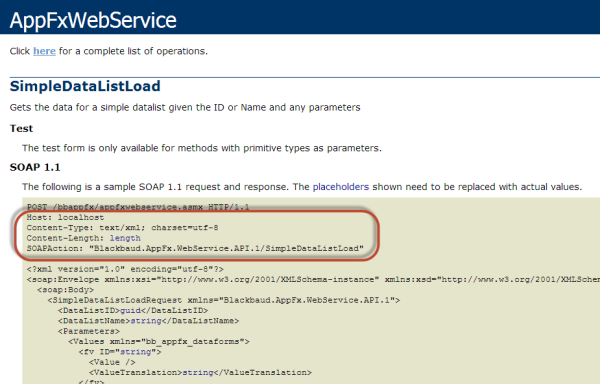
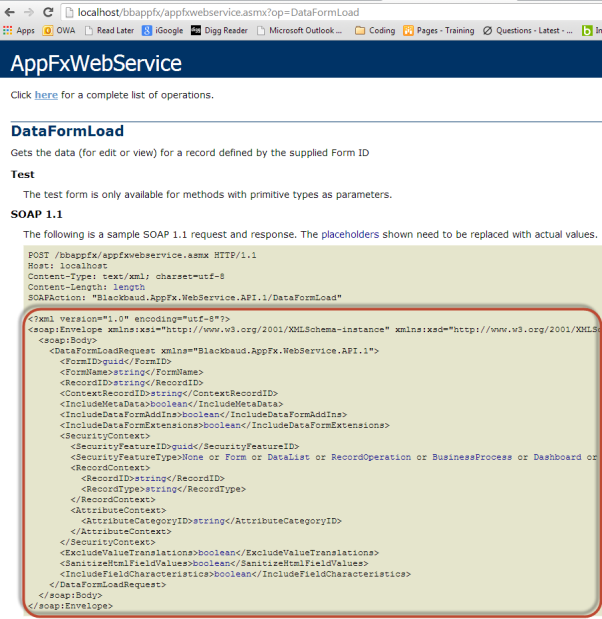
Step 5 – Preparing the Headers in Fiddler. Let’s take a look at the Endpoint description page above the SOAP request example for a DataFormLoad operation.
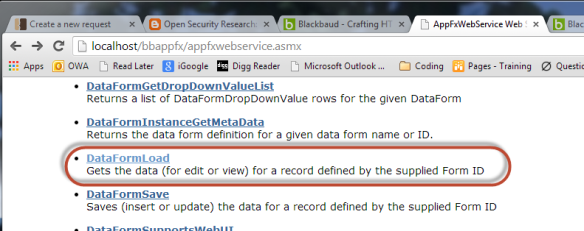
- To find the example, navigate to the Endpoints page:
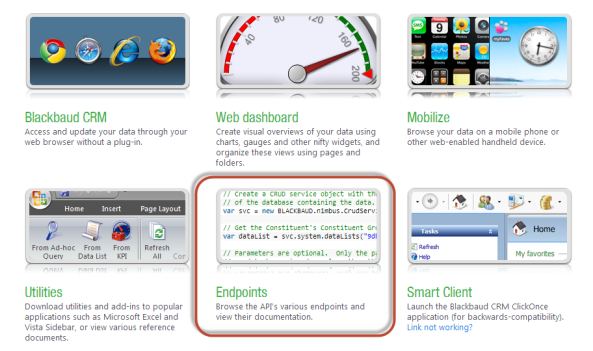
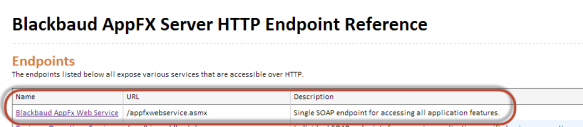
- Select the link to the Blackbaud AppFx Web Service:
- Select the appropriate operation. Since we are keeping it simple in this tutorial we will attempt to load the data from a View Data Form without any parameters. Select the DataFormLoad operation from the list:
- Copy the header from the top of the SOAP 1.1 sample request. Note that I grab the Host, Content-Type, Content-Length, and SOAPAction pieces from the header while leaving out the POST section at the very top of the header.
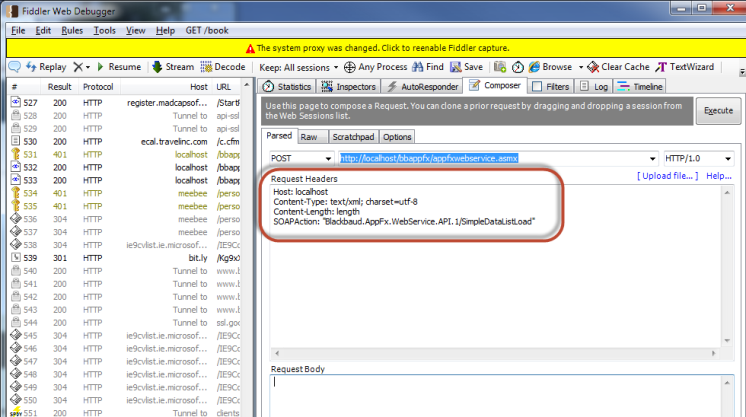
- Next, within Fiddler’s Composer tab, you will need to paste the header information into the box titled Request Headers. Each header item should be on its own line: At this point your Composer tab should look like this:
Step 6 – Adding an Authorization Header
The API is only available to authenticated users, and that includes your application. For Basic Authentication we will create string containing a ‘domain\username:password’ combination for the Infinity log-in credentials. The user name should have rights to use the feature and the data you wish to retrieve within the Infinity application.
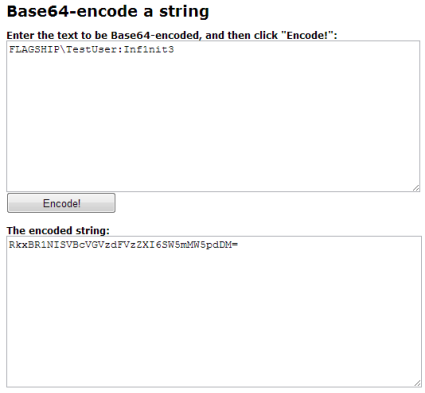
So, let’s say I have a user named ‘TestUser’ in an Active Directory domain called ‘FLAGSHIP’ with a password of ‘Inf1nit3’. The ‘username:password’ combination will look like this ‘FLAGSHIP\TestUser:Inf1nit3’.
- Make sure you have permissions to use the Individual Biographical View Form (system record id of 48cefdc3-a719-4fef-bd61-3108a5971d2b). If your Application User account is designated as a System Administrator then you will have access to all features. A good rule of thumb is to view or use the feature within the application. If you can, you have permission to use the feature.
- Take the ‘domain\username:password’ combination string and Base64 encode it. There are a lot of free utilities that will Base64 encode a string. Once of them can be found at http://www.string-functions.com/base64encode.aspx
- Once you have Base64 encoded the credentials you should append the Base64 string as part of the following header:
Authorization: Basic YOURBASE64ENCODEDAUTHENTICATIONSTRING
So, using the dummy credentials above our completed header would look like this:
Authorization: Basic RkxBR1NISVBcVGVzdFVzZXI6SW5mMW5pdDM=
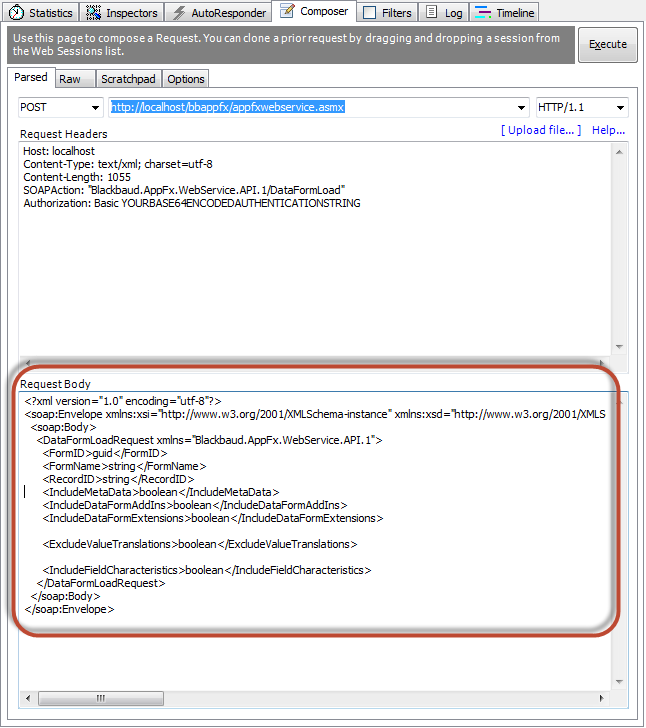
- Add the string at the end of the Request Header within Fiddler. Our modified headers within the Fiddler Composer’s Request Headers box should look something like this (You will need to be sure and provide your own Base64 encoded authentication string in place of the one displayed below) :
Host: localhost
Content-Type: text/xml; charset=utf-8
Content-Length: 1055
SOAPAction: "Blackbaud.AppFx.WebService.API.1/DataFormLoad"
Authorization: Basic YOURBASE64ENCODEDAUTHENTICATIONSTRING
Step 7 – Preparing the Request Body
- Next, we will take the SOAP body xml from the DataFormLoad sample and place the xml into the Request Body section of Fiddler’s Composer.
- Strip out unnecessary xml elements from the request body such as the <SecurityContext> element,<SanitizeHtmlFieldValues> element, and <ContextRecordID> element. At this point, your xml in the Request Body should look like this:
Step 8 – Identifying the feature in the SOAP message body
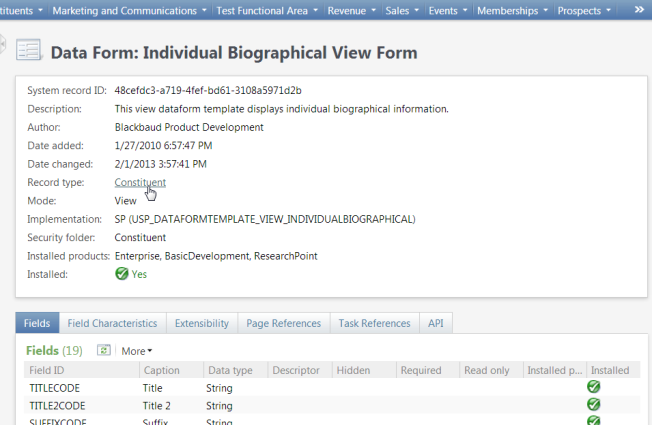
Next we will need to tell the web server the name of the view data form we wish to use for the data pull. You can use either the <FormID> or <FormName> elements within the Request Body to identify the view data form. If you have system administrator rights, you can use Design Mode to view the feature metadata for the view data form and discover either the name of the feature or the value for the system record id. By toggling design mode on, we can select the button within the section holding our Individual Biographical View Form which navigates us to the feature page for the view data form..
Tip: For more information about Design Mode, see the Blackbaud CRM Page Designer Guide.
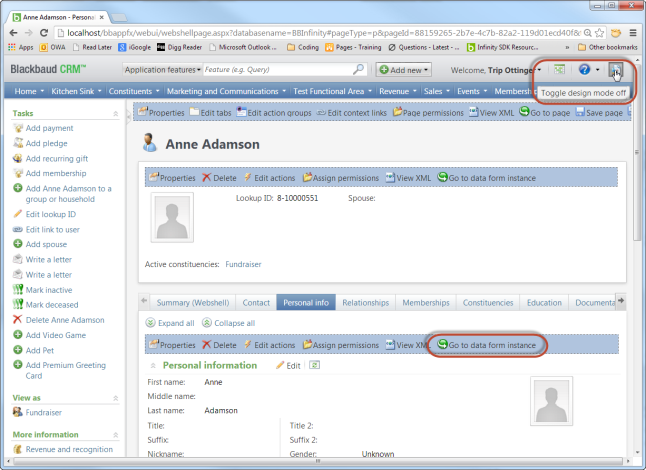
Here we can see both the name of the data form and its system record id. I will elect to use the system record id to identify the data form.
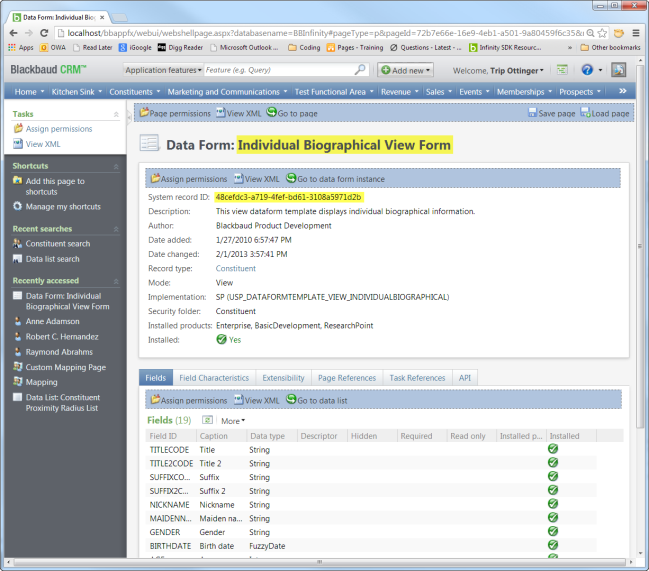
- Copy the guid for the system record id from the feature page and paste it in the request body for the value of the
<FormID>element. - Remove the
<FormName>element from the request body since we are using FormID.
Step 9 – Identify the record to retrieve
Next we need to provide a value for the <RecordID> element in the request body. This will indicate to the View Data Form the record to retrieve. For most data forms, this value represents a primary key value for a table within the Infinity database. In a real world scenario, you will need to determine how you will retrieve the id for the record you wish to retrieve. In order to determine the type of record to pass to the View Data Form, you need to know the Record Type of the form. You can think of Record Type as a logical name for the entity associated with the View Data Form. The Record Type will help guide you to the underlying base table in SQL Server that holds the primary key value. Viewing the feature page for the Individual Biographical View Form reveals a record type of Constituent.
Selecting the link on Constituent navigates you to the Record Type feature page where the underlying base table is revealed along with other data forms, data lists, search lists, pages, etc. that share a relationship with the record type. In this way, a developer can discover how the various different types of features and how they relate to one another to form the overall application.
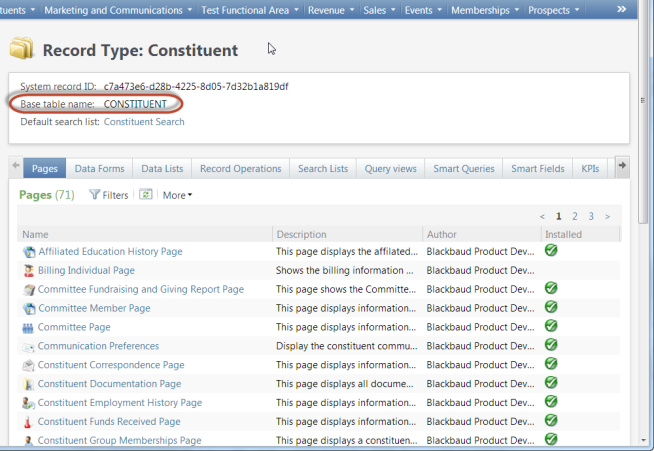
From an Infinity perspective, there are various feature types that can provide an id for a record such as a Search List, Data List, Simple Data List, or Data Form to name a few. You have to ensure the feature you use to retrieve the primary key value shares the same Record Type as the data form. In our case this record type is Constituent. I am going to pull the data for Robert Hernandez. Since I have access to the database via SQL Server Management studio, I will grab his primary key value from the CONSTITUENT table and use it for the <RecordID> element’s value. If you do not have access to the database, you will need to use a feature such as a Search List, Simple Data List, or Data Form to retrieve the ID of the record you wish to retreive.
- Within the Request Body, add the GUID representing the constituent as the value of the RecordID element. At this point your Request Body should look like this:

Step 10 – Set the remaining values for the Request Body
IncludeMetaData Element
- Let’s set the value for the IncludeMetaData element to true.
Setting the IncludeMetaData element to true will return the MetaData element which contains all kind of useful information that’s associated with the form including the form’s definition (form fields, UI Model, UI Fields), form mode, help key, code table permissions, form header, and record type. The most valuable information returned is the form fields. Within the MetaData element, you will find information on each form field such as the FieldID, DataType, MaxLength, and Caption. There may be additional information associated with a form field. For example, if the form field is associated with a code table, we will receive the name of the database table that drives the list of values. Or, if the form field is associated with a value list (enumeration), we will receive a list of each item value and labels (translation values), etc. Consider using the information within this metadata to verify the data type or to help establish a basic user interface for your own software.
Tip: If you are unfamiliar with the concept of form meta data check out Form Metadata, FormField Element, and FormField Elements.
IncludeDataFormAddIns Element
- We do not need this information and therefore will set this to false.
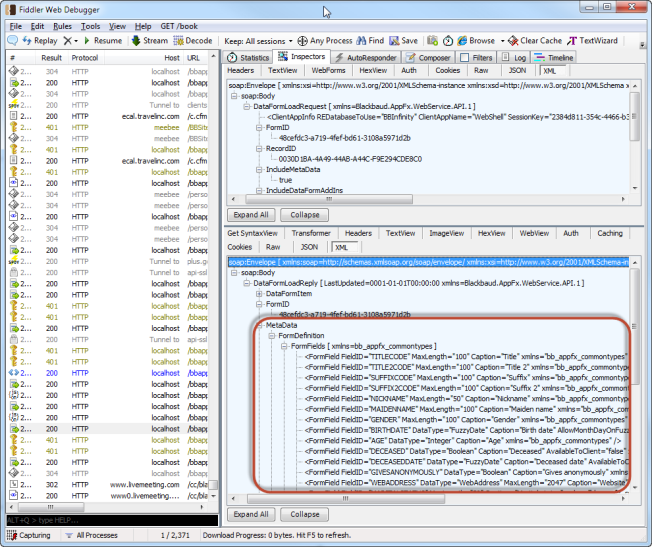
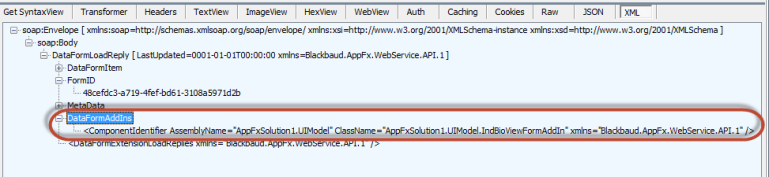
Setting the IncludeDataFormAddIns element’s value to true will return a list of Data Form Add-Ins associated with the data form by listing the ComponentIdentifier elements which contain UIModel assemblies and related classes. Data Form Add-Ins enable 3rd party developers the ability to add user interface behavior to an existing UI Model data form.
For educational purposes, an example of what is returned in the reply when the IncludeDataFormAddIns element’s value is set to true is displayed below.
Tip: For more information see UI Model for Data Forms, Extensibility, and Data Form Add-Ins.
IncludeDataFormsExtensions Element
- We do not need this information and therefore will set this to false.
Setting the IncludeDataFormExtensions element’s value to true will return a list of Data Form extensions associated with the data form. Data Form Extensions allow a 3rd party developer to extend an existing data form with custom data form.
Tip: For more information see UI Model for Data Forms, Extensibility, and Data Form Extensions.
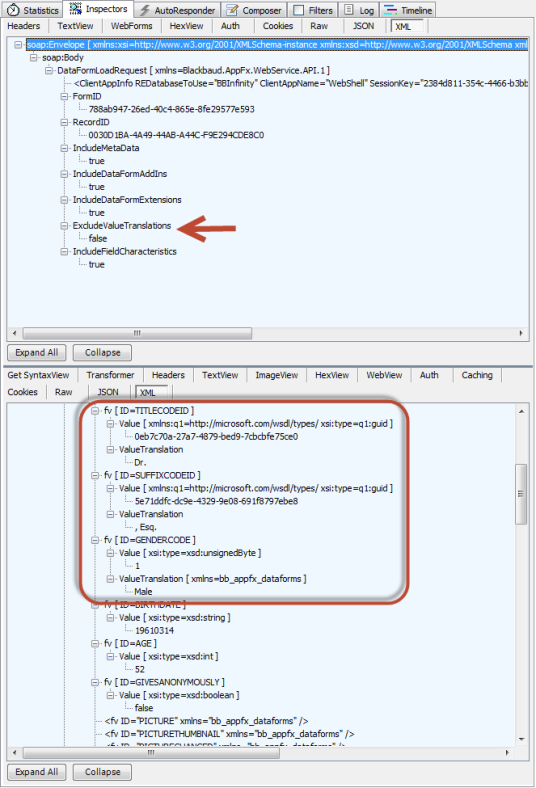
ExcludeValueTranslations Element
- Set this value to false.
Setting this value to true will cause only the ID of the value to be returned in the reply. This applies when the form meta data for the feature contains form fields that are driven by one of the various types of lists such as a code table, value list, or simple data list. Setting the value to false will cause both the ID AND the value translation to be returned.
For educational purposes , an example of setting the ExcludeValueTranslations element to false has been displayed below for a call to the Individual Biographical Edit Form 3 (system record id (Form ID): 788ab947-26ed-40c4-865e-8fe29577e593).
IncludeFieldCharacteristics
- Set this value to false.
Allows the caller to indicate that custom field characteristics data should be returned with the reply. At this time, no further information is available on this element.
Step 11 – Building the ClientAppInfo Element for the Request Body
Last but certainly not least is the critical ClientAppInfo element. Unfortunately, the built in documentation sample for the operation of the AppFxWebService.asmx does not describe this element that must be included. Its format is as follows:
<ClientAppInfo
        REDatabaseToUse="YOUR DATABASE IDENTIFIER/KEY"
        ClientAppName="THE NAME OF YOUR REQUESTING APPLICATION"
        TimeOutSeconds="THE NUMBER OF SECONDS BEFORE A REQUEST TIMES OUT"
        />
Tip: For more information on ClientAppInfo’s various attributes, see the section titled ClientAppInfo within Crafting HTTP Requests to the AppFxWebService.asmx
- Read through the definition of each attribute for the ClientAppInfo element below and review the section titled ClientAppInfo within Crafting HTTP Requests to the AppFxWebService.asmx.
- Provide the appropriate values for the REDatabasetoUse, ClientAppName, and TimeOutSeconds attributes.
REDatabaseToUse
Your database identifier/key will vary. For this example, I am using ‘BBInfinity’.
This is the identifier of the database your Infinity product uses. This is also known as the ‘database key’. You can find this value in the URL when you are using the product. For example, on the landing page of Blackbaud CRM/Research Point the URL is
http://localhost/.../webshellpage.aspx?databasename=BBInfinity
and we can see that the database identifier is `BBInfinity`.
ClientAppName
Let’s use ‘HTTP Fiddler Test’ for the ClientAppName value.
This is a name that you should come up with to identify your application to the API. It should be unique and specific to your application. The Infinity application can use this application name for auditing purposes when additions, edits, or deletes occur to the data within the database tables.
TimeOutSeconds
The number of seconds before the request times out. I will use 120 seconds for this setting.
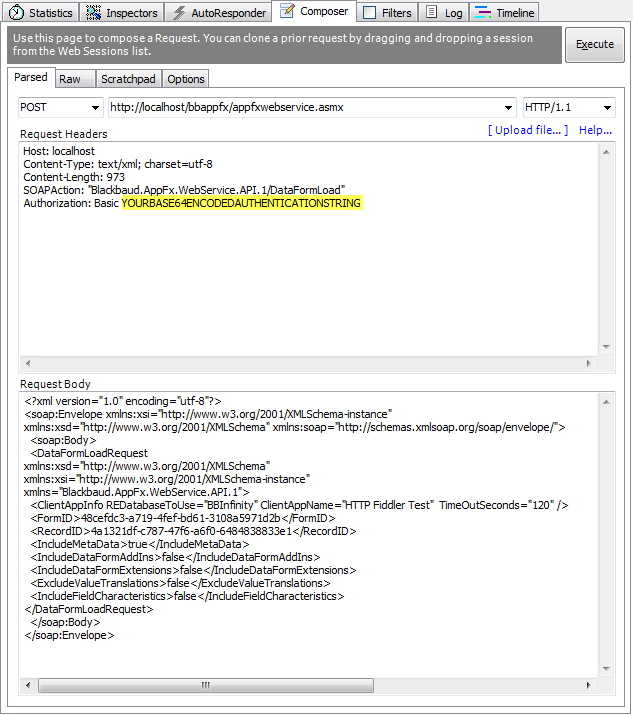
- Place the completed the ClientAppInfo element into the Request Body within Fiddler’s Composer tab. Place the element as a child element within the DataFormLoadRequest Element. At this point your Request Body should look similar to this:
<?xml version="1.0" encoding="utf-8"?>
<soap:Envelope xmlns:xsi="http://www.w3.org/2001/XMLSchema-instance" xmlns:xsd="http://www.w3.org/2001/XMLSchema" xmlns:soap="http://schemas.xmlsoap.org/soap/envelope/">
  <soap:Body>
  <DataFormLoadRequest xmlns:xsd="http://www.w3.org/2001/XMLSchema" xmlns:xsi="http://www.w3.org/2001/XMLSchema-instance" xmlns="Blackbaud.AppFx.WebService.API.1">
  <ClientAppInfo REDatabaseToUse="BBInfinity" ClientAppName="HTTP Fiddler Test"  TimeOutSeconds="120" />
  <FormID>48cefdc3-a719-4fef-bd61-3108a5971d2b</FormID>
  <RecordID>4a1321df-c787-47f6-a6f0-6484838833e1</RecordID>
  <IncludeMetaData>true</IncludeMetaData>
  <IncludeDataFormAddIns>false</IncludeDataFormAddIns>
  <IncludeDataFormExtensions>false</IncludeDataFormExtensions>
  <ExcludeValueTranslations>false</ExcludeValueTranslations>
  <IncludeFieldCharacteristics>false</IncludeFieldCharacteristics>
</DataFormLoadRequest>
  </soap:Body>
</soap:Envelope>
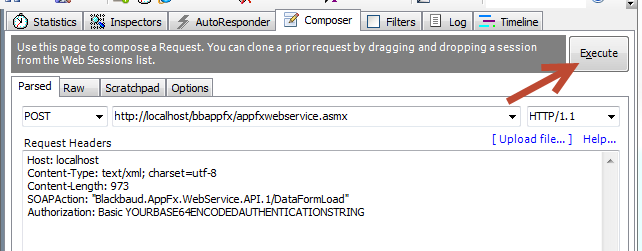
Step 12 – Review your Request Body in Fiddler’s Composer and Execute the request
At this point your request headers and body should look like this. Of course you need to replace the YOURBASE64ENCODEDAUTHENTICATIONSTRING with your own Base64 encoded authentication string before executing the request.
- Within Fiddler’s Composer tab, click the Execute button
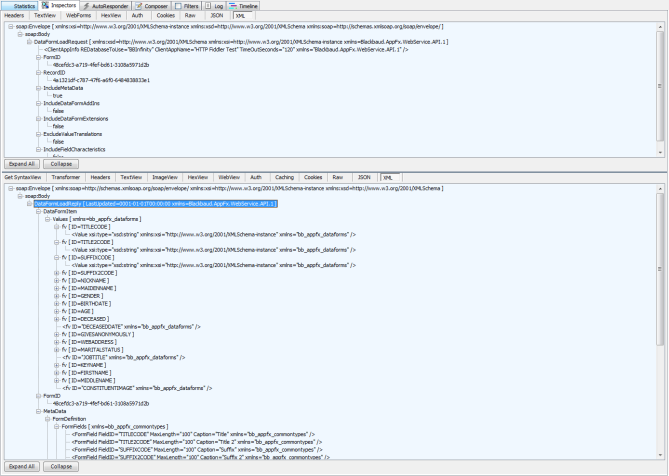
After you execute the composed HTTP request, an item will be added to the list on the right hand pane. The result code will display in the Result column of the list. A result code of 200 is good. This means the request was processed successfully. Fiddler will direct you automatically to the Inspectors tab where you can explore the values within the reply.

- Double click the item in the list. This will cause the reply to be displayed. In our case, its a DataFormLoadReply. Here you can inspect the values of each DataFormItem (form field values) and MetaData for the view data form.
And that’s it. I have placed the entire Request Header and Request Body below. Again, you will need to be sure and provide your own Base64 encoded authentication string in place of the one displayed below.
Request Header
Host: localhost
Content-Type: text/xml; charset=utf-8
Content-Length: 973
SOAPAction: "Blackbaud.AppFx.WebService.API.1/DataFormLoad"
Authorization: Basic YOURBASE64ENCODEDAUTHENTICATIONSTRING
Request Body
<?xml version="1.0" encoding="utf-8"?>
<soap:Envelope xmlns:xsi="http://www.w3.org/2001/XMLSchema-instance"
xmlns:xsd="http://www.w3.org/2001/XMLSchema" xmlns:soap="http://schemas.xmlsoap.org/soap/envelope/">
  <soap:Body>
  <DataFormLoadRequest
xmlns:xsd="http://www.w3.org/2001/XMLSchema"
xmlns:xsi="http://www.w3.org/2001/XMLSchema-instance"
xmlns="Blackbaud.AppFx.WebService.API.1">
  <ClientAppInfo REDatabaseToUse="BBInfinity" ClientAppName="HTTP Fiddler Test"  TimeOutSeconds="120" />
  <FormID>48cefdc3-a719-4fef-bd61-3108a5971d2b</FormID>
  <RecordID>4a1321df-c787-47f6-a6f0-6484838833e1</RecordID>
  <IncludeMetaData>true</IncludeMetaData>
  <IncludeDataFormAddIns>false</IncludeDataFormAddIns>
  <IncludeDataFormExtensions>false</IncludeDataFormExtensions>
  <ExcludeValueTranslations>false</ExcludeValueTranslations>
  <IncludeFieldCharacteristics>false</IncludeFieldCharacteristics>
</DataFormLoadRequest>
  </soap:Body>
</soap:Envelope>