[转载]为您的.NET网站增加OpenID,Window Live,人人网等多种登录方式之一: 增加OpenID登录 – Otis’s Technology Space – 博客园.
OpenID在国外很流行. 在国内就不怎么样了.. 很多网站,论坛都不支持. 经常在网上逛的人,几乎都要注册很多帐号,记很多密码. 或者是帐号和密码都设定一样.呵. 我在想,如果国内大量的论坛都支持OpenID登录,那么,将会多爽!
不了解OpenID的朋友可 以看中文,或英文http://www.openid.net 的介绍.
本人最近 做的一个网站( http://www.86e0.com ) 有用到OpenID的登录(当然还有其它的登录方式,慢慢会说到). 一开始我也是狂找资料, 中文的,英文的都找过了.可惜的是,资料少得很. 下面总结一些经验和分享一些代码.
.NET下使用OpenID,首先要去下载一个第三方组件:dotnetopenauth. 网址为: http://www.dotnetopenauth.net/
压缩包里会有示例. 由于我的项目是用ASP.NET MVC2,所以我直接看OpenIdRelyingPartyMvc 这个示例. 示例是ASP.NET MVC1.0版的.很快我们就可以找出他的关键代码:
HTML为:
1 |
<form action="Authenticate?ReturnUrl=<%=HttpUtility.UrlEncode(Request.QueryString["ReturnUrl"]) %>" method="post"> |
2 |
<label for="openid_identifier">OpenID: </label> |
3 |
<input id="openid_identifier" name="openid_identifier" size="40" /> |
4 |
<input type="submit" value="Login" /> |
Action为:
01 |
[ValidateInput(false)] |
02 |
public ActionResult Authenticate(string returnUrl) { |
03 |
var response = openid.GetResponse(); |
04 |
if (response == null) { |
07 |
if (Identifier.TryParse(Request.Form["openid_identifier"], out id)) { |
09 |
return openid.CreateRequest(Request.Form["openid_identifier"]).RedirectingResponse.AsActionResult(); |
10 |
} catch (ProtocolException ex) { |
11 |
ViewData["Message"] = ex.Message; |
15 |
ViewData["Message"] = "Invalid identifier"; |
20 |
switch (response.Status) { |
21 |
case AuthenticationStatus.Authenticated: |
22 |
Session["FriendlyIdentifier"] = response.FriendlyIdentifierForDisplay; |
23 |
FormsAuthentication.SetAuthCookie(response.ClaimedIdentifier, false); |
24 |
if (!string.IsNullOrEmpty(returnUrl)) { |
25 |
return Redirect(returnUrl); |
27 |
return RedirectToAction("Index", "Home"); |
29 |
case AuthenticationStatus.Canceled: |
30 |
ViewData["Message"] = "Canceled at provider"; |
32 |
case AuthenticationStatus.Failed: |
33 |
ViewData["Message"] = response.Exception.Message; |
37 |
return new EmptyResult(); |
最后在HomeController 的Index Action(就是主页)增加 X-XRDS-Location 的Header. Xrds Action是输出上面的Xrds View.如下: 其中请注意xrds的地址. 代码如下.
01 |
public class HomeController : Controller { |
02 |
public ActionResult Index() { |
03 |
Response.AppendHeader( |
05 |
new Uri(Request.Url, Response.ApplyAppPathModifier("~/Home/xrds")).AbsoluteUri); |
09 |
public ActionResult Xrds() { |
XRDS 的View为:
01 |
<%@ Page Language="C#" Inherits="System.Web.Mvc.ViewPage" ContentType="application/xrds+xml" %><?xml version="1.0" encoding="UTF-8"?> |
03 |
This page is a required for relying party discovery per OpenID 2.0. |
04 |
It allows Providers to call back to the relying party site to confirm the |
05 |
identity that it is claiming in the realm and return_to URLs. |
06 |
This page should be pointed to by the 'realm' home page, which in this sample |
12 |
xmlns="xri://$xrd*($v*2.0)"> |
14 |
<Service priority="1"> |
16 |
<%-- Every page with an OpenID login should be listed here. --%> |
17 |
<%-- We use the Authenticate action instead of Login because Authenticate |
18 |
is the action that receives OpenId assertions. --%> |
19 |
<URI><%=new Uri(Request.Url, Response.ApplyAppPathModifier("~/user/authenticate"))%></URI> |
这样就OK啰. 这只是简单的用法. 因为这个只返回很少信息. 一般只有两个,一个是:FriendlyIdentifierForDisplay ,就是用户名,一个是ClaimedIdentifier, 是用户的标识. 如果是这样用就OK,那我这文章也写得没什么意义了.呵. 因为一般我们还要抓到用户的Email,和个性图标.等等一些有用的东西.但是默认的是不返回的.
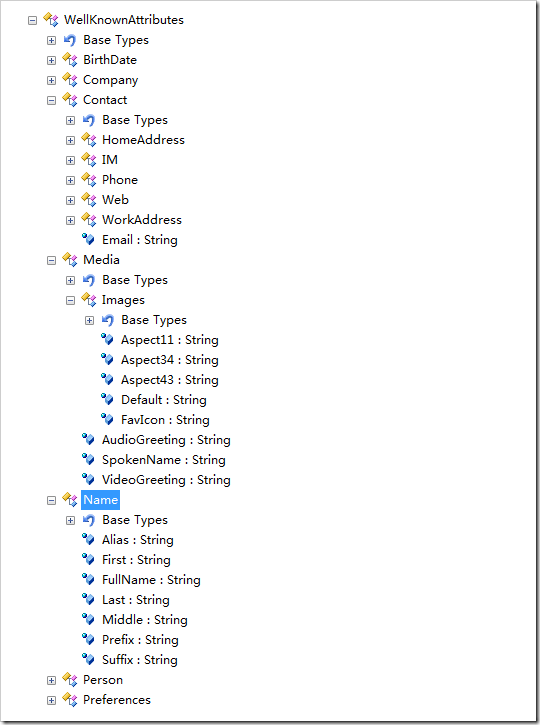
先看看可以返回什么信息. DotNetOpenAuth中有一个WellKnownAttributes 类, 这个类中定义了一系列可以返回的信息. 下面是这个类的抓图:

如何获取这些信息呢? 请看下面的示例代码 :
01 |
[AcceptVerbs(HttpVerbs.Post)] |
02 |
public ActionResult Login(string openid_identifier) |
06 |
var openid = new OpenIdRelyingParty(); |
07 |
IAuthenticationRequest request = openid.CreateRequest(Identifier.Parse(openid_identifier)); |
10 |
var fetch = new FetchRequest(); |
11 |
fetch.Attributes.AddRequired(WellKnownAttributes.Contact.Email); |
12 |
fetch.Attributes.AddRequired(WellKnownAttributes.Name.Alias); |
13 |
fetch.Attributes.AddRequired(WellKnownAttributes.Name.FullName); |
14 |
fetch.Attributes.AddRequired(WellKnownAttributes.Media.Images.Default); |
15 |
request.AddExtension(fetch); |
25 |
return request.RedirectingResponse.AsActionResult(); |
29 |
ViewData["ErrorMessage"] = "您输入的OpenID 不正确或您的帐号的提供商不提供OpenID服务"; |
31 |
ViewData["OpenIDLoginURL"] = openid_identifier; |
这样创建请求就可以成功获取你想要的信息了, 这里是请求获取 Email, 姓名, 个性图标.
注意我注释了的代码, 一开始我也用这样,但是,这个无法获取个性图标.
最后,最后很关键喔.. 配置文件!! 对.. 一开始我因为没注意这个,花了不少时间.. ======
http://www.86e0.com 用的配置文件如下,基本是抄OpenIdRelyingPartyMvc 这个示例的.
04 |
<security requireSsl="false" /> |
08 |
<add type="DotNetOpenAuth.OpenId.Behaviors.AXFetchAsSregTransform, DotNetOpenAuth" /> |
16 |
<add name="localhost" /> |
18 |
</untrustedWebRequest> |
21 |
<reporting enabled="false" /> |
好了,现在基本没问题了.
剩下就是在登录成功后获取这些信息了. 相关的代码如下:
01 |
switch (response.Status) { |
02 |
case AuthenticationStatus.Authenticated: |
03 |
string nickName = response.FriendlyIdentifierForDisplay; |
04 |
if (string.IsNullOrEmpty(nickName)) nickName = "匿名用户"; |
05 |
string email = string.Empty; |
06 |
string picIcon = string.Empty; |
08 |
if (nickName.Length > 50) { nickName = nickName.Substring(0, 50); } |
10 |
var claim = response.GetExtension<ClaimsResponse>(); |
11 |
var fetch = response.GetExtension<FetchResponse>(); |
13 |
string picKey = WellKnownAttributes.Media.Images.Default; |
15 |
if (fetch !=null && fetch.Attributes != null && fetch.Attributes.Contains(picKey)) |
17 |
var picAttr = fetch.Attributes[picKey]; |
18 |
if (picAttr != null && picAttr.Values.Count > 0) { picIcon = picAttr.Values[0]; } |
22 |
nickName = claim.Nickname; |
24 |
if (string.IsNullOrEmpty(nickName)) |
26 |
int ttIndex = claim.Email.IndexOf("@"); |
29 |
nickName = claim.Email.Substring(0, ttIndex); |
33 |
nickName = claim.Email; |
39 |
case AuthenticationStatus.Canceled: |
40 |
ViewData["Message"] = "Canceled at provider"; |
42 |
case AuthenticationStatus.Failed: |
43 |
ViewData["Message"] = response.Exception.Message; |
OK了. 上面的这么多 if是因为抓出来的资料会有 null的情况.. 这个应该是用户没设定那些资料.
最后,个人博客的话, 不用这么麻烦,比如说老赵的个人博客,直接用https://rpxnow.com/的服务就好了.呵.
感兴趣的朋友欢迎去http://www.86e0.com 体验.
这个系列应该会写三四个. 第二个应该是加入Window live 的登录. 因为Live官方的OpenID登录还在开发中.. 所以不得不用 live sdk 的方式去做.

 Mikel
Mikel


