[转载]C#串口通信总结
- C#
- 2011-10-08
- 157热度
- 0评论
private static extern int OpenPort(int PortNum, int BaudRate);
如果一些厂家比较懒的话,没有提供相应的dll,我们只能对它进行串口通信编程了。以前从没接触过串口编程,最近在一个项目中有几个地方都需要采用串口通信,跟公司一个老手请教后,感觉学到了很多东西,特在此做个总结:
一:首先我们来认识下什么是串口:
右键 我的电脑-管理-设备管理器-端口,选择一个端口,点击属性。
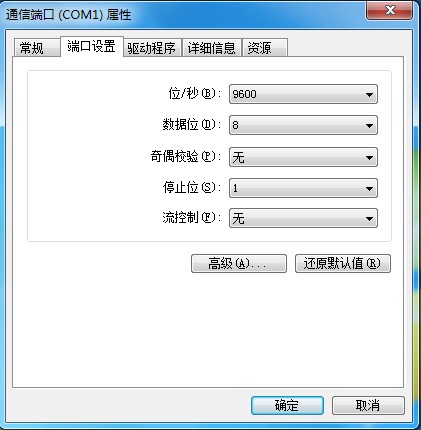
我们可以看到该串口的属性,在C#中我们使用SerialPort类来表示串口
comm.serialPort.PortName = config.ReadConfig("SendHealCard");
//波特率
comm.serialPort.BaudRate = 9600;
//数据位
comm.serialPort.DataBits = 8;
//两个停止位
comm.serialPort.StopBits = System.IO.Ports.StopBits.One;
//无奇偶校验位
comm.serialPort.Parity = System.IO.Ports.Parity.None;
comm.serialPort.ReadTimeout = 100;
comm.serialPort.WriteTimeout = -1;
二:串口调试工具:
在对串口进行编程时候,我们要向串口发送指令,然后我们解析串口返回的指令。在这里向大家推荐一款工具。

将要发送的指令用空格隔开,选择HEX显示为放回的字符串。
三:正式编程:
编写Comm类:
{
public delegate void EventHandle(byte[] readBuffer);
public event EventHandle DataReceived;
public SerialPort serialPort;
Thread thread;
volatile bool _keepReading;
public Comm()
{
serialPort = new SerialPort();
thread = null;
_keepReading = false;
}
public bool IsOpen
{
get
{
return serialPort.IsOpen;
}
}
private void StartReading()
{
if (!_keepReading)
{
_keepReading = true;
thread = new Thread(new ThreadStart(ReadPort));
thread.Start();
}
}
private void StopReading()
{
if (_keepReading)
{
_keepReading = false;
thread.Join();
thread = null;
}
}
private void ReadPort()
{
while (_keepReading)
{
if (serialPort.IsOpen)
{
int count = serialPort.BytesToRead;
if (count > 0)
{
byte[] readBuffer = new byte[count];
try
{
Application.DoEvents();
serialPort.Read(readBuffer, 0, count);
if(DataReceived != null)
DataReceived(readBuffer);
Thread.Sleep(100);
}
catch (TimeoutException)
{
}
}
}
}
}
public void Open()
{
Close();
serialPort.Open();
if (serialPort.IsOpen)
{
StartReading();
}
else
{
MessageBox.Show("串口打开失败!");
}
}
public void Close()
{
StopReading();
serialPort.Close();
}
public void WritePort(byte[] send, int offSet, int count)
{
if (IsOpen)
{
serialPort.Write(send, offSet, count);
}
}
}
注册串口:
ConfigClass config = new ConfigClass();
comm.serialPort.PortName = config.ReadConfig("SendHealCard");
//波特率
comm.serialPort.BaudRate = 9600;
//数据位
comm.serialPort.DataBits = 8;
//两个停止位
comm.serialPort.StopBits = System.IO.Ports.StopBits.One;
//无奇偶校验位
comm.serialPort.Parity = System.IO.Ports.Parity.None;
comm.serialPort.ReadTimeout = 100;
comm.serialPort.WriteTimeout = -1;
comm.Open();
发送指令:
/// 发卡到机口
/// </summary>
private void SendCardToOut()
{
is_read_card = false;
sendCardToOut = true;
byte[] send = { 0x02, 0x46, 0x43, 0x34, 0x03, 0x30 };
if (comm.IsOpen)
{
comm.WritePort(send, 0, send.Length);
}
}
收到指令,并解析:
{
//log.Info(HexCon.ByteToString(readBuffer));
if (readBuffer1.Length == 1)
{
receive = HealCardClass.ByteToString(readBuffer1);
string str = "06";
if (string.Equals(receive.Trim(), str, StringComparison.CurrentCultureIgnoreCase))
{
try
{
if (is_read_card)
{
byte[] send = new byte[1];
send[0] = 0x05;
comm.WritePort(send, 0, send.Length);
Thread.Sleep(500);
comm.DataReceived -= new Comm.EventHandle(comm_DataReceived);
InitReadComm();
}
if (sendCardToOut)
{
byte[] send = new byte[1];
send[0] = 0x05;
comm.WritePort(send, 0, send.Length);
readComm.DataReceived -= new Comm.EventHandle(readComm_DataReceived);
readComm.Close();
log.Info("发卡完成!");
lblMsg.Text = "发卡成功!";
lblSendCardMsg.Text = "发卡完成,请收好卡!";
timer1.Tick -= new EventHandler(timer1_Tick);
PlaySound();
this.btnOK.Enabled = true;
}
}
catch (Exception ex)
{
log.Info(ex.ToString());
}
}
}
}
至此,串口通信编程告一段落