[转载]《Android学习指南》目录。强烈推荐不可多得的好教程 – qixiinghaitang – 博客园.
Android学习指南基础篇文章目录

[转载]《Android学习指南》目录。强烈推荐不可多得的好教程 – qixiinghaitang – 博客园.
Android学习指南基础篇文章目录
[转载]FGMap学习之-添加自己的地图数据 – liongis – 博客园.
今天进入我们的正题,如何来加载自己的地图数据,这里使用的数据可以自己生成,也可以从网上下载,放到本机或自己的服务器上,只要修改对应的路径就行。
仍然在上次的例子上来增加:
在项目的src目录上点击右键,选择”新建ActionScript类”,输入包名、类名及超类:

点击“Finish”后,会在程序中新建出一个MyTileLayer.as的文件,将下面的代码贴入文件中:
package com.examples
{
import com.fgmap.maps.Color;
import com.fgmap.maps.Copyright;
import com.fgmap.maps.CopyrightCollection;
import com.fgmap.maps.LatLng;
import com.fgmap.maps.LatLngBounds;
import com.fgmap.maps.TileLayerBase;
import com.fgmap.maps.interfaces.ICopyrightCollection;
import com.fgmap.maps.interfaces.IMap;

import flash.display.DisplayObject;
import flash.display.Loader;
import flash.display.LoaderInfo;
import flash.events.*;
import flash.geom.Point;
import flash.net.URLRequest;

public class MyTileLayer extends TileLayerBase
{
private var mapMinZoom:int = 11;	//最小显示等级
private var mapMaxZoom:int = 13;	//最大显示等级

public function MyTileLayer(tileSize:Number){
var copyrightCollection:CopyrightCollection = new CopyrightCollection();

super(copyrightCollection, mapMinZoom, mapMaxZoom, 1);	//调用父类的方法

//创建一个自己的版权说明
copyrightCollection.addCopyright(
new Copyright("MyCopyright",
new LatLngBounds(new LatLng(-180, -90),
new LatLng(180, 90)),  0,
"这是我自己的版本说明"));
}

//覆盖加载地图数据的方法,这个很重要,地图数据从这里读取
override public function loadTile(tilePos:Point, zoom:Number):DisplayObject {
var testLoader:Loader = new Loader();
var ymax:int = 1 << zoom;
var y:int = ymax - tilePos.y - 1;

var urlRequest:URLRequest;

if ((zoom < mapMinZoom) || (zoom > mapMaxZoom)) {
urlRequest =  new URLRequest("assets/tiles/nomap.png");	//没有地图时显示的内容
}else{
urlRequest = new URLRequest(
"assets/tiles/" + zoom+"/"+ tilePos.x + "/" + y +".png");	//地图存放的路径,现在是本地的,也可以是服务器的地址。
}

testLoader.contentLoaderInfo.addEventListener(IOErrorEvent.IO_ERROR, ioErrorHandler);
testLoader.load(urlRequest);
return testLoader;
}

//出错处理
private function ioErrorHandler(event:IOErrorEvent):void {
trace("ioErrorHandler: " + event);
}
}
}
在FGMapDemo.mxml文件使用我们刚才写的类:
<!-- 将非可视元素(例如服务、值对象)放在此处 -->
<![CDATA[ import com.fgmap.maps.*; import com.fgmap.maps.MapMouseEvent; import com.fgmap.maps.controls.MapTypeControl; import com.fgmap.maps.controls.NavigationControl; import com.fgmap.maps.controls.OverviewMapControl; import com.fgmap.maps.controls.ScaleControl; import com.fgmap.maps.interfaces.IMapType; import com.fgmap.maps.overlays.*; import com.examples.MyTileLayer; private var marker:Marker; private var centreLatlng:LatLng = new LatLng(39.911842984749946, 116.400146484375);//北京的一个坐标位置。 //地图加载完成后执行的方法 protected function onMapreadyHandler(event:MapEvent):void { map.enableContinuousZoom(); //启用连续平滑缩放。 map.enableScrollWheelZoom(); //启用使用鼠标滚轮缩放。 map.addControl(new MapTypeControl()); //供用户在地图类型之间进行切换的按钮。 map.addControl(new NavigationControl());//供用户更改地图的各项导航参数,包括缩放级别、中心位置和空间方位角。 map.addControl(new ScaleControl()); //比例控件是用于指示当前地图的分辨率和缩放级别的可视指示器。 map.setCenter(centreLatlng,11); //设置地图的中心点。 marker = new Marker(centreLatlng); //建立一个标注。 map.addOverlay(marker); //在地图上显示此标注。 var normalMapType:IMapType = MapType.NORMAL_MAP_TYPE; //定义一个地图类型 var tileLayers:Array = new Array(); tileLayers.push(new MyTileLayer(normalMapType.getTileSize())); //地图类型 var MyMapType:IMapType = new MapType(tileLayers,normalMapType.getProjection(),"我的地图");//创建自己的地图类型 map.addMapType(MyMapType); //增加到地图上 map.setMapType(MyMapType); //设置自己的地图可见 } ]]>
完成后,我们把程序运行起来,结果是:

这样就加上我们自己的地图了。
到这一步,我们的程序是写完了,不过我们还需要一些准备:
地图图片,我是放在”assets/tiles“目录下,这些数据是用我的切图工具生成出来的。同学们可以换成其它的数据试试,记得要改获取图片地址的方法哦!
别外,我们的FGMap库文件也换了一下,现在升级到1.01了,而且是放到lib目录下。
完整的示例程序请点击这里下载:http://files.cnblogs.com/liongis/FGMapDemo2.rar
如有问题请联系我:
Mail:liongis@163.com
QQ:1366940902
[转载]不用Flex,进行轻量级的Flash RIA开发以降低发布文件的尺寸 – xiaotie – 博客园.
用Flex生成的Flash程序文件太大,用Flash CS 工具开发太慢且不顺手,怎么办?请看本文。
众 所周知,Flex是重量级的基于Flash平台的GUI框架,功能十分强大,布局,Style,数据绑定,MXML支持等应有尽有。缺点就是发布尺寸大, 发布一个空应用,导出来也有将近200K。这样一来,开发一些中小型RIA项目就面临着严重的问题:swf文件体积大,加载慢。没办法,只好用Flash CS系列工具去开发。无奈,Flash CS系列工具是专门给美工用的,它们的编码功能虽有增强,但还是很差很难用,再加上Flash CS自带的fl控件库里缺乏布局控件,缺乏数据绑定,缺乏MXML支持,用起来很不友好。有没有办法即能利用Flash Builder强大的生产力,又能够摆脱庞大臃肿的Flex呢?经过数小时的摸索,在前人的基础上,终于摸索出一套可行的方案。
先介绍一下Flash平台下的几个GUI框架:
 (1)[萝莉] bit101的MinimalComps [http://www.minimalcomps.com/]
一个非常mini的GUI库,提供常用的控件,见下图:

由于尺寸很小(加起来才几十k),每个控件写的十分简单,不支持Style,不支持很多常用的属性,适合做简单的界面。有一个哥们对它做了简单的扩展,使它可以在MXML中使用(参见:Using MXML without Flex(Example and Source))。
这个库太简单了,只适合参考借鉴和学习,不适合在开发中使用。
 (2) [御姐] Flash CS 系列自带的 fl 库
Flash CS 系列工具自带了一套简单的UI库,见下图:

这套库支持Style,短小精悍。缺点是缺乏Layout控件,不能通过MXML布局,没法进行数据绑定。
 (3) [傲娇] Yahoo的ASTRA库
Yahoo在Flash的fl基础上,扩展出一套短小精悍却又强大的UI库,叫 ASTRA。补充了fl库的系列不足,提供了强大的布局功能。下面是 ASTRA 的内容:
 结合fl库和ASTRA库,常用的GUI任务皆可以完成。且前者的发布者是Adobe,后者的发布者是Yahoo,都是IT巨头,比较可靠。ASTRA库补充了很多布局控件,然而,依然不能通过MXML布局,只能手写代码来布局,依然不能进行数据绑定。
ASTRA是以 BSD license 协议发布的,这使得我们可以对它进行自由改动。在本文的后半部分,我将介绍改动ASTRA的代码,来用MXML进行布局开发。
 (4) [女王] Flex
Flex无疑是Flash平台最强大的GUI库,女王级别的,气场太强大了,广大人民群众的网速表示受不鸟。
====
对 于中小型应用,由于swf的尺寸问题,不得不放弃Flex女王。MinimalComps 是迷你小萝莉,只可欣赏不可亵玩。只剩下两个了:身出名门的fl御姐和ASTRA傲娇娘。fl和ASTRA都是为Flash CS系列工具定制的,对Flex开发者来说很不友好,直接在MXML中布局,会编译不通过,在as3代码中一行行的布局,即不美观,又开发效率低,还很难 维护。
由于布局任务主要是由ASTRA来完成的,下面对它进行改造。
首先,我们需要一个 Application 类作为Flash应用的容器。参考MinimalComps以及文章Using MXML without Flex(Example and Source,我写了一个简单的Application类:
package
{
import flash.display.DisplayObject;
import flash.display.Sprite;
import flash.display.StageAlign;
import flash.display.StageScaleMode;
import flash.events.Event;
[DefaultProperty( “children” )]
public class Application extends Sprite
{
protected var _width:Number = 0;
protected var _height:Number = 0;
public function Application()
{
super();
x = 0;
y = 0;
stage.align = StageAlign.TOP_LEFT;
stage.scaleMode = StageScaleMode.NO_SCALE;
addEventListener(Event.ENTER_FRAME, onInvalidate);
}
private var _children:Vector.<DisplayObject>;
private var childrenChanged:Boolean = false;
public function get children():Vector.<DisplayObject>
{
return _children;
}
public function set children( value:Vector.<DisplayObject> ):void
{
if ( _children != value )
{
_children = value;
childrenChanged = true;
invalidate();
}
}
protected function invalidate():void
{
addEventListener(Event.ENTER_FRAME, onInvalidate);
}
protected function onInvalidate(event:Event) : void
{
if ( childrenChanged )
{
while ( numChildren > 0 )
{
removeChildAt( 0 );
}
for each ( var child:DisplayObject in children )
{
addChild( child );
}
childrenChanged = false;
}
removeEventListener(Event.ENTER_FRAME, onInvalidate);
}
override public function set width(w:Number):void
{
_width = w;
invalidate();
dispatchEvent(new Event(Event.RESIZE));
}override public function get width():Number
{
return _width;
}
override public function set height(h:Number):void
{
_height = h;
invalidate();
dispatchEvent(new Event(Event.RESIZE));
}override public function get height():Number
{
return _height;
}
override public function set x(value:Number):void
{
super.x = Math.round(value);
}
override public function set y(value:Number):void
{
super.y = Math.round(value);
}
}
}
然后,对ASTRA里的BaseLayoutPane.as文件进行修改,修改后为:
[DefaultProperty( “children” )]
public class BaseLayoutPane extends BaseScrollPane
{
private var _children:Vector.<DisplayObject>;
public function get children():Vector.<DisplayObject>
{
return _children;
}
public function set children( value:Vector.<DisplayObject> ):void
{
if ( _children != value )
{
_children = value;
if(_children != null)
{
for each(var item:DisplayObject in _children)
{
this.addChild(item);
}
}
invalidate();
}
}……
}
搞定!这样就可以用 ASTRA 里的几个Pane进行布局了。
下面是一个简单的应用:
<?xml version=”1.0″ encoding=”utf-8″?>
<local:Application xmlns:fx=”http://ns.adobe.com/mxml/2009″
xmlns:my=”com.yahoo.astra.fl.containers.*”
width=”400″ height=”300″
xmlns:controls=”fl.controls.*” xmlns:local=”*”>
<my:HBoxPane width=”500″ height=”100″ paddingLeft=”10″ paddingTop=”10″ horizontalGap=”10″>
<controls:Button label=”Hello World!” />
<controls:TextInput text=”Hello World!” id=”input” width=”100″ />
</my:HBoxPane>
</local:Application>
运行界面:
![]() swf文件 尺寸:37k
swf文件 尺寸:37k
用Flex写一个类似的程序:
<?xml version=”1.0″ encoding=”utf-8″?>
<mx:Application xmlns:mx=”http://www.adobe.com/2006/mxml”
layout=”absolute” width=”400″ height=”300″ >
<mx:HBox width=”500″ height=”100″ paddingLeft=”10″ paddingTop=”10″ horizontalGap=”10″>
<mx:Button label=”Hello World!” />
<mx:TextInput text=”Hello World!” />
</mx:HBox>
</mx:Application>
运行界面:
![]()
swf文件尺寸:176k
相比较而言,放弃Flex能让发布的swf尺寸大幅度降低,这对于国内的网络环境来说很重要。
其它:
(1)使用新方案后,如果项目中引用了 Framework.swc,依然可以进行数据绑定,且增加了数据绑定后,swf尺寸变化甚微。ASTRA 的类的属性不支持数据绑定,由于它的代码是开放的,可以自行添加Bindable标记;
(2)fl和ASTRA也支持style,但这里的style需要硬性指定,而不能用styleName来指定,这有些不方便,不知道有没有办法来克服;
(3)不支持Flash Builder的设计器,没办法拖控件布局。不过用MXML布局也挺方便直观的,界面复杂的话,Flash Builder的设计器很慢且容易崩溃。既然用不着设计器了,就可以用开源的IDE FlashDevelop进行开发。
[转载].Net通用基础框架(.Net Common Infrastructure)-缓存 – 张艺聍 – 博客园.
缓存可以提高网站性能,减轻数据库压力。网站中常用的缓存分为业务数据缓存和页面文件缓存两类,其中业务数据缓存常用AspnetCache,Memcached等,而页面文件缓存常用Squid和Nginx,今天 介绍的内容是业务数据缓存。

using System;
using System.Collections.Generic;

namespace Common.Cache
{
/// <summary>
/// 缓存
/// </summary>
public interface ICache
{
/// <summary>
/// 增加
/// </summary>
/// <typeparam name="T">类型</typeparam>
/// <param name="key">键</param>
/// <param name="value">值</param>
/// <returns>结果</returns>
bool Add<T>(string key, T value);

/// <summary>
/// 增加
/// </summary>
/// <typeparam name="T">类型</typeparam>
/// <param name="key">键</param>
/// <param name="value">值</param>
/// <param name="duration">持续时间</param>
/// <returns>结果</returns>
bool Add<T>(string key, T value, TimeSpan duration);

/// <summary>
/// 清除
/// </summary>
void Clear();

/// <summary>
/// 获取
/// </summary>
/// <typeparam name="T">类型</typeparam>
/// <param name="key">键</param>
/// <returns>值</returns>
T Get<T>(string key);

/// <summary>
/// 多线程获取
/// </summary>
/// <param name="keys">键集合</param>
/// <returns>值集合</returns>
IDictionary<string, object> MultiGet(IList<string> keys);

/// <summary>
/// 移除
/// </summary>
/// <param name="key">键</param>
void Remove(string key);

/// <summary>
/// 设置
/// </summary>
/// <typeparam name="T">类型</typeparam>
/// <param name="key">键</param>
/// <param name="value">值</param>
/// <returns>结果</returns>
bool Set<T>(string key, T value);

/// <summary>
/// 设置
/// </summary>
/// <typeparam name="T">类型</typeparam>
/// <param name="key">键</param>
/// <param name="value">值</param>
/// <param name="duration">持续时间</param>
/// <returns>结果</returns>
bool Set<T>(string key, T value, TimeSpan duration);
}
}
缓存基类
using System;
using System.Collections.Generic;

namespace Common.Cache
{
/// <summary>
/// 缓存基类
/// </summary>
public abstract class CacheBase : ICache
{
private TimeSpan maxDuration = TimeSpan.FromDays(15);

/// <summary>
/// 最长持续时间
/// </summary>
public TimeSpan MaxDuration
{
get
{
return this.maxDuration;
}
set
{
this.maxDuration = value;
}
}

/// <summary>
/// 前缀
/// </summary>
public string Prefix
{
get;
set;
}

public bool Add<T>(string key, T value)
{
return this.Add<T>(key, value, this.MaxDuration);
}

public abstract bool Add<T>(string key, T value, TimeSpan duration);

public abstract void Clear();

public abstract T Get<T>(string key);

/// <summary>
/// 获取全名
/// </summary>
/// <param name="key">键</param>
/// <returns>全名</returns>
public virtual string GetFullName(string key)
{
string result = key;
if (!string.IsNullOrWhiteSpace(this.Prefix))
{
result = string.Format("{0}.{1}", this.Prefix, key);
}

return result;
}

public abstract IDictionary<string, object> MultiGet(IList<string> keys);

public abstract void Remove(string key);

public bool Set<T>(string key, T value)
{
return this.Set<T>(key, value, this.MaxDuration);
}

public abstract bool Set<T>(string key, T value, TimeSpan duration);
}
}
Aspnet缓存实现
using System;
using System.Collections;
using System.Collections.Generic;
using System.Web;
using System.Web.Caching;
namespace Common.Cache
{
/// <summary>
/// Aspnet缓存
/// </summary>
public class AspnetCache : CacheBase
{
private System.Web.Caching.Cache cache = HttpRuntime.Cache;
/// <summary>
/// 构造函数
/// </summary>
public AspnetCache()
: this("Common.Cache")
{
}
/// <summary>
/// 构造函数
/// </summary>
/// <param name="prefix">前缀</param>
public AspnetCache(string prefix)
{
this.Prefix = prefix;
}
public override bool Add<T>(string key, T value, TimeSpan duration)
{
bool result = false;
if (value != null)
{
if (duration <= TimeSpan.Zero)
{
duration = this.MaxDuration;
}
result = this.cache.Add(this.GetFullName(key), value, null, DateTime.Now.Add(duration), System.Web.Caching.Cache.NoSlidingExpiration, CacheItemPriority.Default, null) == null;
}
return result;
}
public override void Clear()
{
// 获取键集合
IList<string> keys = new List<string>();
IDictionaryEnumerator caches = this.cache.GetEnumerator();
while (caches.MoveNext())
{
string key = caches.Key.ToString();
if (key.StartsWith(this.Prefix))
{
keys.Add(key);
}
}
// 移除全部
foreach (string key in keys)
{
this.cache.Remove(key);
}
}
public override T Get<T>(string key)
{
T result = default(T);
object value = this.cache.Get(this.GetFullName(key));
if (value is T)
{
result = (T)value;
}
return result;
}
public override IDictionary<string, object> MultiGet(IList<string> keys)
{
IDictionary<string, object> result = new Dictionary<string, object>();
foreach (string key in keys)
{
result.Add(key, this.Get<object>(key));
}
return result;
}
public override void Remove(string key)
{
this.cache.Remove(this.GetFullName(key));
}
public override bool Set<T>(string key, T value, TimeSpan duration)
{
bool result = false;
if (value != null)
{
if (duration <= TimeSpan.Zero)
{
duration = this.MaxDuration;
}
this.cache.Insert(this.GetFullName(key), value, null, DateTime.Now.Add(duration), System.Web.Caching.Cache.NoSlidingExpiration);
result = true;
}
return result;
}
}
}
[/csharp]
Memcached分布式缓存实现:EnyimMemcached客户端中实现了一致性哈希算法
[csharp]
using System;
using System.Collections.Generic;
using System.Linq;
using Enyim.Caching;
using Enyim.Caching.Memcached;
namespace Common.Cache
{
/// <summary>
/// Memcached缓存
/// </summary>
public class MemcachedCache : CacheBase
{
private static MemcachedClient memcached = new MemcachedClient();
public override bool Add<T>(string key, T value, TimeSpan duration)
{
if (duration <= TimeSpan.Zero)
{
duration = this.MaxDuration;
}
return memcached.Store(StoreMode.Add, this.GetFullName(key), value, duration);
}
public override void Clear()
{
memcached.FlushAll();
}
public override T Get<T>(string key)
{
return memcached.Get<T>(this.GetFullName(key));
}
public override IDictionary<string, object> MultiGet(IList<string> keys)
{
IEnumerable<string> fullKeys = keys.Select<string, string>(k => this.GetFullName(k));
return memcached.Get(fullKeys);
}
public override void Remove(string key)
{
memcached.Remove(this.GetFullName(key));
}
public override bool Set<T>(string key, T value, TimeSpan duration)
{
if (duration <= TimeSpan.Zero)
{
duration = this.MaxDuration;
}
return memcached.Store(StoreMode.Set, this.GetFullName(key), value, duration);
}
}
}
[/csharp]
缓存结果通知:实现了Spring.Aop中的IMethodInterceptor接口,用Spring的表达式解析得出key的值,使用时在方法上打特性标签,如Common.Mom项目中用到的[CacheResult(CacheName = "Aspnet", Key = "'Cmr.Dsr.GetSubscriber.' + #id", TimeToLive = "0:5:0")]
[csharp]
using System.Collections;
using System.Collections.Generic;
using System.Reflection;
using AopAlliance.Intercept;
using Spring.Caching;
using Spring.Context;
using Spring.Expressions;
namespace Common.Cache.Aspects
{
/// <summary>
/// 缓存结果通知
/// </summary>
public class CacheResultAdvice : IApplicationContextAware, IMethodInterceptor
{
private IDictionary<MethodInfo, CacheResultAttribute> cacheResults = new Dictionary<MethodInfo, CacheResultAttribute>();
public IApplicationContext ApplicationContext
{
get;
set;
}
/// <summary>
/// 获取缓存结果
/// </summary>
/// <param name="invocation">调用</param>
/// <returns>缓存结果</returns>
private CacheResultAttribute GetCacheResult(IMethodInvocation invocation)
{
CacheResultAttribute result = null;
MethodInfo method = invocation.Method;
if (this.cacheResults.ContainsKey(method))
{
result = this.cacheResults[method];
}
if (result == null)
{
object[] attributes = method.GetCustomAttributes(typeof(CacheResultAttribute), false);
if (attributes.Length > 0)
{
result = (CacheResultAttribute)attributes[0];
this.cacheResults[method] = result;
}
}
return result;
}
/// <summary>
/// 获取参数集合
/// </summary>
/// <param name="invocation">调用</param>
/// <returns>参数集合</returns>
private IDictionary GetParameters(IMethodInvocation invocation)
{
IDictionary result = new Hashtable();
MethodInfo method = invocation.Method;
object[] arguments = invocation.Arguments;
ParameterInfo[] parameters = method.GetParameters();
for (int i = 0; i < parameters.Length; i++)
{
ParameterInfo parameter = parameters[i];
result[parameter.Name] = arguments[i];
}
return result;
}
public object Invoke(IMethodInvocation invocation)
{
object result = null;
IDictionary parameters = this.GetParameters(invocation);
CacheResultAttribute cacheResult = this.GetCacheResult(invocation);
if (cacheResult != null && cacheResult.KeyExpression != null)
{
string key = cacheResult.KeyExpression.GetValue(null, parameters).ToString();
if (!string.IsNullOrEmpty(key))
{
ICache cache = this.ApplicationContext.GetObject(cacheResult.CacheName) as ICache;
if (cache != null)
{
result = cache.Get<object>(key);
if (result == null)
{
result = invocation.Proceed();
if (this.IsMatch(cacheResult.ConditionExpression, result, parameters))
{
cache.Set<object>(key, result, cacheResult.TimeToLiveTimeSpan);
}
}
}
}
}
if (result == null)
{
result = invocation.Proceed();
}
return result;
}
/// <summary>
/// 是否匹配
/// </summary>
/// <param name="expression">表达式</param>
/// <param name="context">上下文</param>
/// <param name="parameters">参数集合</param>
/// <returns>结果</returns>
private bool IsMatch(IExpression expression, object context, IDictionary parameters)
{
bool result = expression == null;
if (!result)
{
result = (bool)expression.GetValue(result, parameters);
}
return result;
}
}
}
测试时启动Common.Cache.ConsoleTest即可
[转载]几种开源网络爬虫的简单比较 – ShaPherD – 博客园.
爬虫里面做的最好的肯定是google ,不过google公布的蜘蛛是很早的一个版本,下面是几种开源的网络爬虫的简单对比表:

还有其他的一些比如Ubicrawler、FAST Crawler、天网蜘蛛等等没有添加进来。
之后主要研究下larbin爬虫,如果有可能会给它添加一个删除功能,因为其排重部分用的是bloom filter算法,这个算法的有点很明显,对大规模数据的处理很快,性能很好,而且内存占用很小,但是什么事都没有尽善尽美的,该算法的直接缺点就是不能 删除,还会出现误判情况。关于bloom filter有很多相关论文,网上也有些高质量的文章,暂时不做累述,之后如果自己有不一样的看法,再写关于该算法的文章。
删除功能的算法暂时还不太确定,需要进一步了解,现在了解的counting bloom filter不错,带来的代价是内存占用高一点,园友们有什么建议和想法欢迎提出来哈!
[转载]C# 谈谈Interface和通过Interface传递web页面数据 – spring yang – 博客园.
接口是一种规划(为你定义出一系列的规则和任务,但不去实现它);
先看一个实例:
interface IPoint
{
// Property signatures:
int x
{
get;
set;
}

int y
{
get;
set;
}
}

class Point : IPoint
{
// Fields:
private int _x;
private int _y;

// Constructor:
public Point(int x, int y)
{
_x = x;
_y = y;
}

// Property implementation:
public int x
{
get
{
return _x;
}

set
{
_x = value;
}
}

public int y
{
get
{
return _y;
}
set
{
_y = value;
}
}
}

class MainClass
{
static void PrintPoint(IPoint p)
{
Console.WriteLine("x={0}, y={1}", p.x, p.y);
}

static void Main()
{
Point p = new Point(2, 3);
Console.Write("My Point: ");
PrintPoint(p);
}
}
// Output: My Point: x=2, y=3
上面是一个简单的接口实现,如果在一个Web网页上的.CS文件中继承一个接口,如下:
先定义接口:
<body>
    <form id="form1" runat="server">
    <div>

        <table class="style1">
            <tr>
                <td class="style2">
                    <asp:Label ID="lblUsername" runat="server" Text="Username"></asp:Label>
                </td>
                <td>
                    <asp:TextBox ID="txtUserName" runat="server"></asp:TextBox>
                </td>
            </tr>
            <tr>
                <td class="style2">
                    <asp:Label ID="lblPassWord" runat="server" Text="PassWord"></asp:Label>
                </td>
                <td>
                    <asp:TextBox ID="txtPassWord" runat="server"></asp:TextBox>
                </td>
            </tr>
            <tr>
                <td class="style2">
                     </td>
                <td>
                    <asp:Button ID="btnSubmit" runat="server" onclick="btnSubmit_Click"
                        Text="Submit" />
                </td>
            </tr>
            <tr>
                <td class="style2">
                     </td>
                <td>
                    <asp:Label ID="lblMessage" runat="server"></asp:Label>
                </td>
            </tr>
        </table>

    </div>
    </form>
</body>
最近做网站需要随时添加商品分类信息,然后默认选中添加的分类信息,为了避免重复获取服务器分类信息,于是需要利用JQuery添加Select组件的Option选项,实例代码如下:
//异步保存分类信息
function SaveCategory() {
$.post("/GoodsCategory/AjaxSave", { categoryName: $("#CategoryName").val(), parentID: $("#parentID").val() }, function(data) {
if (data) {
alert("保存成功!");
//如果为一级分类,添加到分类中
if (data.ParentID == 1) {
var str = "<option value='" + data.Identifier + "'> " + data.CategoryName + "</option>";
$("select#Category_ID").append(str);
} else {
//添加新的分类到分类选择中,并默认选中
$("select#Category_ID option").each(function(obj) {
if (data.ParentID == $(this).val()) {
var span = "";
for (i = 2; i < data.Cate_Level * 1; i++)
span = span + " ";
var str = "<option value='" + data.Identifier + "'>" + span + data.CategoryName + "</option>";
$(str).insertAfter(this);
}
});
}
//设置选中值为当前添加的值
$("select#Category_ID").val(data.Identifier);
tb_remove();
} else {
alert("保存分类失败!");
}
}, "json");
}
[转载]AndroidContacts操作系列之 查看底层联系人表结构 – duicky – 博客园.
对于很多想做通讯录,或者很多想对系统通讯录操作的童鞋们肯定都会遇到个问题,系统通讯录操作很麻烦,我能不能直接看看底层联系人表结构呢 ?
如果可以看到的话,那一定能提高相关操作的准确性和效率吧。
不多说,直接把步骤给列出来:
1、 打开Eclipse,运行模拟器
2、 调出 Android 中的 File Explorer(Windows—>Show View -> Other -> Android – > File Explorer)

3、 打开File Explorer , 选择 Data->Data->com.Android.providers.contacts->databases, 此时你能看到一个数据库:contacts2.db。
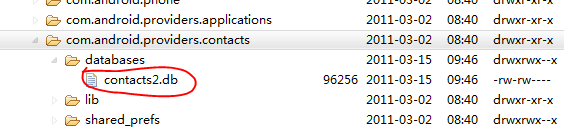
4、 点击File Explorer 右上角的 “ <- ” 导出键,把contacts2.db到处到 自定义位置。我这导出到 D盘的根目录下 :
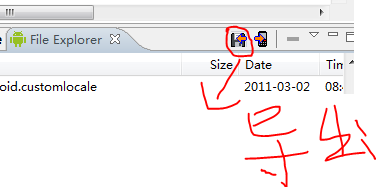
导出键
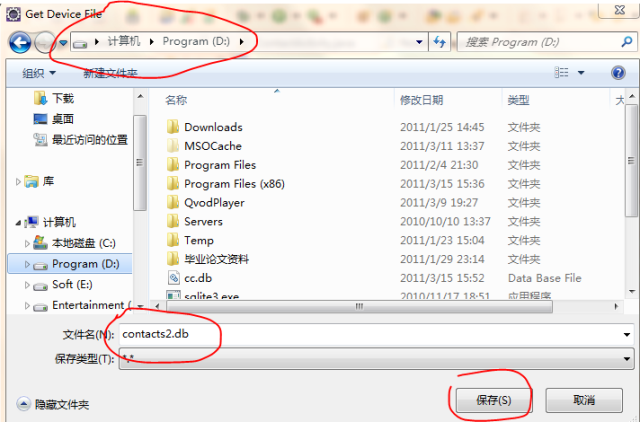
保存文件
5、 下载SQLite 管理工具SQLiteDev344。 大家可以随便百度google搜搜。我是从这下载的(http://www.cr173.com/soft/12286.html)
6、 正常安装,打开如图:
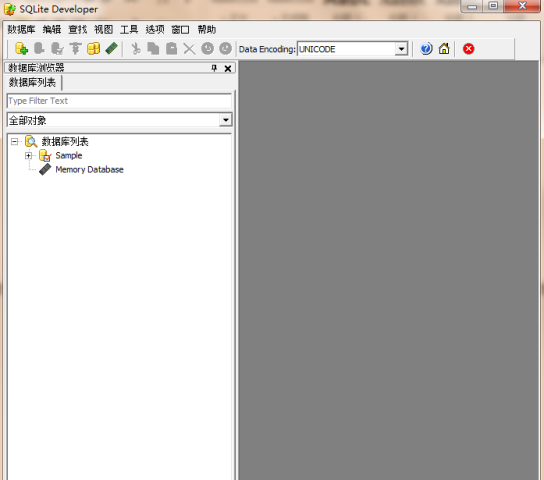
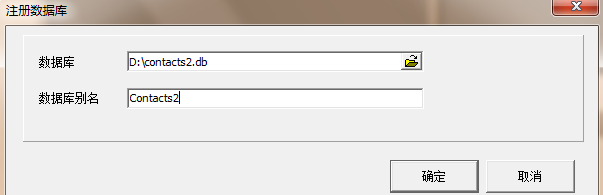
7、 点击“+数据库”、或者 数据库->注册数据库

8、 选择你导出的数据库。 数据库别名能随便取:
9、 打开左边菜单,双击Contacts2数据库。
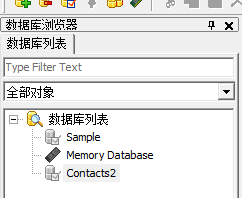

10、 选择表,你就能看到Contacts 的所有表都在你手中了。

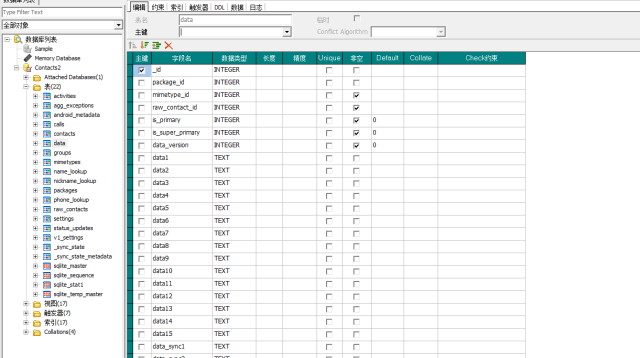
11、 双击data表,查看表的结构
12、 点击 数据,查看表中内容
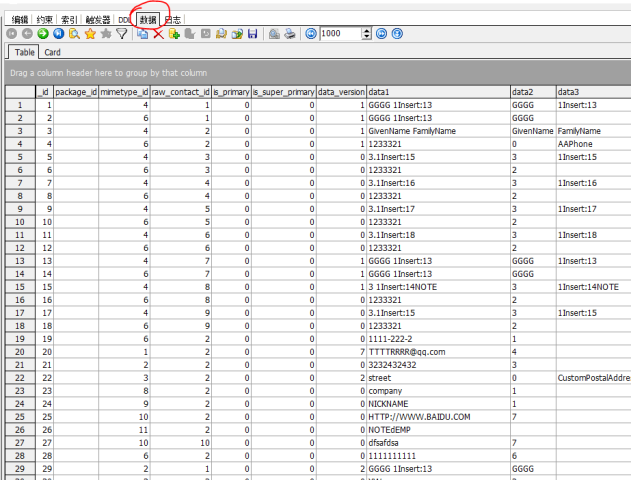
13、恭喜到此为止,你能查看Contacts中的任意表结构和数据了。
14、接下来有时间还准备发表些关于 联系人操作 的文章 , 有问题可留言一起讨论 。
今天做公司的企业网站要加上QQ在线客服,可是官方提供的几种样式和网站特别不协调,所以就在研究怎么自定义图标。找了很长时间的资料,也试了很多遍,还是不行,后来在一博友那里找到了答案,特分享给大家,如果有用就免费收藏吧!!!
我们使用自定义图片的时候怎么来根据不同的状态显示不同的图片呢,今天看了下QQ提供的图片,发现通过判断QQ提供的图片的宽度可以得到qq的状态。这个是QQ提供的图片地址SRC=http://wpa.qq.com/pa?p=1:28171291:4,p的最后一个参数要是4才可以判断,提供的别的图片,大小宽高都是一样的不能判断。
下边是示例代码,测试的时候可以换成自己的QQ,在线的时候显示QQ的logo,不在线显示百度的logo,
李伟的博客
<script type="text/javascript">// <![CDATA[
function showQQ()
{
var qq=document.getElementById("qq")
if(qq.width<20)
{
qq.src="http://piao.hunbohui.com/qq11.gif"
qq.alt="QQ不在线"
}
else
{
qq.src="http://piao.hunbohui.com/qq1.gif"
qq.alt="罗威婚纱为您服务!"
}
var qq1=document.getElementById("qq1")
if(qq1.width<20)
{
qq1.src="http://piao.hunbohui.com/qq11.gif"
qq1.alt="QQ不在线"
}
else
{
qq1.src="http://piao.hunbohui.com/qq1.gif"
qq1.alt="罗威婚纱为您服务!"
}
var qq2=document.getElementById("qq2")
if(qq2.width<20)
{
qq2.src="http://piao.hunbohui.com/qq11.gif"
qq2.alt="QQ不在线"
}
else
{
qq2.src="http://piao.hunbohui.com/qq1.gif"
qq2.alt="罗威婚纱为您服务!"
}
var qq3=document.getElementById("qq3")
if(qq3.width<20) { qq3.src="http://piao.hunbohui.com/qq11.gif" qq3.alt="QQ不在线" } else { qq3.src="http://piao.hunbohui.com/qq1.gif" qq3.alt="罗威婚纱为您服务!" } }
// ]]></script>
<a href="http://wpa.qq.com/msgrd?V=1&Uin=610477649&Exe=QQ&Site=im.qq.com&Menu=No" target="blank">
<img id="qq" src="http://wpa.qq.com/pa?p=1:610477649:4" border="0" alt="给我发消息" /></a>
<a href="http://wpa.qq.com/msgrd?V=1&Uin=595312709&Exe=QQ&Site=im.qq.com&Menu=No" target="blank">
<img id="qq1" src="http://wpa.qq.com/pa?p=1:595312709:4" border="0" alt="给我发消息" /></a>
<a href="http://wpa.qq.com/msgrd?V=1&Uin=1351962303&Exe=QQ&Site=im.qq.com&Menu=No" target="blank">
<img id="qq2" src="http://wpa.qq.com/pa?p=1:1351962303:4" border="0" alt="给我发消息" /></a>
<a href="http://wpa.qq.com/msgrd?V=1&Uin=1061177270&Exe=QQ&Site=im.qq.com&Menu=No" target="blank">
<img id="qq3" src="http://wpa.qq.com/pa?p=1:1061177270:4" border="0" alt="给我发消息" /></a>
想知道一台电脑多久就能破解你的密码,一年、十年还是几秒钟?
![用一台电脑多久能破解你的密码[图] | 小众软件](http://img1.appinn.com/2011/03/20110314-221133000.png "用一台电脑多久能破解你的密码[图] | 小众软件")
感谢 juliet 同学的推荐,他还说道:
为你的网络账户设置一个足够长、足够复杂的密码已经是大家的常识了。但你的密码究竟有多安全?这个问题似乎很难有一个直观的计量方式。近日上线的一家新网站就在这方面做出了有趣的尝试。
其站名、网址相当直观:How Secure is my password。网站界面中仅有一个文本框,只要输入你的密码即可马上给出其安全程度。
目前拿自己的qq密码尝试了一下,结果是
It would take About a billion years for a desktop PC to crack your password
这个网站 HOW SECURE IS MY PASSWORD? 能帮你计算出密码强度,使用一台电脑多久可以计算出来。快去试试吧,如果在几天内的话,可以改密码了。
对于担心密码安全的同学,可以使用相似的密码来测试,不要泄露了真实密码。