[优化]自己动手写个ORM实现(4) 关于反射DataRow数据记录到实体性能的优化

mikel阅读(684)

总所周知,反射对于运行时确定对象类型十分方便,但是它最大的不足就是效率低下,比直接调用的效率慢了一百倍有余。

在3.5以前有codeDom或借助Emit直接编写IL来优化其效率,但是使用不便,借助3.5新增的Expression,让我们有了一种既简洁,在速度上又较反射有很大的提高。 示例如下


 1 public static T GetEntityByDataRowSlow<T>(this DataRow data) where T : new()
 2         {
 3             T t = new T();
 4             PropertyInfo[] properties = typeof(T).GetProperties();
 5 
 6             foreach (PropertyInfo p in properties)
 7             {
 8                 object value = data[p.Name] == DBNull.Value ? null : data[p.Name];
 9                 p.SetValue(t, value, null); 
10             }
11             return t;
12         }


如上,整段代码慢就慢在p.SetValue(t,value,null)这段上。 也有可能有人会说 typeof(T).GetProperties()获取所有属性应该缓存,但实际测试结果看下来影响并不大,效率相差无几。

接下来,主角登场了


 1 static Func<T, objectobject> GetSetDelegate<T>(MethodInfo m,Type type)
 2         {
 3            
 4             var param_obj = Expression.Parameter(typeof(T), "obj");
 5             var param_val = Expression.Parameter(typeof(object), "val");
 7             var body_val = Expression.Convert(param_val, type);
 8             var body = Expression.Call(param_obj, m, body_val);
 9             Action<T, object> set = Expression.Lambda<Action<T, object>>(body, param_obj,  param_val).Compile();
10             return (instance, v) =>
11             {
12                 set(instance, v);
13                 return null;
14             };
15         }


1 static void FastSetValue<T>(this PropertyInfo property,T t, object value)
2         {
3             MethodInfo m = property.GetSetMethod();
4             GetSetDelegate<T>(m,property.PropertyType)(t, value);
5         }


关于Expression和lambda的介绍可参看园里大牛赵哥的文章  方法的直接调用,反射调用与……Lambda表达式调用

经过改良的调用方法


public static T FastGetEntityByDataRow<T>(this DataRow data) where T : new()
        {
            T t 
= new T();
            PropertyInfo[] properties 
= GetProperties(typeof(T));
            
            
foreach (PropertyInfo p in properties)
            {                    
                
object value = data[p.Name] == DBNull.Value ? null : data[p.Name];
                p.FastSetValue
<T>(t, value);
            }
            
return t; 
        }


经过测试下来  如果直接是Entity.Property = "somevalue"设置属性的速度比值是1的话,反射的速度比值是100多,而经过改良的上述方法比值在2-3之间。

尽管这样,常见Web应用的主要瓶颈还是在结构的设计,数据库的读取,上面的方法对于整个程序框架的影响也只是积跬步,单用这个地方用了也几乎白用,不用白不用。谨记录一下。


[AsWing]AsWing中文教程下载

mikel阅读(855)

After half year part-time writting, the book is finished, as original plan, it will be published as a papery book in chinese, but for some reason, now it can’t. So i released it as a e-book for free, and accept donation.

aswing book

aswing book

You can download it here : http://code.google.com/p/aswing/downloads/list

I plan to hire some one to translate it into english, so the most donation money will be used for the translation, if some one can help the translation, that will be cool, contact me!

[优化]利用Emit减少反射的性能损失

mikel阅读(1022)

我很喜欢在程序里使用反射,让事 情变得更简单、灵活。但是在获得便利的同时带来的是性能上的损失。粗略的测试一下,通过反射根据成员名字去访问成员比直接访问慢250倍左右。听起来挺吓 人,但是以时间来算,用我的p4 2.66G的机用反射访问成员一次耗时仅3微秒,对与整个程序的运行周期看来,这占的时间微不足道。
不过我用反射的程度确实过分了点。我很久以前就做过这么一样东西,利用反射实现asp.net控件和数据之间的双向绑定。意料之中的是,有人对我仅为了赋值,取值就使用反射提出质疑。.net阵营不像java那样财大气粗,很多人对性能还是很看重的,風語·深蓝甚至还被上司禁止使用工厂模式,说Activator.CreateInstance会影响性能…
于 是,我开始在思考如何减少反射带来的性能损失。首先元数据可以缓存起来,这样就不必重复执行GetTypes(), GetMembers()等方法了,不过这些操作耗时很少,在程序中用到的地方也少,最重要还是要解决如何能快速的通过传入一个对象和对象的属性名去访问 属性。要大幅提高性能,唯一办法就是不要用反射。。。
还能怎样呢?我想到了一个有这样结构的类:
这个类有GetValue和SetValue方法,通过一堆case去根据参数去读或写相应的属性,用这种方法就能达到我想要的效果,而又不需要反射了。
但是这样针对每一个类,就要有另一个对应的类去处理这样的事情,所以这些负责Get/Set的类应该在运行时动态生成,这就得靠反射最高级的特性-Emit了。
利用System.Reflection.Emit中的类,可以运行时构造类型,并且通过IL去构造成员。当然,生成C#代码用CodeDom编译也可以,但是速度肯定大打折扣了。
跟着我开始动手,先定义IValueHandler接口:

using System;
namespace NoReflection
{
    
internal interface IValueHandler {
        
object GetValue(object o, string expression);
        
void SetValue(object o,string expression, object value);
        
object CreateInstance();
    }
}

然后定义一个叫ObjectUtil类,会用动态构造出用来处理特定类型的IValueHandler的实现类,然后把它放到缓存里。通过几个方法的包装,根据需要调用ValueHandler的GetValue/SetValue。
不 要把构造IL想的太恐怖,其实只要对CLI和MSIL有一定的了解,并且能看懂就行了,因为我可以先用熟悉的C#写好代码,编译后再反汇编去看,大部分可 以抄。当然这个过程还是花了我很多时间,因为IL里头装箱/拆箱得自己管,不同类型的数据转换的代码又各不相同,然后还发现用short form指令的话如果目标地址的偏移量超过了8位/*双鱼座纠正说是7位…*/就会出错,所以xx.s的指令就不能照抄,统统用xx代替。。。
SQLConnection的处理来举例,动态生成的类是这个样子的:

public class ValueHandler : IValueHandler
{
    
// Methods
    public ValueHandler()
    {
    }
    
public override object CreateInstance()
    {
        
return new SQLConnection();
    }
    
public override object GetValue(object obj, string property)
    {
        
switch (property)
        {
            
case "ConnectionString":
                {
                    
return ((SqlConnection) obj).ConnectionString;
                }
            
case "ConnectionTimeout":
                {
                    
return ((SqlConnection) obj).ConnectionTimeout;
                }
            
case "Database":
                {
                    
return ((SqlConnection) obj).Database;
                }
            
case "DataSource":
                {
                    
return ((SqlConnection) obj).DataSource;
                }
            
case "PacketSize":
                {
                    
return ((SqlConnection) obj).PacketSize;
                }
            
case "WorkstationId":
                {
                    
return ((SqlConnection) obj).WorkstationId;
                }
            
case "ServerVersion":
                {
                    
return ((SqlConnection) obj).ServerVersion;
                }
            
case "State":
                {
                    
return ((SqlConnection) obj).State;
                }
            
case "Site":
                {
                    
return ((SqlConnection) obj).Site;
                }
            
case "Container":
                {
                    
return ((SqlConnection) obj).Container;
                }
        }
        
throw new Exception("The property named " + property + " does not exists");
    }
    
public override void SetValue(object obj, string property, object value)
    {
        
switch (property)
        {
            
case "ConnectionString":
                {
                    ((SqlConnection) obj).ConnectionString 
= (string) value;
                    
return;
                }
            
case "Site":
                {
                    ((SqlConnection) obj).Site 
= (ISite) value;
                    
return;
                }
        }
        
throw new Exception("The property named " + property + " does not exists");
    }
}

 ObjectUtil与ASP.NET里的DataBinder用法十分相似,不过DataBinder只能Get,ObjectUtil可以 Get/Set。为了最大的提高性能,我把简单的属性表达式和跨对象的复杂表达式区分对待,例如SqlCommand的CommandText应该使用 ObjectUtil.GetValue(cmd, "CommandText"); 而要得到他的Connection的ConnectionString,则要调用ObjectUtil.GetComplexValue(cmd, "Connection.ConnectionString")。因为GetComplexValue方法多了个对参数Split('.')的操作,如果 是跨对象表达式的则要从左到右一步步获得对象引用,再Get/Set最终对象属性的值。不要小看一次Split(),它已经会使整个过程多花近50%的时 间了。另外也支持对索引器的访问,这里我把表达式规则小改了一下,DataBinder使用和开发语言语法一致的表达式,并且同时兼容VB.NET和C# 语法,例如可以使用DataBinder.Eval(myList, "[0]")或DataBinder.Eval(myList, "(0)")访问索引为0的元素,而ObjectUtil规定了整型的索引直接使用数字,例如OjbectUtil.GetValue(myList, "0"),字符型的索引直接传入字符,如OjbectUtil.GetValue(myList, "someKey")。这样做的原因,一是节省了分析方括号的时间,二是我也省了不少事 🙂
这是生成的处理NameValueCollection的类,比较有代表性,索引器可以是int或string:

public override object GetValue(object obj3, string text1)
{
      
switch (text1)
      {
            
case "AllKeys":
            {
                  
return ((NameValueCollection) obj3).AllKeys;
            }
            
case "Count":
            {
                  
return ((NameValueCollection) obj3).Count;
            }
            
case "Keys":
            {
                  
return ((NameValueCollection) obj3).Keys;
            }
      }
      
if (char.IsDigit(text1[0]))
      {
            
return ((NameValueCollection) obj3)[Convert.ToInt32(text1)];
      }
      
return ((NameValueCollection) obj3)[text1];
}
 

跟着就是测试性能了。我拿ObjectUtil和反射、DataBinder、Spring.Net的ObjectNavigator来做对比。对比结果是:
如果是简单表达式,速度是反射的3.5倍,DataBinder的7倍,ObjectNavigator的15倍。。。这东西真是有java特色啊
复杂表达式,是反射的1.5倍,DataBinder的3.5倍,ObjectNavigator的6.5倍。
由于ObjectUtil用法和DataBinder和ObjectNavigator类似,比直接反射简单的多,以他们为参照比较合适。成绩算不错了 🙂
CreateInstance是后来顺便加上的,用默认的构造函数去创建对象。看来还很有必要,有些类型的对象用反射创建耗时极长,我也不知原因,就拿SqlCommand来说,用ObjectUtil创建比用反射快超过40倍
当然,在实际应用中,它带来的效果通常不太明显,原因就是我前面所说的,在整个程序执行期间,反射耗时仅占极少一部分。例如我曾经用NHibernate 0.8做测试,性能仅提高了3%左右,因为大部分时间花在了分析HQL和数据库读取上。但是用在大部分时间在反射的ObjectComparer上,效果不错,用ObjectUtil替换后速度是原来3倍
源码 /Files/Yok/NoReflection.rar
生成的类 /Files/Yok/EmittedDlls.rar

[测试]自动测试框架Tellurium快速上手指南.

mikel阅读(913)

TelluriumQuickStart  

Tellurium快速上手指南.

简介

Tellurium 是一个开源的网页测试框架,现阶段还是建立在Selenium之上。 但有很多独特的测试理念。 比之Selenium, 维护性,鲁棒性, 和可复用性都要好。 它支持JUnit和TestNG。Tellurium的测试代码可以用Java, Groovy和纯DSL脚本来写.

Tellurium子项目

Tellurium由以下子项目构成:

一点Tellurium概念

虽然Tellurium脱胎于Selenium,但两者在概念上有很大的不同。Selenium主要是用记录和重播(Record and Replay)模式,而Tellurium要求你首先定义待测的UI模块。下面列出Tellurium的一些主要概念:

Tellurium物件

Tellurium定义了一些常用的物件,如Button, Table, Form等。

Tellurium物件 缺省属性
Button tag: "input"
Container
CheckBox tag: "input", type: "checkbox"
Div tag: "div"
Form tag: "form"
Image tag: "img"
InputBox tag: "input"
RadioButton tag: "input", type: "radio"
Selector tag: "select"
Span tag: "span"
SubmitButton tag: "input", type: "submit"
Table tag: "table"
UrlLink tag: "a"
StandardTable tag: "table"

值得注意的是Tellurium物件大多为抽象物件,比如Container就可以实用于不同的HTML标签。每个Tellurium物件都有一个uid,即它的别名。

Locator

Locator是用来定位一个元素在网页DOM中的位置,Tellurium支持两种Locator, 一种叫Base Locator, 用“locator”标识,它是一个相对的XPath. 如:

InputBox(uid: "SearchBox", locator: "//input[@title='Google Search']")

另一个是Composite Locator, 用“clocator”来标识,它是由一组属性构成,如

InputBox(uid: "SearchBox", clocator: [title: "Google Search"])

Composite Locator_是Tellurium的缺省Locator, 它容易写,表叙性好,方便动态生成Runtime Locator.

UI模块

UI模块是一个复合的Tellurium物件,它是由一些单个Tellurium物件嵌套构成。一个UI模块往往代表DOM的一个子树。比如Google首页搜索模块就可以表叙为

ui.Container(uid: "GoogleSearchModule", clocator: [tag: "td"], group: "true"){
   InputBox(uid: "Input", clocator: [title: "Google Search"],respond: ["focus", "mouseOver"])
   SubmitButton(uid: "Search", clocator: [name: "btnG", value: "Google Search"])
   SubmitButton(uid: "ImFeelingLucky", clocator: [value: "I'm Feeling Lucky"])
}

UI 模块的最外层元素以定要以"ui."开始。这里group为“true”表示Tellurium用利用UI元素之间的关系来协助它们在网页DOM中的定 位。respond属性定义了InputBox需要触发“focus”和“mouseOver”事件,Tellurium会自动触发这些事件的。

Tellurium测试案例

Tellurium 测试代码可以用Java, Groovy, 或纯DSL脚本来写。无论哪种方法,Tellurium要求你定义独立的UI模块,使之和测试代码分离,以便于维护。UI模块必须继承Tellurium 的DslContext class, 一般你还需定义对UI模块的操作方法。例如:

class GoogleSearchModule extends DslContext{
   public void defineUi() {
         ui.Container(uid: "google_start_page", clocator: [tag: "td"], group: "true"){
            InputBox(uid: "searchbox", clocator: [title: "Google Search"])
            SubmitButton(uid: "googlesearch", clocator: [name: "btnG", value: "Google Search"])
            SubmitButton(uid: "Imfeelinglucky", clocator: [value: "I'm Feeling Lucky"])
        }
   }
   def doGoogleSearch(String input){
        keyType "searchbox", input
        pause 500
        click "googlesearch"
        waitForPageToLoad 30000
    }
    def doImFeelingLucky(String input){
        type "searchbox", input
        pause 500
        click "Imfeelinglucky"
        waitForPageToLoad 30000
    }
}

如果你的测试案例用JUnit来写,你需要继承TelluriumJavaTestCase.

public class GoogleSearchTestCase extends TelluriumJavaTestCase {
    private static GoogleSearchModule gsm;
   
    @BeforeClass
    public static void initUi() {
        gsm = new GoogleSearchModule();
        gsm.defineUi();
    }
    @Before
    public void connectToGoogle() {
        connectUrl("http://www.google.com");
    }
    @Test
    public void testGoogleSearch() {
        gsm.doGoogleSearch("tellurium . ( Groovy ) Test");
    }
    @Test
    public void testGoogleSearchFeelingLucky() {
        gsm.doImFeelingLucky("tellurium automated Testing");
    }
}

TestNG的案例类似,除了你要继承TelluriumTestNGTestCase。如果用Groovy, 你需要继承TelluriumGroovyTestCase.

Tellurium配置

Tellurium用一个配置文件TelluriumConfig.groovy来配置系统。它包括对Selenium服务器和Tellurium框架本身的配置,如:

tellurium{
    //embedded selenium server configuration
    embeddedserver {
        //port number
        port = "4445"
        //whether to use multiple windows
        useMultiWindows = false
        runInternally = true
        profile = ""
    }
    //event handler
    eventhandler{
        //whether we should check if the UI element is presented
        checkElement = true
        //wether we add additional events like "mouse over"
        extraEvent = true
    }
    //data accessor
    accessor{
        //whether we should check if the UI element is presented
        checkElement = false
    }
    connector{
        //selenium server host
        //please change the host if you run the Selenium server remotely
        serverHost = "localhost"
        //server port number the client needs to connect
        port = "4445"
        //base URL
        baseUrl = "http://localhost:8080"
        //Browser setting, valid options are
        //  *firefox [absolute path]
        //  *iexplore [absolute path]
        //  *chrome
        //   *iehta
        browser = "*chrome"
    }
    datadriven{
        dataprovider{
            reader = "PipeFileReader"
        }
    }
    test{
        result{
            reporter = "XMLResultReporter"
            output = "Console"
            filename = "TestResult.output"
        }
        exception{
            captureScreenshot = true
            filenamePattern = "Screenshot?.png"
        }
    }
    uiobject{
        builder{
            //example:
           SelectMenu="org.tellurium.builder.SelectMenuBuilder"
        }
    }
    widget{
        module{
            //define your widget modules here, for example Dojo or ExtJs
            included=""
        }
    }
}

此外,Tellurium还提供了方法让用户来覆盖Tellurium中的配置,

public class GoogleSearchModuleTestCase extends TelluriumJavaTestCase
{
   static{
       setCustomConfig(true, 5555, "*chrome", true, null);
   }
...
}

运行Tellurium的条件

由于Tellurium的UI模块必须是一个Groovy class, 你需要Groovy才能运行Tellurium. 请从Groovy官方网页下载Groovy,当然,你也可以用Maven下载。

在IDE中运行Tellurium, 你需要安装Groovy插件。Eclipse的Groovy插件在: http://dist.codehaus.org/groovy/distributions/update/. 新版的Netbeans和IntelliJ本身就带有Groovy插件。

创建自己的Tellurium测试项目

有三种方法创建自己的Tellurium测试项目。一是从Tellurium下载网页下载文件手工创建,这样比较费事。或者下载Tellurium的参考项目,用它作为你的模板项目。更方便的方法是用Tellurium的Maven archetype来创建,非常简单,一个Maven命令就完事, 比如:

mvn archetype:create -DgroupId=example -DartifactId=demo -DarchetypeArtifactId=tellurium-junit-archetype -DarchetypeGroupId=tellurium -DarchetypeVersion=1.0-SNAPSHOT  -DarchetypeRepository=http://kungfuters.org/nexus/content/repositories/snapshots

这个命令创建了Tellurium JUnit 测试项目。然后用编辑器如IntelliJ IDEA打开项目用如下部步骤,

New Project > Import project from external model > Maven > Project directory > Finish

你会发现项目中有以下文件

pom.xml
src
src/main
src/main/groovy
src/main/resources
src/test
src/test/groovy
src/test/groovy/module
src/test/groovy/module/GoogleSearchModule.groovy
src/test/groovy/test
src/test/groovy/test/GoogleSearchTestCase.java
src/test/resources
TelluriumConfig.groovy

其 中TelluriumConfig.groovy是Tellurium配置文件, 而GoogleSearchModule是示范网页模块文件, 而GoogleSearchTestCase是示范测试文件。检查项目的Groovy配置,确保是1.6.0版本。 然后就可以用以下Maven命令来运行示范测试文件了,

mvn test

如果你想创建TestNG项目,可以用以下Maven命令:

mvn archetype:create -DgroupId=your_group_id -DartifactId=your_artifact_id -DarchetypeArtifactId=tellurium-testng-archetype -DarchetypeGroupId=tellurium -DarchetypeVersion=1.0-SNAPSHOT -DarchetypeRepository=http://kungfuters.org/nexus/content/repositories/snapshots

创建自己的UI模块

Tellurium的Firefox Plugin(TrUMP)可以用来自动创建网页模块文件, 然后你加入测试逻辑就行了。 TrUMP可以从Tellurium网站下载

http://code.google.com/p/aost/downloads/list

或者从Firefox addons直接下载

https://addons.mozilla.org/en-US/firefox/addon/11035

TrUMP简单易用,具体的操作这里就不细说了。

相关资源

[MVC]ASP.NET MVC For Visual Studio 2010 Beta 1

mikel阅读(764)

ASP.NET MVC For Visual Studio 2010 Beta 1

 Downloads & Files


Application AspNetMVC1.1_VS2010.exe

application, 1227K, uploaded Wed  – 612 downloads
Application Release Notes

application, 68K, uploaded Wed  – 228 downloads
Application ASP.NET MVC Snippets for VS2010 Beta 1

application, 8K, uploaded Wed  – 404 downloads

Release Notes

This release only applies to Visual Studio 2010 Beta 1
It contains the tooling and assemblies for ASP.NET MVC 1.0, but with the placeholder version 1.1.
Please see the full release notes included with this release for more details. You can also read the announcement on here.
There are some known issues with the release as noted in the release notes. If you run into problems, please see the following post.
Also included in this release are snippets. To install the snippets:

  1. Unzip "ASP.NET MVC Snippets.zip" into "C:\Users\<username>\Documents\Visual Studio 10\Code Snippets\Visual Web Developer\My HTML Snippets", where "C:\" is your OS drive.
  2. Visual Studio will automatically detect these new files.

[JavaScript]javascript数据类型转换

mikel阅读(733)

parseFloat 转换成浮点数
parseInt 转换成整数.

这两个函数都有些容错性的,比如"123abc"会变成123.
如果楼主希望更准确一些,其实可以判断一下,然后用eval,像这样

不过也可以使用这样的方法:
var a = "234" ;
a = a.replace(/(^[\\s]*)|([\\s]*$)/g, "");
if( a !="" && !isNaN( a ) )
{//如果是数字
a = eval( a )
}
else
{//如果不是数字
a = null
}

JavaScript有两种数据类型的转换方法:一种是将整个值从一种类型转换为另一种数据类型(称作基本数据类型转换),另一种方法是从一个值中提取另一种类型的值,并完成转换工作。

基本数据类型转换的三种方法:

1.转换为字符型:String(); 例:String(678)的结果为"678"
2.转换为数值型:Number(); 例:Number("678")的结果为678
3.转换为布尔型:Boolean(); 例:Boolean("aaa")的结果为true

从一个值中提取另一种类型的值的方法:

1.提取字符串中的整数:parseInt(); 例:parseInt("123zhang")的结果为123
2.提取字符串中的浮点数:parseFloat(); 例:parseFloat("0.55zhang")的结果为0.55
3.执行用字符串表示的一段JavaScript代码:eval(); 例:zhang=eval("1+1")的结果zhang=2

[MVC]AOP in Asp.net MVC

mikel阅读(928)

转载:http://www.cnblogs.com/me-sa/archive/2009/06/09/AopInAspNetMVC.html

不同的观点,开拓迥然不同的世界.

Another point of view can sometimes open up a whole new world.

                                                                                                —- HSBC

本文内容包括:

  1. SoC
  2. AOP
  3. AOP in ASP.NET
  4. AOP in ASP.NET MVC


SoC

Separation of concerns (SoC) is the process of breaking a computer program into distinct features that overlap in functionality as little as possible.

源文档 <http://en.wikipedia.org/wiki/Separation_of_concerns>

上面是维基百科中对SoC的定义,在不同的场景中Soc有着不同的含义

  • Soc是一个过程:SoC是一个将功能点分解以尽量减小功能交叉的过程.
  • SoC是软件开发的一个基本原则
  • SoC是一个指标:关注点的分离度


       SoC的实践体现在不同的编程模型(Programming paradigm),编程模型帮助开发者提高关注点分离度.过程化编程模型把关注点分解成多个过程.在面向对象编程中,关注点抽象为对象/.面向方面编程模型中,将关注点分解为多个"方面".

XOP 

        这里有一个非常有意思的思考,我们回顾一下上面三种编程模型的发展历程:面向过程编程模型是人们面对复杂问题的一种自然思路:功能分解.需求的不断变化,功能分解已经不足以应对变化,于是面向对象编程模型的最核心的方法论是抽象.通过在不同视角进行抽象,抽象之后概念视角和规约视角能够保证相对的稳定,具体实现的变化被隔离开.说到这里我们不厌其烦的再次回首面向对象设计原则:SRP原则和ISP原则.单一职责和接口隔离本质上就是在强调对变化的隔离.再具体一点,MVC设计模式也是在强调一种分离,只不过它的是把内容和展示做了分离.


AOP

Aspect-oriented programming (AOP) is a programming paradigm that increases modularity by enabling improved separation of concerns. This entails breaking down a program into distinct parts (so-called concerns, cohesive areas of functionality). All programming paradigms support some level of grouping and encapsulation of concerns into separate, independent entities by providing abstractions (e.g. procedures, modules, classes, methods) that can be used to implement, abstract and compose these concerns. But some concerns defy these forms of implementation and are called crosscutting concerns because they "cut across" multiple abstractions in a program.

源文档 <http://en.wikipedia.org/wiki/Aspect-oriented_programming>

上面的文字同样来自维基百科,我们来做细致解读:

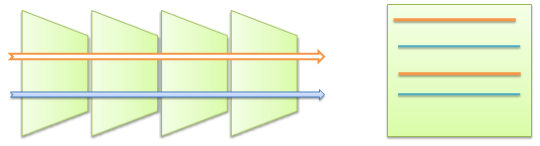
     OOP引入封装、继承和多态性等机制来建立一种对象层次结构.当我们需要为分散的对象引入公共行为的时候,00P则显得无能为力。一个典型的例子:日志功能。日志代码往往水平地散布在所有对象层次中.而与它所散布到的对象的核心功能毫无关系。对于其他类型的代码如权限检查、异常处理也是如此。这种散布在各处的无关的代码被称为横切(crosscutting)代码,在OOP设计中.它导致了大量代码的重复,而不利于各个模块的重用。本质上核心功能和权限检查之类的功能处于不同的维度,但是在实现的时候所有的代码都被平铺在同一个维度上了.简单看一下下面的示意图:

de  

      OOP解决横切代码的乏力,AOP将散落各处的却又重复的代码组织在一起,OOP工作的基础上进一步完成模块化.AOP解决这一问题的机制被称为"横切技术";横切技术实现有两种方式:一是采用动态代理技术,利用截取消息的方式.对该消息进行装饰,以取代原有对象行为的执行.二是采用静态织入的方式,引入特

定的语法创建“方面”.从而使得编译器可以在编译期间织入有关“方面”的代码通常将静态横切称为introduce


AOP in Asp.net

      AOP真的离我们很远么?举两个现实中Asp.net的例子:

  1. 我们要在用户访问若干页面的时候检查是否具有对该页面的权限
  2. 我们要为页面做内容的繁简体转换

     上面的两个问题你打算怎么解决?在每一个页面的Page_Load里面都做一下权限检查么?然后在页面事件的最后做一下繁简体转换?

   是的,我们的解决方法是做了HTTPModule.通过对用户请求的拦截,做权限检查.在页面输出到客户端之前获取控制权完成页面繁简体转换.我们发现这样做的好处是:1.对页面核心代码没有任何修改 2.控制灵活:一旦不需要做权限检查了,只需要注释掉Web.config对应的配置节就可以了.之所以能够获得这样的便利,本质上是因为我们做到了权限检查代码的模块化.我们将权限检查的功能和核心业务成功的分离开,而权限检查功能的切入方式就是通过消息拦截.

    我们把HTTPMoudle理解为一种动态横切,Web应用程序生命周期中的特定事件就是Join point.HTTPModule中对特定事件的绑定就是PointCut,执行逻辑是Advice,一个HTTPModule代表一个Aspect.也许有学院派的朋友会不同意我的看法.我个人的看法是AOP是一种思想,这种思想还没有一个严格的定义,AOP需要更多的实践可能性来丰富,它不拘泥于AspectJ或者Aspect#.

    在享受HTTPMoudle便利的同时,我们也发现了这种方案的特点:应用程序生命周期中所暴露的事件就是可利用的Join Point,由于在应用程序级实施横切,横切功能的粒度是应用程序级的.我们思考的方向自然走到这里:Asp.net是不是可以有一个更细粒度的横切实践?嗯哼,ASP.NET MVC出现了.


AOP in ASP.NET MVC

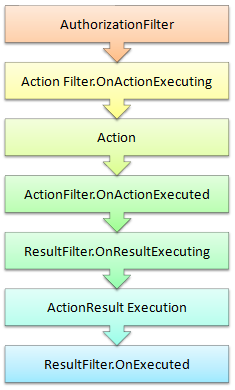
 上回书我们已经讨论过了Asp.netMVC生命周期,我们截取请求处理的其中一个片段,我们从ActionInvoker.InvokeAction方法开始讨论.基于上面对于AOP的思考,当我们再次审视下图的时候,呈现在我们面前的已经是一个个Join Point.下图中核心的代码执行逻辑是Action Execution–>ActionResult Execution –>View.Render.在这些核心功能的执行前后会成为我们的切入点,类似于应用程序事件的PrePost一样,我们看到了OnActionExecuting ,OnActionExecuted,OnResultExecuting,OnResultExecuted.

partlife 

    OutputCache是一个典型的方面应用,我们通过OutputCacheAttribute这样一个系统的默认实现来做具体分析:


  1/* ****************************************************************************
  2 *
  3 * Copyright (c) Microsoft Corporation. All rights reserved.
  4 *
  5 * This software is subject to the Microsoft Public License (Ms-PL). 
  6 * A copy of the license can be found in the license.htm file included 
  7 * in this distribution.
  8 *
  9 * You must not remove this notice, or any other, from this software.
 10 *
 11 * ***************************************************************************/

 12
 13namespace System.Web.Mvc {
 14    using System;
 15    using System.Diagnostics.CodeAnalysis;
 16    using System.Web;
 17    using System.Web.UI;
 18
 19    [SuppressMessage("Microsoft.Performance""CA1813:AvoidUnsealedAttributes",
 20        Justification = "Unsealed so that subclassed types can set properties in the default constructor.")]
 21    [AttributeUsage(AttributeTargets.Class | AttributeTargets.Method, Inherited = true, AllowMultiple = false)]
 22    public class OutputCacheAttribute : ActionFilterAttribute {
 23
 24        private OutputCacheParameters _cacheSettings = new OutputCacheParameters();
 25
 26        public string CacheProfile {
 27            get {
 28                return _cacheSettings.CacheProfile ?? String.Empty;
 29            }

 30            set {
 31                _cacheSettings.CacheProfile = value;
 32            }

 33        }

 34
 35        internal OutputCacheParameters CacheSettings {
 36            get {
 37                return _cacheSettings;
 38            }

 39        }

 40
 41        public int Duration {
 42            get {
 43                return _cacheSettings.Duration;
 44            }

 45            set {
 46                _cacheSettings.Duration = value;
 47            }

 48        }

 49
 50        public OutputCacheLocation Location {
 51            get {
 52                return _cacheSettings.Location;
 53            }

 54            set {
 55                _cacheSettings.Location = value;
 56            }

 57        }

 58
 59        public bool NoStore {
 60            get {
 61                return _cacheSettings.NoStore;
 62            }

 63            set {
 64                _cacheSettings.NoStore = value;
 65            }

 66        }

 67
 68        public string SQLDependency {
 69            get {
 70                return _cacheSettings.SQLDependency ?? String.Empty;
 71            }

 72            set {
 73                _cacheSettings.SQLDependency = value;
 74            }

 75        }

 76
 77        public string VaryByContentEncoding {
 78            get {
 79                return _cacheSettings.VaryByContentEncoding ?? String.Empty;
 80            }

 81            set {
 82                _cacheSettings.VaryByContentEncoding = value;
 83            }

 84        }

 85
 86        public string VaryByCustom {
 87            get {
 88                return _cacheSettings.VaryByCustom ?? String.Empty;
 89            }

 90            set {
 91                _cacheSettings.VaryByCustom = value;
 92            }

 93        }

 94
 95        public string VaryByHeader {
 96            get {
 97                return _cacheSettings.VaryByHeader ?? String.Empty;
 98            }

 99            set {
100                _cacheSettings.VaryByHeader = value;
101            }

102        }

103
104        [SuppressMessage("Microsoft.Naming""CA1704:IdentifiersShouldBeSpelledCorrectly", MessageId = "Param",
105            Justification = "Matches the @ OutputCache page directive.")]
106        public string VaryByParam {
107            get {
108                return _cacheSettings.VaryByParam ?? String.Empty;
109            }

110            set {
111                _cacheSettings.VaryByParam = value;
112            }

113        }

114
115        public override void OnResultExecuting(ResultExecutingContext filterContext) {
116            if (filterContext == null{
117                throw new ArgumentNullException("filterContext");
118            }

119
120            // we need to call ProcessRequest() since there's no other way to set the Page.Response intrinsic
121            OutputCachedPage page = new OutputCachedPage(_cacheSettings);
122            page.ProcessRequest(HttpContext.Current);
123        }

124
125        private sealed class OutputCachedPage : Page {
126            private OutputCacheParameters _cacheSettings;
127
128            public OutputCachedPage(OutputCacheParameters cacheSettings) {
129                // Tracing requires Page IDs to be unique.
130                ID = Guid.NewGuid().ToString();
131                _cacheSettings = cacheSettings;
132            }

133
134            protected override void FrameworkInitialize() {
135                // when you put the <%@ OutputCache %> directive on a page, the generated code calls InitOutputCache() from here
136                base.FrameworkInitialize();
137                InitOutputCache(_cacheSettings);
138            }

139        }

140
141    }

142}

143


下面对OutputCacheAttribute的特点做一个归纳:

  1.  OuputCache标签是应用在Controller级别上的,由于一个Controller可以对应多个View,所以它的粒度介于应用程序级和页面级之间
  2.  OuputCache标签是静态引入到Controller,在编译时完成OutputCache的引入而非运行时,是一种静态横切的实现
  3. OuputCache标签的执行的PointCut是OnResultExecuting
  4. OutputCacheAttribute的继承关系是:OutputCacheAttribute —–> ActionFilterAttribute—–>  FilterAttribute, IActionFilter, IResultFilter

我们今天的主角出现了,看一下ActionFilterAttribute的代码:


 1/* ****************************************************************************
 2 *
 3 * Copyright (c) Microsoft Corporation. All rights reserved.
 4 *
 5 * This software is subject to the Microsoft Public License (Ms-PL). 
 6 * A copy of the license can be found in the license.htm file included 
 7 * in this distribution.
 8 *
 9 * You must not remove this notice, or any other, from this software.
10 *
11 * ***************************************************************************/

12
13namespace System.Web.Mvc {
14    using System;
15
16    [AttributeUsage(AttributeTargets.Class | AttributeTargets.Method, Inherited = true, AllowMultiple = false)]
17    public abstract class ActionFilterAttribute : FilterAttribute, IActionFilter, IResultFilter {
18
19        // The OnXxx() methods are virtual rather than abstract so that a developer need override
20        // only the ones that interest him.
21
22        public virtual void OnActionExecuting(ActionExecutingContext filterContext) {
23        }

24
25        public virtual void OnActionExecuted(ActionExecutedContext filterContext) {
26        }

27
28        public virtual void OnResultExecuting(ResultExecutingContext filterContext) {
29        }

30
31        public virtual void OnResultExecuted(ResultExecutedContext filterContext) {
32        }

33    }

34}

35


   ActionFilterAttribute定义的实际上定义了四个PoinCut,可以看到这四个pointCut是虚方法,注释里面解释了这样做的缘由:可以按照需要来重写感兴趣的方法,就是编写Advice代码了;Asp.net HTTPModule实现本质上是读HTTP请求的拦截,而在Asp.net框架中通过ActionFilterAttribute定义了PointCut,从而创建了更多扩展的机会.除此之外,Asp.net MVC框架还提供了AuthorizeAttribute,HandleErrorAttribute等等常规"方面"默认实现,我们同样可以进行扩展.

    比较一下Asp.netAsp.netMVCAOP实现上的不同:


Asp.net

Asp.net MVC

AOP粒度

应用程序级

灵活的粒度控制

AOP实现方法

动态横切

静态横切


      Asp.net MVC继承了Asp.net的优良传统,同时Asp.net MVC框架承诺的更灵活,扩展性更好在这里有一个更好的体现.当我们耐心的做一下比较,我们发现这不是一句空话,而今天我们看到的灵活性和扩展性,也仅仅是一个"方面"而已.

[Flex]Flex与.NET互操作(十三):FluorineFx.Net实现视频录制与视频回放

mikel阅读(831)

      本文主要介绍使用FluorineFx.Net来实现视频录制与视频回放,FluorineFx如同FMS一样,除了有AMF通 信,RTMP协议,RPC和远程共享对象外,它同样具备视频流服务的功能。通过它我们可以非常方便的实现在线视频录制、视频直播、视频聊天以及视频会议等 类似应用程序的开发。

      在《FMS3系列(四):在线视频录制、视频回放 》这篇文章里我写了通过FMS来实现在线视频录制和视频回放的功能,客户端的开发和这篇文章是相同的,不同的是本文将使用Flex来开发。

      首先我们来看看使用FluorineFx服务端是如何开发的,建立ApplicationAdapter是必然的,这里我们为本文中的 示例程序建立的ApplicationAdapter为VideoApplication,并为其添加RemotingServiceAttribute 如下代码块:

namespace Fx.Adapter
{
    
/// <summary>
    
/// 视频应用
    
/// </summary>
    [RemotingService]
    
public class VideoApplication : ApplicationAdapter
    {
        
public override bool AppStart(IScope application)
        {

            
return base.AppStart(application);
        }
        
public override bool AppConnect(IConnection connection, object[] parameters)
        {
            
return base.AppConnect(connection, parameters);
        }
    }
}


      ApplicationAdapter模板所提供的方法在实际项目开发中根据自己的需求去重写,这里不作过多介绍。光是这样还是不能实 现视频的录制和回放的功能,这只是实现了基本的启动应用程序和客户端连接等基本功能,要想实现视频录制和回放,我们还得让 VideoApplication实现IStreamService接口,该接口提供了实现视频发布和播放的相应功能,其定义如下:

namespace FluorineFx.Messaging.Api.Stream
{
    [CLSCompliant(
false)]
    
public interface IStreamService : IScopeService, IService
    {
        
void closeStream();
        
int createStream();
        
void deleteStream(int streamId);
        
void deleteStream(IStreamCapableConnection connection, int streamId);
        
void pause(bool pausePlayback, double position);
        
void play(bool dontStop);
        
void play(string name);
        
void play(string name, double start);
        
void play(string name, double start, double length);
        
void play(string name, double start, double length, bool flushPlaylist);
        
void publish(bool dontStop);
        
void publish(string name);
        
void publish(string name, string mode);
        
void receiveAudio(bool receive);
        
void receiveVideo(bool receive);
        
void releaseStream(string streamName);
        
void seek(double position);
    }
}


      OK,有了应用处理器接下来在FluorineFx网站的apps中添加应用程序(VideoApp),并配置好由此处理器来处理视频录制和回放。

<?xml version="1.0" encoding="utf-8"?>
<configuration>
    
<application-handler type="Fx.Adapter.VideoApplication"/>
</configuration>


      要使用RTMP协议,那么配置RTMP通信信道肯定是不能少的,在配置文件WEB-INF/flex/service-config.xml中配置使用RTMP协议的通信信道。

?xml version="1.0" encoding="utf-8" ?>
<services-config>
  
<channels>
    
<channel-definition id="my-rtmp" class="mx.messaging.channels.RTMPChannel">
      
<endpoint uri="rtmp://{server.name}:1617" class="flex.messaging.endpoints.RTMPEndpoint"/>
    
</channel-definition>
  
</channels>
</services-config>


       于此FluorineFx服务器端“基本”算是完成了。下面转到客户端的开发,建立Flex项目并设计好界面,如下图:            
            

      建立与FluorineFx服务器上应用程序的连接,连接成功则将自己的视频数据显示到界面上,如下实现代码:

private function connectionServer(event:MouseEvent):void
{
    nc 
= new NetConnection();
    nc.connect(
"rtmp://localhost:1617/VideoRecord","beniao","123456");
    nc.addEventListener(NetStatusEvent.NET_STATUS,onNetStautsHandler);
    nc.client 
= this;
}
private function onNetStautsHandler(event:NetStatusEvent):void
{
    
if(event.info.code == "NetConnection.Connect.Success")
    {
        cam 
= Camera.getCamera();
        
if(cam != null)
        {
            
this.myVideo.attachCamera(cam);
        }
        
else
        {
            Alert.yesLabel 
= "确定";
            Alert.show(
"没有检测到视频摄像头","系统提示");
        }
    }
}


      录制视频也就是将自己本机的视频摄像头获取的视频数据以及音频设备的数据附加到网络流(NetStream),使用网络流的publish()方法将流发布到服务器上,这和使用FMS是相同的。

private function onRecordVideo(event:MouseEvent):void
{
    
if(this.nc)
    {
        var mic:Microphone 
= Microphone.getMicrophone();
        ns 
= new NetStream(this.nc);
        ns.attachCamera(cam);
        ns.attachAudio(mic);
        ns.client 
= this;
        ns.publish(
this.videoName.text,"record");
        
        
this.btnStart.enabled = false;
        
this.btnEnd.enabled = true;                
    }
}
private function onStopRecord(event:MouseEvent):void
{
    
if(this.nc)
    {
        
this.nc.close();
        
this.btnStart.enabled = true;
        
this.btnEnd.enabled = false;
        
this.btnPlay.enabled = true;
    }
}


      停止视频录制的功能就更加简单了,直接断开当前客户端与服务器端的连接就可以,使用网络连接(NetConnection)的close()方法。 


     录制好的视频将会保存在网站下的apps/VideoApp/stream目录中,如下图:                              


      实现录制的视频回放实际上就是播放服务器上的一个.flv视频文件,同样需要先建立与服务器端的网络连接,通过网络流去加载指定的视频文件,最后将其显示到应用界面上。

private function onPlayVideo(event:MouseEvent):void
{
    nc 
= new NetConnection();
    nc.connect(
"rtmp://localhost:1617/VideoRecord","beniao","123456");
    nc.addEventListener(NetStatusEvent.NET_STATUS,onPlayNetStautsHandler);
    nc.client 
= this;
}
private function onPlayNetStautsHandler(event:NetStatusEvent):void
{
    
if(event.info.code == "NetConnection.Connect.Success")
    {
        ns 
= new NetStream(this.nc);
        ns.client 
= this;
        var video:Video 
= new Video();
        video.width 
= 320;
        video.height 
= 240;
        video.attachNetStream(
this.ns);
        
this.myVideo.addChild(video);
        
this.ns.play(this.videoName.text);
    }
}


      到此就完成了使用FluorineFx.Net来实现视频录制和回放的功能,接下来我们来看看FluorineFx对发布录制视频流以 及实况视频流的安全方面是怎么处理的。FluorineFx.Messaging.Api.Stream.IStreamPublishSecurity 接口就是专门用来处理发布流是的安全处理的,如果要对发布流进行安全方面的处理,那么就自定义一个实现该接口的安全策略类,在策略类里根据自己的实际情况 来处理安全设置。

      通过该安全策略类可以很方便的判断发布流的类型、流的名称以及对发布流进行授权等相关操作。如下安全策略类:


namespace Fx.Adapter
{
    
public class PublishSecurity : IStreamPublishSecurity
    {
        
public bool IsPublishAllowed(IScope scope, string name, string mode)
        {
            
//是否为录制流
            if (!"record".Equals(mode))
            {
                
return false;
            }
            
//文件名是否以test开头
            if (!name.StartsWith("test"))
                
return false;
            
else
                
return true;
        }
    }
}


      在应用处理程序里通过ApplicationAdapter提供的RegisterStreamPublishSecurity()方法注册安全策略,该方法的定义如下所示:

public void RegisterStreamPublishSecurity(IStreamPublishSecurity handler); 


      要注册发布流的安全策略,通常都是在应用程序启动中注册,如下代码块:

public override bool AppStart(IScope application)
{
    RegisterStreamPublishSecurity(
new PublishSecurity());
    
return base.AppStart(application);
}


      通过RegisterStreamPublishSecurity()方法注册好发布流的安全策略后,每次发布流都会通过自定义的安全 策略来检测当前发布流是否符合自定义的安全规则。这样一方便可以保证别人恶意连接到你的应用程序进行流的发布,消耗网络带宽等多中不利现象,更多的好处还 待研究。

本文示例程序下载: FluorineFxVideo.rar


版权说明

  本文属原创文章,欢迎转载,其版权归作者和博客园共有。  

  作      者:Beniao

 文章出处:http://beniao.cnblogs.com/  或  http://www.cnblogs.com/


[MVC]Asp.net MVC 示例项目"Suteki.Shop"分析之---结束篇

mikel阅读(750)

     到今天,这个系列的文章就要先告一段落了。其中我用了10篇文章也没有穷尽该项目的设计思想,只能从
中捡了一些我感兴趣的东西进行了分析和说明,正所谓兴趣是最大的动力。当然限于本人水平有限,难免有一
些认识上的错误,也希望大家在回复中与我进行交流。

    下面把一些还未穷尽的内容做一下罗列,以备感兴趣的朋友继续品味。
   
    1.项目中使用了“Rhino.Mocks”,有对单元测试和这个项目感兴趣的朋友可以通过测试代码研究一下。
   
    2.在下面三个文件夹下有大量的辅助类和扩展方法,其中有些代码大家可以很容易的移植到自己的项目中:
   
      Suteki.Common\HtmlHelpers
      Suteki.Common\UI
      Suteki.Shop\HtmlHelpers
     
    3.项目中使用了MvcContrib和MvcContrib.Castle,因为未对视图"View"(Suteki.Shop\Views)进行分析,
      所以就未详细说明。

    好了,完成这个系列之后,我要偃旗息鼓一段时间来处理个人的事情了。如果大家有什么问题,我可能不会
马上解释,望见谅!   

   
    最后希望ASP.NET MVC 的优秀项目越来越多,给我们提供更多有价值的参考,望 MVC 一路走好。
   
    下面是这个系列全部文章链接:
    
    Asp.net MVC 示例项目"Suteki.Shop"分析之—安装篇   
    Asp.net MVC 示例项目"Suteki.Shop"分析之—Controller 
    Asp.net MVC 示例项目"Suteki.Shop"分析之—Filter      
    Asp.net MVC 示例项目"Suteki.Shop"分析之—数据验证
    Asp.net MVC 示例项目"Suteki.Shop"分析之—ModelBinder
    Asp.net MVC 示例项目"Suteki.Shop"分析之—ViewData
    Asp.net MVC 示例项目"Suteki.Shop"分析之—Model和Service
    ASP.NET MVC 示例项目"Suteki.Shop"分析之—IOC(控制反转)
    Asp.net MVC 示例项目"Suteki.Shop"分析之—NVelocity模版引擎
    Asp.net MVC 示例项目"Suteki.Shop"分析之—NHibernate

    作者: daizhj,代震军,LaoD

    Tags: mvc,Suteki.Shop

    网址: http://daizhj.cnblogs.com/

    原文链接:http://www.cnblogs.com/daizhj/archive/2009/06/09/1494194.html