[转载]android开发我的新浪微博客户端-登录页面UI篇(4.1) – 遇见未知的自己 – 博客园.
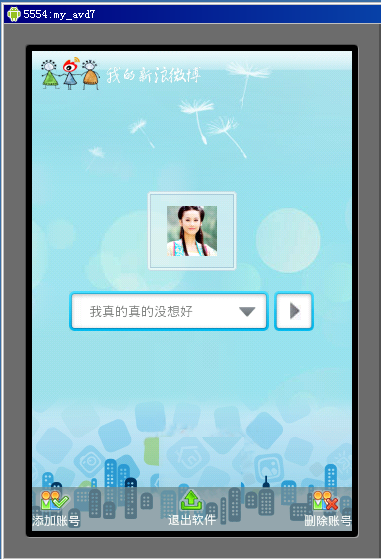
首先回顾一下功能流程当用户开启软件显示载入页面时程序首先去SQLite库查询是否已经保存有用户的新浪微博的UserID号、Access Token、Access Secret的记录如果没有一条记录那么跳转到用户授权功能页面,这个已经由上面两篇文章实现了,如果有记录那么页面跳转到用户登录页面,也就是本篇以及 下篇要实现的功能,本篇讲UI的实现,本项目支持多微博账号了,也就是用户可以设置多个微博账号,登录的时候选择其中的一个登录,具体效果如上图,新建名 LoginActivity.java的Activity并且在AndroidManifest.xml中进行相应配置,这个页面就是我们要实现的用户登 录页面。
看上面的效果,首先页面分3部分实现,背景部分、底部菜单部分、用户选择以及头像显示部分,首先在res/layout的目录下新建名为login.xml的layout,然后根据页面显示要求编写如下的布局控制:

 代码
代码
<LinearLayout
xmlns:Android=”http://schemas.android.com/apk/res/android”
android:id=”@+id/layout”
android:orientation=”vertical”
android:layout_width=”fill_parent”
android:layout_height=”fill_parent”>
<ImageView
android:layout_width=”wrap_content”
android:layout_height=”wrap_content”
android:src=”@drawable/logo_s”
android:layout_marginTop=”5dip”
android:layout_marginLeft=”5dip”>
</ImageView>
<RelativeLayout
android:layout_width=”fill_parent”
android:layout_height=”fill_parent”>
<RelativeLayout
android:id=”@+id/iconBtn”
android:layout_width=”90px”
android:layout_height=”80px”
android:background=”@drawable/icon_selector”
android:layout_above=”@+id/selectLayout”
android:layout_centerHorizontal=”true”
android:layout_marginBottom=”20dip”>
<ImageView
android:id=”@+id/icon”
android:layout_width=”wrap_content”
android:layout_height=”wrap_content”
android:layout_centerInParent=”true”>
</ImageView>
</RelativeLayout> <RelativeLayout
android:id=”@+id/selectLayout”
android:layout_width=”wrap_content”
android:layout_height=”wrap_content”
android:layout_centerInParent=”true”>
<EditText
android:id=”@+id/iconSelect”
android:layout_width=”200px”
android:layout_height=”wrap_content”
android:maxLength=”10″
android:paddingLeft=”20px”
android:editable=”false”
android:enabled=”false”
android:textSize=”13px”
android:background=”@drawable/input_over” >
</EditText>
<ImageButton
android:id=”@+id/iconSelectBtn”
android:layout_width=”wrap_content”
android:layout_height=”wrap_content”
android:layout_marginRight=”1.0dip”
android:layout_alignTop=”@+id/iconSelect”
android:layout_alignRight=”@+id/iconSelect”
android:layout_alignBottom=”@+id/iconSelect”
android:background=”@drawable/more_selector” >
</ImageButton>
<ImageButton
android:id=”@+id/login”
android:layout_width=”40px”
android:layout_height=”40px”
android:layout_marginLeft=”5dip”
android:layout_alignTop=”@+id/iconSelectBtn”
android:layout_toRightOf=”@+id/iconSelectBtn”
android:layout_alignBottom=”@+id/iconSelectBtn”
android:background=”@drawable/btn_in_selector” >
</ImageButton>
</RelativeLayout> <RelativeLayout
android:layout_width=”fill_parent”
android:layout_height=”44dip”
android:layout_alignParentBottom=”true”
android:background=”#BB768e95″>
<LinearLayout
android:id=”@+id/addLayout”
android:layout_width=”wrap_content”
android:layout_height=”wrap_content”
android:orientation=”vertical”
android:layout_alignParentLeft=”true”
android:gravity=”center”
android:layout_marginTop=”3px”>
<ImageButton
android:id=”@+id/addIcon”
android:layout_width=”wrap_content”
android:layout_height=”wrap_content”
android:background=”@drawable/add_selector”>
</ImageButton>
<TextView
android:layout_width=”wrap_content”
android:layout_height=”wrap_content”
android:textColor=”#ffffff”
android:textSize=”12px”
android:text=”添加账号”>
</TextView>
</LinearLayout>
<LinearLayout
android:id=”@+id/exitLayout”
android:layout_width=”wrap_content”
android:layout_height=”wrap_content”
android:orientation=”vertical”
android:layout_centerInParent=”true”
android:gravity=”center”
android:layout_marginTop=”3px”>
<ImageButton
android:id=”@+id/exitIcon”
android:layout_width=”wrap_content”
android:layout_height=”wrap_content”
android:background=”@drawable/exit_selector”>
</ImageButton>
<TextView
android:layout_width=”wrap_content”
android:layout_height=”wrap_content”
android:textColor=”#ffffff”
android:textSize=”12px”
android:text=”退出软件”>
</TextView>
</LinearLayout>
<LinearLayout
android:id=”@+id/delLayout”
android:layout_width=”wrap_content”
android:layout_height=”wrap_content”
android:orientation=”vertical”
android:layout_alignParentRight=”true”
android:gravity=”center”
android:layout_marginTop=”3px”>
<ImageButton
android:id=”@+id/delIcon”
android:layout_width=”wrap_content”
android:layout_height=”wrap_content”
android:background=”@drawable/del_selector”>
</ImageButton>
<TextView
android:layout_width=”wrap_content”
android:layout_height=”wrap_content”
android:textColor=”#ffffff”
android:textSize=”12px”
android:text=”删除账号”>
</TextView>
</LinearLayout>
</RelativeLayout>
</RelativeLayout>
</LinearLayout>
正对上面的login.xml的layout进行一下说明,背景部分前面已经讲过了这里也就不重复。
底部菜单实现,原本我是采用GridView实现的非常的方便但是后来由于显示位置不好控制改成了用RelativeLayout和LinearLayout嵌套的方式,实现的比较土但是达到了显示需求,首先是一个最外面的RelativeLayout目的是用来实现底部对齐显示,并且把这个RelativeLayout的背景设置为浅蓝色半透明的效果,关键这2行:android:layout_alignParentBottom=”true”和android:background=”#BB768e95″。然后是在RelativeLayout内部添加3个LinearLayout分别是用来显示添加账号、退出软件、删除账号3个功能按钮菜单,并且分别设置为左对齐、居中对齐、右对齐,3个LinearLayout都设置为垂直布局android:orientation=”vertical”,然后每LinearLayout添加相应的图片和文字。
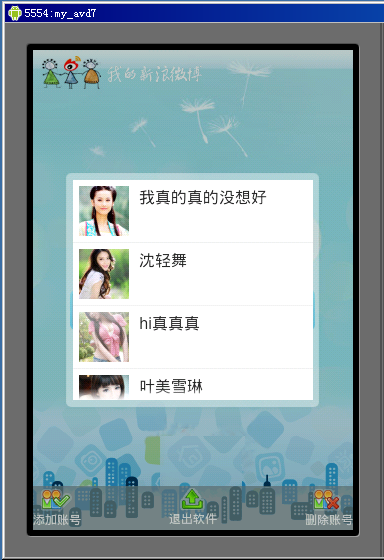
用户选择以及头像显示部分,这块分成3小块,用来显示用户头像的ImageView、用来显示用户名字并且点击可以出现选择列表的EditText、用来 点击进入当前选择用户首页的功能按钮ImageButton,这3小块的布局实现也是采用elativeLayout和LinearLayout相互嵌套 配合的方式实现的具体参考login.xml。这里重点说说这个账号选择列表弹出窗口的实现,当点击下拉箭头按钮的时候弹出并显示,这个是用Dialog 控件实现,首先准备好圆角的半透明背景图mask_bg.png然后添加到res/drawable-mdpi文件夹下,接着自定义一个Dialog样式 文件,在res/values目录下新建名为dialogStyles2.xml的resources文件,在用户授权验证页面的时候我们也自定义过类似 的Dialog的样式,具体解释可以参考前面的户授权验证页面功能,内容如下:
代码
<resources>
<style name=”dialog2″ parent=”@android:style/Theme.Dialog”>
<item name=”android:windowFrame”>@null</item>
<item name=”android:windowIsFloating”>true</item>
<item name=”android:windowIsTranslucent”>false</item>
<item name=”android:windowNoTitle”>true</item>
<item name=”android:windowBackground”>@drawable/mask_bg</item>
<item name=”android:backgroundDimEnabled”>true</item>
</style>
</resources>
接下来还需要定义选择列表的layout,新建名为dialog2.xml的layout文件,内容如下:
代码
<LinearLayout
xmlns:android=”http://schemas.android.com/apk/res/android”
android:layout_width=”wrap_content”
android:layout_height=”wrap_content”
android:orientation=”vertical”
android:padding=”4dip”>
<ListView
android:id=”@+id/list”
android:layout_width=”240px”
android:layout_height=”220px”
android:divider=”#f1f2f2″
android:dividerHeight=”1px”
android:layout_margin=”5px”
android:background=”#ffffff”
android:cacheColorHint=”#00000000″>
</ListView>
</LinearLayout>
完成了layout和样式文件的编写,接下来就是把dialogStyles2.xml样式文件和dialog2.xml的列表layout用起来,当点击id为iconSelectBtn的ImageButton时显示用户选择窗口,在LoginActivity的onCreate方法中添加如下代码:
代码
super.onCreate(savedInstanceState);
setContentView(R.layout.login);
LinearLayout layout
=(LinearLayout)findViewById(R.id.layout);//背景自动适应
AndroidHelper.AutoBackground(this, layout, R.drawable.bg_v, R.drawable.bg_h);
ImageButton iconSelectBtn
=(ImageButton)findViewById(R.id.iconSelectBtn);iconSelectBtn.setOnClickListener(new OnClickListener(){
@Override
public void onClick(View v) {
View diaView=View.inflate(LoginActivity.this, R.layout.dialog2, null);
dialog=new Dialog(LoginActivity.this,R.style.dialog2);
dialog.setContentView(diaView);
dialog.show();
……
}
});
到这里登录的UI部分就实现的差不多了,剩下的都是一些功能部分代码用来实现从SQLite中账号列表的获取,以及点击选择等交互操作等,这些在下一篇中来继续的讲。