C#净化版WebApi框架 – kiba518 – 博客园
- ASP.NET
- 2022-05-26
- 99热度
- 0评论
来源: C#净化版WebApi框架 - kiba518 - 博客园
前言
我们都知道WebApi是依赖于Asp.Net MVC的HttpRouteCollection进行路由 。
但WebApi和MVC之间是没有依赖关系的, WebApi的基类ApiController继承于IHttpController,而MVC的基类Controller 继承于IController。
WebApi和MVC虽然都使用HttpRouteCollection进行路由,但WebApi经历的通道是ServicesContainer,而MVC经历通道还是原始的IHttpModule。
但用Visual Studio创建的MVC WebApi项目通常会带很多功能,而这些功能,很多是我们并不想用的,或者我们想用其他开源控件代替它。
而直接创建空项目的WebApi又太原始。
所以,让我们编写一个简洁版本的WebApi吧。
净化版WebApi预览
首先,我们先看下净化版WebApi的结构。
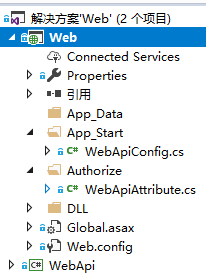
如上图所示,代码结构很简单,除开配置文件,整个Web项目只有2个文件;而需要被调用的WebApi都被封装到了WebApi程序集中了。
接下来我们一起看下编写这个净化版WebApi的过程吧。
净化版WebApi编写
WebApiConfig
首先,引入必要的Dll,如下图所示。
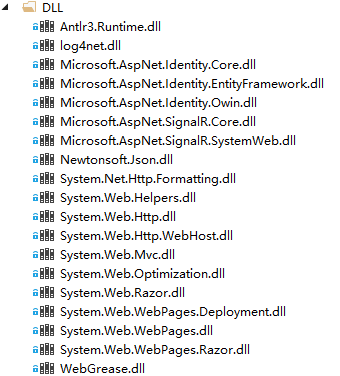
然后,我们编写Web项目的写WebApiConfig;代码如下:
|
1
2
3
4
5
6
7
8
9
10
11
12
13
14
15
16
17
18
|
public static class WebApiConfig{ public static void Register(HttpConfiguration config) { config.Filters.Add(new WebApiAttribute()); // 解决json序列化时的循环引用问题 config.Formatters.JsonFormatter.SerializerSettings.ReferenceLoopHandling = Newtonsoft.Json.ReferenceLoopHandling.Ignore; // 对 JSON 数据使用混合大小写。跟属性名同样的大小.输出 config.Formatters.JsonFormatter.SerializerSettings.ContractResolver = new DefaultContractResolver(); // Web API 路由 config.MapHttpAttributeRoutes(); config.Routes.MapHttpRoute( name: "DefaultApi", routeTemplate: "webapi/{controller}/{id}", defaults: new { id = RouteParameter.Optional } ); }} |
可以看到WebApiConfig是个静态类中,我们在其中创建了静态注册方法Register,在方法内,我们主要在做一件事,那就是为HttpConfiguration对象做配置。
而在配置中,我们将WepApi的路由配置成了webapi/{controller}/{id},也就是说,我们的WebApi未来的访问地址将为【http://localhost:5180/webapi/Login】这样的模式。
在WebApiConfig类中,我们还用到了这样一个类WebApiAttribute,我们在为HttpConfiguration对象的Filters属性,添加了这个类的对象。
通过Filters属性这个字样,我们可以得出,这个类主要应用应该是过滤。
下面我们看一下这个类的代码:
|
1
2
3
4
5
6
7
8
9
10
11
12
13
14
15
16
17
18
19
20
21
22
23
|
[AttributeUsage(AttributeTargets.Method | AttributeTargets.Class, Inherited = true, AllowMultiple = true)]public class WebApiAttribute : ActionFilterAttribute{ public override void OnActionExecuting(HttpActionContext actionContext) { //API执行前触发 if (true)//当前设置,所有API都可以被调用 { base.OnActionExecuting(actionContext); } else { throw new Exception("Error"); } } public override void OnActionExecuted(HttpActionExecutedContext actionExecutedContext) { //API执行后触发 若发生例外则不在这边处理 if (actionExecutedContext.Exception != null) return; base.OnActionExecuted(actionExecutedContext); }} |
通过阅读代码,我们应该可以发现,这是一个AOP的过滤器。
在执行真正WebApi之前,会先进入这里进行过滤,过滤通过的API,才会调用 base.OnActionExecuting(actionContext)方法进行调用和执行。
结束调用同理,结束调用前,会在该类中进行拦截和过滤处理。
配置文件
WebApiConfig编写结束了,现在,我们需要将这个静态类注册到项目中。
打开Global.asax文件,编写如下代码:
|
1
2
3
4
5
|
protected void Application_Start(){ GlobalConfiguration.Configure(WebApiConfig.Register); GlobalConfiguration.Configuration.Formatters.XmlFormatter.SupportedMediaTypes.Clear();//删除XML格式 回應} |
可以看到,我们已通过Configure方法,将我们编写好的WebApiConfig添加到了全局配置中了。
因为网站访问都存在跨域问题,所以我们再向Global.asax中添加如下代码处理:
|
1
2
3
4
5
6
7
8
9
10
|
protected void Application_BeginRequest(object sender, System.EventArgs e){ var req = System.Web.HttpContext.Current.Request; if (req.HttpMethod == "OPTIONS")//过滤options请求,用于js跨域 { Response.StatusCode = 200; Response.SubStatusCode = 200; Response.End(); }} |
到此Web项目的编写就完成了,下面我们在WebApi程序集中,编写个简单的WebApi,代码如下:
|
1
2
3
4
5
6
7
8
9
10
11
12
13
14
15
16
17
18
19
20
21
|
public class LoginController : BaseApiController{ public BaseResult Get() { try { return new BaseResult() { IsSuccess=true }; } catch (Exception ex) { throw ex; } }<br>}public class BaseApiController : ApiController{ public string Options() { return null; }} |
然后我们运行网站,进行WebApi访问。

如上图所示,我们的WebApi访问成功。
----------------------------------------------------------------------------------------------------
到此C#净化版WebApi框架就介绍完了。
框架代码已经传到Github上了,欢迎大家下载。
Github地址:https://github.com/kiba518/WebApi
----------------------------------------------------------------------------------------------------