Vue3 目前已经趋于稳定,不少代码库都已经开始使用它,很多项目未来也必然要迁移至Vue3。本文记录我在使用Vue3时遇到的一些问题,希望能为其他开发者提供帮助。
1. 使用reactive封装基础数据类型
传统开发模式中,数据声明很简单。但是在Vue中有多个响应式变量声明方式,整体的使用规则如下:
使用reactive来封装Object,Array,Map,Set数据类型;
使用ref封装String,Number,Boolean类型。
如果使用reactive来封装基础数据类型,会产生警告,同时封装的值不会成为响应式对象。
<script setup>
import { reactive } from "vue";
const count = reactive(0);
</script>
但是,可以使用ref来封装Object、Array等数据类型,内部会调用reactive。
2. 解构reactive对象
下面代码中,count封装成了reactive对象,点击按钮时,count会自增。
<template>
  Counter: {{ state.count }}
  <button @click="add">Increase</button>
 </template>


 <script>
 import { reactive } from "vue";
 export default {
  setup() {
   const state = reactive({ count: 0 });


   function add() {
    state.count++;
   }

   return {
    state,
    add,
   };
  },
 };
 </script>
如果需要使用ES6结构赋值对state进行结构,需要使用如下的代码:
<template>
  <div>Counter: {{ count }}</div>
  <button @click="add">Increase</button>
</template>

<script>
import { reactive } from "vue";
export default {
  setup() {
    const state = reactive({ count: 0 });

    function add() {
      state.count++;
    }

    return {
      ...state,
      add,
    };
  },
};
</script>
结构复制完成之后,点击按钮,效果如下:
代码看起来比较相似,而且根据以前的表现,逻辑是可以正常执行的。但事实上,Vue的响应式追踪通过属性获取,这意味着我们不能去解构响应式对象,会导致引用连接丢失。这是响应式代理的限制之一。
3. 使用.value造成的困惑
Ref接受一个值并返回一个响应式对象,该值只有在内部对象.value属性下可用。
const count = ref(0)

 console.log(count) // { value: 0 }
 console.log(count.value) // 0

 count.value++
 console.log(count.value) // 1
但是ref如果应用在template中,不需要对ref进行解包,也就是不需要使用.vue。
<script setup>
import { ref } from 'vue'

const count = ref(0)

function increment() {
  count.value++
}
</script>

<template>
  <button @click="increment">
    {{ count }} // 不需要调用.value
  </button>
</template>
需要注意的是,解包只作用于一级属性,下边的代码会返回[object Object]
<script setup>
import { ref } from 'vue'
const object = { foo: ref(1) }
</script>
<template>
  {{ object.foo + 1 }}  // [object Object]
</template>
正确使用.value需要时间,初学者偶尔会忘记它。在使用时,要注意只在合适的场景下使用它。
4. Emitted事件
从Vue发布以来,子组件可以通过emits与父组件通信,只需要添加一个自定义的监听器来监听事件即可。
this.$emit('my-event')
<my-component @my-event="doSomething" />
Vue3中,需要使用编译器宏defineEmits来声明emits。
const emit = defineEmits(['my-event'])
 emit('my-event')
 </script>
在setup语法糖下,defineEmits和defineProps会被自动引入。其它情况下,需要主动引入。
<script setup>
const props = defineProps({
  foo: String
})

const emit = defineEmits(['change', 'delete'])
// setup code
</script>
最后,由于Vue3中,事件必须声明,因此再需要使用.native修饰符,该修饰符已被移除。
5.声明组件选项
setup不支持如下组件选项声明:
- name
- inheritAttrs
- customOptions
如果需要继续使用这些属性,可以声明多个script脚本,如下所示:
<script>
  export default {
    name: 'CustomName',
    inheritAttrs: false,
    customOptions: {}
  }
</script>

<script setup>
  // script setup logic
</script>
6.使用Reactivity Transform
Reactivity Transform是Vue3中一个预览属性,有一定的争议性,默认是禁用的。它主要用来简化组件的声明方式。这个想法是利用编译时转换来自动解包ref,从而避免使用.value。从Vue3.3中已经删除该功能,作为一个扩展包提供。由于它不是Vue的核心部分,且目前风险还是比较多,建议先不要在此方面投入太多事件。感兴趣可以参考文章:Reactivity Transform
7. 定义异步组件
异步组件以前是通过将它们包含在方法中来声明的。
const asyncModal = () => import('./Modal.vue')
Vue3中需要使用defineAsyncComponent来声明异步组件。
import { defineAsyncComponent } from 'vue'
 const asyncModal = defineAsyncComponent(()
=> import('./Modal.vue'))
8. template中使用不必要的包装元素
<!-- Layout.vue -->
<template>
  <div>
    <header>...</header>
    <main>...</main>
    <footer>...</footer>
  </div>
</template>
Vue3中支持多个根元素,不再需要使用外层div元素包裹。
<template>
  <header>...</header>
  <main v-bind="$attrs">...</main>
  <footer>...</footer>
</template>
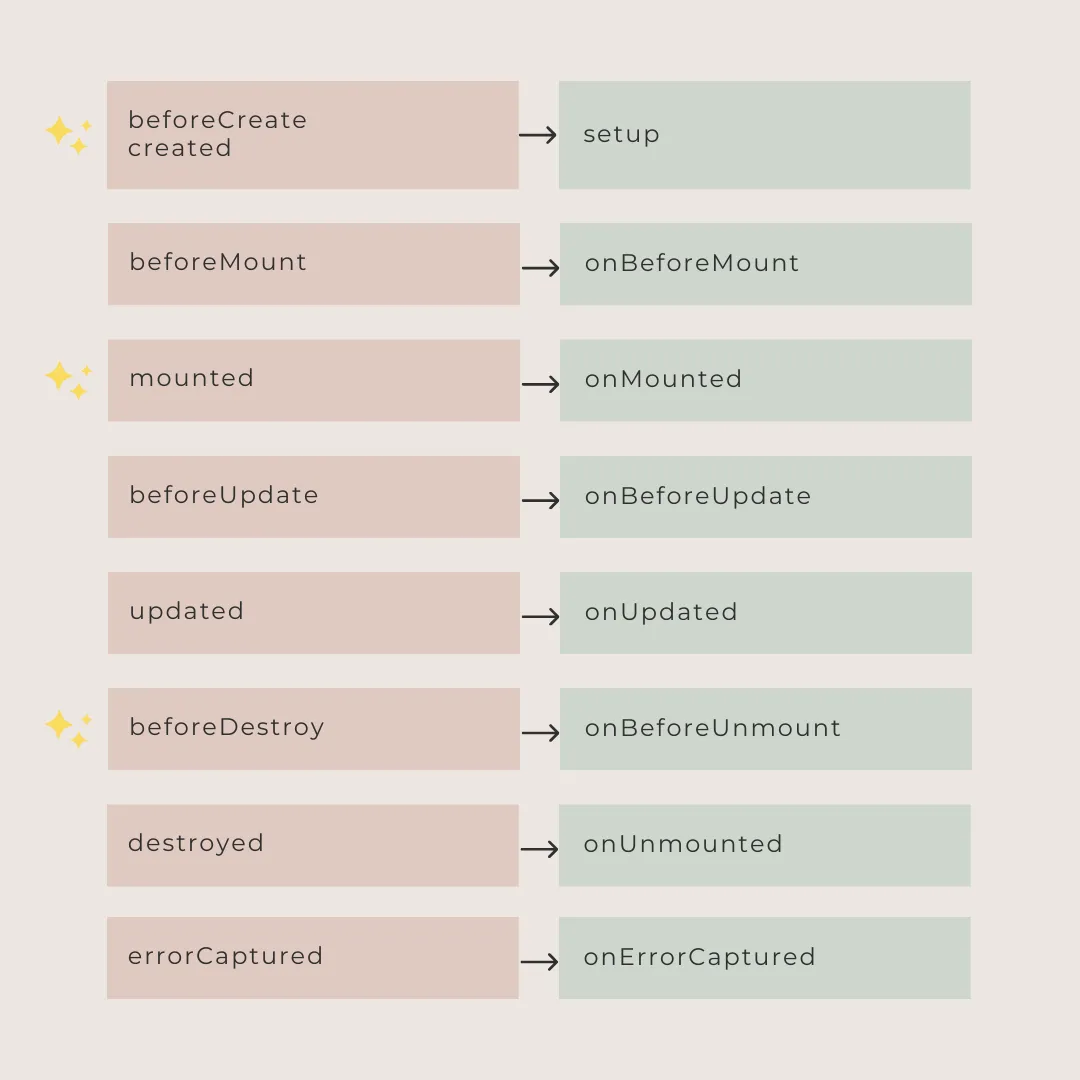
9. 生命周期函数
所有组件生命周期函数都通过添加on前缀或完全更名实现,下图详细列出了具体的变化:
10. 产品文档
官方对文档已经做了更新,补充更新了API,并包含很多有价值的注释、指南和最佳实践。即使你现在使用的是Vue2,通过阅读新的文档也会学到一些新知识。
总结
每个框架都有学习曲线,Vue3相对Vue2更加陡峭,在框架切换之间也会有一定的学习成本。但Vue3组合式API相对Vue2选项式API确实更加简洁易用。如果您在使用过程中有什么疑问,也欢迎留言交流。
本文翻译自文章:
https://fadamakis.com/10-mistakes-to-avoid-when-starting-with-vue-3-1d1ced8552ae
扩展链接: