What else is burried down in the depth’s of Google’s amazing JavaScript?
So the new GTalk interface in GMail is pretty rad. Congrats to Dan and the rest of the team that made it “go”.
The talk feature is cool not just from a UI perspective as the code is also chock full of little gems. I’m kind of a dork about low-latency data transport to the browser. HTTP wasn’t meant to be used this way…so of course I’m interested! Ever since Joyce got me involved in the rewrite of mod_pubsub I’ve had my eye on the various ways that servers can push data to browsers and the kinds of technology that will prevent a server that’s doing this from melting down (hellooooooooo Twisted). Using just what’s available to the browser, it’s possible to have the server push data encapsulated in <script> blocks and rely on a progressive rendering behavior that every modern browser implements to dispatch events in near real-time (compared to full page refresh or polling delay). There are a mountain of browser quirks that of course play into this process. The least desirable of these to the user are the “phantom click” and the “throbber of doom” that afflict IE users.
When a page (or an iframe it hosts) is loading content, your browser usually shows some sort of “I’m working” indicator. In the bottom “taskbar” there is usually some sort of progress meter. In the upper right (on IE) the “throbber” will continue to animate until the work is done. Of course in the scenario I’m describing the sent page is never done. The whole point is that the server keeps the connection open. Combine this with the IE behavior of producing a “click” like sound when an iframe is navigated to a different URL, and you’ve got a pretty poor user experience.
But couldn’t you do something with XMLHTTP? Short answer: yes, but not as portably and it won’t get you around IE’s 2-connection limit either so there’s not much of a win. For the long answer, see my talk at ETech or wait for me to post the slides. At the end of the day, the hidden <iframe> hack scales best and is the most portable. Especially if you can lick the UX problems.
Which Google has.
How? By cleverly abusing another safe-for-scripting ActiveX control in IE. Here’s the basic structure of the hack:
  // we were served from child.example.com but
// have already set document.domain to example.com
var currentDomain = "http://exmaple.com/";
var dataStreamUrl = currentDomain+"path/to/server.cgi";
var transferDoc = new ActiveXObject("htmlfile"); // !?!
// make sure it's really scriptable
transferDoc.open();
transferDoc.write("<html>");
transferDoc.write("<script>document.domain='"+currentDomain+"';</script>");
transferDoc.write("</html>");
transferDoc.close();
// set the iframe up to call the server for data
var ifrDiv = transferDoc.createElement("div");
transferDoc.appendChild(ifrDiv);
// start communicating
ifrDiv.innerHTML = "<iframe src='"+dataStreamUrl+"'></iframe>";
This is the kind of fundamental technique that is critical to making the next generation of interactive experiences a reality. Server tools like mod_pubsub and LivePage (and perhaps even JMS buses) are starting to come into their own and the benefits of event-driven IO are starting to become well understood by server-side devs. It’s only a matter of time before server-push data hits an inflection point in the same way that background single-request/single-response data transfer did with Ajax. Dojo will, of course, have infrastructure to support this kind of thing when the borader developer community is ready (most if it is already in place).
From long and painful experience and amazingly deep respect, I take my hat off and bow to whoever it was on the GMail/GTalk team that figured this out. It’s a hell of a hack. It’s no wonder that Google has been able to attract and develop the bestDHTMLhackersin theworld.
Update: so just to be *very* clear, I worked on the rewrite of the mod_pubsub *client*. The server rewrite was handled by some folks who are much smarter than I am.
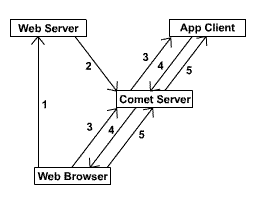
Web pages and ASP.NET are wonderful tools, but as the old proverb goes, "if all you have is a hammer, everything seems like a nail". ASP.NET is a web technology, all of which exists to serve up resources to Web Browsers which request them. That's great, and it works for the vast majority of things currently on the Internet. In fact, when people think of the Internet, they mostly associate it with the ubiquitous World Wide Web model or its HTTP protocol. But, what if we want more…what if instead of Web Browsers just requesting resources, we want to push information actively out to them, without being asked first? Examples of this include: live wiki's, polls, chat, stock tickers, real-time auctions, and games.
This is where the existing paradigm fails, and we have to fall back to older technologies, the roots on which the Internet is founded….yes, I'm talking about actual two-way communication, interactivity, *gasp* sockets, TCP/IP!
Taking a step back, web requests can roughly be compared to a student asking a teacher questions. However, only the student is allowed to ask questions, the teacher cannot actively prompt the student with facts. This article sets out one experimental approach to breaking that model. Most of the current solutions, collectively called "Comet", involve the Web Browser keeping an active HTTP connection to the Web Server, like a student always keeping the teacher's attention. Presented here is another aproach, utilizing a "side-channel", where the "teacher" (that's the Web Server) doesn't spend as much attention or resources responding to pesky questions (web requests), and we can push information out instead, or engage in a more interactive way.
Background
This article is inspired and partially based on the work and code by Alex MacCaw, the developer who created the Juggernaut extension to Ruby on Rails. But, why leave all the fun to those dynamic language people? Can't we have that in ASP.NET too? The answer is "yes we can".
How do we communicate with the Web Browser without it making a request first? One solution is to have the Web Browser keep open a socket connection directly to the server using a small light-weight Flash component.
What are the benefits of this aproach?
It consumes much less Web Server resources. We are not dedicating any Web Server threads to responding to a "long-polling" request.
It's simple and easy to implement.
Good cross-platform support (any modern Web Browser that supports Flash 8, e.g., IE, FireFox, Safari, Opera).
Lower latency, no re-establishing connections, or other HTTP protocol overheads.
And yes, it does have drawbacks:
We need to install something on the Web Server or the network domain to accept these socket connections.
The embedded Flash component making the connection to the Comet server will not work behind firewalls or proxies that block non-HTTP ports.
It needs Flash and JavaScript enabled on the Web Browser.
It's a hack (though the same thing could be said about many, now ubiquitous, Web Browser technologies).
Using the Code
Comet applications can be divided into two categories:
"Server-push" applications where the Web Server pushes out information on updates and changes based on user events, e.g., live wiki's, polls, chat etc.
"Interactive" applications where an external process pushes information to the web browser in response to an event, e.g., stock tickers, real-time auctions, games etc.
Server-push
The work flow for using Comet in a server-push scenario is:
The Web Browser requests a page from the Web Server, which includes the Flash Comet component, Comet JavaScript, and a unique authentication string.
The Web Server registers the Comet connection with the "Comet Server", specifying its channel, its authentication string, and any initial state.
The Web Browser opens a socket connection to the Comet Server, and sends its authentication string.
The Web Browser sends data to the Web Server using postbacks.
The Web Server responds to any postbacks or AJAX calls and publishes any updates to the Comet Server.
The Web Browser responds to any updates from its Comet connection.
Finally, the Web Browser receives the data published on the Web Server and executes it:
Collapse
guestbook_addComment = function(name, comment)
{
var commentsDiv = document.getElementById ("comments");
var e = document.createElement("blockquote");
e.innerHTML = comment + " - " + name + "";
commentsDiv.insertBefore (e, commentsDiv.firstChild);
}
Interactive
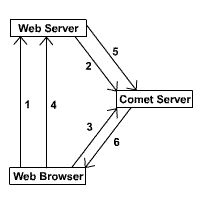
The interactive scenario is very similar, but instead of the Web Browser doing postbacks or AJAX calls to the Web Server, the Web Browser uses its Comet connection to send data directly to an Application Client and vice versa.
The work flow for using Comet in an interactive scenario is:
The Web Browser requests a page of the Web Server, which includes the Flash Comet component, Comet JavaScript, and a unique authentication string.
The Web Server registers the Comet connection with the "Comet Server", specifying its channel, its authentication string, and any initial state.
The Web Browser opens a socket connection to the Comet Server, and sends its authentication string, and the Comet Server tells any Application Clients whether a connection has been made on a channel they have subscribed to.
The Application Client sends data to the Comet Server, which passes it onto any Web Browser which has connected on that channel.
The Web Browser sends data to the Comet Server over its Comet connection, which passes it onto any Application Client which has subscribed to that channel.
The Web Browser code is still very similar, but now, instead of doing AJAX calls or postbacks, we can just send data to our actively listening Application Client over the Comet connection.
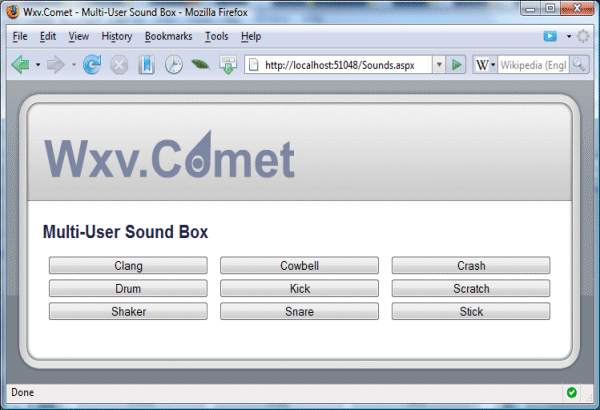
E.g.: in response to a button click in a "sound player" application:
Collapse
function sounds_click(soundId)
{
comet.send (soundId);
}
The Comet Server and Clients
The Comet Server is a simple event handling and messaging component that accepts two types of connections:
Comet connections from Web Browsers, these are always pre-registered and associated with a single channel.
Client connections from the Web Server, Comet Controls, or Client Applications.
It responds to the following Client events:
Register – A Client wants to allow a Web Browser to make a Comet connection.
Subscribe – A Client wants to listen to events on a specific channel.
Publish/Push – A Client wants to send data to an entire channel (Publish) or a specific Comet connection (Push).
It sends the following events to any Client that has subscribed to the related channel.
Connect – A Web Browser has successfully connected and authenticated with the Comet Server.
Disconnect – An authenticated Web Browser has disconnected from the Comet Server.
Send – A Web Browser has sent data to the Comet Server.
Both the Comet Server and the Client component, which Application Clients can be written with, are simple components. The Comet Server component is self-contained, the only interaction needed is to get it to start and stop, and it can be easily hosted in a Windows application, a Service, or even in the Web Server itself. Similarly, the Client is a simple component (which the CometControl already encapsulates) which exposes some simple methods and events (on a single thread) which can easily be extended to write your own Application Clients which can also be hosted in a variety of ways.
Summary
Web browsers opening socket connections to a server isn't actually that new. In their isolated little sandboxes, Java applets have been doing it since they were invented more then a decade ago, and Flash has had the capability for a while too. Microsoft's Silverlight will eventually be getting it in version 2.0. All that the Comet approaches are trying to do is get a similar capability directly within the web browser itself.
I've had fun with this project, exploring a Comet solution for ASP.NET. I don't pretend that it's anything more than it is, a toy project; so consume and eat it with a grain of salt (and credit me if it tastes nice). For this author however, it gave an interesting insight to what's possible.
Im a Software Developer working in Auckland, New Zealand. When i was a lot shorter, i started programming in Atari Basic, though these days its mostly C#, and a bit of java (mostly the caffinated kind).
This code is not production ready; it is designed to demonstrate a theoretical solution to using COMET in ASP.NET. This article covers the server-side implementation of COMET and how to combat the scalability problems. To demonstrate the client code, I will release a smaller article soon which demonstrates a small tic-tac-toe game using the COMET thread pooling mechanism I mention below, which should give you some idea about using it in a real world application.
Introduction
Over the past six months, I have been putting together an online chess application where players can register, login, and play chess in real-time. One of the obstacles I had to overcome was how to implement a real-time communication between the client and the server. For this to be successful, a number of factors need to be addressed:
Scalability – I wanted it to function in a load-balanced environment, and not consume huge amounts of server resources.
Compatibility – I wanted it to function with many different flavours of browsers, hopefully without the need for a plug-in.
Performance – I needed responses from players to be available to the opponents as soon as possible so I could manage time controls and provide a better experience.
Simplicity – I wanted to implement the communication layer without installing a third party server application. Mainly, so it would work on hosted environments such as www.discountASP.NET.
So, I evaluated up all of my options. My first prototype used a standard AJAX mechanism which polled the server; this created too much latency and too much traffic, so I quickly moved on from this. I researched other mechanisms of transport, such as using socket communication via a hidden Flash applet; this required a browser plug-in, and so I moved on. I then found the COMET idea, and thought, bingo, this is what I want to use, so I did some more research and built a prototype.
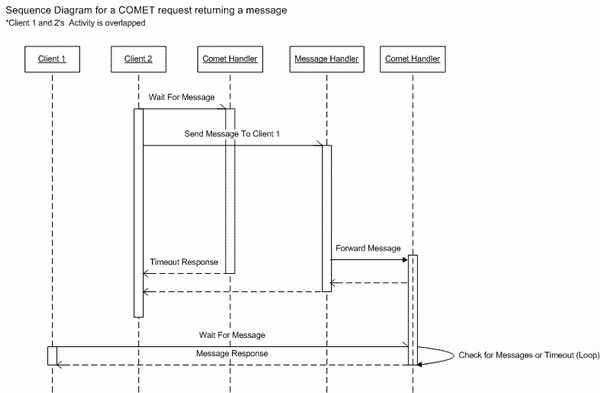
The idea behind COMET
COMET uses a persistent connection between the client (Web Browser, using XmlHttpRequest) and the server. This persistent connection is held open on the server for a predefined period of time (let's say, 5 seconds) and will only respond back to the client with either a timeout message, or when some part of the server's application logic wants to send a message. Once the client receives the message, it is processed using whatever application logic is implemented on the client. The persistent connection is then reopened, and the process starts again.
This mechanism solves the Performance requirement; it means that whenever a message is needed to be sent to the client, and if a persistent connection is open, the client should receive it with very little latency, almost instantly.
A second connection is used to send messages to the server; this connection is not persistent, and typically returns immediately after it is processed. From the point of view of a chess game, the persistent connection would be waiting for my opponent’s move, while the non-persistent connection would send my move.
Real world use implementation of COMET
So far, everything looks great on paper; we have a mechanism that can deliver messages to a browser in real-time without a plug-in, but in practice, this is much more difficult. Many articles that describe the features of using a persistent connection comment about how much of a "hack" this is. I tend to disagree with these statements.
It is true that COMET can run into issues when running on some browsers (mainly because HTTP imposes a two connection per browser, per host limitation). This limitation of the HTTP protocol was implemented to provide better performance for normal browsing over low bandwidth connections (e.g., dialup modems), and can cause performance issues when running COMET (there are ways around this!). This issue is only really noticeable in Internet Explorer (I think IE is strict with this standard up until IE8); Firefox 2 allows more connections, and manages them better, and Firefox 3 allows even more, meaning the future for COMET style applications is bright.
The second issue comes from the scalability of the technology, and this is mainly what this article is trying to remedy. This issue is present because the platforms lack the support for a COMET style protocol, and presently do not scale well when using persistent connections. I would say this is not a failure of the overall idea of COMET, rather a failure of the implementation of a specific COMET server.
Other developers have put together servers that sit in front of the platforms we develop on, these allow us to separate the COMET request mechanism from the web server, and allow the solution to scale by managing their own persistent connections. What I will demonstrate in this article is how you should not use COMET in ASP.NET, and the possible solution.
Load testing COMET
The major drawback with persistent connections to ASP.NET is that each connection consumes an ASP.NET worker thread for the five seconds that the connection is open. Therefore, each client that connects will hold a thread from the ASP.NET thread pool and, eventually, under load, the server will stop responding.
To demonstrate this, I put together a very simple application to simulate persistent connections to an ASP.NET application, with a handler that holds the requests open for 5 seconds before returning to the client:
Collapse
publicclass CometSyncHandler : IHttpHandler
{
#region IHttpHandler Members
publicbool IsReusable
{
get { returntrue; }
}
publicvoid ProcessRequest(HttpContext context)
{
int workerAvailable = 0;
int completionPortAvailable = 0;
ThreadPool.GetAvailableThreads(out workerAvailable,
out completionPortAvailable);
Debug.WriteLine("CometSyncHandler.ProcessRequest Start");
Debug.WriteLine(string.Format("Worker Threads Available: {0}",
workerAvailable));
Debug.WriteLine(string.Format("Completion Port Threads Available: {0}",
completionPortAvailable));
DateTime now = DateTime.Now;
while (true)
{
Thread.Sleep(50);
if (DateTime.Now.Subtract(now).TotalSeconds >= 5)
break;
}
Debug.WriteLine("CometSyncHandler.ProcessRequest End");
}
#endregion
}
This handler is very simple, it holds the execution of the request up to for 5 seconds, then returns. This simulates a COMET request that would eventually timeout and return the client.
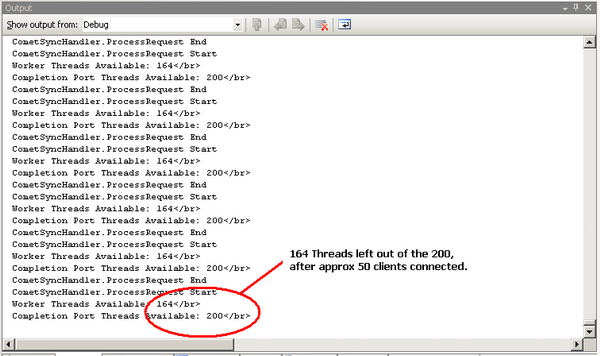
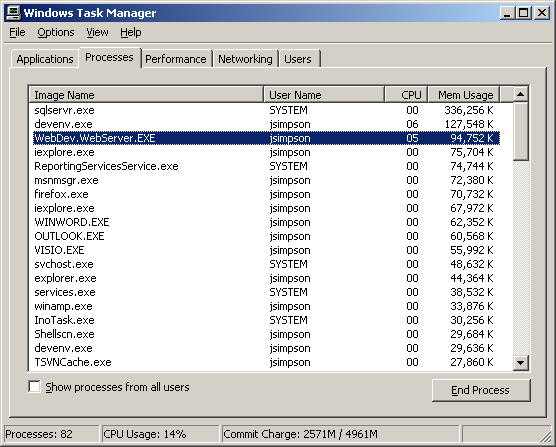
I also wrote a console application that ramps up WebRequest calls to the CometSyncHandler handler. The results were pretty much as expected; each client used an ASP.NET worker thread, and eventually after 40 or so connections, the website started to underperform, and page requests started to respond very slowly.
The screenshot below shows this happening:
I ramped up approximately 50 connections with two instances of the CometClientSimulator application, and as the website performance dropped, it started to drop connections from the simulator. To repeat this test, you can open and Debug the CometAsync website, which would open default.aspx and set everything running, then open an instance of the CometClientSimulator console application and type addsyncclients; this will then ramp up 25 clients, adding one every two seconds into the ASP.NET application.
Clearly, this is no good for any real world application, so I did some digging and devised a solution.
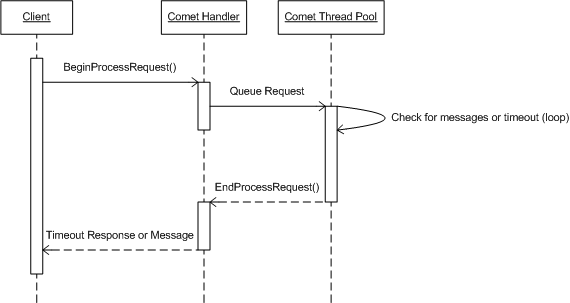
IHttpAsyncHandler
This is the first part of the solution. This little piece of magic allows us to run code asynchronously on the web server when we service a request to a handler. If you are not familiar with IAsyncHttpHandler, then read my brief explanation of how it works below:
IHttpAsyncHandler exposes two main methods that require implementation; these are BeginProcessRequest and EndProcessRequest. The general idea behind this is we service the start of our request in BeginProcessRequest; we then hand execution off to some sort of asynchronous method, e.g., Database Query Execution, or indeed any asynchronous .NET method. The asynchronous method completes, and then the response to the client is processed in EndProcessRequest.
The sequence diagram below shows how this would work:
CometThreadPool
The sequence diagram above introduces a custom thread pool for servicing the COMET requests that sits around on the server. This is required because we don't want ASP.NET to use one of its threads while waiting around for a COMET request to timeout.
The code for this pooling mechanism is located in the website in the CometAsync folder. It contains the following files:
CometAsyncHandler – This is the IHttpAsyncHandler implementation.
CometAsyncResult – This is a custom IAsyncResult implementation that contains the state of a COMET asynchronous operation.
CometThreadPool – This is a static class that manages the COMET thread pool.
CometWaitRequest – This is an object that represents the request from the client. These are queued to be processed in the custom thread pool.
CometWaitThread – This is a thread that processes CometWaitRequest objects from the queue.
This implementation works by first creating a set of background CometWaitThread objects that each contain a single thread that processes the CometWaitRequest queue items. In our web application, we would initialize the thread pool in Application_Start in the global.asax file.
Collapse
protectedvoid Application_Start(object sender, EventArgs e)
{
//// queue 5 threads to run// the comet requests
CometThreadPool.CreateThreads(5);
}
This fires up five threads that idle along in the background, waiting for CometWaitRequest instances to service.
Our CometAsyncHandler than waits for requests from the client; its responsibility is to queue the requests in the thread pool.
Collapse
public IAsyncResult BeginProcessRequest(HttpContext context,
AsyncCallback cb, object extraData)
{
int workerAvailable = 0;
int completionPortAvailable = 0;
ThreadPool.GetAvailableThreads(out workerAvailable,
out completionPortAvailable);
Debug.WriteLine(
string.Format(
"BeginProcessRequest: {0} {1} out of {2}/{3} ({4} Requests Active)",
Thread.CurrentThread.IsThreadPoolThread,
Thread.CurrentThread.ManagedThreadId,
workerAvailable,
completionPortAvailable,
CometWaitRequest.RequestCount));
// get the result here
CometAsyncResult result =
new CometAsyncResult(context, cb, extraData);
result.BeginWaitRequest();
// ok, return itreturn result;
}
The BeginProcessRequest outputs some Debug information so we can keep track exactly of what threads are available, and then creates an instance of a CometAsyncResult class that tracks the HttpContext and is used to return to ASP.NET to indicate it has started an asynchronous process. Before returning, it calls BeginWaitRequest, which adds the request into the thread pool.
This code creates a new instance of the CometWaitRequest object and queues it in the thread pool.
Collapse
internalstaticvoid QueueCometWaitRequest(CometWaitRequest request)
{
CometWaitThread waitThread;
lock (state)
{
// else, get the next wait thread
waitThread = waitThreads[nextWaitThread];
// cycle the thread that we want
nextWaitThread++;
if (nextWaitThread == maxWaitThreads)
nextWaitThread = 0;
CometWaitRequest.RequestCount++;
}
// queue the wait request
waitThread.QueueCometWaitRequest(request);
}
This logic picks a CometWaitThread to assign the CometWaitRequest to, based on a round robin approach (e.g., if thread 1 received the previous request, thread 2 will receive the second).
The request is added into an internal list of CometWaitRequest objects in the chosen thread.
At this point, the CometAsyncHandler has returned the ASP.NET thread to the pool, and is waiting for the CometWaitThread to complete the asynchronous process so it can complete the client's request. Our CometWaitThread code looks like this:
Collapse
privatevoid QueueCometWaitRequest_WaitCallback()
{
// here we are...// in a loopwhile (true)
{
CometWaitRequest[] processRequest;
lock (this.state)
{
processRequest = waitRequests.ToArray();
}
Thread.Sleep(100);
for (int i = 0; i < processRequest.Length; i++)
{
// timed out so remove from the queueif (DateTime.Now.Subtract
(processRequest[i].DateTimeAdded).TotalSeconds >= 5)
{
//// queue anotehr wait callback, so// we tell close handler down// the endRequest will exist on a // different thread to this// one and not tear down this thread
processRequest[i].Result.ResponseObject =
this.CheckForServerPushEvent(processRequest[i], true);
this.QueueCometWaitRequest_Finished(processRequest[i]);
}
else
{
object serverPushEvent =
this.CheckForServerPushEvent(processRequest[i], false);
if (serverPushEvent != null)
{
// we have our event, which is good// it means we can serialize it back to the client
processRequest[i].Result.ResponseObject =
serverPushEvent;
// queue the response on another // ASP.NET Worker threadthis.QueueCometWaitRequest_Finished
(processRequest[i]);
// dequeue the request
DequeueCometWaitRequest(processRequest[i]);
}
}
Thread.Sleep(100);
}
}
}
The QueueCometWaitRequest_WaitCallback is the entry point for this thread, and was started way back in Application_Start. It has been cycling around in a loop, waiting for a CometWaitRequest item to appear in its queue; once a client requests the CometAsyncHandler handler, one will be present.
It processes each item in the queue in a sequenced order in each loop iteration, e.g., if there were three requests pending, it would check request 1, 2, then 3, then continue the loop and process request 1, 2, and 3 again. This ensures that each request is processed as soon as possible without having to wait for a previous request to finish its 5 second timeout.
The loop checks to see if the CometWaitRequest has been in the queue for longer than the predefined timeout (in this case, 5 seconds); otherwise, it checks to see if there is an event waiting to be sent back to the client. If either case is true, it completes the CometWaitRequest, returning the desired response object, and then removes it from the queue.
Collapse
privatevoid QueueCometWaitRequest_WaitCallback()
{
.
.
// queue the response on another ASP.NET Worker threadthis.QueueCometWaitRequest_Finished(processRequest[i]);
// dequeue the request
DequeueCometWaitRequest(processRequest[i]);
.
.
}
.
.
privatevoid QueueCometWaitRequest_Finished(object target)
{
CometWaitRequest request = target as CometWaitRequest;
request.Result.SetCompleted();
}
.
.
The QueueCometWaitRequest_Finished method completes the asynchronous operation by calling SetCompleted on the CometAsyncResult object, which then calls the callback delegate in the CometAsyncResult which is pointing to EndProcessRequest on the CometAsyncHandler. The following code is then executed:
Collapse
publicvoid EndProcessRequest(IAsyncResult result)
{
int workerAvailable = 0;
int completionPortAvailable = 0;
ThreadPool.GetAvailableThreads(
out workerAvailable, out completionPortAvailable);
Debug.WriteLine(string.Format("EndProcessRequest: {0} {1}" +
" out of {2}/{3} ({4} Requests Active)",
Thread.CurrentThread.IsThreadPoolThread,
Thread.CurrentThread.ManagedThreadId,
workerAvailable,
completionPortAvailable,
CometWaitRequest.RequestCount));
CometAsyncResult cometAsyncResult = result as CometAsyncResult;
if (cometAsyncResult != null &&
cometAsyncResult.ResponseObject != null)
{
DataContractJsonSerializer serializer =
new DataContractJsonSerializer(
cometAsyncResult.ResponseObject.GetType());
serializer.WriteObject(
cometAsyncResult.HttpContext.Response.OutputStream,
cometAsyncResult.ResponseObject);
}
cometAsyncResult.HttpContext.Response.End();
}
This method responds to the client by serializing whatever response object we set in the completion into the response stream of the request's HttpContext.
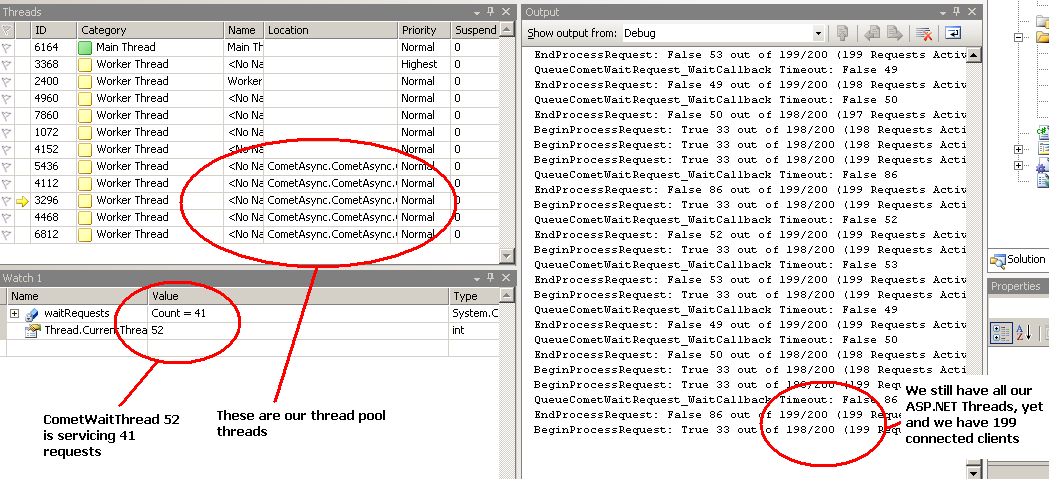
One thing to mention here is what threads are actually doing the processing of the request. When it arrives in BeginProcessRequest, it is an ASP.NET worker process that is executing, and when the CometWaitThread has completed, either with a timeout or a message, the EndProcessRequest method is executed on one of the CometThreadPool threads, meaning that ASP.NET has only used one of its thread pool thread for the initialization of the COMET request, the remaining 5 seconds were processed without an ASP.NET thread.
We can see that in action in the following screenshot:
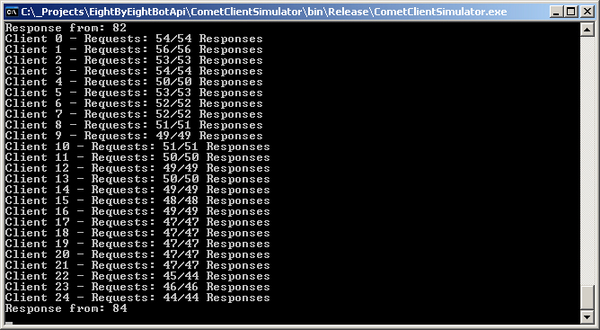
At this point, it is also worth mentioning that the response from the website is very good, considering there are 200 persisted connections, and the CPU/memory usage for the box is good (it is also running the clients).
To also double check everything is working smoothly, I log a counter for each request and response pair to ensure that each request is met with a response. The screenshot below shows this output from running the test with 200 clients for five minutes:
This shows that all the requests were complete successfully, (apart from 1, but I put that down to a small race condition in the shutdown code, you can see it completes after!).
Conclusion
By implementing a custom thread pool, we can leverage a COMET mechanism in our ASP.NET server code without implementing a custom server, or even implementing any complicated messaging routines, just a simple thread pool to manage multiple requests (e.g., we had five threads managing all 200 COMET requests).
Using the code
The website project CometAsync will execute and provide a default.aspx page that lists the amount of available threads available to ASP.NET when that request executes.
The CometClientSimulator application will simulate the client connections; it should be executed as follows:
Collapse
CometClientSimulator [websitehost]
websitehost = the host name of the website CometSync app is running e.g. http://localhost:2251
I am currently using a similar engine on my chess website, but it is undergoing vigorous testing right now. By the way, if anyone’s interested in playing chess on there and wants to help out with the testing, drop me an email at imebgo@gmail.com. Thanks!
If you have read my previous article Scalable COMET Combined with ASP.NET, then you should understand what I was trying to achieve. I explained COMET and how to get the best scalable performance from ASP.NET; however, I think the previous article was a little too close to the wire. It demonstrated the technique well enough, but did not really contain any useful code. So, I thought I would write an API that wrapped up the functionality of the previous article into a neat set of classes that can be included in a typical web project, giving you the opportunity to leverage (and test) the idea.
I'm not going to go into much detail about the threading model, because it is pretty much covered in the previous article; I'm just going to cover the API and how to use it in your web applications.
I decided I would write a lightweight messaging API that is similar to the Bayeux protocol in the way it exchanges messages; however, it is not an implementation of this protocol as I believe it was overkill for what was required to get this API to work, and it is also only a draft.
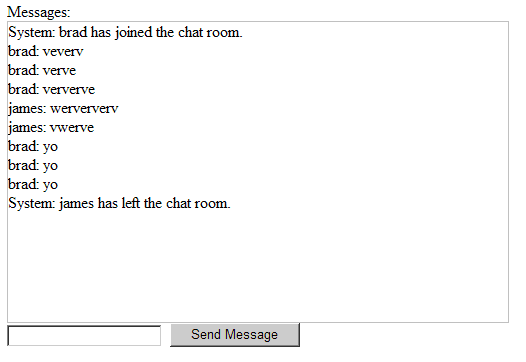
My original article stated I would put together a Tic-Tac-Toe game; unfortunately, I figured the idea would be easier demonstrated with a simple chat application. The application uses a COMET channel to receive messages, and a WCF service to send messages.
The basic chat application
Glossary of Terms
Below is a list of terms that I use in this document, and what they are meant to describe:
Channel – This is an end point that a COMET client can connect to. Any messages sent to the client must be delivered through a channel.
Timeout – This is when a client has been connected to a channel for a predefined amount of time and no messages have been received. A client can reconnect when they "timeout".
Idle Client – This is the time frame that a client has not been connected to the server, an idle client will be disconnected after a predefined time.
Message – A JSON message that is sent through a channel to a client.
Subscribed – A client that is subscribed to a channel. They are connected and ready to receive messages.
The Core Project
The core project contains all the classes required to enable COMET in your ASP.NET application. The code is very close in design to the code in the original article, but I have extended the functionality to enable the transmission of generic messages between the clients and the server.
The main class that controls the COMET mechanism is CometStateManager. This class manages a single channel within your application. This class aggregates an ICometStateProvider instance that manages the state in a particular way for your application. In the API, there is a built-in InProcCometStateProvider implementation that stores the state within the server's memory. Obviously, this is no good for load balanced environments, but one could implement a custom provider that uses a DB, or a custom state server.
To expose your channel to the outside world, it needs to be wrapped up in an IHttpAsyncHandler implementation. I actually attempted to use the asynchronous model within WCF, but found that it did not release the ASP.NET worker threads the same way as the asynchronous handler, which is a bit of a shame, and totally unexpected.
The code below demonstrates how you would setup an IHttpAsyncHandler to provide an end point for your COMET channel:
publicclass DefaultChannelHandler : IHttpAsyncHandler
{
// this is our state manager that // will manage our connected clientsprivatestatic CometStateManager stateManager;
static DefaultChannelHandler()
{
// initialize the state manager
stateManager = new CometStateManager(
new InProcCometStateProvider());
}
#region IHttpAsyncHandler Members
public IAsyncResult BeginProcessRequest
(HttpContext context, AsyncCallback cb, object extraData)
{
return stateManager.BeginSubscribe(context, cb, extraData);
}
publicvoid EndProcessRequest(IAsyncResult result)
{
stateManager.EndSubscribe(result);
}
#endregion#region IHttpHandler Members
publicbool IsReusable
{
get { returntrue; }
}
publicvoid ProcessRequest(HttpContext context)
{
thrownew NotImplementedException();
}
publicstatic CometStateManager StateManager
{
get { return stateManager; }
}
#endregion
}
The above code is pretty simple. We have a static instance of our CometStateManager that is constructed with an implementation of ICometStateProvider. In this example, we use the built-in InProcCometStateProvider implementation.
The rest of the implementation of the class simply maps the BeginProcessRequest and EndProcessRequest methods to the BeginSubscribe and EndSubscribe methods of our CometStateManager instance.
We also need the entry in the web.config file that enables the handler.
That's it, the channel is now ready to be subscribed to by a client.
The CometClient Class
The channel needs to keep track of clients, each client is represented in some sort of cache by an instance of the CometClient class. We don't want any old client connecting to the server or subscribing to channels without some sort of authentication, so we would implement an authentication mechanism, maybe a standard ASP.NET login form, or possibly a WCF call to a service that can validate some credentials and then initialize a client in our channel.
The code below shows the login action of the default.aspx file in the included chat application:
protectedvoid Login_Click(object sender, EventArgs e)
{
try
{
DefaultChannelHandler.StateManager.InitializeClient(
this.username.Text, this.username.Text, this.username.Text, 5, 5);
Response.Redirect("chat.aspx?username="
+ this.username.Text);
}
catch (CometException ce)
{
if (ce.MessageId == CometException.CometClientAlreadyExists)
{
// ok the comet client already exists, so we should really show// an error message to the userthis.errorMessage.Text =
"User is already logged into the chat application.";
}
}
}
We are not validating a password or anything, we are simply taking the username directly from the page and using that to identify our client. A COMET client has two tokens that are supplied by the consumer of the API:
PrivateToken – This is the token which is private to the client, the token that is used to subscribe to messages for that client.
PublicToken – This is the token which is used to identify the client to other clients. This is typically used when sending messages to a specific client.
The reason why we use a public and private token is because the private token can be used to subscribe to a channel and receive messages for that user. We don't want any other client to be able to do that apart from the original client (e.g., we don't want the messages spoofed!). Because of this reason, we use the public token if we wanted to send messages between clients.
I have also included a DisplayName property on the client that can be used to store a username; this has been added just for simplicities sake.
To setup a client in the channel, you need to call InitializeClient. This is shown above. This method takes the following parameters:
publicToken – The public token of the client
privateToken – The private token of the client
displayName – The display name of the client
connectionTimeoutSeconds – The amount of seconds a connected client will wait for a message until it responds with a timeout message
connectionIdleSeconds – The amount of seconds the server will wait for a client to reconnect before it kills the idle client
In the above example, InitializeClient is called, specifying the username from the form as the publicToken, privateToken, and displayName. Although this is not very secure, it is good enough for the example. To make this more secure, I could have generated a GUID for the privateToken, and kept the public token as the username.
The InitializeClient call will then call through to the ICometStateProvider.InitializeClient with a newly initialized CometClient class, and expect it to store it in a cache.
With the CometClient now available in the channel, clients may subscribe to the channel using their privateToken.
To enable the client-side functionality, there is a WebResource located in the core project, Scripts/AspNetComet.js that contains all the JavaScript needed to subscribe to the channel (and a public domain JSON parser from here). To make things easier, I have included a static method on CometStateManager called RegisterAspNetCometScripts, which accepts a Page as a parameter and registers the script on that page.
With this call in place, we are free to use the very basic client-side API that is available to us. The example below is taken from chat.aspx in the web project, and shows how you can subscribe to a particular channel once a client has been initialized.
var defaultChannel = null;
function Connect()
{
if(defaultChannel == null)
{
defaultChannel =
new AspNetComet("/DefaultChannel.ashx",
"<%=this.Request["username"] %>",
"defaultChannel");
defaultChannel.addTimeoutHandler(TimeoutHandler);
defaultChannel.addFailureHandler(FailureHandler);
defaultChannel.addSuccessHandler(SuccessHandler);
defaultChannel.subscribe();
}
}
All the functionality for the client-side API is wrapped up in a JavaScript class called AspNetComet. An instance of this class is used to track the state of a connected client. All that is required to subscribe is the URL of the COMET end point handler, the privateToken of the CometClient, and an alias that is used to identify the channel on the client. Once we have constructed an instance of AspNetComet, we setup a bunch of handlers that are called at specific times during the COMET life cycle.
addTimeoutHandler – Adds a handler that is called when a client has waited for a predefined amount of time and no messages have been received.
addFailureHandler – Adds a handler that is called when a COMET call fails; examples of failures would be the COMET client is not recognised.
addSuccessHandler – Adds a handler that is called for every message that is sent to the client.
The following code shows the signatures of each handler method:
function SuccessHandler(privateToken, channelAlias, message)
{
// message.n - This is the message name// message.c - This is the message contents
}
function FailureHandler(privateToken, channelAlias, errorMessage)
{
}
function TimeoutHandler(privateToken, channelAlias)
{
}
The message parameter of the SuccessHandler is an instance of the CometMessage class. The code below shows the class and its JSON contract:
[DataContract(Name="cm")]
publicclass CometMessage
{
[DataMember(Name="mid")]
privatelong messageId;
[DataMember(Name="n")]
privatestring name;
[DataMember(Name="c")]
privateobject contents;
///<summary>/// Gets or Sets the MessageId, used to track /// which message the Client last received///</summary>publiclong MessageId
{
get { returnthis.messageId; }
set { this.messageId = value; }
}
///<summary>/// Gets or Sets the Content of the Message///</summary>publicobject Contents
{
get { returnthis.contents; }
set { this.contents = value; }
}
///<summary>/// Gets or Sets the error message if this is a failure///</summary>publicstring Name
{
get { returnthis.name; }
set { this.name = value; }
}
}
Sending a Message
In the chat web application, I have included an AJAX-enabled WCF web service that acts as the end point for the "Send Message" functionality of the chat application. The code below shows the client-side event handler for the click of the Send Message button:
function SendMessage()
{
var service = new ChatService();
service.SendMessage(
"<%=this.Request["username"] %>",
document.getElementById("message").value,
function()
{
document.getElementById("message").value = '';
},
function()
{
alert("Send failed");
});
}
The code constructs an instance of the ChatService client-side object that is created by the ASP.NET Web Service framework, then just calls the SendMessage method, passing over the privateToken of the client and their message.
The server code for SendMessage then takes the parameters, and writes a message to all the clients; the code below demonstrates this:
[OperationContract]
publicvoid SendMessage(string clientPrivateToken, string message)
{
ChatMessage chatMessage = new ChatMessage();
//// get who the message is from
CometClient cometClient =
DefaultChannelHandler.StateManager.GetCometClient(clientPrivateToken);
// get the display name
chatMessage.From = cometClient.DisplayName;
chatMessage.Message = message;
DefaultChannelHandler.StateManager.SendMessage(
"ChatMessage", chatMessage);
// Add your operation implementation herereturn;
}
This method looks up the CometClient from the private token, and then creates a ChatMessage object that is used as the content of the message that is sent to each connected client using the SendMessage method on the CometStateManager instance. This will trigger any connected client to the callback on the SuccessHandler method contained in chat.aspx, which writes the message to the chat area on the page.
The website included in the solution will execute without any configuration changes, then just connect a few clients to the application login using a desired username, and chat. Messages should be received in real-time, and appear instantly to each user.
Using the API will enable you to use a COMET style approach in your AJAX enabled applications. Using WCF can be handy for sending messages to the server, this is all neatly wrapped up for you automatically, then just callback to the connected clients on a COMET channel.

 bool uSEOOP = iWRType == 1;
 {
{
 HttpRuntime.ProcessRequestNoDemand(wr);
 }
}


 }
}