[C#]Db4o for .NET

mikel阅读(1519)

当你想要快速的开发系统原型,用于演示功能、探索需求、消除风险时,用db4o吧;
当你的程序的数据量不算特别大,而又想最快的提高开发速度时,用db4o吧;
当你不想在程序的可配置信息的存储、解析上花费时间时,用db4o吧;
当你不懂SQL也不想学SQL时,用db4o吧。

Db4o是对象数据库,有java和.net两个分支。这里没有sql,没有表,一切都是原生对象。官方网站对Db4o的描述是:
•完全原生于Java和.NET
•100% 面向对象, 抛开对象-关系映射
•为嵌入式应用优化
•开源,可以基于GPL协议免费使用

Db4o的使用十分简单,以本地数据库为例子:

(1)打开数据库
IObjectContainer ObjectContainer = Db4oFactory.OpenFile("data.yap");
这句话打开本地数据库data.yap,如果该文件不在,则自动创建数据库文件。
(2)关闭数据库
ObjectContainer.Close();
(3)查询对象
IList<YourClass> rlist = ObjectContainer.Query< YourClass >();
这句话查询数据库中全部的YourClass对象。
Db4o提供了多种对象查询方式,详情可见官方文档。
(4)Activate对象
默认从数据库提取的对象只有一定的深度,更深的被引用的对象为null,为了提取更深的对象,需要Activate已提取的对象:
ObjectContainer.Activate(YourObject, depth)
(4)储存/更新对象
ObjectContainer.Store(YourObject)
如果YourObject不是从数据库中通过查询获得的实例,则将YourObject及它所持有的对象,及持有的持有的……所有可达对象全部储存入数据库。
如果 YourObject是从数据库通过查询获得的实例,则更新YourObject的属性。默认不进行级联更新,你也可以设置级联更新,如:
 Db4objects.Db4o.Db4oFactory.Configure().ObjectClass(typeof(YourClass)).CascadeOnUpdate(true);
(5)删除对象
ObjectContainer.Delete(YourObject)

以上是最基本的操作,很快很敏捷。更多的操作可见官方文档。

我现在用最懒惰的方法在用db4o:设置一个Root Object,其它Objects都挂接在Root Object之下,程序启动时就从数据库中把第一个Root实例提取出来,把要用的对象都Activate出来,数据变动时就 Store(ObjectChanged)一下子。

Db4o官方网站http://www.db4o.com/
JackyXu 的博客有数篇关于db4o的笔记:http://www.cnblogs.com/JackyXu/
db4o 中的数据库重构: http://www.ibm.com/developerworks/cn/java/j-db4o3.html

[Flash]Linux下的Flash Player 10

mikel阅读(740)

Linux在Flash播放器领域终于成为了主流的操作系统了,Adobe今天发布了支持Linux的Adobe Flash Player 10,给Linux的多种媒体封装格式带来了极大的方便。在过去Linux在这个领域只能算是二流的成员,得不到Flash播放器的青睐,2007年Linux用户就是在其他主流平台使用Flash 9长达6个月之后,才迎来Linux版本。

   如今,当微软决定将Linux平台Silverlight技术推迟发布之后,Adobe给Linux平台带来了“平等”的播放器,并称“Flash播放 器已经占据了互联网桌面市场98%的份额”,同时,“80%的在线视频均采用Adobe的Flash技术”,而且在9个月之后,Flash9将占据互联网 桌面市场90%的份额。
  Flash Player 10是配合Adobe Creative Suite (CS) 4发布的客户端软件,提供了对Photoshop和Illustrator创建矢量绘图的支持,并支持2D和3D多种特效。
  Adobe反复强调他的“Open Screen Project”,在今年5月份他就提出这个计划,称他们将免费开放的文件格式和API,使得Flash可以在移动设备上和桌面市场一样被广泛使用。
  在Microsoft Silverlight 发布不久, mono小组就开始了linux下的Silverlight实现,名称叫Moonlight,代码olive,也就是在短短的一个月左右的时间,Moonlight已经可以运行。

  GNOME的创始人Miguel deIcaza称,Flash还不能在免费和开源软件社区大出风头,作为一个非盈利的组织,肯定担心Abobe在多媒体获得太多的控制权。他们已经开发了Flash的替代品Gnash,只使用免费授权的软件和编解码器。
  Flash 10 已经发布了支持Linux, Windows, 和 Macintosh平台的版本,支持Solaris的版本将在年底发布。同时Flash10还支持Adobe AIR。
  访问:多个平台的Flash10

[C#]等比例缩放图片

mikel阅读(880)

看到海东兄的按比例缩放图片 ,我就把我写的js版本的也拿出来show一下,哈哈!
js版本:
function resizeImage(obj, MaxW, MaxH)
{
 var imageObject = obj;
    var state = imageObject.readyState;
 if(state!='complete')
 {
        setTimeout("resizeImage("+imageObject+","+MaxW+","+MaxH+")",50);
  return;
    }
    var oldImage = new Image();
    oldImage.src = imageObject.src;
    var dW = oldImage.width;
    var dH = oldImage.height;
    if(dW>MaxW || dH>MaxH)
 {
        a = dW/MaxW; b = dH/MaxH;
        if( b>a ) a = b;
        dW = dW/a; dH = dH/a;
    }
    if(dW > 0 && dH > 0)
 {
        imageObject.width = dW;
  imageObject.height = dH;
 }
}
使用很简单:<img src="../pic.jpg" onload='resizeImage(this,60,90)> 就OK了;
注:等比例放缩的时候会出现抖动的情况,处理方法很简单,你在img的属性先设置它的widht和height,这样的话加载的时候绝对不会超过这个尺寸,等你js运行好之后就会调到你所规定的比例,绝对不会以下撑到很大。

同时也附上C#版本的
C#版本—海东兄 http://www.cnblogs.com/ghd258/archive/2005/11/07/270447.html
1/// <summary>
 2        /// 按比例缩放图片
 3        /// </summary>
 4        /// <param name="imgUrl">图片的路径</param>
 5        /// <param name="imgHeight">图片的高度</param>
 6        /// <param name="imgWidth">图片的宽度</param>
 7        /// <returns></returns>

 8        public static string GetImageSize(string imgUrl,int imgHeight,int imgWidth)
 9        {
10            string fileName = System.Web.HttpContext.Current.Server.MapPath(imgUrl);
11            string strResult = string.Empty;
12            if(System.IO.File.Exists(fileName) && imgHeight != 0 && imgWidth != 0)
13            {
14                decimal desWidth;decimal desHeight;                                            //目标宽高
15                System.Drawing.Image objImage = System.Drawing.Image.FromFile(fileName);
16                decimal radioAct = (decimal)objImage.Width/(decimal)objImage.Height;        //原始图片的宽高比
17                decimal radioLoc = (decimal)imgWidth/(decimal)imgHeight;                    //图片位的宽高比
18                if(radioAct > radioLoc)                                                        //原始图片比图片位宽
19                {        
20                    decimal dcmZoom = (decimal)imgWidth/(decimal)objImage.Width;
21                    desHeight = objImage.Height*dcmZoom;
22                    desWidth = imgWidth;
23                }

24                else
25                {
26                    decimal dcmZoom = (decimal)imgHeight/(decimal)objImage.Height;
27                    desWidth = objImage.Width*dcmZoom;
28                    desHeight = imgHeight;
29                }

30                objImage.Dispose();                //释放资源
31                strResult = "width=\"" + Convert.ToString((int)desWidth) + "\" height=\""
32                    + Convert.ToString((int)desHeight) + "\" ";
33            }

34            return strResult;
35        }

[MVC]ASP.NET MVC Beta版发布

mikel阅读(706)

一大早来看到了一个不好也不坏的消息,经过了漫长的从Preview 1到Preview 5的预览,好的是ASP.NET MVC终于发布Beta版了,坏的是UCenter.NET项目又得进行升级了。这次发布的Beta版本相对于ASP.NET MVC Preview 5来说,变化不是很大,主要包括:

1. 改变验证信息使其对最终用户更加友好

2. 在Controller中添加了Url属性,类型为UrlHelper

3. 重命名CompositeViewEngine为AutoViewEngine

4. 在IViewEngine中新添加了ReleaseView方法

5. 移除了HtmlHelper中的大多数方法,变为HtmlHelper的扩展方法,并且放在了System.Web.Mvc.Html命名空间下

6. 添加了新的HttpVerbs枚举,包含了常用的Http谓词:GET, POST, PUT, Delete, HEAD

7. 从ViewContext中移除了ViewName属性

还有其他的一些变化,就不列举了,大家可以到这里下载ASP.NET MVC Beta版本

官方站点:http://www.codeplex.com/aspnet

[C#]Db4o for .NET 使用心得(1、2):Trace db4o;慎用struct

mikel阅读(813)

Db4o(http://www.db4o.com/)是著名的开源对象数据库,使用它能够将持续层代码量降低到忽略不计的程度。如果数据量不大,用它能够将开发速度提高一个层次。
我手中的小项目需要储存约十万个联系人的数据,考察了SQLite与db4o,最终决定选用db4o. 我使用的是db4o 7.4 for .NET 2.0。关于db4o网上有很多文档,然而有一些问题,在网上不容易找到解决办法,总结一下,写在下面。

(1) Trace db4o

ObjectManager是官方查看db4o数据库的客户端,然而,db4o7.4这个版本对应的ObjectManager不再免费,用不了 了。要弄清楚在程序中db4o数据库到底做了哪些事情,除了ObjectManager外,还可以打开db4o 的日志,进行跟踪。

在打开数据库之前,进行Trace操作的代码如下:

Code


这样,在VS的output窗口或者控制台里会有相关的操作日志,如:

[db4o 7.4.60.11658   20081016 07:59:06
 
17563 update Orc.ContactManager.Contact, 联系人管理器
[db4o 
7.4.60.11658   20081016 07:59:06
 
346372 new System.Guid, mscorlib
[db4o 
7.4.60.11658   20081016 07:59:06
 
346415 new Orc.ContactManager.ChannelType, 联系人管理器
[db4o 
7.4.60.11658   20081016 07:59:06
 
17770 update Orc.ContactManager.Contact, 联系人管理器
[db4o 
7.4.60.11658   20081016 07:59:06
 
346571 new System.Guid, mscorlib


2 尽量少用struct, enum

目前db4o处理普通struct及enum还不尽如意。
对于普通的struct及enum,db4o不能辨别待储存/更新的实例与数据库中原有实例是否同一实例,因此当update时,即使值没有变 动,db4o也会将它new一个出来,储存入数据库。如果仅仅只是这样,不过浪费了一些无谓的IO操作,更大的问题是它储存进去一个新值,却不删除原有的 值,导致数据库文件中存在大量的垃圾数据。

通过下面小程序就可以验证这一缺陷:

Code


程序运行结束后,数据库文件test.yap 大小为2k.

运行日志如下:


[db4o 
7.4.60.11658   20081016 09:42:39]
 
914 update Db4oTest.Contact, Db4oTest
[db4o 
7.4.60.11658   20081016 09:42:39]
 
914 update Db4oTest.Contact, Db4oTest
[db4o 
7.4.60.11658   20081016 09:42:39]
 
914 update Db4oTest.Contact, Db4oTest
[db4o 
7.4.60.11658   20081016 09:42:39]
 
914 update Db4oTest.Contact, Db4oTest
[db4o 
7.4.60.11658   20081016 09:42:39]
 
914 update Db4oTest.Contact, Db4oTest

可见,每次运行ObjectContainer.Store(c)均对c进行update。

将Contact的代码改为:

Code


编译程序,删除test.yap文件,重新运行程序,得到新的test.yap文件大小为144k,可见其中存在大量的垃圾数据。查看日志信息可以发现问题所在:


2352 update Db4oTest.Contact, Db4oTest
[db4o 
7.4.60.11658   20081016 09:48:56]
 
99639 new System.Guid, mscorlib
[db4o 
7.4.60.11658   20081016 09:48:56]
 
99682 new Db4oTest.ContactType, Db4oTest
[db4o 
7.4.60.11658   20081016 09:48:56]
 
2352 update Db4oTest.Contact, Db4oTest
[db4o 
7.4.60.11658   20081016 09:48:56]
 
99716 new System.Guid, mscorlib
[db4o 
7.4.60.11658   20081016 09:48:56]
 
99759 new Db4oTest.ContactType, Db4oTest


可见每update一次Contact c,db4o都要new一个Guid,new 一个ContactType,存入数据库,原有的Guid/ContactType,则变成垃圾,依旧呆在数据库中,导致数据库文件急剧增长。

.net下,Int32也是一种struct,然而,从上例日志中却未发现新建Int32 Code,我猜测是db4o对Int32这些常用struct进行了特殊处理。

为了避免垃圾数据,使用db4o时最好慎用struct。

[Adobe]Adobe发布的Adobe Flash Player10下载

mikel阅读(663)

Adobe Systems周三在毫无征兆的情况下发布了Adobe Flash Player 10软件,版本号10.0.12.36,内置3D处理能力,并支持数种Flash特效。

Flash Player 10是配合Adobe Creative Suite (CS) 4发布的客户端软件,提供了对Photoshop和Illustrator创建矢量绘图的支持。

下载:Adobe Flash Player 10

[FCKEditor]Integrating FCKeditor in ASP.Net

mikel阅读(957)

Note: This is an unedited contribution. If this article is inappropriate, needs attention or copies someone else's work without reference then please Report This Article

Introduction

In Basic ASP.NET, FCKeditor can be easily integrated. Here is the link where I found that.

http://docs.fckeditor.net/FCKeditor_2.x/Developers_Guide/Integration/ASP.NET

However, to integrate FCKeditor in ASP.NET MVC environment, we have to follow some tricky steps. Here I will show how to integrate using core JavaScript as well as using JQuery.

Using JavaScript

Step 1

Download the FCKeditor from http://www.fckeditor.net/download.

Step 2

Unzip the package and put in your project content directory. I liked to make a directory "JavaScript" under "Content" directory and put "unzipped fckeditor" here. I have also put fckeditorapi.js in "Javascript" folder. You can get more information on FCKeditor API here

http://docs.fckeditor.net/FCKeditor_2.x/Developers_Guide/JavaScript_API

Step 3

I have added a MVC view file in Home folder and named it as "Fck.aspx". To view this file, I included a method in HomeController, as follows.

/// <summary>
/// Show FCK Editor View Page
/// </summary>
public void Show()
{
RenderView("Fck");
}  

Step 4

In Fck.aspx, include the fckeditor.js and fckeditorapi.js file:

<script type="text/javascript" src="../../Content/Javascript/fckeditor/fckeditor.js"></script>
<script type="text/javascript" src="../../Content/Javascript/fckeditorapi.js"></script>

Include the following to replace textarea (named 'content') by FCKeditor. Here I have included InsertContent(), ShowContent() and ClearContent() methods to perform some extra actions.

<script type="text/javascript">
window.onload = function()
{
var oFCKeditor = new FCKeditor( 'content' ) ;
oFCKeditor.BasePath = "/Content/Javascript/fckeditor/" ;
oFCKeditor.Height = 300;
oFCKeditor.ReplaceTextarea() ;
}
function InsertContent()
{
var oEditor = FCKeditorAPI.GetInstance('content') ;
var sample = document.getElementById("sample").value;
oEditor.InsertHtml(sample);
}
function ShowContent()
{
var oEditor = FCKeditorAPI.GetInstance('content') ;
alert(oEditor.GetHTML());
}
function ClearContent()
{
var oEditor = FCKeditorAPI.GetInstance('content');
oEditor.SetHTML("");
}
</script>

Here is the html content:

<div>
<input id="sample" type="text" />
<input id="cmdInsert" type="button" value="Insert Content" onclick="InsertContent()" />
<input id="cmdClear" type="button" value="Clear Content" onclick="ClearContent()" />
<br /> <br />
<textarea id="content" cols="30" rows="10"></textarea>
<br />
<input id="cmdShow" type="button" value="Show Content" onclick="ShowContent()" />
</div> 

Step 5

Now build the application and run. Click the "FCK Editor" link and get the result.

Using JQuery

Step 1

Download JQuery from http://www.jquery.com. I have put jQuery-1.2.6.pack.js and jQuery.FCKEditor.js in my "Javascript" folder".

Step 2

I have added a MVC view file in Home folder and named it as "FckjQuery.aspx". To view this file, I included a method in HomeController, as follows.

/// <summary>
/// Show FCK Editor By JQuery
/// </summary>
public void View()
{
RenderView("FckJquery");
}

Step 3

In FckJquery.aspx, include the jquery-1.2.6.pack.js, fckeditor.js and jquery.FCKEditor.js file:

<script type="text/javascript" src="../../Content/Javascript/jquery-1.2.6.pack.js"></script>
<script type="text/javascript" src="../../Content/Javascript/fckeditor/fckeditor.js"></script>
<script type="text/javascript" src="../../Content/Javascript/jquery.FCKEditor.js"></script>

Include the following to replace textarea (named 'content') by FCKeditor. Here I have included InsertContent(), ShowContent() and ClearContent() methods to perform some extra actions.

<script type="text/javascript">
$(document).ready(function(){
$.fck.config = {path: '/Content/Javascript/fckeditor/', height: 300 };
$('textarea#content').fck();
});
function InsertContent()
{
var sample = document.getElementById("sample").value;
$.fck.insertHtml('fck1', sample);
}
function ShowContent()
{
alert($.fck.content('fck1', ''));
}
function ClearContent()
{
$.fck.clearHtml('fck1');
}
</script>

Here is the html content:

<div>
<input id="sample" type="text" />
<input id="cmdInsert" type="button" value="Insert Content" onclick="InsertContent()" />
<input id="cmdClear" type="button" value="Clear Content" onclick="ClearContent()" />
<br /> <br />
<textarea id="content" cols="30" rows="10"></textarea>
<br />
<input id="cmdShow" type="button" value="Show Content" onclick="ShowContent()" />
</div>

Step 4

In jquery.FCKEditor.js file, I have included two functions. Function insertHtml() inserts html content into fckeditor and clearHtml() clears the content.

// insert Html Content
insertHtml: function(i, v) {
try{
var x = FCKeditorAPI.GetInstance(i);
if(v) x.InsertHtml(v);
else return '';
}
catch(e) { return ''; };
},
// clear Html Content
clearHtml: function(i) {
try{
var x = FCKeditorAPI.GetInstance(i);
x.SetHTML('');
}
catch(e) { return ''; };
},

Step 5

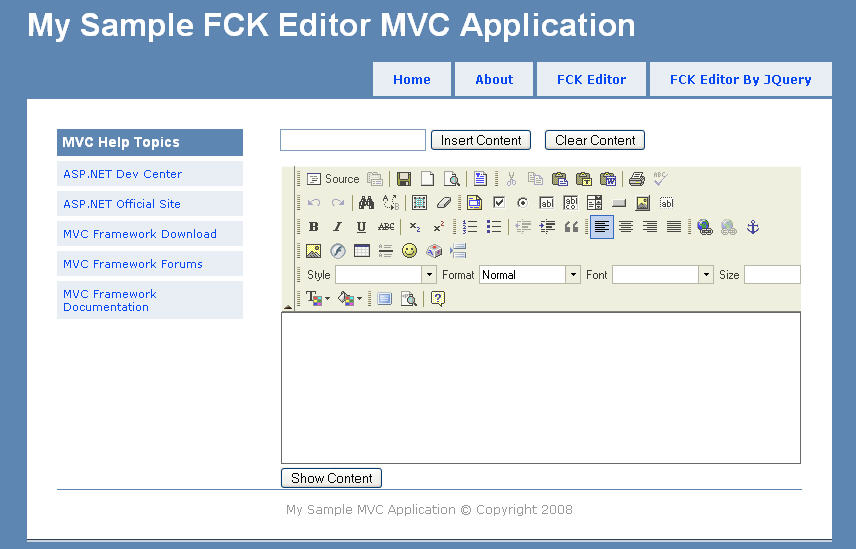
Now build the application and run. Click the "FCK Editor By JQuery" link and get the result. Enjoy It!

References

http://docs.fckeditor.net

http://www.jquery.com

http://www.fyneworks.com/jquery/FCKEditor

Conclusion

Next I will try to give some demonstration on how to build plugins in FCKeditor. Till then bye.

License

This article, along with any associated source code and files, is licensed under The Code Project Open License (CPOL)

About the Author

Mohammad Jahedur Rahman

I am a .Net Developer working now in a leading software company Brain Station-23 Bangladesh.

Occupation: Web Developer
Company: Brain Station-23
Location: Bangladesh Bangladesh

[CSS]面向对象的CSS

mikel阅读(657)

时下流行面向对象,那么有没有可能把样式表也面向对象一下呢,将现在的CSS(Cascading Style Sheets层叠样式表)进

化一下,演变成面向对象的样式表给套了个概念上去,以下叫“OOCSS”,即 Object oriented Cascading Style Sheets。


 ◆ 为什么会这样想?

      没办法,被逼的, 俺们公司的美工只做图片,其它的是啥都不管,近来弄个WEB项目,都做差不多了,老总说要能换肤。呵呵

还好之前有所考虑,三两天就搞定了。

      我的方法是,页面全部用CSS控制,主要有 common.css、list.css、addedit.css等10来个css文件和图片,全部放一个叫

Common/Skins的目录下 ,Common/Skins下每套皮肤一个文件夹,最终目录结构大致如下。

Code


      共定义有5、6套皮肤,CSS和图片文件急剧上涨,由原来的10来个一下子上升到了7,8十个,虽然数量是有点吓人,不过每套

皮肤,CSS和图片都大部分差不多,也没花多少功夫就搞定了,不管了,甩一边。

      几天后的某一天早晨,好大的台风,呼呼的,雨也不小,让人觉得很不爽,就像出事前的预兆 !

      果然,没坐下多久,老总过来说“和美工讨论了下,有几个地方,布局要变下……”。

      一阵的嘻哩哗啦之后,我心里除了佩服老总口才不错之外,觉得自己命好苦呀!

      那么多CSS,得改多久呀,以后要再变的话不还得改吗!

      仔细分析下CSS,其实每套皮肤都大体差不多,不同的地方一般都是边框、文字的颜色和背景色,还有图片、字号,于是我决定

所有的皮肤都用同一套公共的CSS文件,另外,每套皮肤再加一个独立CSS文件(Settings.css),而该CSS中只定义基本的样式,

相当于配置文件一样的,然后作用于其余几个公共的CSS文件。

      我坚信这样的思路是对的,可是怎么实现呢?

      首先想到的,当然是用CSS的组合,将之前部分CSS规则分离,公共部分提取出来放在 Settings.css中定义,如:

      将List.css中规则 
               .ToolBar{color:#f0e000;border:1px solid gray;} 
          分离为
               .DefaultColor{color:#f0e000;}定义在Settings.css中
               .ToolBar{border:1px solid gray;}仍然保留在List.css中

          然后将HTML中对 .ToolBar 的引用“class='ToolBar'”改为“class='DefaultColor ToolBar '”

      再将其它color属性相同的CSS规则进行同样的分离。这样每套皮肤不同的地方就只是 settings.css文件里.DefaultColor类型

的规则。

      而这样做又引发的新的问题,必须得每个页面改HTML中的class属性,而背景图片只能依靠 expression 来解决,expression

又常常造成页面的死锁,无奈之下只有另谋出路。


 ◆ 面向对象的CSS: OOCSS 基本构思

      继承:

            OOCSS中,类(样式规则)可以继承自另一类,如

例一

            .Base{font-size:20pt;}
            .Sun{color:red;}

            假如用如下语法可以实现继承

            .Base{font-size:20pt;}
            .Sun (inherit .Base)
            {
                    color:red;
            }


            而现在类 .Sun 则不单单拥有 “color:red;”属性,应该拥有从基类 .Base 中继承的 “font-size:20pt”属性 ,

     cssText应该是 “font-size:20pt;color:red”。

      覆盖:

           将上例中的 .Sun 更改如下:

            .Base{font-size:20pt;}
            .Sun (inherit .Base)
            {
                    font-size:10pt;
                    color:red;
            }

            则实现了对基类“font-size:20pt”的覆盖,.Sun中的font-size则为10pt。


     子类访问基类

例二

            .Base
            {
                    v:20;
                    font-size:20pt;
            }

            .Sun (inherit .Base)
            {
                    padding : (base.v+10)px;
                    font-size:(base.fontSize/2)pt;
                    color:red;
            }

            .Sun2 (inherit .Base)
            {
                    padding : (base.v+20)px;

            }


           在基类 .Base 中定义了变量 “v:20”和style属性“font-size:20pt”,子类 .Sun和.Sun2中style属性padding和

     font-size通过访问基类变量和属性计算而来,而最终 .Sun 中 padding等于30px,.Sun2中padding等于40px;.Sun中

     fong-size等于10pt,.Sun2没有覆盖基类中的font-size,所以font-size继承基类,值仍为20pt。


     多继承

例三

            .Base{font-size:20pt;}

            .Base2{color:red;}

            .Sun (inherit .Base,.Base2)
            {
                    padding:20px;
            }

            .Grandson (inherit .Base)
            {

            }


          类.Sun继承自两个基类.Base和.Base2,所以.Sun的cssText为“font-size:20pt;color:red;padding:20px;”,而

     .Grandson继承自.Sun,本身没有任何自定义属性,因此cssText和.Sun一样,仍为“font-size:20pt;color:red;

     padding:20px;”。


     私有(假如用private作为关键字)

例四

            .Base
             {
                    font-size:20pt;
                    private color:red;
             }

            .Sun (inherit .Base)
            {
                    padding:10px;
            }


          子类 .Sun 继承基类 .Base 中的fontSize属性,因为 .Base中color属性受private(私有)限制,不能被.Sun继承,最终

     .Sun的cssText是“font-size:20pt;padding:10px”。


     更多特性待琢磨……


  ◆ 这样做有意义吗?

       我的回答是“有”     !

       1.  CSS的优点之一“一处定义,多处使用”

               目前的CSS多处使用指的是,一个CSS规则可以由多个HTML元素引用。可CSS规则间不能互操作。

       2.  CSS的继承

               CSS的继承不是真正意义上的继承,而是HTML元素对外层元素Style属性的继承,且部分Style属性、HTML元素是不能

          继承的,如backgroundColor属性、border属性、padding属性、table元素等等(当然,部分不支持继承也是合理的)。

      3.  CSS优先级

               当多个CSS规则作用于同一个HTML元素时,CSS将根据CSS规则权重 、规则定义的先后配合HTML元素的层次关系决

          定最终的有效值,这样的解决方案有时很巧妙,可当HTML层次结构过深、而作用于同一个HTML元素的CSS规则过多时,

          CSS规则的优先级控制是相当的不容易,有时候不得不用蹩脚的“! important”来解决问题,可“! important”不符合标

          准,支持的浏览器很少。

      OOCSS在保留CSS特性(或者说是优点)的前提下,将从某种程度上解决以上问题

     1.  OOCSS中,类可以访问基类甚至没有依赖关系的其他类,应用灵活……。

     2.  OOCSS中,继承是类对基类属性的继承,不同于CSS中的继承(HTML元素对上层元素Style属性的继承),子类直接继承

          基类不受private(私有)关键字修饰的属性。

     3.  OOCSS实现继承后,就会在一定程度上避免CSS组合的应用,便会减少意外的HTML元素匹配,同时HTML元素在class属

          性中应用子类时,权重跟基类无关,和子类一致,如例三中,子类 .Sun 的权重跟基类 .Base1、.Base2无关 。


 ◆ 我认为OOCSS很有趣,也有用,那么该怎么做呢?

           上面的想法都是建立在假如的基础上的,都只是我一种猜想而已

            .Base
             {
                    font-size:20pt;
                    private color:red;
             }

            .Sun (inherit .Base)
            {
                    padding:10px;
            }

            这样的代码各位都不认识,浏览器又怎么会认识呢,那么是不是就不能实现呢?不是的,我们可以通过一些其他方法模拟,

       虽然有些尴尬!

            我的做法是,写个JS解析,基本实现以上想法,代码太多,不方便贴出来,供下截

                 下载:http://www.66s.com.cn/oocss/OOCSSDemo.rar
                         http://files.cnblogs.com/kuiyouli/OOCSSDemo.rar

                 演示:http://www.66s.com.cn/oocss/

                 有兴趣的朋友可进入QQ群:15774494

                 注:目前只支持IE浏览器

       实现功能如下:

       1.  继承 

                因为浏览器不支持 .Sun (inherit .Base) 这样的语法,所以改为如下形式:

                    .DefaultColor{color:red;}
                    .Sun
                    {
                         base: .DefaultColor;
                         font-size:9pt;
                    }
                用 “base”关键字指定基类,注意是“.DefaultColor”,而不是“DefaultColor”,基类必须是类全称,可以指定多个基

          类,如:

                    .BaseHeight{height:30px;}
                    .DefaultColor{color:red;}
                    .Sun
                    {
                         base: .DefaultColor,.BaseHeight;
                         font-size:9pt;
                    }          


       2.  附加

                跟继承类似,实现的却是CSS的组合功能。

                    .BaseHeight{height:30px;}
                    .DefaultColor{color:red;}
                    .Sun
                    {
                         append: .DefaultColor,.BaseHeight;
                         font-size:9pt;
                    } 

               当HTML元素引用类 .Sun 时,OOCSS会自动将 .DefaultColor、.BaseHeight附加到HTML元素的class属性,如:

                    <div class=".Sun"></div>

               则该div最后的class属性值为“.Sun .DefaultColor .BaseHeight”。因此,.DefaultColor、.BaseHeight中的属性受

          其优先级的影响,跟.Sun的优先级无关。

      3.   eval表达式

               eval表达式类似expression表达式,不同之处在于,eval只在初始化时执行一次。

                     .TestEval
                    {
                         E-height: eval(20+30);
                    }

               相当于:

                     .TestEval
                    {
                         height: 50px;
                    }


               可以在eval中访问脚本变量,如:

                    <script>
                         var skin={color:'red', defaultSize:'9pt'}
                    </script>

                    <style>
                         .TestEval
                         {
                              E-color: eval(skin.color);
                              E-font-size: eval(skin.defaultSize);
                         } 

                         .LargeFont
                         {
                              e-font-size:eval(     (parseInt(skin.defaultSize)+3)+"pt"     )
                         }
                    </style>

               以上代码相当于:

                    <style>
                         .TestEval
                         {
                              color: red;
                              font-size: 9pt;
                         }
 

                         .LargeFont
                         {
                              font-size:12pt;
                         }
                    </style>                    

     4.  .Global或.Init初始化

          可以类名为 .Global或 .Init的类配合eval关键字初始化。

                   <style>

                         .Global
                         {
                              E-init: eval(     window.skin={color:'red', defaultSize:'9pt'}     );
                         }

                         .TestEval
                         {
                              E-color: eval(skin.color);
                              E-font-size: eval(skin.defaultSize);
                         }
                    </style>

               以上代码相当于:

                    <style>
                         .TestEval
                         {
                              color: red;
                              font-size: 9pt;
                         }
                    </style> 


     5.  访问基类

          通过eval关键字和base关键字,访问基类对象。

                    .DefaultHeight{height:30px;}
                    .Sun
                    {
                         base: .DefaultHeight;
                         E-height: eval(parseInt(base.height)+20);
                    }

           相当于:

                    .Sun
                    {
                         height: 50px;
                    }

           当有多个基类时,则可以这样访问:

                    .DefaultColor{color:red;}                    
                    .DefaultHeight{height:30px;}
                    .Sun
                    {
                         base: .DefaultColor ,.DefaultHeight;
                         E-height: eval(parseInt(base[1].height)+20);
                    }

           也可以这样访问

                    .DefaultColor{color:red;}                    
                    .DefaultHeight{height:30px;}
                    .Sun
                    {
                         base: .DefaultColor ,.DefaultHeight;
                         E-height: eval(parseInt(base[DefaultHeight].height)+20);
                    }

           相当于:

                    .Sun
                    {
                         color: red;
                         height: 50px;
                    }


     6.  私有成员

          下一版本实现……

[JQuery]JQuery取得IFrame中的值

mikel阅读(793)

1.在父窗口中操作 選中IFRAME中的所有單選鈕
$(window.frames["iframe1"].document).find("input[@type=&#39;radio&#39;]").attr("checked","true");
2.在IFRAME中操作 選中父窗口中的所有單選鈕
$(window.parent.document).find("input[@type=&#39;radio&#39;]").attr("checked","true");
iframe框架的:<iframe src="test.html" id="iframe1" width="700" height="300" frameborder="0" scrolling="auto"></iframe>
$(&#39;#parentElem&#39;, top.document).append(&#39;</code><div class="imgbox" id="imgbox"><img class="img" src="http://www.blogger.com/pp.png" id="img" /></div>&#39;);
alert($(document.getElementById(&#39;ifr&#39;).contentWindow.document.body).html());

[FCKEditor]FCKeditor远程图片自动上传插件

mikel阅读(963)

有时候我们从其他网页上拷贝来的内容中含有图片,当原始地址失效后就会影响读者阅读。
所以我制作了这样一个插件,可以将远程图片保存到本地服务器。
声明:下面的文字是本文不可缺少的部分,转载请保留,谢谢!
////////////////////////////////////////////////////
作者:武眉博<活靶子.NET>
同时首发于:
    落伍者   && 博客园  
    开发者学院   && .Net男孩社区
////////////////////////////////////////////////////
今天转载了xiaozhuang朋友的文章同时从博客园服务器上下载了图片
演示见:http://www.devedu.com/Doc/DotNet/AspNet/AspNet-AjaxWCF-ServiceADONET-Entity-FrameworkShiXianShuJuLieBiaoShuJuShaiXuanFenYePaiXuShanChu.aspx


原理如下:
    1.实现ICallbackEventHandler接口以用启用客户端回调。
    2.从当前FckEdiotr内容分析出所有<img标签,取得src的地址。
    3.回调下载到服务器。
    4.返回下载后位于本服务器上的路径。
    5.替换当前FckEdiotr内容内对应的<img标签的src属性。
其他废话不多说了,代码中都有注释。
如果您熟悉Fckeditor的插件工作流程,请继续向下阅读,另请不要留言要我直接提供下载,下面的代码已经可以完整调试了。
E:\IISROOT\FckTest\FckTest\fckeditor\editor\plugins\remoteimagerubber\remoteimagerubber.aspx

  1 <%
  2 使用单页模型(非代码后置),是为了便于此插件部署,
  3 不需编译成dll,只需拷贝remoteimagerubber.aspx 和 fckplugin.js 到plugn目录,
  4 并配置一下fckconfig.js及相应的语言包,就可以使用了。
  5 %>
  6 
  7 <%@ Page Language="C#" %>
  8 
  9 <%@ Import Namespace="System.Net" %>
 10 <%
 11 实现ICallbackEventHandler接口以提供客户端回调功能。
 12 %>
 13 <%@ Implements Interface="System.Web.UI.ICallbackEventHandler" %>
 14 
 15 <script runat="server">
 16     
 17     /// <summary>
 18     /// 此处配置远程文件保存目录
 19     /// </summary>
 20     private static readonly string savePath = "~/Uploads/";
 21 
 22     /// <summary>
 23     /// 此处配置允许下载的文件扩展名
 24     /// <remarks>
 25     ///     暂未考虑使用动态网页输出的图片如:http://site/image.aspx?uid=00001 这样的URI;
 26     ///  若要实现此功能可读取流并判断ContentType,将流另存为相应文件格式即可。
 27     /// </remarks>
 28     /// </summary>
 29     private static readonly string[ ] allowImageExtension = new string[ ] { ".jpg" , ".png" , ".gif" };
 30 
 31     /// <summary>
 32     /// 此处配置本地(网站)主机名
 33     /// </summary>
 34     private static readonly string[ ] localhost = new string[ ] { "localhost" , "www.devedu.com" };
 35 
 36     private string localImageSrc = string.Empty;
 37 
 38     private void Page_Load( object obj , EventArgs args )
 39     {
 40         if ( !Page.IsPostBack )
 41         {
 42             ClientScriptManager csm = Page.ClientScript;
 43 
 44             string scripCallServerDownLoad = csm.GetCallbackEventReference( this , "args" , "__ReceiveServerData" , "context" );
 45             string callbackScriptDwonLoad = "function __CallServerDownLoad(args , context) {" + scripCallServerDownLoad + "; }";
 46             if ( !csm.IsClientScriptBlockRegistered( "__CallServerDownLoad" ) )
 47             {
 48                 csm.RegisterClientScriptBlock( this.GetType( ) , "__CallServerDownLoad" , callbackScriptDwonLoad , true );
 49             }
 50         }
 51     }
 52 
 53     #region ICallbackEventHandler 成员
 54 
 55     /// <summary>
 56     /// 返回数据
 57     /// </summary>
 58     /// <remarks>如果处理过程中出现错误,则仍然返回远程路径</remarks>
 59     /// <returns>服务器端处理后的本地图片路径</returns>
 60     public string GetCallbackResult( )
 61     {
 62         return localImageSrc;
 63 
 64     }
 65 
 66     /// <summary>
 67     /// 处理回调事件 
 68     /// </summary>
 69     /// <param name="eventArgument">一个字符串,表示要传递到事件处理程序的事件参数</param>
 70     public void RaiseCallbackEvent( string eventArgument )
 71     {
 72 
 73         string remoteImageSrc = eventArgument;
 74 
 75         string fileName = remoteImageSrc.Substring( remoteImageSrc.LastIndexOf( "/" ) + 1 );
 76         string ext = System.IO.Path.GetExtension( fileName );
 77 
 78         if ( !IsAllowedDownloadFile( ext ) )
 79         {
 80             //非指定类型图片不进行下载,直接返回原地址。
 81             localImageSrc = remoteImageSrc;
 82             return;
 83         }
 84 
 85         Uri uri = new Uri( remoteImageSrc );
 86         if ( IsLocalSource( uri ) )
 87         {
 88             //本地(本网站下)图片不进行下载,直接返回原地址。
 89             localImageSrc = remoteImageSrc;
 90             return;
 91         }
 92 
 93         try
 94         {
 95             //自动创建一个目录。
 96             DateTime now = DateTime.Now;
 97             string datePath = string.Format( @"{0}\{1}\{2}\{3}" , now.Year , now.Month.ToString( "00" ) , now.Day.ToString( "00" ) , Guid.NewGuid( ).ToString( ) );
 98 
 99             string localDirectory = System.IO.Path.Combine( Server.MapPath( savePath ) , datePath );
100             if ( !System.IO.Directory.Exists( localDirectory ) )
101             {
102                 System.IO.Directory.CreateDirectory( localDirectory );
103             }
104 
105             string localFilePath = System.IO.Path.Combine( localDirectory , fileName );
106 
107             //不存在同名文件则开始下载,若已经存在则不下载该文件,直接返回已有文件路径。
108             if ( !System.IO.File.Exists( localFilePath ) )
109             {
110                 Client.DownloadFile( uri , localFilePath );
111             }
112 
113             string localImageSrc = ResolveUrl( "~/" + localFilePath.Replace( Server.MapPath( "~/" ) , string.Empty ).Replace( "\\" , "/" ) );
114 
115         }
116         catch
117         {
118             //下载过程中出现任何异常都不抛出(  有点狠啊 🙂  ),仍然用远程图片链接。
119             localImageSrc = remoteImageSrc;
120         }
121 
122     }
123 
124 
125     #endregion
126 
127     private WebClient client;
128 
129     /// <summary>
130     /// <see cref="System.Net.WebClient"/>
131     /// </summary>
132     public WebClient Client
133     {
134         get
135         {
136             if ( client != null )
137             {
138                 return client;
139             }
140 
141             client = new WebClient( );
142             client.Headers.Add( "user-agent" , "Mozilla/4.0 (compatible; MSIE 6.0; Windows NT 5.2;)" );
143 
144             return client;
145 
146         }
147     }
148 
149     /// <summary>
150     /// 判断Uri是否为本地路径
151     /// </summary>
152     /// <param name="uri"></param>
153     /// <returns></returns>
154     private bool IsLocalSource( Uri uri )
155     {
156         for ( int i = localhost.Length ; >= 0 ; )
157         {
158             if ( localhost[ i ].ToLower( ) == uri.Host.ToLower( ) )
159             {
160                 return true;
161             }
162         }
163 
164         return false;
165 
166     }
167 
168     /// <summary>
169     /// 检测文件类型是否为允许下载的文件类型
170     /// </summary>
171     /// <param name="extension">扩展名 eg: ".jpg"</param>
172     /// <returns></returns>
173     private bool IsAllowedDownloadFile( string extension )
174     {
175         for ( int i = allowImageExtension.Length ; >= 0 ; )
176         {
177             if ( allowImageExtension[ i ].ToLower( ) == extension.ToLower( ) )
178             {
179                 return true;
180             }
181         }
182 
183         return false;
184     }
185     
186 </script>
187 
188 <!DOCTYPE html PUBLIC "-//W3C//DTD XHTML 1.0 Transitional//EN" "http://www.w3.org/TR/xhtml1/DTD/xhtml1-transitional.dtd">
189 <html xmlns="http://www.w3.org/1999/xhtml">
190 <head runat="server">
191     <title></title>
192     <style type="text/css">
193     body { margin: 0px; overflow: hidden;  background-color: buttonface;  }
194     td { font-size: 11pt; font-family: Arial;text-align: left;}
195     #domProgressBarId{
196         width: 0%;
197         height: 15px;  
198         border-right: buttonhighlight 1px solid;
199         border-top: buttonshadow 1px solid; 
200         border-left: buttonshadow 1px solid; 
201         border-bottom: buttonhighlight 1px solid;
202         background-color: highlight;
203     }
204 </style>
205 
206     <script type="text/JavaScript" language="JavaScript"> 
207         
208         var RemoteImageRubber = function ( remoteSrcList )
209         {
210             this._remoteSrcList = remoteSrcList;
211             this._totalFilesCount = remoteSrcList.length; 
212         }
213 
214         RemoteImageRubber.prototype.CurrentPercent = function()
215         {
216             return Math.round( 100 * (1  this.CurrentFilesCount() / this.TotalFilesCount() ) )+"%";
217         }
218         
219         RemoteImageRubber.prototype.TotalFilesCount = function()
220         {
221             return this._totalFilesCount;
222         }
223         
224         RemoteImageRubber.prototype.CurrentFilesCount = function()
225         {
226             return this._remoteSrcList.length;
227         }
228 
229         RemoteImageRubber.prototype.NextFile = function ()
230         {
231            
232             if(this._remoteSrcList.length >0)
233             {
234                 var currentRemoteSrc = this._remoteSrcList.shift( )
235                 __PreCallServer(currentRemoteSrc);
236             }        
237         }
238         
239     </script>
240 
241     <script type="text/javascript" language="javascript">
242         
243         var oEditor;
244         var domProgressBar;
245         var domCurrentFile;
246         var domAllFilesCount;
247         var domAlreadyDownloadFilesCount;
248         
249         var imageUrls;
250         var remoteList = new Array();
251         var localList = new Array(); 
252         
253         var progressBar;
254         
255         function Ok()
256         {
257             var __imgIndex;
258             for(__imgIndex = 0; __imgIndex < imageUrls.length; __imgIndex ++)
259             {
260                 imageUrls[__imgIndex].src = localList[__imgIndex];                    
261             }    
262             
263             return true ;
264         }
265         
266     </script>
267 
268     <script language="javascript" type="text/javascript">
269     
270         function __PreCallServer(currentRemoteSrc)
271         {
272             var start = currentRemoteSrc.lastIndexOf("/"+ 1;
273             var end = currentRemoteSrc.length  currentRemoteSrc.lastIndexOf("/");
274 
275             var currentFileName = currentRemoteSrc.substr(start,end);
276                         
277             domCurrentFile.innerHTML = currentFileName;         
278             __CallServerDownLoad(currentRemoteSrc,'');
279             
280         }
281         
282         function __ReceiveServerData(receiveValue ,context)
283         {
284             // 注意:——————————————————————————————-
285             //
286             // (1)不要在接收回调数据时使用变量 "i"。
287             // (2)如果再次回调请使用window.setTimeout(.这样的形式
288             //
289             //      否则会导致 "'__pendingCallbacks[].async' 为空或不是对象"的错误产生。
290             //  
291             //      因为MS的开发人员在WebForm_CallbackComplete函数内使用了全局变量"i" 。这是一个比较ugly的bug。
292             //
293             // 参见:
294             //   http://connect.microsoft.com/VisualStudio/feedback/ViewFeedback.aspx?FeedbackID=101974
295             //   http://developers.de/blogs/damir_dobric/archive/2006/03/02/4.aspx?Ajax_CallBack=true
296             //   http://developers.de/files/folders/279/download.aspx
297             //   http://blogs.SQLxml.org/bryantlikes/archive/2005/12/20/4593.aspx
298             //
299             //————————————————————————————————-
300 
301             if(receiveValue )
302             {
303                 var localSrc = receiveValue;
304                 localList.push(localSrc);
305                 
306                 domAlreadyDownloadFilesCount.innerHTML = progressBar.TotalFilesCount()  progressBar.CurrentFilesCount();
307                 domProgressBar.style.width = progressBar.CurrentPercent();
308                 
309                 if( progressBar.CurrentFilesCount() > 0 )
310                 {
311                    window.setTimeout("progressBar.NextFile()",0);        
312                 }
313             }            
314             
315             if(progressBar.CurrentFilesCount() == 0)
316             {                
317                 window.setTimeout("__reFlush()",500)
318             } 
319         }
320 
321         function __StartDownLoad()    
322         {   
323             imageUrls = oEditor.EditorDocument.body.getElementsByTagName("img");
324                 
325             var m; 
326             for(m = 0; m < imageUrls.length; m ++)
327             {
328                remoteList[m] = imageUrls[m].src;                      
329             }
330             
331             progressBar = new RemoteImageRubber(remoteList);              
332             domAllFilesCount.innerHTML = progressBar.TotalFilesCount();
333             
334             window.setTimeout("progressBar.NextFile()",0);
335             
336         }    
337 
338         function __reFlush()
339         {           
340             
341             domProgressBar.style.width  = "100%";
342             
343             //display the 'OK' button            
344             window.parent.SetOkButton( true ) ;
345         }
346         
347 
348     </script>
349 
350 </head>
351 <body>
352     <form id="aspnetForm" runat="server">
353         <div style="width: 300px; padding-left: 10px;">
354             <table border="0" cellspacing="0" cellpadding="2">
355                 <tr>
356                     <td nowrap="nowrap" style="width: 290px;">
357                         当前文件:&nbsp;<span id="domCurrentFile" style="display: inline; text-overflow: ellipsis"></span></td>
358                 </tr>
359                 <tr>
360                     <td style="text-align: left; width: 290px;">
361                         <div id="domProgressBarId">
362                         </div>
363                     </td>
364                 </tr>
365                 <tr>
366                     <td nowrap="nowrap" style="width: 290px;">
367                         共有:&nbsp;<span id="domAllFilesCount"></span>&nbsp;&nbsp;个文件</td>
368                 </tr>
369                 <tr>
370                     <td nowrap="nowrap" style="width: 290px;">
371                         已下载:&nbsp;<span id="domAlreadyDownloadFilesCount"></span>个。</td>
372                 </tr>
373             </table>
374         </div>
375     </form>
376 
377     <script type="text/javascript" language="javascript">
378     window.parent.SetOkButton( false ) ; 
379     
380     oEditor = window.parent.InnerDialogLoaded().FCK;       
381     
382     domProgressBar = document.getElementById("domProgressBarId");
383     domCurrentFile = document.getElementById("domCurrentFile");
384     domAllFilesCount = document.getElementById("domAllFilesCount");
385     domAlreadyDownloadFilesCount = document.getElementById("domAlreadyDownloadFilesCount");   
386 
387     window.setTimeout("__StartDownLoad()",0);  
388     </script>
389 
390 </body>
391 </html>
392 

E:\IISROOT\FckTest\FckTest\fckeditor\editor\plugins\remoteimagerubber\fckplugin.js

 1 FCKCommands.RegisterCommand(
 2     'RemoteImageRubber',
 3     new FCKDialogCommand( 'RemoteImageRubber', 
 4         FCKLang["RemoteImageRubberBtn"], 
 5         FCKPlugins.Items['remoteimagerubber'].Path + 'remoteimagerubber.aspx', 
 6         350
 7         200 ) 
 8 ) ;
 9 var oBtn=new FCKToolbarButton('RemoteImageRubber',null,FCKLang["RemoteImageRubber"],null,false,true,48);
10 FCKToolbarItems.RegisterItem('RemoteImageRubber',oBtn);
11 

E:\IISROOT\FckTest\FckTest\fckeditor\editor\lang\zh-cn.js(其他语言同样)

1 var FCKLang =
2 {
3 //
4 RemoteImageRubberBtn:   "保存远程图片"
5 };

配置一下fckconfig.js

 1FCKConfig.ToolbarSets["Default"= [
 2    ['Source','DocProps','','Save','NewPage','Preview','','Templates'],
 3    ['Cut','Copy','Paste','PasteText','PasteWord','','Print','SpellCheck'],
 4    ['Undo','Redo','','Find','Replace','','SelectAll','RemoveFormat'],
 5    ['Form','Checkbox','Radio','TextField','Textarea','Select','Button','ImageButton','HiddenField'],
 6    '/',
 7    ['Bold','Italic','Underline','StrikeThrough','','Subscript','Superscript'],
 8    ['OrderedList','UnorderedList','','Outdent','Indent'],
 9    ['JustifyLeft','JustifyCenter','JustifyRight','JustifyFull'],
10    ['Link','Unlink','Anchor'],
11    ['Image','Flash','Table','Rule','Smiley','SpecialChar','PageBreak'],
12    '/',
13    ['Style','FontFormat','FontName','FontSize'],
14    ['TextColor','BGColor'],
15    ['FitWindow','','InsertCode','RemoteImageRubber','','About']
16] ;