现在越来越发现HTML其实是个很不怎么样的东西,尽管现在增加了CSS将样式分离了,可还是不可掩盖它丑陋的本质,尤其是数据的显示,干吗非得定义一套既定的什么table,div,ul,li……….来框住数据,数据是什么,数据是格式不固定的东西,我干吗非得要告诉你这个数据要用表格,哪个数据要用ul显示,我只需要给你一个我自己定义的xml数据文件,你用xslt看着办装饰就行了,因此发现html的末日基本上已成定局,还是xml+xslt来的干脆实际,正应了,让上帝的归上帝,凯撒的归凯撒那句化,数据和表现分离的如此彻底,想必这是html想都想不到的
学习网站:http://www.w3school.com.cn/

[推荐]HTML学习的网站
今天在Stumble Up看到一个推荐“HTML Playground”。虽然是2006年的作品,个人认为是目前为止看到的最好的学习HTML的资源。尤其是对于那些追求更好的语义化HTML产品的工程师,这个网站实在是一大福音。
如果感兴趣,现在就打开这个网站(新窗口打开)看看哦。我发现深入细节之后,自己的HTML还有很多潜力可以挖掘:)
关于这个网站的使用方法,我简单描述一下:
-
在左上角,用鼠标选择一个HTML标签。
-
右上角会出现这个标签的含义。例如你选择“<tfoot>”,右侧会出现:
Defines a table footer. The thead, tfoot and tbody elements enable you to group rows in a table. When you create a table, you might want to have a header row, some rows with data, and a row with totals at bottom. This division enables browsers to support scrolling of table bodies independently of the table header and footer. When long tables are printed, the table header and footer information may be repeated on each page that contains table data.
我简单翻译一下:(<tfoot>)定义一个table的底。thead、tfoot和tbody元素能让你为一个table分排(上 中下)。因为,当你创建一个table的时候,你也许需要一个表头、内容和一个表尾(三排)。这样做的好处是,当一个table被打印时,表头和表尾会在 每一页重复出现(内容在中间循环),这样用户看起来就会更加清晰。
-
右下角有一个“Example Code”,这里面的内容可以即使编辑并在右侧看到效果,这一点类似Firebug的HTML Edit工具。对于一次性修改多处HTML、CSS非常有用。
-
左下角是当前标签所能支持的各种属性。可以动态地修改以观察效果。类似3
我有一点感慨:现在Web开发的门槛随着Google AppEngine和大量的JavaScript开发库的涌现,已经非常低了。使用Google AppEngine(目前仅Python)和JQuery,可以很快的构建一套自己的Web服务。而开发者只需用到一些简单的Python、 JavaScript知识来分别处理服务器端和前端的逻辑。而类似“HTML Playground”这些优秀的智能教程也在逐渐出现,Web开发本身会不会在未来成为一门“基本技能”呢?
可以说,快速、高效的Web开发如果成为一种基本技能,必然会给其他行业带来极大的(方)便利(益)。而(开发者)如何向第三方(使用Web开发受益的传统行业)索取回报,也许是未来一个有趣的话题。
[教程]VS2008中ASP.net中应用FCKEditor
http://blog.blueshop.com.tw/topcat/archive/2006/11/30/45727.aspx
1.下载Fckeditor标准版,这个很重要因为需要里面的html和js文件,解压
2.下载Fckeditor.net压缩包,解压缩
3.在vS2008中新建WebSite项目
4.引用fckeditor.net\bin\Release\2.0\FredCK.FCKeditorV2.dll
5.拷贝步骤一中解压的fckeditor文件夹到website项目根目录这点很重要,因为fckeditor默认读取根目录下的fckeditor文件夹的html和js
6.添加到工具箱


选择浏览,选择fckeditor.net\bin\Release\2.0\FredCK.FCKeditorV2.dll,然后单击打开

这样就可以看到fckeditor被加入framework组件中

工具栏中出现fckeditor组件,就可以拖拽到页面上进行可视化编辑了

[代码]AIR的配置文件解析
今天对AIR安装配置文件做了一下研究,发现有很多细致配置的东西,把自动生成的文件添加了中文注释.相信对正在做AIR项目的人能够有所帮助.
<?xml version="1.0" encoding="UTF-8"?> <application xmlns="http://ns.adobe.com/air/application/1.0"> <!-- The application identifier string, unique to this application. Required. --> <id>AIRTest1</id><!-- 软件ID,当安装时系统将会检测同一ID软件版本,版本高的即做更新操作 --> <!-- Used as the filename for the application. Required. --> <filename>AIRTest_filename</filename><!-- 安装界面中 Application: --> <!-- The name that is displayed in the AIR application installer. Optional. --> <name>AIRTest_name</name><!-- 桌面快捷方程式及窗口和系统控制面板添加程序中名称 --> <!-- An application version designator (such as "v1", "2.5", or "Alpha 1"). Required. --> <version>1.0</version><!-- 软件版本 --> <!-- Description, displayed in the AIR application installer. Optional. --> <description>AIRTest_description</description><!-- 安装第二个界面中的 description --> <!-- Copyright information. Optional --> <copyright>AIRTest_copyright</copyright> <!-- Settings for the application's initial window. Required. --> <initialWindow> <!-- The main SWF or HTML file of the application. Required. --> <!-- Note: In Flex Builder, the SWF reference is set automatically. --> <content>[This value will be overwritten by Flex Builder in the output app.xml]</content> <!-- The title of the main window. Optional. --> <title>AIRTest_title</title><!-- 窗体标题,当此处为注释状态时取 name标签中内容 --> <!-- The type of system chrome to use (either "standard" or "none"). Optional. Default standard. --> <systemChrome>none</systemChrome><!-- standard为标准窗体,none 为圆滑窗体 --> <!-- Whether the window is transparent. Only applicable when systemChrome is false. Optional. Default false. --> <transparent>true</transparent><!-- 背景是否透明 --> <!-- Whether the window is initially visible. Optional. Default false. --> <visible>true</visible><!-- 窗体初始化的时候是否可见 --> <!-- Whether the user can minimize the window. Optional. Default true. --> <minimizable>true</minimizable><!-- 是否允许最小化 --> <!-- Whether the user can maximize the window. Optional. Default true. --> <!-- <maximizable></maximizable> --><!-- 是否允许最大化 --> <!-- Whether the user can resize the window. Optional. Default true. --> <!-- <resizable></resizable> --><!-- 是否允许缩放窗体 --> <!-- The window's initial width. Optional. --> <!-- <width></width> --><!-- 窗体宽 --> <!-- The window's initial height. Optional. --> <!-- <height></height> --><!-- 窗体高 --> <!-- The window's initial x position. Optional. --> <!-- <x></x> --><!-- 窗体X位置坐标 --> <!-- The window's initial y position. Optional. --> <!-- <y></y> --><!-- 窗体Y位置坐标 --> <!-- The window's minimum size, specified as a width/height pair, such as "400 200". Optional. --> <!-- <minSize></minSize> --><!-- 窗体最小化值 --> <!-- The window's initial maximum size, specified as a width/height pair, such as "1600 1200". Optional. --> <!-- <maxSize></maxSize> --><!-- 窗体最大化值 --> </initialWindow> <!-- The subpath of the standard default installation location to use. Optional. --> <installFolder>AIRInstrallField/AIR</installFolder><!-- 默认安装路径 C:\Program Files\AIRInstrallField\AIR --> <!-- The subpath of the Windows Start/Programs menu to use. Optional. --> <programMenuFolder>AIRTest_programMenuFolder</programMenuFolder><!-- 开始/程序 快捷方程式所在文件夹 --> <!-- The icon the system uses for the application. For at least one resolution, specify the path to a PNG file included in the AIR package. Optional. --> <!-- 图标的大小必须和标签中标写的尺寸一致 --> <icon> <image16x16>icons/logo.png</image16x16><!-- 系统菜单中及系统控制面板添加程序中的图标 --> <image32x32>icons/logo_32.png</image32x32><!-- 桌面图标,窗口图标 --> <image48x48>icons/logo_48.png</image48x48><!-- 安装目录EXE文件图标 --> <image128x128>icons/logo_128.png</image128x128><!-- 未知 --> </icon> <!-- Whether the application handles the update when a user double-clicks an update version of the AIR file (true), or the default AIR application installer handles the update (false). Optional. Default false. --> <!-- <customUpdateUI></customUpdateUI> --><!-- 是否为同一版本的时候双击直接更新 --> <!-- Whether the application can be launched when the user clicks a link in a web browser. Optional. Default false. --> <!-- <allowBrowserInvocation></allowBrowserInvocation> --><!-- 是否应用程序可以通过浏览器激活 --> <!-- Listing of file types for which the application can register. Optional. --> <!-- <fileTypes> --> <!-- Defines one file type. Optional. --> <!-- <fileType> --> <!-- The name that the system displays for the registered file type. Required. --> <!-- <name></name> --> <!-- The extension to register. Required. --> <!-- <extension></extension> --> <!-- The description of the file type. Optional. --> <!-- <description></description> --> <!-- The MIME type. Optional. --> <!-- <contentType></contentType> --> <!-- The icon to display for the file type. Optional. --> <!-- <icon> <image16x16></image16x16> <image32x32></image32x32> <image48x48></image48x48> <image128x128></image128x128> </icon> --> <!-- </fileType> --> <!-- </fileTypes> --> </application>
[新闻]Thermo预览
Adobe MAX 2008 is going to be highlighting a new RIA product codenamed "Thermo". Working with the product development team directly I was able to get some exclusive screenshots of "Thermo". Make sure to take a look at the higher resolution images (linked). We will see a ton of "Thermo" at Adobe MAX 2008, see you there!


See you at Adobe MAX 2008!
[文档]Java与ActionScript的类型对应
| Java | ActionScript |
| java.utile.HashMap | Object |
| int | int |
| java.utile.List | ArrayCollection |
| String | String |
[教程]Asp.Net AJAX系列教程
ASP.NET AJAX入门系列将会写关于ASP.NET AJAX一些控件的使用方法以及基础知识,其中部分文章为原创,也有一些文章是直接翻译自官方文档,本部分内容会不断更新。
目录
导读:作为本系列文章的开篇,简单介绍一下ASP.NET AJAX的概况及各个组成部分。
ASP.NET AJAX入门系列(2):使用ScriptManager控件
导读:ScriptManager控件包括在ASP.NET 2.0 AJAX Extensions中,它用来处理页面上的所有组件以及页面局部更新,生成相关的客户端代理脚本以便能够在JavaScript中访问Web Service,所有需要支持ASP.NET AJAX的ASP.NET页面上有且只能有一个ScriptManager控件。在ScriptManager控件中我们可以指定需要的脚本库,或者指定通过JS来调用的Web Service,以及调用AuthenticationService和ProfileService,还有页面错误处理等。
ASP.NET AJAX入门系列(3):使用ScriptManagerProxy控件
导读:在ASP.NET AJAX中,由于一个ASPX页面上只能有一个ScriptManager控件,所以在有母版页的情况下,如果需要在Master-Page和Content-Page中需要引入不同的脚本时,这就需要在Content-page中使用ScriptManagerProxy,而不是ScriptManager,ScriptManager 和 ScriptManagerProxy 是两个非常相似的控件。
ASP.NET AJAX入门系列(4):使用UpdatePanel控件(一)
导读:UpdatePanel可以用来创建丰富的局部更新Web应用程序,它是ASP.NET 2.0 AJAX Extensions中很重要的一个控件,其强大之处在于不用编写任何客户端脚本,只要在一个页面上添加几个UpdatePanel控件和一个ScriptManager控件就可以自动实现局部更新。通过本文来学习一下UpdatePanel简单的使用方法(第一篇)。
ASP.NET AJAX入门系列(5):使用UpdatePanel控件(二)
导读:UpdatePanel可以用来创建丰富的局部更新Web应用程序,它是ASP.NET 2.0 AJAX Extensions中很重要的一个控件,其强大之处在于不用编写任何客户端脚本,只要在一个页面上添加几个UpdatePanel控件和一个ScriptManager控件就可以自动实现局部更新。通过本文来学习一下UpdatePanel其他的一些使用方法(第二篇)。
ASP.NET AJAX入门系列(6):UpdateProgress控件简单介绍
导读:在ASP.NET AJAX Beta2中,UpdateProgress控件已经从“增值”CTP中移到了ASP.NET AJAX核心中,本文简单介绍一些它的基本用法,翻译自官方文档。
ASP.NET AJAX入门系列(7):使用客户端脚本对UpdateProgress编程
导读:在本篇文章中,我们将通过编写JavaScript来使用客户端行为扩展UpdateProgress控件,客户端代码将使用ASP.NET AJAX Library中的PageRequestManager,在UpdateProgress控件中,将添加一个Button,来允许用户取消异步更新,并且使用客户端脚本来显示或者隐藏进度信息,翻译自官方文档。
导读:在UpdatePanel控件异步更新时,如果有错误发生,默认情况下会弹出一个Alert对话框显示出错误信息,这对用户来说是不友好的,本文看一下如何在服务端和客户端脚本中自定义异常处理,翻译自官方文档。
ASP.NET AJAX入门系列(9):在母版页中使用UpdatePanel
导读:本文简单介绍一下在母版页中使用UpdatePanel控件,翻译自官方文档。
ASP.NET AJAX入门系列(10):Timer控件简单使用
导读:本文主要通过一个简单示例,让Web页面在一定的时间间隔内局部刷新,来学习一下ASP.NET AJAX中的服务端Timer控件的简单使用。
ASP.NET AJAX入门系列(11):在多个UpdatePanle中使用Timer控件
导读:本文将使用Timer控件更新两个UpdatePanel控件,Timer控件将放在UpdatePanel控件的外面,并将它配置为UpdatePanel的触发器,翻译自官方文档
[教程]ASP.NET Page Templates - Using Inheritance
Introduction
Anyone who has developed commercial websites has run into the problem of creating a template for the site. For most sites a large percentage of the HTML is the same or similar for all pages. The header, navigation, and footer elements of a typical site layout appear on almost every page.
Some developers will put that markup in every page's source file. Anyone who's had to maintain a site put together this way knows how difficult it is to make site-wide changes. You end up depending on massive search and replace operations, which can be difficult to do without creating markup errors that require hand-tuning to repair.
In traditional ASP programming, like many other server-based programming environments, this was typically solved using an include file. The page is divided into logical sections representing the header, left navigation, body, and footer elements. A separate include is created for each of the common elements and the body section is placed in the actual ASP page. The page then includes the appropriate files to build up the look and feel of the page. This is a significant improvement over the previous approach, but still creates a few maintenance problems.
First of all, the individual ASP files must contain the code necessary to include the correct support files. This makes each page's content strongly coupled to the site's template. It also means that when you add a new page to the site, you must remember to setup all the correct includes in the right order.
An additional problem happens when you decide to make a significant look-and-feel change to the site. If you're lucky, you may be able to make all of your changes in the include files. Most of the time, however, the tight coupling between the include files and the ASP pages means that you end up having to edit each and every ASP page as well.
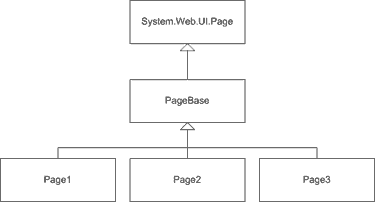
With the introduction of ASP.NET, developers have been giving a powerful new set of tools to help resolve these problems. ASP.NET uses an object-oriented development paradigm. In practical terms this means that every page is a class that derives from System.Web.UI.Page. This class provides a number of services to the web developer including caching, rendering, response and request access, etc.
So the question is: How can we best take advantage of the object-oriented nature of ASP.NET when creating websites? Is there a better way to create templates than using include-files?
Web User Controls
One of the first things a developer notices when getting started with ASP.NET is that a new style of control has been introduced: Web User Controls. User Controls allow a developer to encapsulate a common chunk of HTML or server-side code into a component that can be reused on many different pages.
User controls are not used in a page using the #include directive. Instead that are either placed in the ASPX file as a custom tag (with the Register directive) or from server-side code with the LoadControl statement.
This article is not going to go into the details of creating and using User Controls; there are many other sources that cover that topic. They are, however, and improvement over the old include-file approach and deserved mention here.
They don't solve all of the problems discussed above though. If, for example, you encapsulate your page header in a user control, you still have to remember to use it on each and every page in the site. If you decide you need to add another user control to another part of your site, then once again you end up editing every page to get that user control embedded.
Also, depending on the layout of the pages in your site, you may end up having some formatting or positioning markup in each page to make sure that the User Control is exactly where you want it on the page. This markup is common to every page and we should be able to find a way to have that code exist in only one place.
Simple Page Inheritance
If you're familiar with object-oriented programming then you are probably already seeing something familiar. When you have a chunk of code that occurs in more than one class, it is common practice to refactor that code by creating a base class and moving that code "up" one level in the inheritance chain. Why not do that here?
Since all ASPX pages derive from System.Web.UI.Page, we should be able to create a base class that sits between our page class and the Page class. This class will be responsible for producing the template used in our site. Then our page classes will derive from the base class and will only contain the markup and server controls needed for their specific task. To illustrate this, let's create an example base class called PageBase and then derive a page class from it. (All of the examples in this article are written in C#, but you should easily be able to convert them to VB.NET or any other .NET language.)
using System;
using System.Web.UI;
public class PageBase : System.Web.UI.Page
{
private string _pageTitle;
public string PageTitle
{
get { return _pageTitle; }
set { _pageTitle = value; }
}
protected override void Render(HtmlTextWriter writer)
{
// First we will build up the html document,

// the head section and the body section.

writer.Write( @"
<html>
<head>
<title>" + PageTitle + @"</title>
</head>
<body>" );
// Then we allow the base class to render the

// controls contained in the ASPX file.

base.Render( writer );
// Finally we render the final tags to close

// the document.

Writer.Write( @"
</body>
</html>" );
}
}
Let's take a look at a few interesting points illustrated in this base class. First of all, we expose a property called PageTitle that will contain the title for the page. This property's contents are written out in the <title> section of the page. Also notice the '@' symbol used before the string literals. While not explicitly required for this example, the '@' symbol is a C# token that says the following string literal should not have escape sequences expanded. If we didn't do this, we would have to escape our slash characters. If you are working in VB.NET you don't have to worry about this.
Now we will create an ASPX page that derives from PageBase. I'll be using code-behind pages, so we have two files. The first file has a file extension .ASPX and contains the markup for the page.
<%@ Page language="c#" Codebehind="SimplePageInheritance.aspx.cs" AutoEventWireup="false"
Inherits="SimplePageInheritance" %>
<form id="SimplePageInheritance" method="post" runat="server">
<h1>This is Page 1</h1>
<p>
This page demonstrates Simple Page Inheritance where the content is rendered
using the base class' Render() method. You cannot use Server Controls that
postback in the base class, they can only be used in the .ASPX page itself.
</p>
</form>
Notice that there is no markup for "standard" content like <html>, <head> and <body> because they will be rendered in the base class. The code-behind class defines the SimplePageInheritance class referenced in the Page declaration.
public class SimplePageInheritance : PageBase
{
public SimplePageInheritance()
{
PageTitle = "Simple Page Inheritance";
}
}
Pretty cool, eh? This solution solves all of the problems with include-based templates mentioned earlier. For some situations, however, it doesn't solve everything. For those we need Advanced Page Inheritance.
Advanced Page Inheritance
The biggest problem with the Simple Page Inheritance system is that you cannot put any server controls that cause a post-back in the template base class. The reason for this is related to the position of the <form> tag. In Simple Page Inheritance, the <form> tag is included in the derived ASPX page. Therefore any markup rendered by the base class will be either before or after the ASPX file markup. This might occur if, for example, we wanted a search system included in the template.
There are many different ways we could solve this problem. For this example, we will move the <form> tag from the ASPX file to the base class. We can't just render the <form> tag as a string literal either, because in ASPX files, the form is actually processed on the server before the markup is sent to the browser. So we have to create a Form object and insert it into the Controls collection of the page.
using System;
using System.Web.UI;
using System.Web.UI.HtmlControls;
using System.Web.UI.WebControls;
public class AdvancedPageInheritanceBase : System.Web.UI.Page
{
protected override void OnInit(System.EventArgs e)
{
BuildPage( GenerateHtmlForm() );
base.OnInit(e);
}
protected void BuildPage( HtmlForm form )
{
////////////////////////////////////////////////////////

// Build the page and include the generated form

this.Controls.AddAt( 0, new LiteralControl( @"
<html>
<head>
<title>" + PageTitle + @"</title>
</head>
<body>
") );
this.Controls.Add( form );
this.Controls.Add( new LiteralControl( @"
</body>
</html>
"));
}
private HtmlForm GenerateHtmlForm()
{
HtmlForm form = new HtmlForm();
AddSearch(form);
AddControlsFromDerivedPage(form);
return form;
}
private void AddSearch( HtmlForm form )
{
searchBox = new TextBox();
Button searchButton = new Button();
searchButton.Text = "Search";
searchButton.Click +=
new EventHandler( this.OnSearchButtonClicked );
form.Controls.Add( searchBox );
form.Controls.Add( searchButton );
form.Controls.Add( new LiteralControl("<br>") );
}
protected void OnSearchClick( object sender, EventArgs e )
{
// Do the search here

}
private void AddControlsFromDerivedPage(HtmlForm form)
{
int count = this.Controls.Count;
for( int i = 0; i<count; ++i )
{
System.Web.UI.Control ctrl  = this.Controls[0];
form.Controls.Add( ctrl );
this.Controls.Remove( ctrl );
}
}
}
Remember that I said there are many ways to solve the <form> tag placement problem. In this solution we create an HtmlForm control, populate it with the contents of the ASPX page and then insert it into the template.
This system works very well and allows us to create ASPX pages that are completely independent of the template. Here is the ASPX file:
<%@ Page language="c#" Codebehind="AdvancedPageInheritance.aspx.cs"
AutoEventWireup="false"
Inherits="PageInheritanceSample.AdvancedPageInheritance" %>
<h1>Advanced Page Inheritance</h1>
<p>This demonstrates the Advanced Page Inheritance Technique.</p>
The code-behind file is no different than the one used in the Simple Page Inheritance example. Notice that our ASPX file doesn't have a <form> tag in it.
Performance
I was surprised to find that there is almost no performance difference when using page inheritance. Using Microsoft Application Center Test, I ran page load tests on three different versions of similar page structures:
- The first page used user controls to encapsulate the header, left navigation and footer sections. It did not use any page inheritance.
- The second page had the same look & feel and the same content but used the method outlined in Simple Page Inheritance.
- The third page had a similar look & feel (it included a search box like in the example code) and used the method outlined in Advanced Page Inheritance.
The following table shows the results after loading each page continuously for 5 minutes on my development workstation. As you can see, the differences are minimal.
| Page | # of Requests | Avg. Response Time (ms) | Avg. Requests per Sec. |
|---|---|---|---|
| WebUserControl.aspx | 16,693 | 10.53 | 55.64 |
| SimplePageInheritance.aspx | 16,636 | 10.54 | 55.45 |
| AdvancedPageInheritance.aspx | 16,965 | 10.20 | 56.55 |
Conclusion
Developing websites and web applications that are easy to maintain has always been a challenge. Over time the techniques used have evolved from almost nothing to modern object-oriented techniques like those presented in this article. These techniques can be used by anyone with a basic understanding of object-oriented programming and will almost certainly help you produce better factored, easier to maintain code.
[MVC]this.ReadFromRequest读取的是Name的值
发现个问题,原来ASP.NET MVC 框架中的this.ReadFromRequest(string key)读取的是form中组件的name值,不觉得让我很是不解,难怪只定义了id不能获得到值呢
代码如下:
<form id="Area" method="post" action="<%=Url.Action("SaveArea") %>">
<div>
AreaName:<%=ViewData.AreaName %>
<label>地区名称:</label><input type="text" id="AreaName" name="AreaName"/>
<label><input type="submit" value="保存" /></label>
</div>
</form>
不过这样也可以理解,毕竟ID不能重复,而name可以重复,这样就可以用来读取radio的值了
代码如下:
<div class="qygr">
<label>
<input id="Enterprise" type="radio" name="radiobutton" value="2"  onclick="showCompany();"/>
</label>
企业
<label>
<input id="Person" type="radio" name="radiobutton" value="1" checked="checked" onclick="hideCompany();" />
个人</label>
</div>
[应用]Flair在线制作应用Flex
Flair允许使用者创建自己的Web或者是桌面的Flex应用程序,也就是说,是在Flair运行中,直接在里面添加控件,自定义程序各种UI以及事 件。相当不错的想法,Flair应该是刚刚被放出来没多久的项目,Demo已经上线,不过在Google Code的主页上还没有任何东西可以下载。Demo中基本的控件已经实现(双击进行添加),不过位置的移动等操作实现比较麻烦。有兴趣地可以去体验一下。
Google Code上主页:http://code.google.com/p/flair/
Demo地址:http://www.flairbuilder.com/FlairBuilder.html
Permalink:http://blog.minidx.com/2008/06/09/901.html
Related PostRuboss Framework:将Adobe Flex和AIR应用简单高效的与Ruby On Rails集成的开发框架AIR/Flex博客圈中居然也存在这种人利用Away3D快速创建Flex/Flash的3D应用的教程Flex中利用 Ruby on Rails解决超大文件上传问题Flex中通过设置fontFamily和labelStyleName样式在HSlider控件中使用嵌入字体的例子 Flex中如何通过设置tickLength样式设定HSlider控件上一个标记号(tick)长度的例子Flex中通过设置textAlign样式在 一个List控件中改变文本对齐方向的例子Flex中如何通过设置fontFamily样式在ComboBox控件中使用自定义嵌入字体的例子Flex中 如何通过prompt属性在ComboBox控件中添加一个提示项(prompt)的例子Flex中如何通过设定headerStyleName样式在 Accordion控件中使用嵌入字体的例子Flex中如何通过leading样式在一个text控件中设置文本铅框(text leading)的例子Flex中通过自定义Accordion容器头部来阻止用户点击Accordion容器头部的例子Flex中利用 firstDayOfWeek属性改变DateChooser控件日历(calendar)布局的例子作为一个Flash平台开发/设计者应该拥有的10 本书36款新鲜出炉的很酷的Flex/AS3组件,开发包和工具Flex中利用Repeater显示一组CheckBox控件的例子Flex中利用 Repeater显示一组RadioButton控件的例子Flex中如何通过borderStyle和borderSides样式设置 NumericStepper控件特定边框(上下左右边)的例子Flex中如何通过borderThickness样式设置NumericStepper 控件边框厚度的例子Flex中通过borderColor样式设置NumericStepper控件边框颜色的例子