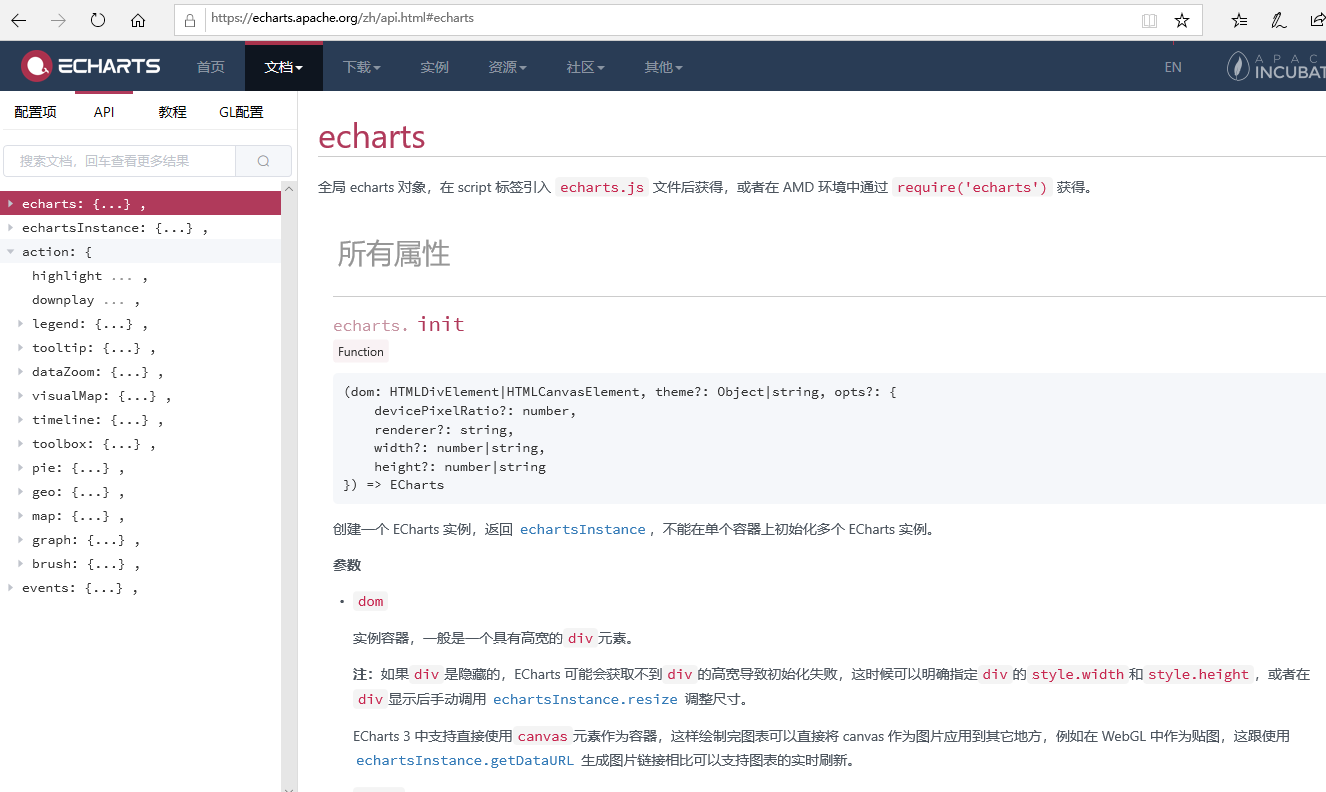
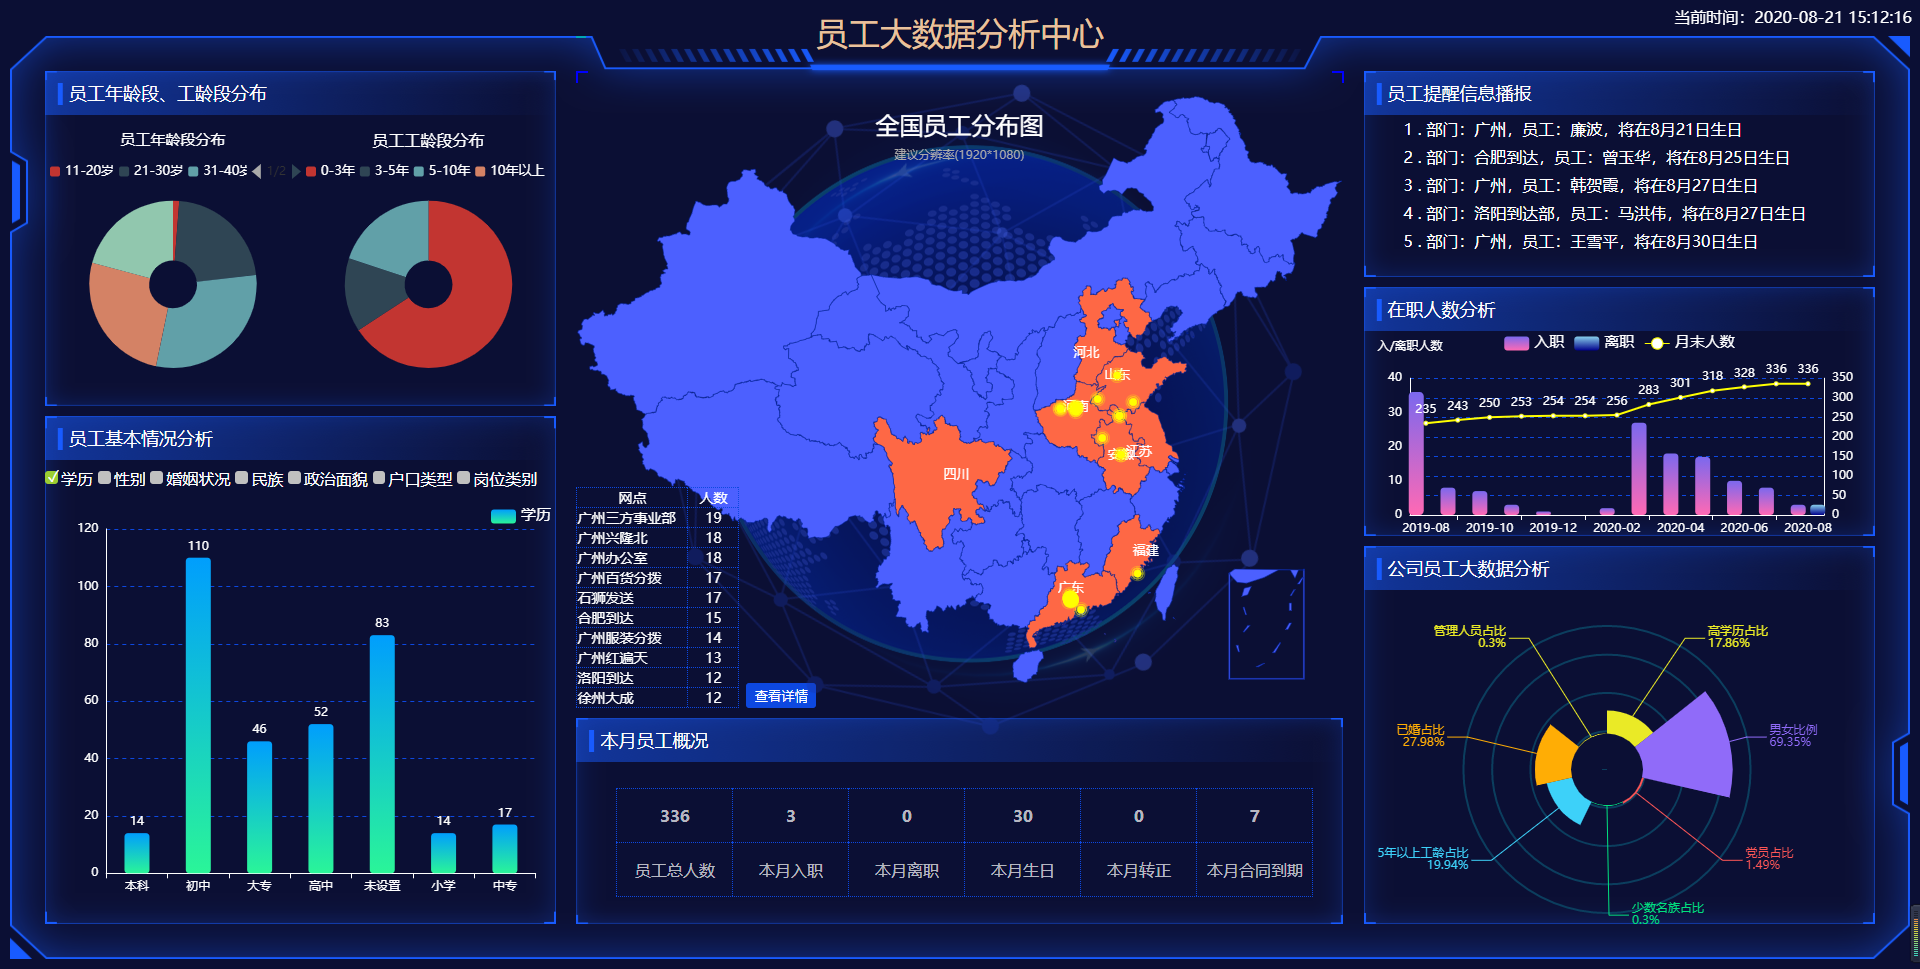
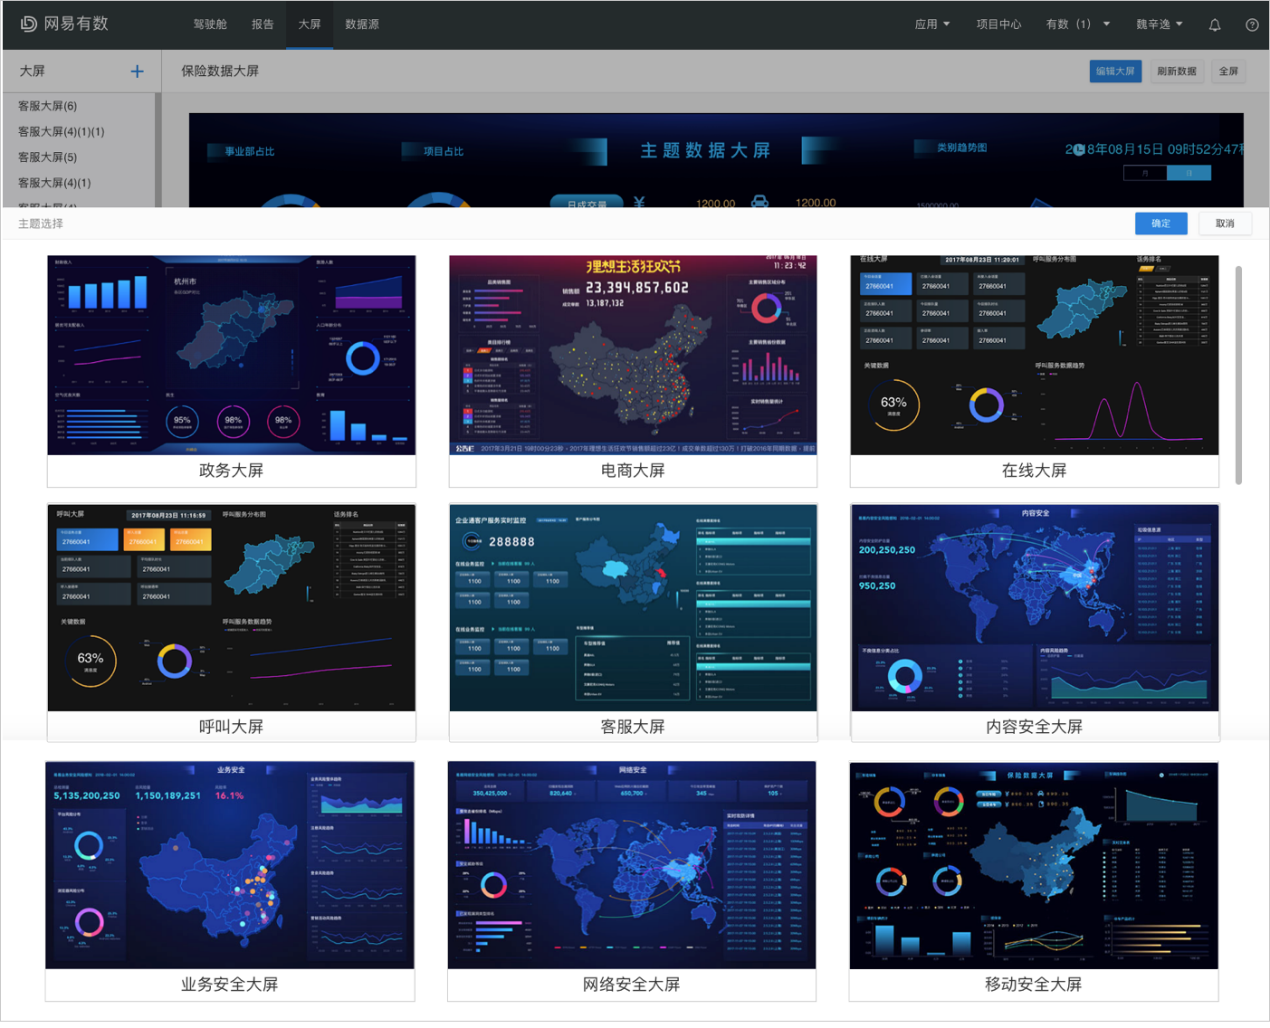
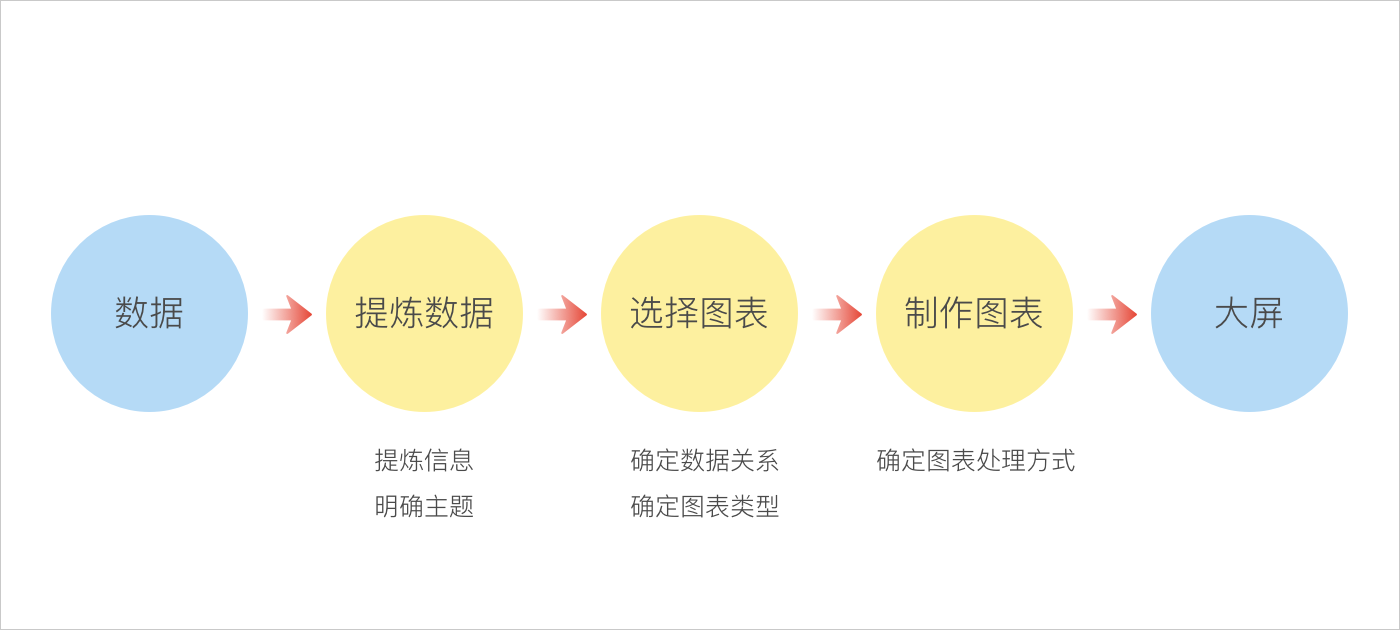
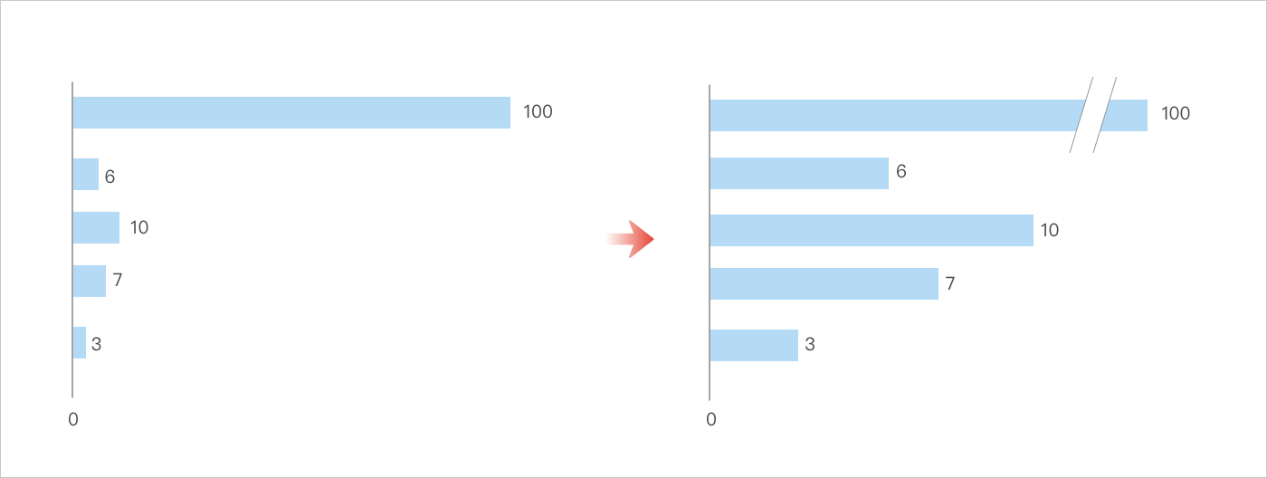
现如今市场上的人事系统五花八门,可做了大数据分析的人事系统少之又少,最近本人花了一个星期好好研究了大数据展示方面的内容,图表主要用的是echarts来实现的,官网地址:https://echarts.apache.org/zh/index.html
$(function () {
map();
})
var lightProvince = [];
var provinceMap = {
台湾: ‘taiwan’,
河北: ‘hebei’,
山西: ‘shanxi’,
辽宁: ‘liaoning’,
吉林: ‘jilin’,
黑龙江: ‘heilongjiang’,
江苏: ‘jiangsu’,
浙江: ‘zhejiang’,
安徽: ‘anhui’,
福建: ‘fujian’,
江西: ‘jiangxi’,
山东: ‘shandong’,
河南: ‘henan’,
湖北: ‘hubei’,
湖南: ‘hunan’,
广东: ‘guangdong’,
海南: ‘hainan’,
四川: ‘sichuan’,
贵州: ‘guizhou’,
云南: ‘yunnan’,
陕西: ‘shanxi1’,
甘肃: ‘gansu’,
青海: ‘qinghai’,
新疆: ‘xinjiang’,
广西: ‘guangxi’,
内蒙古: ‘neimenggu’,
宁夏: ‘ningxia’,
西藏: ‘xizang’,
北京: ‘beijing’,
天津: ‘tianjin’,
上海: ‘shanghai’,
重庆: ‘chongqing’,
香港: ‘xianggang’,
澳门: ‘aomen’
};
var py_provinceMap = {
china: ‘全国’,
hebei: ‘河北’,
shanxi: ‘山西’,
liaoning: ‘辽宁’,
jilin: ‘吉林’,
heilongjiang: ‘黑龙江’,
jiangsu: ‘江苏’,
zhejiang: ‘浙江’,
anhui: ‘安徽’,
fujian: ‘福建’,
jiangxi: ‘江西’,
shandong: ‘山东’,
henan: ‘河南’,
hubei: ‘湖北’,
hunan: ‘湖南’,
guangdong: ‘广东’,
hainan: ‘海南’,
sichuan: ‘四川’,
guizhou: ‘贵州’,
yunnan: ‘云南’,
shanxi: ‘陕西’,
gansu: ‘甘肃’,
qinghai: ‘青海’,
xinjiang: ‘新疆’,
guangxi: ‘广西’,
neimenggu: ‘内蒙古’,
ningxia: ‘宁夏’,
xizang: ‘西藏’,
beijing: ‘北京’,
tianjin: ‘天津’,
shanghai: ‘上海’,
chongqing: ‘重庆’
};
var cityMap = {
北京市: ‘110100’,
天津市: ‘120100’,
上海市: ‘310100’,
重庆市: ‘500100’,
崇明县: ‘310200’,
湖北省直辖县市: ‘429000’,
铜仁市: ‘522200’,
毕节市: ‘522400’,
石家庄市: ‘130100’,
唐山市: ‘130200’,
秦皇岛市: ‘130300’,
邯郸市: ‘130400’,
邢台市: ‘130500’,
保定市: ‘130600’,
张家口市: ‘130700’,
承德市: ‘130800’,
沧州市: ‘130900’,
廊坊市: ‘131000’,
衡水市: ‘131100’,
太原市: ‘140100’,
大同市: ‘140200’,
阳泉市: ‘140300’,
长治市: ‘140400’,
晋城市: ‘140500’,
朔州市: ‘140600’,
晋中市: ‘140700’,
运城市: ‘140800’,
忻州市: ‘140900’,
临汾市: ‘141000’,
吕梁市: ‘141100’,
呼和浩特市: ‘150100’,
包头市: ‘150200’,
乌海市: ‘150300’,
赤峰市: ‘150400’,
通辽市: ‘150500’,
鄂尔多斯市: ‘150600’,
呼伦贝尔市: ‘150700’,
巴彦淖尔市: ‘150800’,
乌兰察布市: ‘150900’,
兴安盟: ‘152200’,
锡林郭勒盟: ‘152500’,
阿拉善盟: ‘152900’,
沈阳市: ‘210100’,
大连市: ‘210200’,
鞍山市: ‘210300’,
抚顺市: ‘210400’,
本溪市: ‘210500’,
丹东市: ‘210600’,
锦州市: ‘210700’,
营口市: ‘210800’,
阜新市: ‘210900’,
辽阳市: ‘211000’,
盘锦市: ‘211100’,
铁岭市: ‘211200’,
朝阳市: ‘211300’,
葫芦岛市: ‘211400’,
长春市: ‘220100’,
吉林市: ‘220200’,
四平市: ‘220300’,
辽源市: ‘220400’,
通化市: ‘220500’,
白山市: ‘220600’,
松原市: ‘220700’,
白城市: ‘220800’,
延边朝鲜族自治州: ‘222400’,
哈尔滨市: ‘230100’,
齐齐哈尔市: ‘230200’,
鸡西市: ‘230300’,
鹤岗市: ‘230400’,
双鸭山市: ‘230500’,
大庆市: ‘230600’,
伊春市: ‘230700’,
佳木斯市: ‘230800’,
七台河市: ‘230900’,
牡丹江市: ‘231000’,
黑河市: ‘231100’,
绥化市: ‘231200’,
大兴安岭地区: ‘232700’,
南京市: ‘320100’,
无锡市: ‘320200’,
徐州市: ‘320300’,
常州市: ‘320400’,
苏州市: ‘320500’,
南通市: ‘320600’,
连云港市: ‘320700’,
淮安市: ‘320800’,
盐城市: ‘320900’,
扬州市: ‘321000’,
镇江市: ‘321100’,
泰州市: ‘321200’,
宿迁市: ‘321300’,
杭州市: ‘330100’,
宁波市: ‘330200’,
温州市: ‘330300’,
嘉兴市: ‘330400’,
湖州市: ‘330500’,
绍兴市: ‘330600’,
金华市: ‘330700’,
衢州市: ‘330800’,
舟山市: ‘330900’,
台州市: ‘331000’,
丽水市: ‘331100’,
合肥市: ‘340100’,
芜湖市: ‘340200’,
蚌埠市: ‘340300’,
淮南市: ‘340400’,
马鞍山市: ‘340500’,
淮北市: ‘340600’,
铜陵市: ‘340700’,
安庆市: ‘340800’,
黄山市: ‘341000’,
滁州市: ‘341100’,
阜阳市: ‘341200’,
宿州市: ‘341300’,
六安市: ‘341500’,
亳州市: ‘341600’,
池州市: ‘341700’,
宣城市: ‘341800’,
福州市: ‘350100’,
厦门市: ‘350200’,
莆田市: ‘350300’,
三明市: ‘350400’,
泉州市: ‘350500’,
漳州市: ‘350600’,
南平市: ‘350700’,
龙岩市: ‘350800’,
宁德市: ‘350900’,
南昌市: ‘360100’,
景德镇市: ‘360200’,
萍乡市: ‘360300’,
九江市: ‘360400’,
新余市: ‘360500’,
鹰潭市: ‘360600’,
赣州市: ‘360700’,
吉安市: ‘360800’,
宜春市: ‘360900’,
抚州市: ‘361000’,
上饶市: ‘361100’,
济南市: ‘370100’,
青岛市: ‘370200’,
淄博市: ‘370300’,
枣庄市: ‘370400’,
东营市: ‘370500’,
烟台市: ‘370600’,
潍坊市: ‘370700’,
济宁市: ‘370800’,
泰安市: ‘370900’,
威海市: ‘371000’,
日照市: ‘371100’,
莱芜市: ‘371200’,
临沂市: ‘371300’,
德州市: ‘371400’,
聊城市: ‘371500’,
滨州市: ‘371600’,
菏泽市: ‘371700’,
郑州市: ‘410100’,
开封市: ‘410200’,
洛阳市: ‘410300’,
平顶山市: ‘410400’,
安阳市: ‘410500’,
鹤壁市: ‘410600’,
新乡市: ‘410700’,
焦作市: ‘410800’,
濮阳市: ‘410900’,
许昌市: ‘411000’,
漯河市: ‘411100’,
三门峡市: ‘411200’,
南阳市: ‘411300’,
商丘市: ‘411400’,
信阳市: ‘411500’,
周口市: ‘411600’,
驻马店市: ‘411700’,
省直辖县级行政区划: ‘469000’,
武汉市: ‘420100’,
黄石市: ‘420200’,
十堰市: ‘420300’,
宜昌市: ‘420500’,
襄阳市: ‘420600’,
鄂州市: ‘420700’,
荆门市: ‘420800’,
孝感市: ‘420900’,
荆州市: ‘421000’,
黄冈市: ‘421100’,
咸宁市: ‘421200’,
随州市: ‘421300’,
恩施土家族苗族自治州: ‘422800’,
长沙市: ‘430100’,
株洲市: ‘430200’,
湘潭市: ‘430300’,
衡阳市: ‘430400’,
邵阳市: ‘430500’,
岳阳市: ‘430600’,
常德市: ‘430700’,
张家界市: ‘430800’,
益阳市: ‘430900’,
郴州市: ‘431000’,
永州市: ‘431100’,
怀化市: ‘431200’,
娄底市: ‘431300’,
湘西土家族苗族自治州: ‘433100’,
广州市: ‘440100’,
韶关市: ‘440200’,
深圳市: ‘440300’,
珠海市: ‘440400’,
汕头市: ‘440500’,
佛山市: ‘440600’,
江门市: ‘440700’,
湛江市: ‘440800’,
茂名市: ‘440900’,
肇庆市: ‘441200’,
惠州市: ‘441300’,
梅州市: ‘441400’,
汕尾市: ‘441500’,
河源市: ‘441600’,
阳江市: ‘441700’,
清远市: ‘441800’,
东莞市: ‘441900’,
中山市: ‘442000’,
潮州市: ‘445100’,
揭阳市: ‘445200’,
云浮市: ‘445300’,
南宁市: ‘450100’,
柳州市: ‘450200’,
桂林市: ‘450300’,
梧州市: ‘450400’,
北海市: ‘450500’,
防城港市: ‘450600’,
钦州市: ‘450700’,
贵港市: ‘450800’,
玉林市: ‘450900’,
百色市: ‘451000’,
贺州市: ‘451100’,
河池市: ‘451200’,
来宾市: ‘451300’,
崇左市: ‘451400’,
海口市: ‘460100’,
三亚市: ‘460200’,
三沙市: ‘460300’,
成都市: ‘510100’,
自贡市: ‘510300’,
攀枝花市: ‘510400’,
泸州市: ‘510500’,
德阳市: ‘510600’,
绵阳市: ‘510700’,
广元市: ‘510800’,
遂宁市: ‘510900’,
内江市: ‘511000’,
乐山市: ‘511100’,
南充市: ‘511300’,
眉山市: ‘511400’,
宜宾市: ‘511500’,
广安市: ‘511600’,
达州市: ‘511700’,
雅安市: ‘511800’,
巴中市: ‘511900’,
资阳市: ‘512000’,
阿坝藏族羌族自治州: ‘513200’,
甘孜藏族自治州: ‘513300’,
凉山彝族自治州: ‘513400’,
贵阳市: ‘520100’,
六盘水市: ‘520200’,
遵义市: ‘520300’,
安顺市: ‘520400’,
黔西南布依族苗族自治州: ‘522300’,
黔东南苗族侗族自治州: ‘522600’,
黔南布依族苗族自治州: ‘522700’,
昆明市: ‘530100’,
曲靖市: ‘530300’,
玉溪市: ‘530400’,
保山市: ‘530500’,
昭通市: ‘530600’,
丽江市: ‘530700’,
普洱市: ‘530800’,
临沧市: ‘530900’,
楚雄彝族自治州: ‘532300’,
红河哈尼族彝族自治州: ‘532500’,
文山壮族苗族自治州: ‘532600’,
西双版纳傣族自治州: ‘532800’,
大理白族自治州: ‘532900’,
德宏傣族景颇族自治州: ‘533100’,
怒江傈僳族自治州: ‘533300’,
迪庆藏族自治州: ‘533400’,
拉萨市: ‘540100’,
昌都地区: ‘542100’,
山南地区: ‘542200’,
日喀则地区: ‘542300’,
那曲地区: ‘542400’,
阿里地区: ‘542500’,
林芝地区: ‘542600’,
西安市: ‘610100’,
铜川市: ‘610200’,
宝鸡市: ‘610300’,
咸阳市: ‘610400’,
渭南市: ‘610500’,
延安市: ‘610600’,
汉中市: ‘610700’,
榆林市: ‘610800’,
安康市: ‘610900’,
商洛市: ‘611000’,
兰州市: ‘620100’,
嘉峪关市: ‘620200’,
金昌市: ‘620300’,
白银市: ‘620400’,
天水市: ‘620500’,
武威市: ‘620600’,
张掖市: ‘620700’,
平凉市: ‘620800’,
酒泉市: ‘620900’,
庆阳市: ‘621000’,
定西市: ‘621100’,
陇南市: ‘621200’,
临夏回族自治州: ‘622900’,
甘南藏族自治州: ‘623000’,
西宁市: ‘630100’,
海东地区: ‘632100’,
海北藏族自治州: ‘632200’,
黄南藏族自治州: ‘632300’,
海南藏族自治州: ‘632500’,
果洛藏族自治州: ‘632600’,
玉树藏族自治州: ‘632700’,
海西蒙古族藏族自治州: ‘632800’,
银川市: ‘640100’,
石嘴山市: ‘640200’,
吴忠市: ‘640300’,
固原市: ‘640400’,
中卫市: ‘640500’,
乌鲁木齐市: ‘650100’,
克拉玛依市: ‘650200’,
吐鲁番地区: ‘652100’,
哈密地区: ‘652200’,
昌吉回族自治州: ‘652300’,
博尔塔拉蒙古自治州: ‘652700’,
巴音郭楞蒙古自治州: ‘652800’,
阿克苏地区: ‘652900’,
克孜勒苏柯尔克孜自治州: ‘653000’,
喀什地区: ‘653100’,
和田地区: ‘653200’,
伊犁哈萨克自治州: ‘654000’,
塔城地区: ‘654200’,
阿勒泰地区: ‘654300’,
自治区直辖县级行政区划: ‘659000’,
台湾省: ‘710000’,
香港特别行政区: ‘810100’,
澳门特别行政区: ‘820000’
};
var lightColor = {
河北: ‘#ffa259’,
山西: ‘#fe6845’,
辽宁: ‘#fa4252’,
吉林: ‘#3fc5f0’,
黑龙江: ‘#c72c41’,
江苏: ‘#f4efd3’,
浙江: ‘#c72c41’,
安徽: ‘#e13a9d’,
福建: ‘#e13a9d’,
江西: ‘#cf56a1’,
山东: ‘#fa697c’,
河南: ‘#a3f7bf’,
湖北: ‘#3ed4ff’,
湖南: ‘#9dab86’,
广东: ‘#a6c84c’,
海南: ‘#ffa259’,
四川: ‘#cfb495’,
贵州: ‘#f09595’,
云南: ‘#4f98ca’,
陕西: ‘#617be3’,
甘肃: ‘#9aceff’,
青海: ‘#9aceff’,
新疆: ‘#02a8a8’,
广西: ‘#fbdff0’,
内蒙古: ‘#42e6a4’,
宁夏: ‘#02a8a8’,
西藏: ‘#f6c3e5’,
北京: ‘#a278b5’,
天津: ‘#d6e5fa’,
上海: ‘#fbe3b9’,
重庆: ‘#bac7a7’
};
var geoCoordMap = {
‘新疆’: [86.22, 44.30],
‘九江’: [116.00, 29.70],
‘新乡’: [116.402217, 35.311657],
‘ ‘: [79.92, 37.12],
‘ ‘: [86.85, 47.70],
‘若羌县’: [88.17, 39.02],
‘上海’: [121.4648, 31.2891],
‘东莞’: [113.8953, 22.901],
‘东营’: [118.7073, 37.5513],
‘中山’: [113.4229, 22.478],
‘临汾’: [111.4783, 36.1615],
‘临沂’: [118.3118, 35.2936],
‘丹东’: [124.541, 40.4242],
‘丽水’: [119.5642, 28.1854],
‘乌鲁木齐’: [87.9236, 43.5883],
‘佛山’: [112.8955, 23.1097],
‘保定’: [115.0488, 39.0948],
‘兰州’: [103.5901, 36.3043],
‘包头’: [110.3467, 41.4899],
‘北京’: [116.4551, 40.2539],
‘北海’: [109.314, 21.6211],
‘南京’: [118.8062, 31.9208],
‘南宁’: [108.479, 23.1152],
‘南昌’: [116.0046, 28.6633],
‘南通’: [121.1023, 32.1625],
‘厦门’: [118.1689, 24.6478],
‘台州’: [121.1353, 28.6688],
‘合肥’: [117.29, 32.0581],
‘呼和浩特’: [111.4124, 40.4901],
‘咸阳’: [108.4131, 34.8706],
‘哈尔滨’: [127.9688, 45.368],
‘唐山’: [118.4766, 39.6826],
‘嘉兴’: [120.9155, 30.6354],
‘大同’: [113.7854, 39.8035],
‘大连’: [122.2229, 39.4409],
‘天津’: [117.4219, 39.4189],
‘太原’: [112.3352, 37.9413],
‘威海’: [121.9482, 37.1393],
‘宁波’: [121.5967, 29.6466],
‘宝鸡’: [107.1826, 34.3433],
‘宿迁’: [118.5535, 33.7775],
‘常州’: [119.4543, 31.5582],
‘广州’: [113.5107, 23.2196],
‘廊坊’: [116.521, 39.0509],
‘延安’: [109.1052, 36.4252],
‘张家口’: [115.1477, 40.8527],
‘徐州’: [117.5208, 34.3268],
‘德州’: [116.6858, 37.2107],
‘惠州’: [114.6204, 23.1647],
‘成都’: [103.9526, 30.7617],
‘扬州’: [119.4653, 32.8162],
‘承德’: [117.5757, 41.4075],
‘拉萨’: [91.1865, 30.1465],
‘无锡’: [120.3442, 31.5527],
‘日照’: [119.2786, 35.5023],
‘昆明’: [102.9199, 25.4663],
‘杭州’: [119.5313, 29.8773],
‘枣庄’: [117.323, 34.8926],
‘柳州’: [109.3799, 24.9774],
‘株洲’: [113.5327, 27.0319],
‘武汉’: [114.3896, 30.6628],
‘汕头’: [117.1692, 23.3405],
‘江门’: [112.6318, 22.1484],
‘沈阳’: [123.1238, 42.1216],
‘沧州’: [116.8286, 38.2104],
‘河源’: [114.917, 23.9722],
‘泉州’: [118.3228, 25.1147],
‘泰安’: [117.0264, 36.0516],
‘泰州’: [120.0586, 32.5525],
‘济南’: [117.1582, 36.8701],
‘济宁’: [116.8286, 35.3375],
‘海口’: [110.3893, 19.8516],
‘淄博’: [118.0371, 36.6064],
‘淮安’: [118.927, 33.4039],
‘深圳’: [114.5435, 22.5439],
‘清远’: [112.9175, 24.3292],
‘温州’: [120.498, 27.8119],
‘渭南’: [109.7864, 35.0299],
‘湖州’: [119.8608, 30.7782],
‘湘潭’: [112.5439, 27.7075],
‘滨州’: [117.8174, 37.4963],
‘潍坊’: [119.0918, 36.524],
‘烟台’: [120.7397, 37.5128],
‘玉溪’: [101.9312, 23.8898],
‘珠海’: [113.7305, 22.1155],
‘盐城’: [120.2234, 33.5577],
‘盘锦’: [121.9482, 41.0449],
‘石家庄’: [114.4995, 38.1006],
‘福州’: [119.4543, 25.9222],
‘秦皇岛’: [119.2126, 40.0232],
‘绍兴’: [120.564, 29.7565],
‘聊城’: [115.9167, 36.4032],
‘肇庆’: [112.1265, 23.5822],
‘舟山’: [122.2559, 30.2234],
‘苏州’: [120.6519, 31.3989],
‘莱芜’: [117.6526, 36.2714],
‘菏泽’: [115.6201, 35.2057],
‘营口’: [122.4316, 40.4297],
‘葫芦岛’: [120.1575, 40.578],
‘衡水’: [115.8838, 37.7161],
‘衢州’: [118.6853, 28.8666],
‘西宁’: [101.4038, 36.8207],
‘西安’: [109.1162, 34.2004],
‘贵阳’: [106.6992, 26.7682],
‘连云港’: [119.1248, 34.552],
‘邢台’: [114.8071, 37.2821],
‘邯郸’: [114.4775, 36.535],
‘郑州’: [113.4668, 34.6234],
‘鄂尔多斯’: [108.9734, 39.2487],
‘重庆’: [107.7539, 30.1904],
‘金华’: [120.0037, 29.1028],
‘铜川’: [109.0393, 35.1947],
‘银川’: [106.3586, 38.1775],
‘镇江’: [119.4763, 31.9702],
‘长春’: [125.8154, 44.2584],
‘长沙’: [113.0823, 28.2568],
‘长治’: [112.8625, 36.4746],
‘阳泉’: [113.4778, 38.0951],
‘青岛’: [120.4651, 36.3373],
‘韶关’: [113.7964, 24.7028]
};
var provinces = [‘shanghai’, ‘hebei’, ‘shanxi’, ‘neimenggu’, ‘liaoning’, ‘jilin’, ‘heilongjiang’, ‘jiangsu’, ‘zhejiang’, ‘anhui’, ‘fujian’, ‘jiangxi’, ‘shandong’, ‘henan’, ‘hubei’, ‘hunan’, ‘guangdong’, ‘guangxi’, ‘hainan’, ‘sichuan’, ‘guizhou’, ‘yunnan’, ‘xizang’, ‘shanxi1’, ‘gansu’, ‘qinghai’, ‘ningxia’, ‘xinjiang’, ‘beijing’, ‘tianjin’, ‘chongqing’, ‘xianggang’, ‘aomen’, ‘taiwan’]
var provincesText = [‘上海’, ‘河北’, ‘山西’, ‘内蒙古’, ‘辽宁’, ‘吉林’, ‘黑龙江’, ‘江苏’, ‘浙江’, ‘安徽’, ‘福建’, ‘江西’, ‘山东’, ‘河南’, ‘湖北’, ‘湖南’, ‘广东’, ‘广西’, ‘海南’, ‘四川’, ‘贵州’, ‘云南’, ‘西藏’, ‘陕西’, ‘甘肃’, ‘青海’, ‘宁夏’, ‘新疆’, ‘北京’, ‘天津’, ‘重庆’, ‘香港’, ‘澳门’, ‘台湾’]
var planePath = ‘path://M.6,1318.313v-89.254l-319.9-221.799l0.073-208.063c0.521-84.662-26.629-121.796-63.961-121.491c-37.332-0.305-64.482,36.829-63.961,121.491l0.073,208.063l-319.9,221.799v89.254l330.343-157.288l12.238,241.308l-134.449,92.931l0.531,42.034l175.125-42.917l175.125,42.917l0.531-42.034l-134.449-92.931l12.238-241.308L1705’;
var convertData = function (data) {
var res = [];
for (var i = 0; i < data.length; i++) {
var dataItem = data[i];
var fromCoord = geoCoordMap[dataItem.fromName];
var toCoord = geoCoordMap[dataItem.toName];
if (fromCoord && toCoord) {
res.push({
fromName: dataItem.fromName,
toName: dataItem.toName,
coords: [fromCoord, toCoord]
});
}
}
return res;
};
function SetMap() {
var url = ‘../showdata/mapset.html’;
$(“#iframeWin”).show();
//var name = ‘add’;
//var iWidth = 500;
//var iHeight = 500;
////获得窗口的垂直位置
//var iTop = (window.screen.availHeight – 30 – iHeight) / 2;
////获得窗口的水平位置
//var iLeft = (window.screen.availWidth – 10 – iWidth) / 2;
//window.open(url, name, ‘height=’ + iHeight + ‘,,innerHeight=’ + iHeight + ‘,width=’ + iWidth + ‘,innerWidth=’ + iWidth + ‘,top=’ + iTop + ‘,left=’ + iLeft + ‘,status=no,toolbar=no,menubar=no,location=no,resizable=no,scrollbars=0,titlebar=no’);
};
var series = [];
var mapSelected = ‘china’;
var showMapText = false;
var count = 0;
var seriesIndex;
var dataLength;
var dataIndex;
var timeTicket;
var geoData = {};
var mapJsonData;
var color = [‘#ffa259’, ‘#fe6845’, ‘#fa4252’, ‘#3fc5f0’, ‘#c72c41’, ‘#f4efd3’, ‘#c72c41’, ‘#e13a9d’, ‘#e13a9d’, ‘#ffd800’, ‘#51eaea’, ‘#a3f7bf’, ‘#3ed4ff’, ‘#ffa022’, ‘#a6c84c’];
var chartOption = {
title: {
show: true,
text: ‘实时货量流向图’,
target: null,
subtext: ‘地图设置’,
//sublink: ‘../showdata/mapset.html’,
sublink: ‘JavaScript:SetMap();’,
subtarget: ‘self’,
x: ‘center’,
y: ‘top’,
textAlign: null,
backgroundColor: ‘rgba(0,0,0,0)’,
borderColor: ‘#ccc’,
borderWidth: 0,
padding: 5,
itemGap: 10,
textStyle: {
fontSize: 30,
fontStyle: ‘normal’,
fontWeight: ‘normal’,
color: ‘white’
}
},
tooltip: {
trigger: ‘item’,
},
legend: {
orient: ‘vertical’,
top: ‘bottom’,
left: ‘right’,
data: [],
textStyle: {
color: ‘#fff’
},
selectedMode: ‘single’
},
geo: {
label: {
normal: {
show: showMapText,
color: ‘white’,
fontSize: 13
},
emphasis: {
show: false
}
},
roam: false,
layoutCenter: [‘50%’, ‘50%’],
layoutSize: “110%”,
itemStyle: {
normal: {
areaColor: ‘#101f32’,
borderColor: ‘#43d0d6’
},
emphasis: {
areaColor: ‘#617be3’
}
},
regions: []
},
series: []
};
var isProvince = function (name) {
return provincesText.some(function (province) {
return province === name
})
};
var isCity = function (name) {
var cityvalue = cityMap[name];
if (cityvalue != undefined) {
return true;
}
return false;
};
var facheList = function () {
series.push({
type: ‘lines’,
zlevel: 12,
effect: {
show: true,
period: 3,
trailLength: 0.7,
color: ‘#fff’,
symbol: ‘arrow’,
symbolSize: 8,
xAxisIndex: 0,
yAxisIndex: 0,
polarIndex: 0,
geoIndex: 0,
calendarIndex: 0,
},
lineStyle: {
normal: {
color: ‘white’,
width: 1,
opacity: 0.8,
curveness: 0.2
}
},
data: convertData(geoData.facheList)
}, {
type: ‘lines’,
zlevel: 12,
effect: {
show: true,
period: 3,
trailLength: 0,
symbol: planePath,
symbolSize: 8
},
lineStyle: {
normal: {
color: ‘#9b45e4’,
width: 1,
opacity: 0.6,
curveness: 0.2
}
},
data: convertData(geoData.facheList)
});
playFaCheList(geoData.facheList);
};
var cityList = function () {
for (let i = 0; i < geoData.cityList.length; i++) {
var ci = geoData.cityList[i];
series.push({
name: ci.name,
type: ‘effectScatter’,
coordinateSystem: ‘geo’,
zlevel: 2,
rippleEffect: {
period: 4,
scale: 2.5,
brushType: ‘stroke’
},
label: {
normal: {
//show: true,
position: ‘right’,
offset: [1, 0],
formatter: ‘{b}’
}
},
symbolSize: 10,
itemStyle: {
normal: {
color: ‘#00ffff’
},
emphasis: {
color: ‘green’
}
},
tooltip: {
trigger: ‘item’,
padding: 0,
enterable: true,
transitionDuration: 1,
textStyle: {
color: ‘#000’,
decoration: ‘none’,
},
showDelay: 2,
formatter: function (params) {
var tipHtml = ”;
tipHtml = ‘<div style=”width:200px;height:120px;background:rgba(22,80,158,0.8);border:1px solid rgba(7,166,255,0.7)”>’
+ ‘<div style=”width:100%;height:40px;line-height:40px;border-bottom:2px solid rgba(7,166,255,0.7);padding:0 20px”>’ + ‘<i style=”display:inline-block;width:8px;height:8px;background:#16d6ff;border-radius:40px;”>’ + ‘</i>’
+ ‘<span style=”margin-left:10px;color:#fff;font-size:16px;”>’ + params.name + ‘</span>’ + ‘</div>’
+ ‘<div style=”padding:10px”>’
+ ‘<p style=”color:#fff;font-size:15px;”>发货库存:’ + params.data.fhkc + ‘</p>’
+ ‘<p style=”color:#fff;font-size:15px;”>在途库存:’ + params.data.ztkc + ‘</p>’
+ ‘<p style=”color:#fff;font-size:15px;”>到货库存:’ + params.data.dhkc + ‘</p>’
+ ‘</div>’ + ‘</div>’;
return tipHtml;
},
axisPointer: {
show: true,
type: ‘cross’,
lineStyle: {
type: ‘dashed’,
width: 1
}
}
},
data: [{
name: ci.name,
value: geoCoordMap[ci.name],
fhkc: ci.fhkc,
ztkc: ci.ztkc,
dhkc: ci.dhkc
}]
});
};
};
var playList = function () {
series.push({
name: ”,
type: ‘effectScatter’,
coordinateSystem: ‘geo’,
zlevel: -2,
rippleEffect: {
period: 0,
scale: 0,
brushType: ‘stroke’
},
label: {
normal: {
show: false,
position: ‘right’,
offset: [5, 0],
formatter: ‘{b}’
}
},
symbolSize: 0,
itemStyle: {
normal: {
color: ‘#ffa259’
},
emphasis: {
color: ‘green’
}
},
tooltip: {
trigger: ‘item’,
padding: 0,
enterable: true,
transitionDuration: 1,
textStyle: {
color: ‘#000’,
decoration: ‘none’,
},
showDelay: 2,
formatter: function (params) {
var tipHtml = ”;
tipHtml = ‘<div style=”width:200px;height:120px;background:rgba(22,80,158,0.8);border:1px solid rgba(7,166,255,0.7)”>’
+ ‘<div style=”width:100%;height:40px;line-height:40px;border-bottom:2px solid rgba(7,166,255,0.7);padding:0 20px”>’ + ‘<i style=”display:inline-block;width:8px;height:8px;background:#16d6ff;border-radius:40px;”>’ + ‘</i>’
+ ‘<span style=”margin-left:10px;color:#fff;font-size:16px;”>’ + params.name + ‘</span>’ + ‘</div>’
+ ‘<div style=”padding:10px”>’
+ ‘<p style=”color:#fff;font-size:15px;”>发货库存:’ + params.data.fhkc + ‘</p>’
+ ‘<p style=”color:#fff;font-size:15px;”>在途库存:’ + params.data.ztkc + ‘</p>’
+ ‘<p style=”color:#fff;font-size:15px;”>到货库存:’ + params.data.dhkc + ‘</p>’
+ ‘</div>’ + ‘</div>’;
return tipHtml;
},
axisPointer: {
show: true,
type: ‘cross’,
lineStyle: {
type: ‘dashed’,
width: 1
}
}
},
data: geoData.cityList.map(function (ci) {
return {
name: ci.name,
value: geoCoordMap[ci.name],
fhkc: ci.fhkc,
ztkc: ci.ztkc,
dhkc: ci.dhkc
};
})
});
};
var seriesData = function () {
series = [];
facheList();
cityList();
//playList();
count = 0;
timeTicket = null;
seriesIndex = series.length – 1;
dataLength = series[seriesIndex].data.length;
dataIndex = 0;
chartOption.series = series;
};
var loadMap = function (param) {
var url = “../showdata/js/map/” + param + “.js”;
$.ajax({
url: url,
dataType: “json”
}).done(function (data) {
mapJsonData = data;
echarts.registerMap(param, mapJsonData);
if (param != ‘china’ && param != ‘全国’) {
showMapText = true;
}
else {
showMapText = false;
}
chartOption.geo.map = param;
chartOption.geo.label.normal.show = showMapText;
for (let i = 0; i < lightProvince.length; i++) {
let city = lightProvince[i];
chartOption.geo.regions.push({
name: city,
itemStyle: {
normal: {
areaColor: lightColor[city]
}
},
label: {
normal: {
show: true
},
emphasis: {
show: true
},
}
});
}
myMapChart.hideLoading();
myMapChart.setOption(chartOption);
});
};
var playFaCheList = function (data) {
//var html = ‘<!DOCTYPE html><html><head> <meta charset=”utf-8″> <meta name=”author” content=”” /> <style type=”text/css”> *{margin:10px;padding:10px;border:0px; }body{font-size:20px;color:”white”;} #demo{ overflow:hidden; height:100px; width:280px; margin:90px auto; position:relative; } #demo1{ height:auto; text-align:left; } #demo1 li{ list-style-type:none; height:22px; text-align:left; text-indent:15px; } </style></head><body><div id=”demo”> <ul id=”demo1″> ‘
//for (let i = 0 ; i < data.length; i++) {
// var item = data[i];
// html += ‘<li>’ + item.fromName + ‘=>’ + item.toName + ‘</li>’
//}
//html += ‘</li> </ul> <div id=”demo2″></div></div><script type=”text/JavaScript”> var speed=80 ; var demo=document.getElementById(“demo”); var demo1=document.getElementById(“demo1”); function Marquee(){ if(demo.scrollTop>=demo1.offsetHeight){ demo.scrollTop=0; } else{ demo.scrollTop=demo.scrollTop+1; } };var MyMar=setInterval(Marquee,speed); demo.onmouSEOver=function(){clearInterval(MyMar)}; demo.onmouSEOut=function(){MyMar=setInterval(Marquee,speed)};</script></body></html>’
//var x = document.getElementById(“iframe_play_fc”);
//x.srcdoc = html;
var ul = document.getElementById(“fachelist_ul”);
for (let i = 0 ; i < data.length; i++) {
let item = data[i];
let li = document.createElement(“li”);
li.innerHTML = ‘<li><a href=”#”>’
+ (i + 1) + ‘ . ‘
+ item.billdate + ‘ ‘
//+ item.inonevehicleflag
+ ‘ 车牌:’ + item.vehicleno + ‘ ‘
+ ‘<span style=”color:#ff8ba7″>’ + item.fromName + ‘=》’
+ item.full_toName + ‘</span> ‘
+ ‘</a></li>’;
ul.appendChild(li);
}
}
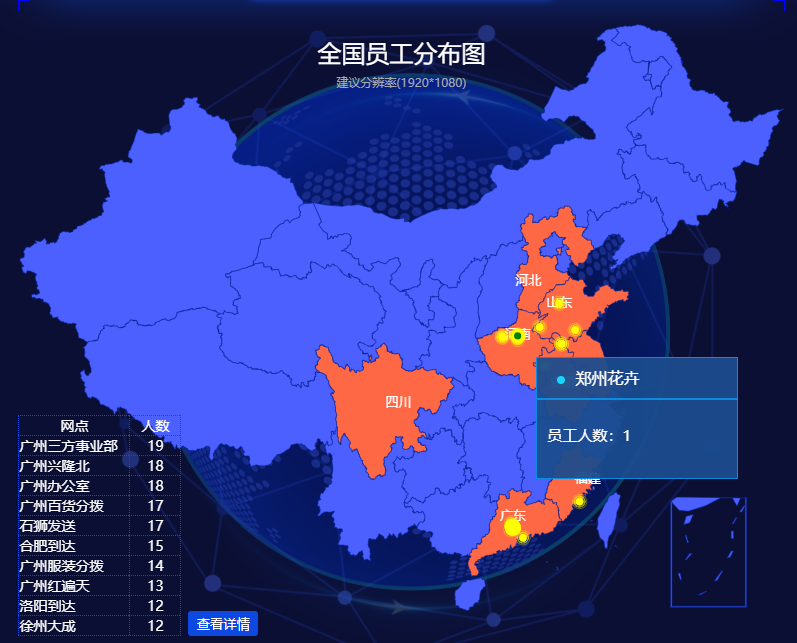
function map() {
myMapChart = echarts.getInstanceByDom(document.getElementById(‘map_1’));
if (myMapChart == undefined) {
myMapChart = echarts.init(document.getElementById(‘map_1’));
}
myMapChart.showLoading({
text: ‘正在加载数据…..’,
color: ‘#fff’,
textColor: ‘#fff’,
maskColor: ‘#46b3e6’,
zlevel: 0
});
$.ajax({
url: “/BI/GetgeoCoordData”,
type: “GET”,
data: { cache: false },
dataType: ‘json’,
cache: false,
success: function (result) {
if (result.status) {
if (result.data.length > 0) {
var data = JSON.parse(result.data);
geoCoordMap = $.extend(geoCoordMap, data);
lightProvince = data.provinceList;
$.ajax({
url: “/BI/GetgeoData”,
type: “GET”,
data: { cache: false },
dataType: ‘json’,
cache: false,
success: function (result) {
if (result.status) {
if (result.data.length > 0) {
var data = JSON.parse(result.data);
geoData = data;
seriesData();
$.ajax({
url: “/BI/GetProvinceCode”,
type: “GET”,
dataType: ‘json’,
success: function (result) {
if (result.status) {
if (result.data.length > 0) {
if (result.data == ‘china’) {
mapSelected = ‘china’;
}
else {
mapSelected = py_provinceMap[result.data];
}
loadMap(result.data);
}
}
},
error: function (XMLHttpRequest, textStatus, errorThrown) {
return;
},
dataType: “json”
}).fail(function (jqXHR, textStatus) {
console.log(“Ajax Error: “, textStatus);
});
window.addEventListener(“resize”, function () {
myMapChart.resize();
});
var setProvinceCode = function (provinceCode) {
$.ajax({
url: “/BI/SetProvinceCode”,
type: “GET”,
data: { provinceCode: provinceCode },
dataType: ‘json’,
cache: false,
success: function (result) {
return;
},
error: function (XMLHttpRequest, textStatus, errorThrown) {
return;
},
dataType: “json”
}).fail(function (jqXHR, textStatus) {
console.log(“Ajax Error: “, textStatus);
});
};
myMapChart.on(‘click’, function (ev) {
if (isProvince(ev.name)) {
mapSelected = ev.name
console.log(mapSelected)
loadMap(provinceMap[ev.name]);
}
else if (isCity(ev.name)) {
mapSelected = ev.name;
loadMap(cityMap[ev.name]);
}
else {
mapSelected = ‘china’
loadMap(mapSelected)
}
});
//timeTicket && clearInterval(timeTicket);
//timeTicket = setInterval(function () {
// myMapChart.dispatchAction({
// type: ‘showTip’,
// seriesIndex: seriesIndex,
// dataIndex: dataIndex
// });
// count++;
// dataIndex++;
// if (dataIndex >= dataLength) {
// dataIndex = 0;
// }
//}, 5000);
//myMapChart.on(‘mouSEOver’, function (params) {
// console.log(params)
// clearInterval(timeTicket);
// myMapChart.dispatchAction({
// type: ‘showTip’,
// seriesIndex: seriesIndex,
// dataIndex: dataIndex
// });
// count++;
// dataIndex++;
// if (dataIndex >= dataLength) {
// dataIndex = 0;
// }
//}, 5000);
//myMapChart.on(‘mouseout’, function (params) {
// timeTicket && clearInterval(timeTicket);
// timeTicket = setInterval(function () {
// myMapChart.dispatchAction({
// type: ‘showTip’,
// seriesIndex: seriesIndex,
// dataIndex: dataIndex
// });
// count++;
// dataIndex++;
// if (dataIndex >= dataLength) {
// dataIndex = 0;
// }
// }, 5000)
//});
}
}
},
error: function (XMLHttpRequest, textStatus, errorThrown) {
return;
},
dataType: “json”
}).fail(function (jqXHR, textStatus) {
console.log(“Ajax Error: “, textStatus);
});
}
}
},
error: function (XMLHttpRequest, textStatus, errorThrown) {
return;
},
dataType: “json”
}).fail(function (jqXHR, status) {
console.log(“Ajax Error: “, status);
});
}
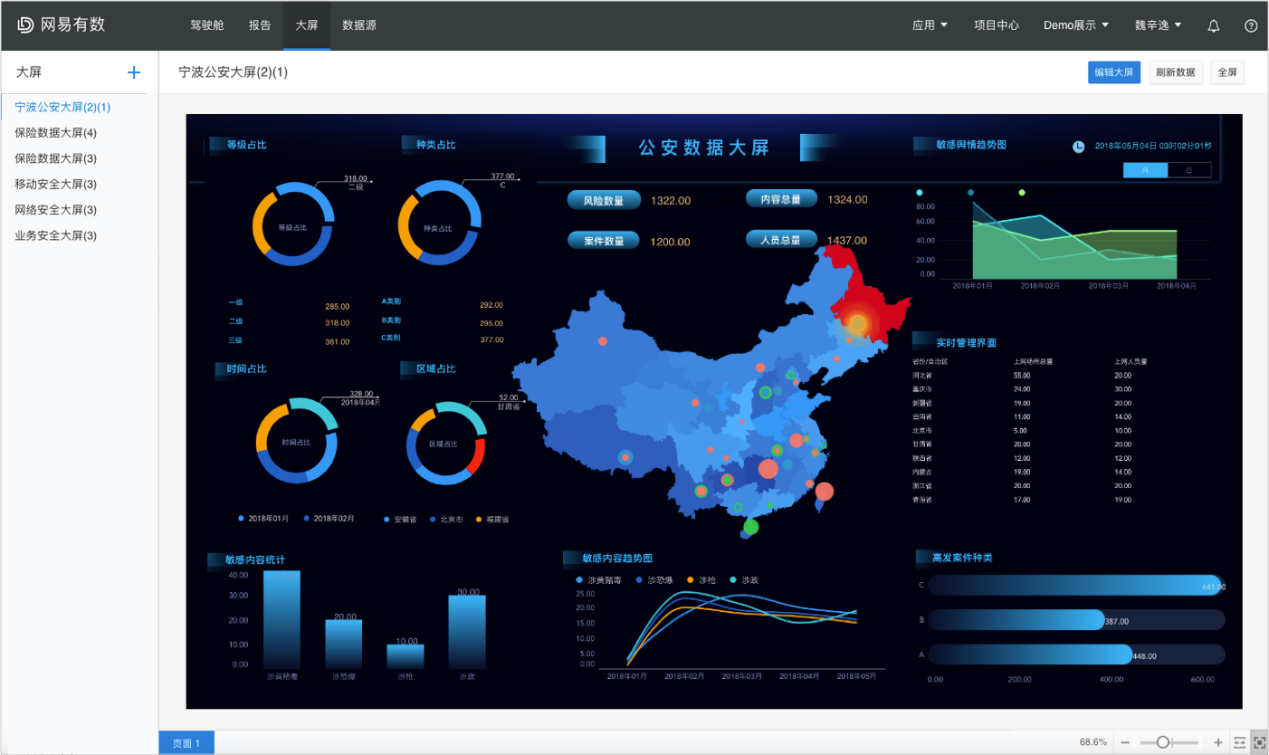
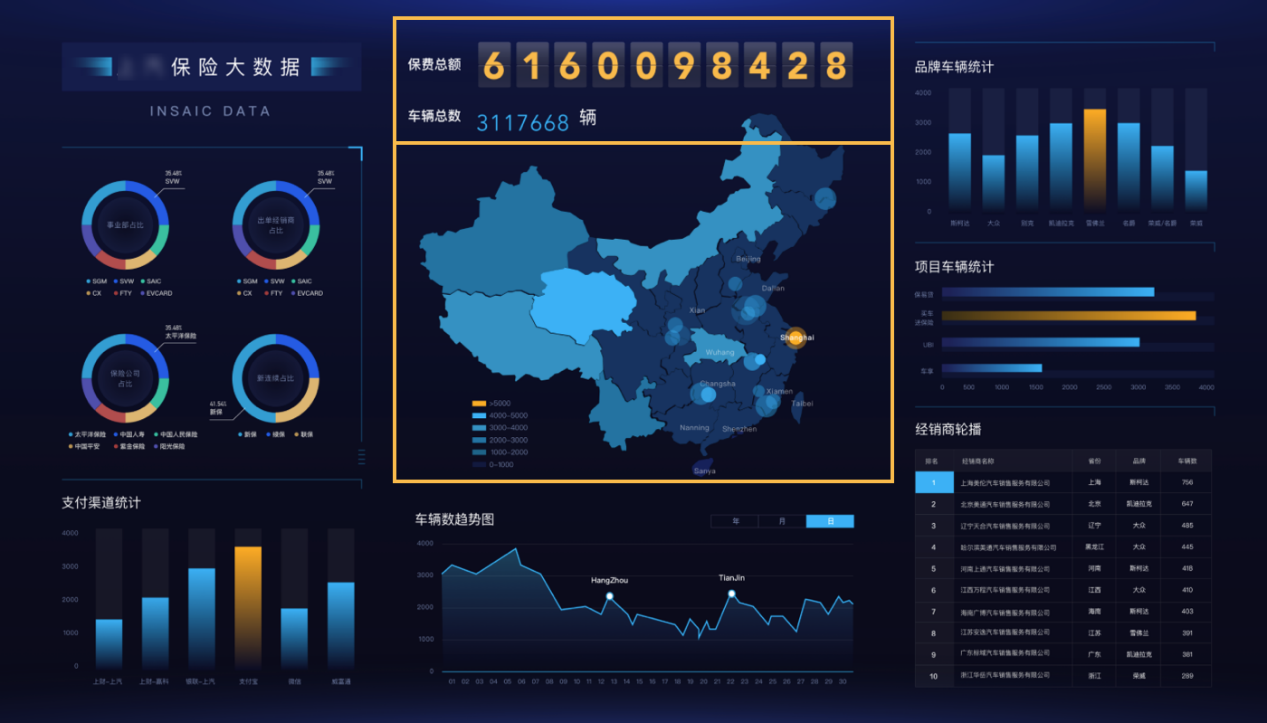
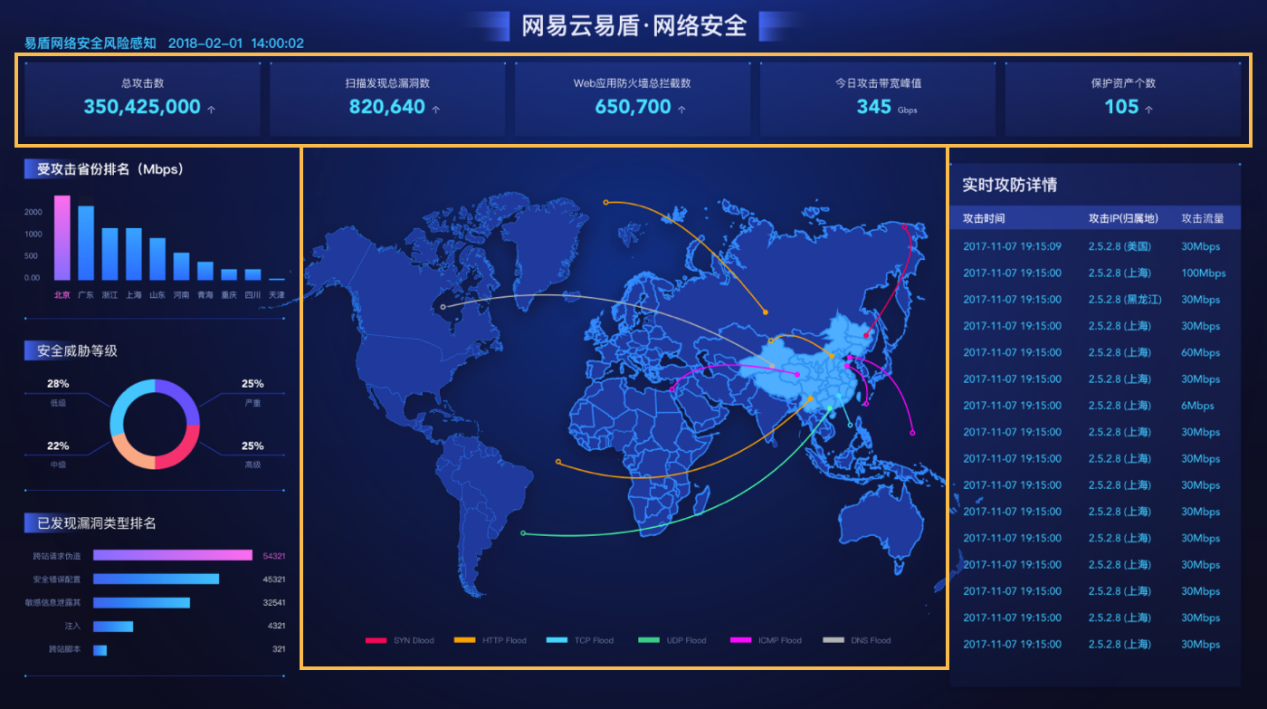
做好大数据分析任重道远,本人也是今年在这方面投入了大力气去学习,之前用WPF实现了一个,可以看我上一篇写的博文,就有介绍过,实现以上两个界面的大数据是用BS来实现的,图表全部用的是echarts,实现出来的图表费用漂亮,其实在做好这样的一个效果出来首先还得去网上找一个好的模板,再去做调整,完成从一个全新开发可能难度较大,样式布局啥的都不会这么专业,我其实是省去了前面部分的工作了,只花了三四天时间既完成了以上效果,速度还是挺快的,公司领导层对这效果也是非常满意的,以后会加强在这方面的研发,让公司的业务,财务数据都能很好在图表方面进行呈现出来,这样客户也会非常喜欢的。