来源: 高效理解 FreeSql WhereDynamicFilter,深入了解设计初衷[.NET ORM] – FreeSql – 博客园
💻 前言
最近几乎每天40度,越热越不想面对电脑,还好开源项目都比较稳定没那么多待解决问题,趁着暑假带着女儿学习游泳已略有小成。游泳好处太多了,建议有孩子的都去学学,我是在岸边指导大约一周左右就学会了,目前可游200米。
FreeSQL 有一个用户很迷的功能 WhereDynamicFilter 动态表格查询,本文讲解它的设计初衷,如何高效理解,从此不再迷惑。
小时候学习编程,老师经常教导我们,程序 = 数据结构 + 算法,今天就以我自身的认知讲解该功能的完整设计过程,其中包含数据结构和算法。
自从编写了.NET ORM 开源项目,每次写文章必有黑子,上次发表的文章评论:
《[开源精品] .NET Redis Client 又多了一个选择》
@China-Mr-zhong说:写的项目 都很烂 怎么好意思 说是精品
@FreeSQL回复:
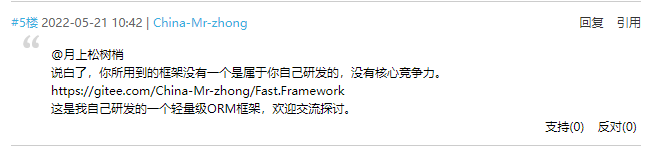
黑子,快回去先学下做人,黑完一次又一次,你代码写得真好。
原来他也是 ORM 作者,开源作品:Fast.Framework
而我上次发表的文章并非 ORM 啊,面对这样的社区圈子,有时候真的无语,这段被黑的内容是事后编辑的,因为现在这篇文章发表没多久已经有黑子开始点反对了。
🌳 ORM概念
Object Relational Mapping 是一种为了解决面向对象与关系数据库存在的互不匹配的现象的技术。
FreeSQL .NET ORM 支持 .NetFramework4.0+、.NetCore、Xamarin、MAUI、Blazor、以及还有说不出来的运行平台,因为代码绿色无依赖,支持新平台非常简单。目前单元测试数量:8500+,Nuget下载数量:900K+。QQ群:4336577(已满)、8578575(在线)、52508226(在线)
FreeSql 使用最宽松的开源协议 MIT https://github.com/dotnetcore/FreeSql ,完全可以商用,文档齐全,甚至拿去卖钱也可以。
FreeSql 主要优势在于易用性上,基本是开箱即用,在不同数据库之间切换兼容性比较好,整体的功能特性如下:
- 支持 CodeFirst 对比结构变化迁移;
- 支持 DbFirst 从数据库导入实体类;
- 支持 丰富的表达式函数,自定义解析;
- 支持 批量添加、批量更新、BulkCopy;
- 支持 导航属性,贪婪加载、延时加载、级联保存;
- 支持 读写分离、分表分库,租户设计;
- 支持 MySql/SQLServer/PostgreSQL/Oracle/Sqlite/Firebird/达梦/神通/人大金仓/翰高/Clickhouse/MsAccess Ado.net 实现包,以及 Odbc 的专门实现包;
8500+个单元测试作为基调,支持10多数数据库,我们提供了通用Odbc理论上支持所有数据库,目前已知有群友使用 FreeSql 操作华为高斯、mycat、tidb 等数据库。安装时只需要选择对应的数据库实现包:
dotnet add packages FreeSql.Provider.MySql
🎣 需求矛盾
虽然 ORM 有理论定义支撑,但实际开发过程中,难免遇到动态查询的需求,常见的有后台管理系统用户自定义过滤查询,如:

鉴于实际与理论的矛盾,导致很多非常实用的功能类库让一些人诟病,指这是 SqlHelper,并非 ORM,在此不便理论,功过自在人心。
📰 数据结构
数据结构的定义,决定了功能的使用深度,这块也参考了一些竟品类似的功能,实际在 .NET ORM 领域很少有完美并简单的现实,要么使用太复杂,要么不支持深层级,甚至有 SQL 注入漏洞。
类似的功能其实市面产品应用挺广泛,几乎已经形成了一套成熟的产品规则。如果不是亲身经历过类似产品,是很难定义出完美的数据结构的,作为一个公众开源项目,API 一旦确定再改是非常痛苦的决定,用户升级不兼容的情况不仅会影响 FreeSql 口碑,还会让使用者进退两难,到底要不要升级?好在 FreeSql 从 2018 年最初理念保持至今,关于前后破坏性升级几乎没有。
最终根据对 SQL 逻辑表达式的理解,加上参考 JAVA 一个知名的后台开源框架,取长补短确定了最终数据结构。
说这么多无外乎三个重点:
1、自己不熟悉的,多方面学习,接纳更成熟的方案;
2、自己要是没想好怎么做,多观察再做;
3、多思考用户场景;
我们需要考虑的场景有以下几种:
1、WHERE id = 1
{
    "Field": "id",
    "Operator": "Equals",
    "Value": 1
}
2、WHERE id = 1 AND id = 2
{
    "Logic": "And",
    "Filters":
    [
        {
            "Field": "id",
            "Operator": "Equals",
            "Value": 1
        },
        {
            "Field": "id",
            "Operator": "Equals",
            "Value": 2
        }
    ]
}
3、WHERE id IN (1,2)
{
"Field": "id",
"Operator": "Contains",
"Value": [1,2]
}
4、WHERE id = 1 OR id = 2
{
    "Logic": "Or",
    "Filters":
    [
        {
            "Field": "id",
            "Operator": "Equals",
            "Value": 1
        },
        {
            "Field": "id",
            "Operator": "Equals",
            "Value": 2
        }
    ]
}
5、WHERE id = 1 AND (id = 2 OR id = 3)
注意优先级,它不是 id = 1 AND id = 2 OR id = 3
{
    "Logic": "And",
    "Filters":
    [
        {
            "Field": "id",
            "Operator": "Equals",
            "Value": 1
        },
        {
            "Logic": "Or",
            "Filters":
            [
                {
                    "Field": "id",
                    "Operator": "Equals",
                    "Value": 2
                },
                {
                    "Field": "id",
                    "Operator": "Equals",
                    "Value": 3
                }
            ]
        }
    ]
}
第5个例子最特别,这也是为什么 WhereDynamicFilter 数据结构定义成树型的主要原因。
关于 Operator 我们需要以下使用场景:
- Contains/StartsWith/EndsWith/NotContains/NotStartsWith/NotEndsWith:包含/不包含,like ‘%xx%’,或者 like ‘xx%’,或者 like ‘%xx’
- Equal/NotEqual:等于/不等于
- GreaterThan/GreaterThanOrEqual:大于/大于等于
- LessThan/LessThanOrEqual:小于/小于等于
- Range:范围查询
- DateRange:日期范围,有特殊处理 value[1] + 1
- Any/NotAny:是否符合 value 中任何一项(直白的说是 SQL IN)
- Custom:自定义解析
最终完整的 C# 数据结构类定义如下:
[Serializable]
public class DynamicFilterInfo
{
public string Field { get; set; }
public DynamicFilterOperator Operator { get; set; }
public object Value { get; set; }
public DynamicFilterLogic Logic { get; set; }
public List<DynamicFilterInfo> Filters { get; set; }
}
public enum DynamicFilterLogic { And, Or }
public enum DynamicFilterOperator
{
Contains,
StartsWith,
EndsWith,
NotContains,
NotStartsWith,
NotEndsWith,
Equal,
Equals,
Eq,
NotEqual,
GreaterThan,
GreaterThanOrEqual,
LessThan,
LessThanOrEqual,
Range,
DateRange,
Any,
NotAny,
Custom
}
[AttributeUsage(AttributeTargets.Method)]
public class DynamicFilterCustomAttribute : Attribute { }
📡 安全考虑
由于 ISelect.WhereDynamicFilter 方法实现动态过滤条件(与前端交互),在 SQL 注入安全防御这块一定要进行到底,主要思考如下:
1、Field 只允许传递 C# 实体属性名(不支持使用数据库字段名,甚至直接使用 SQL 内容片段);
2、Operator 只允许规定的枚举操作类型;
3、Value 必须根据 Operator 进行强制类型检查,比如 “1,2” + Any 检索出来的数据是 int[] { 1,2 };
4、Operator Custom 类型支持用户自行扩展,可现实更自由的查询;
⚡ 算法
如果把数据结构定义成灵魂,那算法就是驱壳,实现 WhereDynamicFilter 的核心算法是递归树结构。
感兴趣的朋友可以直接去源码查看实现:https://github.com/dotnetcore/FreeSql
🌌 难理解
WhereDynamicFilter 功能2020年上线到现在,我个人都觉得其实蛮难理解的,更不要提很多使用者反馈。主要原因是数据结构为树结构,通常80%的人只是简单的一层 AND/OR 需求,他们很少会遇到深层级的自定义查询。
但是作为功能性 ORM 类库,应该满足更多适用范围,而不是妥协为求简单来实现功能。
其实便于理解也不难,只要掌握以下方法:
1、Logic 是设置 Filters 数组下的逻辑关系(这很重要,一定要理解正确)
为了解决 WHERE id = 1 AND (id = 2 OR id = 3) 优先级问题,Filters 更像一对括号
{
    "Logic": "And",
    "Filters":
    [
        { "Field": "id", "Operator": "Equals", "Value": 1 },
        {
            "Logic": "Or",
            "Filters":
            [
                { "Field": "id", "Operator": "Equals", "Value": 2 },
                { "Field": "id", "Operator": "Equals", "Value": 3 }
            ]
        }
    ]
}
2、Field/Operator/Value 与 Logic/Filters 不要同时设置(避免理解困难)
3、删除 JSON 中不必要的内容
这个病不好治,因为强类型对象产生的默认 json 内容,即使无用的属性也序列化了。
{
    "Field": null,
    "Operator": "Equals",
    "Value": null,
    "Logic": "Or",
    "Filters":
    [
        {
            "Field": "Name-1",
            "Operator": "Equals",
            "Value": "ye-01",
            "Logic": "And",
            "Fitlers": null
        },
        {
            "Field": "Name-1",
            "Operator": "Equals",
            "Value": "ye-02",
            "Logic": "And",
            "Fitlers": null
        }
    ]
}
以上类型改成如下,是不是更好理解?
{
    "Logic": "Or",
    "Filters":
    [
        {
            "Field": "Name-1",
            "Operator": "Equals",
            "Value": "ye-01"
        },
        {
            "Field": "Name-1",
            "Operator": "Equals",
            "Value": "ye-02"
        }
    ]
}
🚀 最终功能
一个任意定制的高级查询功能预览如下:
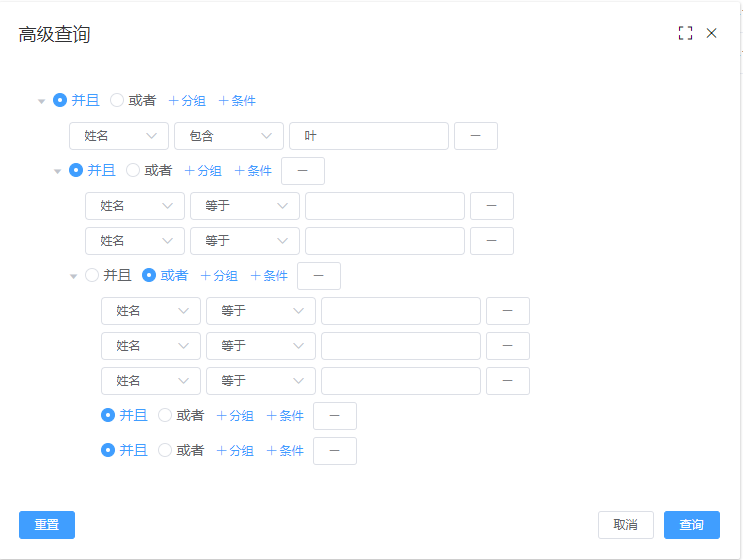
前端只需要按要求组装好 DynamicFilterInfo 对应的 JSON 数据内容,后台就可轻易完成高级过滤查询,有多轻易呢?
var dyfilter = JsonConvert.DeserializeObject<DynamicFilterInfo>(jsonText);

var list = fsql.Select<T>().WhereDynamicFilter(dyfilter).ToList();
⛳ 结束语
希望这篇文章能帮助大家从 WhereDynamicFilter 的设计初衷,轻松理解并熟练掌握它,为企业的项目研发贡献力量。
开源地址:https://github.com/dotnetcore/FreeSql
作者是什么人?
作者是一个入行 18年的老批,他目前写的.net 开源项目有:
需要的请拿走,这些都是最近几年的开源作品,以前更早写的就不发了。
QQ群:4336577(已满)、8578575(在线)、52508226(在线)