- Go to IIS Manager
- Select “Default Web Site”
- In the Feature View click “URL Rewrite Module“
- In the “Actions” pane on right hand side click on “Add rules…”
- In the "Add Rules" dialog, select the "Blank Rule" and click "Ok"
Now you must define the actual rewrite rule. In the URL rewrite module, a rewrite rule is defined by specifying four required pieces of information:
- Name of the rule;
- Pattern to use for matching the URL string;
- Optional set of conditions;
- Action to perform if a pattern is matched and all conditions checks succeed.
Naming a rule
In the “Name” text box enter a name that will uniquely identify the rule, for example: ”Rewrite to article.aspx”.
Defining a pattern
In the “Pattern” text box enter the following string:
^article/([0-9]+)/([_0-9a-z-]+)
This string is a regular expression that specifies that the pattern will match any URL string that meets the following conditions:
- Starts with the sequence of characters “article/”.
- Contains one or more numeric characters after the first “/”.
- Contains one or more alphanumeric or “_” or “-” characters after the second “/”.
Notice that certain parts of the regular expression are within parentheses. These parentheses create capture groups, which can be later referenced in the rule by using back-references.
Defining an action
Since the rule that we are creating is supposed to rewrite the URL, choose the “Rewrite” action type that is listed in the “Action” group box. In the “Rewrite URL:” text box, enter the following string:
article.aspx?id={R:1}&title={R:2}
This string specifies the new value to which the input URL should be rewritten. Notice that for the values of the query string parameters we used {R:1} and {R:2}, which are back-references to the capture groups that were defined in the rule pattern by using parentheses.
Leave default values for all other settings. The "Edit Rule" property page should look like the following page:
Save the rule by clicking on “Apply” action on the right hand side.
Viewing the rewrite rule in configuration file
The rewrite rules are stored either in aplicationHost.config file or in web.config files. To check the configuration of the rule that we have just created, open a web.config file located in %SystemDrive%\inetput\wwwroot\. In this file you should see the <rewrite> section that contains this rule definition:
<rewrite>
<rules>
<rule name="Rewrite to article.aspx">
<match url="^article/([0-9]+)/([_0-9a-z-]+)" />
<action type="Rewrite" url="article.aspx?id={R:1}&title={R:2}" />
</rule>
</rules>
</rewrite>
Testing the rule
To test that the rule correctly rewrites URL’s, open a Web browser and request the following URL:
http://localhost/article/234/some-title
You should see that the rewrite rule on web server has changed the original URL to article.aspx and it has passed “234” and “some-title” as values for query string parameters.
Creating a redirect rule
Now we will create a redirect rule that will redirect all URLs in the following format:
http://localhost/blog/some-other-title/543
will be redirected to:
http://localhost/article/543/some-other-title
To do this, open the URL Rewrite feature view UI in IIS Manager and then click "Add Rule…" and select "Blank Rule" template again.
Within the “Edit Rule” page, enter the following:
- Name: "Redirect from blog" (this is a unique name for the rule)
- Pattern: "^blog/([_0-9a-z-]+)/([0-9]+)" (This pattern will match the URL string that starts with “blog” and captures the second and third segments of the URL into back-references)
- Action: "Redirect" (The redirect action will cause a redirect response to be sent back to the browser)
- Redirect URL: "article/{R:2}/{R:1}" (this substitution string will be used as a redirect URL; notice that it uses back-references to preserve and re-arrange the original URL pieces captured during pattern match)
Leave default values for all other settings. The "Edit rule" property page should look like the following page:
save the rule by clicking on “Apply” action on the right hand side.
Testing the rule
To test that the rule redirects requests correctly, open a Web browser and request the following URL:
http://localhost/blog/some-other-title/323
You should see that the browser was redirected to http://localhost/article/323/some-other-title as a result of redirect rule execution and then the request was rewritten in accordance to the rewrite rule that you have created earlier:
Creating an access block rule
The third rule that we will create is used to block all requests made to Web site if those requests do not have the host header set. This type of rule is useful when you want to prevent hacking attempts that are made by issuing HTTP requests against the IP address of the server instead of using the host name.
We will create this rule without using IIS Manager. Open the Web.config file and locate the <rewrite> section. Insert the following rule:
<rule name="Fail bad requests">
<match url=".*"/>
<conditions>
<add input="{HTTP_HOST}" pattern="localhost" negate="true" />
</conditions>
<action type="AbortRequest" />
</rule>
into the <rules> collection, so that it is a first rule in a collection. The <rewrite> section should look like the following code:
<rewrite>
<rules>
<rule name="Fail bad requests">
<match url=".*"/>
<conditions>
<add input="{HTTP_HOST}" pattern="localhost" negate="true" />
</conditions>
<action type="AbortRequest" />
</rule>
<rule name="Redirect from blog">
<match url="^blog/([_0-9a-z-]+)/([0-9]+)" />
<action type="Redirect" url="article/{R:2}/{R:1}" redirectType="Found" />
</rule>
<rule name="Rewrite to article.aspx">
<match url="^article/([0-9]+)/([_0-9a-z-]+)" />
<action type="Rewrite" url="article.aspx?id={R:1}&title={R:2}" />
</rule>
</rules>
</rewrite>
Let’s analyze the rule to understand what it does.
- <match url=".*"/> – This element says that the rule will match any URL string
- <add input="{HTTP_HOST}" pattern="localhost" negate="true" /> – This element adds a condition to the rule that retrieves the host header value by reading the server variable HTTP_HOST, matches it against the pattern “localhost” and then negates the result of matching. In other words, the condition verifies that the host header does not match “localhost”.
- <action type="AbortRequest" /> – this element tells the URL rewrite module to end the HTTP request.
Testing the rule
To test this rule, open a Web browser and make a request to http://127.0.0.1/article/234/some-title. What you should see is a browser that does not receive any response from the server. However, if you request http://localhost/article/234/some-title, then the Web server will respond successfully.
相关地址:http://learn.iis.net/page.aspx/461/creating-rewrite-rules-for-the-url-rewrite-module/


 }
} }
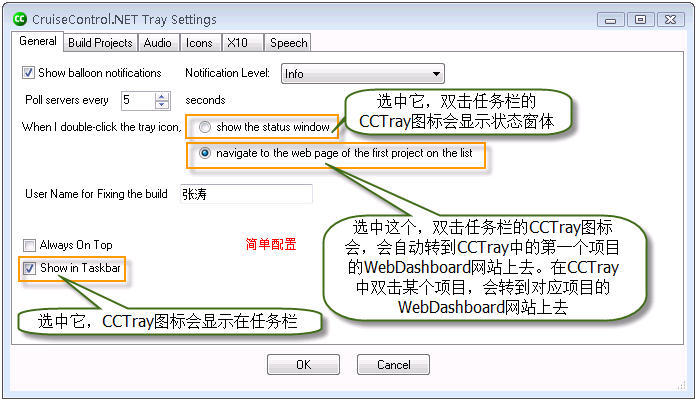
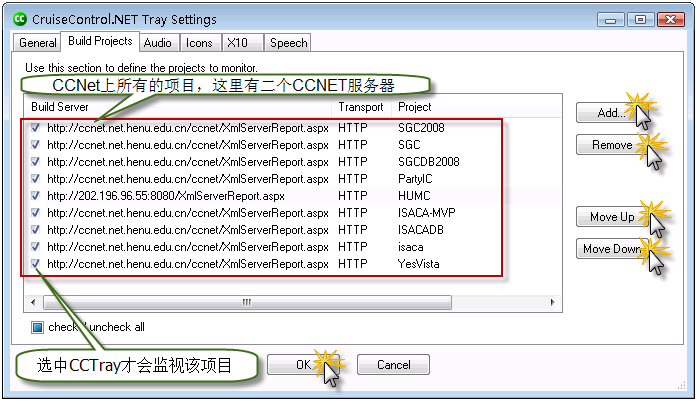
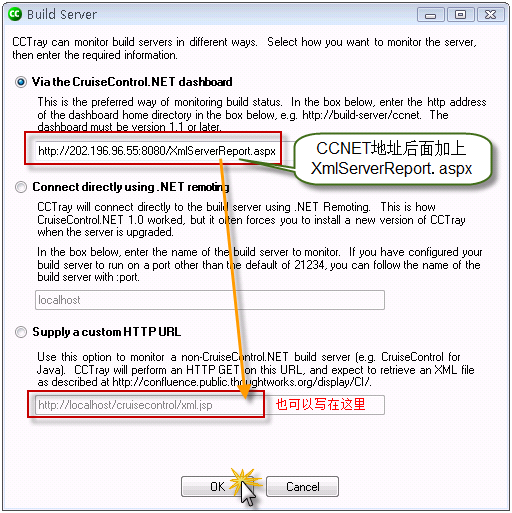
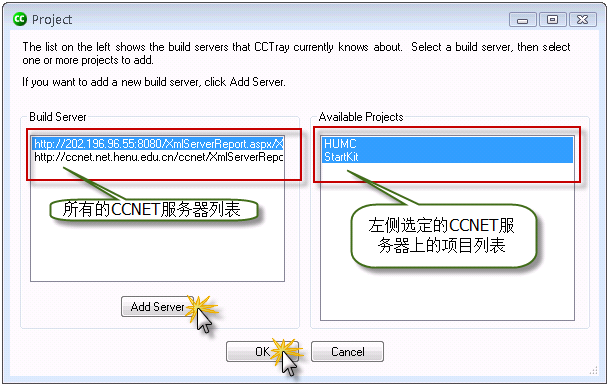
} 点击StartKit,转入下图所示的页面:
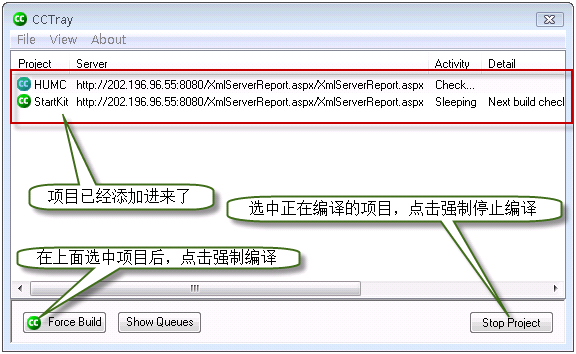
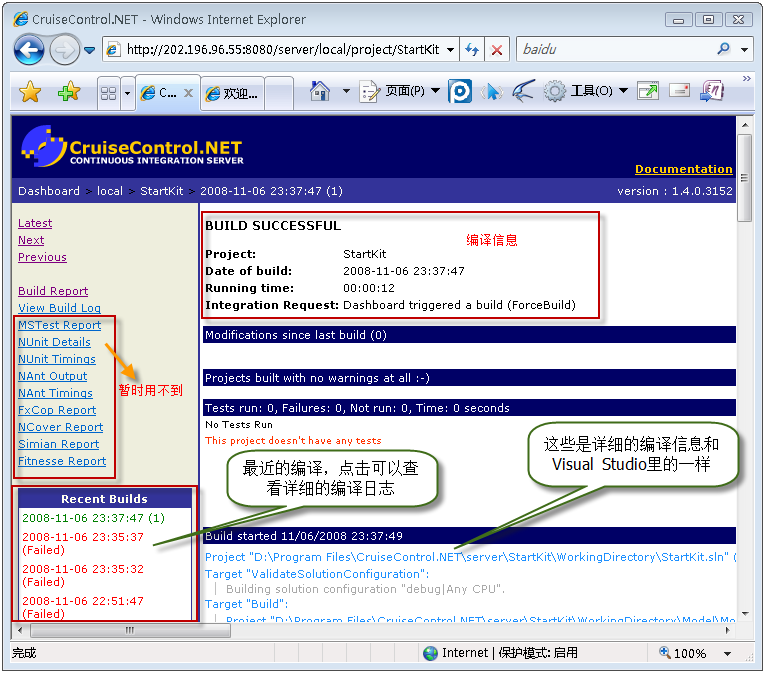 OK,到这里,我们提交更新到SVN服务器后,CCNET就会根据我们配置自动编译项目,而且我们也可以通过Web Dashboard来查看具体的编译信息了,提示如果配置了邮件发送,那么我们还可以通过邮件收到详细的编译信息,怎么样?够方便吧!