[转载]【译著】14 控制器可扩展性 – r01cn – 博客园.
Controller Extensibility
控制器可扩展性
In this chapter, we are going to show you some of the advanced MVC features for working with controllers. We’ll start by exploring the parts of the request processing pipeline that lead to the execution of an action method and demonstrating the different ways you can take control of this process.
在本章中,我们打算向你演示MVC用控制器进行工作的一些高级特性。我们将从考查引导动作方法执行过程的请求处理管道开始,并演示你可以对这种过程进行控制的不同方式。
The second part of this chapter demonstrates two types of specialized controllers, known as sessionless controllers and asynchronous controllers. These can be used to increase the capacity of your server. We demonstrate how to create and use these controller types and explain when you should consider using them in an MVC application.
本章第二部分演示两种类型的应用程序控制器,即无会话控制器和异步控制器。这些可以用来增强服务器的能力。我们演示如何生成和使用这些控制器类型,并解释你应该什么时候考虑在MVC应用程序中使用它们。
Request Processing Pipeline Components
请求处理管道组件
Figure 14-1 shows the basic flow of control between components. Some of the elements in the figure will be familiar to you at this point. We covered the routing system in Chapter 11, and described the relationship between the Controller class and action methods in Chapter 12.
图14-1显示了组件之间的基本控制流程。图中的有些元素你此刻应该是熟悉的。我们第11章讨论了路由系统,第12章我们描述了Controller类和动作方法之间的关系。
 Figure 14-1. Invoking an action method
图14-1. 调用一个动作方法
Our focus for the first part of this chapter is the controller factory and the action invoker. The names of these components suggest their purpose. The controller factory is responsible for creating instances of controllers to service a request, and the action invoker is responsible for finding and invoking the action method in the controller class. The MVC Framework includes default implementations of both of these components, and we’ll show you how to configure these to control their behavior. We’ll also show you how to replace these components entirely and use custom logic.
本章第一部分我们关注的是控制器工厂(Controller Factory)和动作调用器(Action Invoker)。这些组件的名称暗示了它们的目的。控制器工厂负责生成对一个请求进行服务的控制器实例,动作调用器负责查找并调用控制器类中的动作方 法。MVC框架含有这两个组件的默认实现,我们将向你演示如何配置它们,以控制它们的行为。我们也将向你演示如何完全替换这些组件而使用自定义逻辑。
Creating a Controller Factory
生成一个控制器工厂
As with much of the MVC Framework, the best way to understand how controller factories work is to create a custom implementation. We don’t recommend that you do this in a real project, since it’s much easier to create custom behavior by extending the built-in factory, but this is a nice way to demonstrate how the MVC Framework creates instances of controllers.
像MVC框架的大部分情况一样,要理解控制器工厂如何进行工作,最好的办法是生成一个自定义实现。我们不建议你在实际项目中这样做,因为,通过扩展内建的工厂,可以更容易地生成自定义行为。但这是演示MVC框架如何生成控制器实例的一种很好的办法。
Defining a Custom Controller Factory
定义一个自定义控制器工厂
Controller factories are defined by the IControllerFactory interface, which is shown in Listing 14-1.
控制器工厂是由IControllerFactory接口定义的,如清单14-1所示。
Listing 14-1. The IControllerFactory Interface
清单14-1. IControllerFactory接口
namespace System.Web.Mvc {
    using System.Web.Routing;
    using System.Web.SessionState;
    public interface IControllerFactory {
        IController CreateController(RequestContext requestContext, string controllerName);
        SessionStateBehavior GetControllerSessionBehavior(RequestContext requestContext,
                string controllerName);
        void ReleaseController(IController controller);
    }
}
The most important method in the interface is CreateController, which the MVC Framework calls when it needs a controller to service a request. The parameters to this method are a RequestContext object, which allows the factory to inspect the details of the request, and a string, which contains the controller value from the routed URL.
这个接口中最重要的方法是CreateController,当MVC框架需要一个控制器对一个请求进行服务时,框架便会调用这个方法。该方法的参数是一 个RequestContext对象,它允许该工厂检测该请求的细节;和一个字符串,它包含了通过路由的URL所得到的controller值。
One of the reasons that we don’t recommend creating a custom controller this way is that finding controller classes in the web application and instantiating them is complicated. To keep things simple for our demonstration, we will support only two controllers, called FirstController and SecondController. Listing 14-2 shows our implementation of this method as part of the CustomControllerFactory class.
我们不建议这样生成自定义控制器的原因之一是,查找web应用程序中的控制器类、并对它们实例化是复杂的。为了使我们的演示简单,我们将仅支持两个控制 器,叫做FirstController和SecondController。作为CustomControllerFactory类的一部分,清单 14-2演示了这个方法的实现。
Listing 14-2. The CustomControllerFactory Class
清单14-2. CustomControllerFactory类
using System;
using System.Web.Mvc;
using System.Web.Routing;
using System.Web.SessionState;
using ControllerExtensibility.Controllers;
namespace ControllerExtensibility.Infrastructure {
    public class CustomControllerFactory : IControllerFactory {
        public IController CreateController(RequestContext requestContext,
                    string controllerName) {
            Type targetType = null;
            switch (controllerName) {
                case "Home":
                    requestContext.RouteData.Values["controller"] = "First";
                    targetType = typeof(FirstController);
                    break;
                case "First":
                    targetType = typeof(FirstController);
                    break;
                case "Second":
                    targetType = typeof(SecondController);
                    break;
            }
            return targetType == null ?
                null : (IController)Activator.CreateInstance(targetType);
        }
        public SessionStateBehavior GetControllerSessionBehavior(
                    RequestContext requestContext, string controllerName) {
            return SessionStateBehavior.Default;
        }
        public void ReleaseController(IController controller) {
            IDisposable disposable = controller as IDisposable;
            if (disposable != null) {
                disposable.Dispose();
            }
        }
    }
}
The goal of the CreateController method is to create an instance of a controller that can handle the request. How the factory does this is entirely open. The conventions that you have seen so far in the examples in this book exist because that’s the way that the default controller factory works. We’ll cover the default factory after we complete our custom one. For our factory in Listing 14-2, we have ignored all of the conventions and implemented our own logic. This is a pretty odd thing to do, but it does demonstrate the complete flexibility that the MVC Framework offers.
CreateController方法的目的,是生成一个能够对请求进行处理的控制器实例。控制器工厂如何做这种事是完全公开的。存在一些你在本书的例子 中一直看到的约定,因为,这是默认控制器工厂的工作方式。完成我们这个自定义工厂之后,我们将讨论默认控制器工厂。对于清单14-2的工厂,我们忽略了所 有这些约定,而是实现了我们自己的逻辑。这是所做的一件相当奇怪的事情,但它确实演示了MVC框架提供的充分的灵活性。
If we receive a request where the controller value is First or Second, we create new instances of the FirstController or SecondController class. We create instances using the System.Activator class, which lets us create instances of objects from their type, like this:
如果我们接收到controller值是First或Second的一个请求,我们就会生成FirstController或 SecondController类的一个新实例。我们用System.Activator类生成实例,它让我们根据对象的类型生成对象的实例,像这样:
(IController)Activator.CreateInstance(targetType);
If we receive a request where the controller value is Home, we map that request to the FirstController class. Again, this is an odd thing to do, but it shows that that mapping between requests and controllers is solely the responsibility of the controller factory. The same cannot be said for the mapping of requests to views, however.
如果我们收到controller值是Home的一个请求,我们把这个请求映射到FirstController类。同样,这是要做的一件奇怪的事情,但它表明请求与控制器之间的映射是控制器工厂自身的职责。我们无论如何不能把它说成是请求到视图的映射。
The MVC Framework selects a view based on the controller value in the routing data, not the name of the controller class. For example, if we want to map a request for the Home controller to an instance of the First controller, we also need to change the controller value in the request, like this:
MVC框架基于路由数据中的controller值来选择视图,而不是基于控制器类的名字。例如,如果我们想把对Home控制器的请求映射到First控制器的一个实例,我们也需要修改请求中的controller值,像这样:
requestContext.RouteData.Values["controller"] = "First";
So, not only does the controller factory have sole responsibility for matching requests to controllers, but it can change the request to alter the behavior of subsequent steps in the request processing pipeline. This is pretty potent stuff and a critical component of the MVC Framework.
因此,不仅控制器工厂要独自地负责把请求匹配到控制器,而且它可以对请求进行修改,以改变请求处理管道中后继步骤的行为。这是MVC框架相当有力的要素和关键组件。
Two other methods are in the IControllerFactory interface:
IControllerFactory接口中的另外两个方法是:
- The GetControllerSessionBehavior method is used by the MVC Framework to determine if session data should be maintained for a controller. We’ll come back to this in the “Using Sessionless Controllers” section later in this chapter.
GetControllerSessionBehavior方法由MVC框架用来确定是否应该为控制器维护会话数据。我们将在本章稍后的“使用无会话控制器”小节中回到这一论题。 - The ReleaseController method is called when a controller object created by the CreateController method is no longer needed. In our implementation, we check to see if the class implements the IDisposable interface. If it does, we call the Dispose method to release any resources that can be freed.
ReleaseController方法,当不再需要CreateController方法生成的控制器对象时,调用这个方法。在我们的实现中,我们查看这个类是否实现IDisposable接口。如果是,我们调用Dispose方法以释放那些可以被释放的资源。
Registering a Custom Controller Factory
注册一个自定义控制器工厂
We tell the MVC Framework to use our custom controller factory through the ControllerBuilder class, as shown in Listing 14-3.
我们通过ControllerBuilder类来告诉MVC框架要使用我们的自定义控制器工厂,如清单14-3所示。
Listing 14-3. Registering a Custom Controller Factory
清单14-3. 注册一个自定义工厂
protected void Application_Start() {
    AreaRegistration.RegisterAllAreas();
    ControllerBuilder.Current.SetControllerFactory(new CustomControllerFactory());
    RegisterGlobalFilters(GlobalFilters.Filters);
    RegisterRoutes(RouteTable.Routes);
}
Working with the Built-In Controller Factory
用内建的控制器工厂进行工作
For most applications, the built-in controller factory class, called DefaultControllerFactory, is entirely adequate. When it receives a request from the routing system, this factory looks at the routing data to find the value of the controller property (which we described in Chapter 11), and tries to find a class in the web application that meets the following criteria:
对于大多数应用程序,内建的控制器工厂,名为DefaultControllerFactory,是完全足够的。当它从路由系统接收到一个请求时,这个工 厂查找路由数据,以找到controller属性的值(这是我们在第11章所描述的),并试图在这个web应用程序中找到满足以下条件的一个类:
- The class must be public.
这个类必须是一个public类。 - The class must be concrete (not abstract).
这个类必须是具体类(而不是抽象类)。 - The class must not take generic parameters.
这个类必须没有泛型(generic)参数。 - The name of the class must end with Controller.
类名必须以Controller结尾。 - The class must implement the IController interface.
这个类必须实现IController接口。
The DefaultControllerFactory class maintains a list of such classes in the application, so that it doesn’t need to perform a search each and every time a request arrives. If a suitable class is found, then an instance is created using the controller activator (we’ll come back to this in the upcoming “Customizing DefaultControllerFactory Controller Creation” section), and the job of the controller is complete. If there is no matching controller, then the request cannot be processed any further.
DefaultControllerFactory类维护着应用程序中这些类的一个列表,因此,每次一个请求到达时,它并不需要每次都执行一个搜索。如果 找到一个合适的类,那么便用控制器激活器(controller activator)生成一个实例(我们将在马上要描述的“定制DefaultControllerFactory控制器的生成”小节中回到这一论题), 控制器的工作便完成了。如果没有匹配的控制器,那么该请求便不能作进一步处理。
Notice how the DefaultControllerFactory class follows the convention-over-configuration pattern. You don’t need to register your controllers in a configuration file, because the factory will find them for you. All you need to do is create classes that meet the criteria that the factory is seeking.
要注意DefaultControllerFactory类是如何遵循“约定优于配置”模式的。你不需要在配置文件中注册你的控制器,因为这个工厂会为你查找它们。你需要做的全部事情是,生成满足这个工厂查寻条件的类。
If you want to create custom controller factory behavior, you can configure the settings of the default factory or override some of the methods. This way, you are able to build on the useful convention-over-configuration behavior and not need to re-create it. We’ll show you different ways to tailor controller creation in the following sections.
如果你想生成自定义控制器工厂的行为,你可以对默认工厂的设置进行配置,或重写它的一些方法。这样,你便能够建立有用的“约定优于配置”的行为,而不需要重新生成它。我们将在以下小节中向你演示定制控制器生成的不同方式。
Prioritizing Namespaces
安排命名空间优先级
In Chapter 11, we showed you how to prioritize one or more namespaces when creating a route. This was to address the ambiguous controller problem, where controller classes have the same name but reside in different namespaces. We mentioned in Chapter 11 that this information was passed along to the controller factory, and it is the DefaultControllerFactory that processes the list of namespaces and prioritizes them.
在第11章中,我们向你演示了,在生成一条路由时,如何安排一个或多个命名空间的优先级。用它解决控制器的多义性问题,即,同名控制器类位于不同命名空间 的情况。我们在第11章提到,这种信息(指命名空间优先级信息 — 译者注)被沿途传递给控制器工厂,而处理命名空间列表并对之排序的,正是这个DefaultControllerFactory。
If you have an application that has a lot of routes, it can be more convenient to specify priority namespaces globally, so that they are applied to all of your routes. Listing 14-4 shows how to do this.
如果你的应用程序有很多路由,指定全局命名空间优先级可能是更方便的,以使它们能用于你的所有路由。清单14-4演示了如何做这种事情。
Listing 14-4. Global Namespace Prioritization
清单14-4. 全局命名空间优先级
protected void Application_Start() {
    AreaRegistration.RegisterAllAreas();
    ControllerBuilder.Current.DefaultNamespaces.Add("MyControllerNamespace");
    ControllerBuilder.Current.DefaultNamespaces.Add("MyProject.*");
    RegisterGlobalFilters(GlobalFilters.Filters);
    RegisterRoutes(RouteTable.Routes);
}
We use the static ControllerBuilder.Current.DefaultNamespaces.Add method to add namespaces that should be given priority. The order in which we add the namespaces does not imply any kind of search order. All of the default namespaces will be searched for candidate controller classes, and duplicates will still cause an exception, just as when we performed the same task directly in the route definition.
我们用静态的ControllerBuilder.Current.DefaultNamespaces.Add方法来添加应该给予优先的命名空间。我们 添加的命名空间的顺序并不暗示某种搜索顺序。所有默认命名空间都被用来搜索候选的控制器类,而且重义(指有多个相同的包含命名空间在内的控制器 — 译者注)仍然会引发异常,就像我们直接在路由定义中执行同样的事情那样。
■ Tip Global prioritization is overridden by route-specific prioritization. This means you can define a global policy, and then tailor individual routes as required. See Chapter 11 for details on specifying namespaces for individual routes.
提示:Global优先级会被路由优先级所重写。意即,你可以定义一个全局策略,然后在必要时裁剪个别路由。详见第11章的为个别路由指定命名空间。
If the controller factory cannot find a suitable controller class in the namespaces that have been specified, then the rest of the application classes will be inspected. Notice that we used an asterisk character (*) in the second statement shown in bold in Listing 14-4. This allows us to specify that the controller factory should look in the MyProject namespace and any child namespaces. (Warning: Although this looks like regular expression syntax, it isn’t; you can end your namespaces with .*, but you can’t use any other regular expression syntax here.)
如果这个控制器工厂在已经指定的命名空间中找不到一个合适的控制器类,那么将检测应用程序的其余部分。注意,我们在清单14-4中以黑体显示的第二条语句 中使用了星号(*)。这允许我们指定控制器工厂应该查找MyProject命名空间及其任意子命名空间。(警告:这看上去像正则表达式语法,但它却不是, 你可以用*作为命名空间的结尾,但你在这里不能使用任何其它正则表达式语法。)
Customizing DefaultControllerFactory Controller Creation
定制DefaultControllerFactory的控制器生成
There are a number of ways to customize how the DefaultControllerFactory class creates controller objects. By far, the most common reason for customizing the controller factory is to add support for DI. There are several different ways of doing this. The most suitable technique depends on how you are using DI elsewhere in your application.
定制DefaultControllerFactory类如何生成控制器对象有许多种方式。但到目前为止,对控制器工厂进行定制最通常的理由是为了添加对DI的支持。做这件事有几种不同的办法,最适合的技术取决于你在应用程序的其它地方如何使用DI。
Using the Dependency Resolver
使用依赖性解析器
The DefaultControllerFactory class will use a dependency resolver to create controllers if one is available. We covered dependency resolvers in Chapter 10 and showed you our NinjectDependencyResolver class, which implements the IDependencyResolver interface to provide Ninject DI support.
DefaultControllerFactory类在依赖性解析器可用时,将用它来生成控制器。我们在第10章涉及了依赖性解析器,并给你演示了我们的 NinjectDependencyResolver类,它实现了IDependencyResolver接口,以提供Ninject的DI支持。
The DefaultControllerFactory will call the IDependencyResolver.GetService method to request a controller instance, which gives you the opportunity to resolve and inject any dependencies.
DefaultControllerFactory将调用IDependencyResolver.GetService方法来生成一个控制器实例,这给你解析并注入依赖性提供了机会。
Using a Controller Activator
使用控制器激活器
You can also introduce DI into controllers by creating a controller activator. You create this activator by implementing the IControllerActivator interface, as shown in Listing 14-5.
你也可以通过生成一个控制器激活器的办法,把DI引入到控制器中。通过实现IControllerActivator接口,你可以生成这个激活器,如清单14-5所示。
Listing 14-5. The IControllerActivator Interface
清单14-5. IControllerActivator接口
namespace System.Web.Mvc {
    using System.Web.Routing;
    public interface IControllerActivator {
        IController Create(RequestContext requestContext, Type controllerType);
    }
}
The interface contains one method, called Create, which is passed a RequestContext object describing the request and a Type that specifies which controller class should be instantiated. Listing 14-6 shows a simple implementation of this interface.
该接口含有一个方法,名为Create,它传递一个描述请求的RequestContext对象和一个指定应该实例化哪个控制器的类型(Type)。清单14-6演示了这个接口的一个简单实现。
Listing 14-6. Implementing the IControllorActivator Interface
清单14-6. 实现IControllorActivator接口
using System;
using System.Web.Mvc;
using ControllerExtensibility.Controllers;
namespace ControllerExtensibility.Infrastructure {
    public class CustomControllerActivator : IControllerActivator {
        public IController Create(System.Web.Routing.RequestContext requestContext,
                Type controllerType) {
            if (controllerType == typeof(FirstController)) {
                controllerType = typeof(SecondController);
            }
            return DependencyResolver.Current.GetService(controllerType) as IController;
        }
    }
}
Our implementation passes requests on to the dependency resolver, unless they are for the FirstController type. In that case, we request an instance of the SecondController class.
只要请求的不是FirstController类型,我们的实现便把请求传递给依赖性解析器。如果是,我们便请求SecondController类的一个实例。
The IControllerActivator interface can be used only if you are also using a dependency resolver. This is because the DefaultControllerFactory class finds a controller activator by calling the IDependencyResolver.GetService method, requesting the IControllerActivator type. So, we need to register our activator directly with our dependency resolver. In this example, that means using the AddBindings method of the NinjectDependencyResolver class, as shown in Listing 14-7.
只当你也使用一个依赖性解析器时,才可以使用这个IControllerActivator接口。这是因为 DefaultControllerFactory通过调用IDependencyResolver.GetService方法定义了一个控制器激活器, 它请求的是IControllerActivator类型。因此,我们需要用这个依赖性解析器来直接注册我们的激活器。在这个例子中,意味着使用 NinjectDependencyResolver类的AddBindings方法,如清单14-7所示。
Listing 14-7. Registering a Controller Activator
清单14-7. 注册一个控制器激活器
private void AddBindings() {
    // put bindings here
    Bind<IControllerActivator>().To<CustomControllerActivator>();
}
It is almost always simpler to rely on a dependency resolver to create controllers. However, using a controller activator is a useful niche feature if you want to intercept and manipulate requests, as we did in Listing 14-6.
几乎总是简单地根据一个依赖性解析器来生成控制器。然而,如果你想截取并操纵请求,使用一个控制器激活器是一个有用的小环境特性,我们在清单14-6中就是这样做的。
Overriding DefaultControllerFactory Methods
重写DefaultControllerFactory方法
You can override methods in the DefaultControllerFactory class to customize the creation of controllers. Table 14-1 describes the three methods you can override, each of which performs a slightly different role.
你可以重写DefaultControllerFactory类中的方法来定制控制器的生成。表14-1描述了你可以重写的三个方法,每一个都起着略有不同的作用。
| Method 方法 |
Result 结果 |
Description 描述 |
|---|---|---|
| CreateController | IController | The implementation of the CreateController method from the IControllerFactory interface. By default, this method calls GetControllerType to determine which type should be instantiated, and then gets a controller object by passing the result to the GetControllerInstance method. IControllerFactory接口的CreateController方法的实现。默认地,这个方法调用GetControllerType来确定应该实例化哪个类型,然后把结果传递给GetControllerInstance方法来获得一个控制器对象。 |
| GetControllerType | Type | Maps requests to controller types. This is where most of the criteria listed earlier in the chapter are enforced. 把请求映射到控制器类型。这是实现本章前面所列出的大部分条件的地方。 |
| GetControllerInstance | IController | Creates an instance of a specified type. 生成指定类型的一个实例。 |
The GetControllerInstance method is the one that is most typically overridden in projects. We used it to introduce DI into the SportsStore application in Chapter 7.
GetControllerInstance方法是项目中最典型地要重写的一个方法。我们在第7章中用它把DI引入到SprotsStore应用程序中。
Creating a Custom Action Invoker
生成一个自定义动作调用器
Once the controller factory has created an instance of a class, the framework needs a way of invoking an action on that instance. If you derived your controller from the Controller class, then this is the responsibility of an action invoker. If you created your controller by implementing the IController interface directly, then you are responsible for invoking actions directly. See Chapter 12 for examples of both approaches for creating a controller.
一旦控制器工厂已经生成了一个类的实例,框架就需要一种办法来调用这个实例上的一个动作。如果你是从Controller类来派生你的控制器的,那么,这 便是动作调用器的责任。如果你是通过直接实现IController接口来生成你的控制器,那么,你要负责直接调用动作。参见第12章关于生成控制器的两 种办法的例子。
An action invoker implements the IActionInvoker interface, which is shown in Listing 14-8.
动作调用器实现IActionInvoker接口,如清单14-8所示。
Listing 14-8. The IActionInvoker Interface
清单14-8. IActionInvoker接口
namespace System.Web.Mvc {
    public interface IActionInvoker {
        bool InvokeAction(ControllerContext controllerContext, string actionName);
    }
}
The interface has only a single member: InvokeAction. The parameters are a ControllerContext object (which you saw in Chapter 12) and a string that contains the name of the action to be invoked. The return value is a bool. A return value of true indicates that the action was found and invoked. A value of false indicates that the controller has no matching action.
该接口只有一个单一的成员:InvokeAction。其参数是一个ControllerContext对象(你在第12章看到过)和一个要调用的动作名称的字符串。其返回值是一个布尔型。返回值true表示找到并调用了这个动作。false表示控制器没有匹配的动作。
Notice that we have not used the word method in this description. The association between actions and methods is strictly optional. While this is the approach that the built-in action invoker takes, you are free to handle actions any way that you choose. Listing 14-9 shows an implementation of the IActionInvoker interface that takes a different approach.
注意,在这个描述中我们并未使用“方法”这个单词(指上一小节中使用的是“动作”,而不是“动作方法” — 译者注)。动作与方法之间的关联是严格可选的。当这是内建的动作调用器所采取的办法时,你可以采取你所选择的任何方式随意地处理动作。清单14-9演示了 另一种不同办法的IActionInvoker接口的实现。
(关于“动作”和“动作方法”:按译者的理解,说得直白一点,动作是一种行为,而动作方法是实现这种行为的代码。动作调用器的作用是实现对一个动作 的调用,而控制器中才是实现这个动作的动作方法。根据这一含义,动作名和动作方法名是可以不同的,参见稍后的“使用自定义动作名”小节。 — 译者注)
Listing 14-9. A Custom Action Invoker
清单14-9. 一个自定义动作调用器
using System.Web.Mvc;
namespace ControllerExtensibility.Infrastructure {
    public class CustomActionInvoker : IActionInvoker {
        public bool InvokeAction(ControllerContext context, string actionName) {
            if (actionName == "Index") {
                context.HttpContext.Response.Write("This is output from the Index action");
                return true;
            } else {
                return false;
            }
        }
    }
}
This action invoker doesn’t care about the methods in the controller class. In fact, it deals with actions itself. If the request is for the Index action, then the invoker writes a message directly to the Response. If the request is for any other action, then it returns false, which causes a 404 – Not found error to be displayed to the user.
这个动作调用器并不关心控制器类中的方法。事实上,它自己处理动作。如果这是对Index动作的请求,那么这个调用器直接把一条消息写到Response。如果是其它动作的请求,那么它返回false,这会引发一个显示给用户的404 — 未找到错误。
The action invoker associated with a controller is obtained through the Controller.ActionInvoker property. This means that different controllers in the same application can use different action invokers. Listing 14-10 shows a controller that uses the action invoker from Listing 14-9.
这个与一个控制器关联的动作调用器是通过Controller.ActionInvoker属性获得的。意即,同一个应用程序中的不同控制器可以使用不同的动作调用器。清单14-10演示了使用清单14-9动作调用器的一个控制器。
Listing 14-10. Using a Custom Action Invoker in a Controller
清单14-10. 在一个控制器中使用自定义动作调用器
using System.Web.Mvc;
using ControllerExtensibility.Infrastructure;
namespace ControllerExtensibility.Controllers {
    public class CustomActionInvokerController : Controller {
        public CustomActionInvokerController() {
            this.ActionInvoker = new CustomActionInvoker();
        }
    }
}
There are no action methods in this controller. It depends on the action invoker to process requests.
在这个控制器中没有动作方法。它依靠动作调用器来处理请求。
We are not suggesting that you implement your own action invoker. And if you do, we don’t suggest you follow this approach. Why? First, the built-in support has some very useful features, as you will see shortly. Second, our example has some problems: a lack of extensibility, poor separation of responsibilities, and a lack of support for views of any kind. But the example shows how the MVC Framework fits together and demonstrates, once again, that almost every aspect of the request processing pipeline can be customized or replaced entirely.
我们并不建议你实现自己的动作调用器。而且如果你这么做,我们并不建议你遵循这种办法。为什么?首先,内建的支持有一些非常有用的特性,正如你马上就要看 到的。其次,我们的例子有一些问题:缺乏可扩展性、贫乏的职责分离,而且缺乏对各种视图的支持。但这个例子演示了MVC框架如何组合和演示。再一次重申, 请求处理管道的几乎每一个方面都是可以定制或完全替换的。
Using the Built-In Action Invoker
使用内建的动作调用器
The built-in action invoker, which is the ControllerActionInvoker class, has some very sophisticated techniques for matching requests to actions. And, unlike our implementation in the previous section, the default action invoker operates on methods.
内建的动作调用器,ControllerActionInvoker类,有一些把请求与动作相匹配的非常完善的技术。而且,与我们前小节的实现不同,默认动作调用器通过方法进行操作。
To qualify as an action, a method must meet the following criteria:
为了具备一个动作的资格,一个方法必须满足以下条件:
- The method must be public.
该方法必须是public的。 - The method must not be static.
该方法必须不是static的。 - The method must not be present in System.Web.Mvc.Controller or any of its base classes.
该方法必须不在System.Web.Mvc.Controller、或它的任何基类中。 - The method must not have a special name.
该方法必须没有专用名。
The first two criteria are simple enough. For the next, excluding any method that is present in the Controller class or its bases means that methods such as ToString and GetHashCode are excluded, as are the methods that implement the IController interface. This is sensible, since we don’t want to expose the inner workings of our controllers to the outside world. The last criterion means that constructors, properties and event accessors are excluded. In fact, no class member that has the IsSpecialName flag from System.Reflection.MethodBase will be used to process an action.
前两个条件很简单。对于下一个条件,排除了在Controller类或其基类中出现的方法,这意味着不包括ToString及GetHashCode这样 的方法,因为这些是IController接口实现的方法。这是有意义的,因为我们不希望把我们控制器的内部工作暴露给外部世界。最后一个条件意味着排除 构造器、属性、以及事件访问器。实际上是指,不可以用具有System.Reflection.MethodBase的IsSpecialName标志的 类成员来处理一个动作。
■ Note Methods that have generic parameters (such as MyMethod<T>()) meet all of the criteria, but the MVC Framework will throw an exception if you try to invoke such a method to process a request.
注:具有泛型参数的方法(如MyMethod<T>())满足所有条件,但如果你试图调用这样的方法来处理一个请求,MVC框架会弹出一个异常。
By default, the ControllerActionInvoker finds a method that has the same name as the requested action. So, for example, if the action value that the routing system produces is Index, then the ControllerActionInvoker will look for a method called Index that fits the action criteria. If it finds such a method, it will be invoked to handle the request. This behavior is exactly what you want almost all of the time, but as you might expect, the MVC Framework provides some opportunities to fine-tune the process.
默认地,ControllerActionInvoker找到一个具有与请求的动作同名的方法。例如,如果路由系统产生的action的值为Index, 那么ControllerActionInvoker将查找符合这个动作条件的Index。如果找到这样一个方法,将调用它来处理这个请求。这种行为差不 多总是恰好是你所想要的,但正如你所期望,MVC框架提供了一些微调这一过程的机会。
Using a Custom Action Name
使用自定义动作名
Usually, the name of an action method determines the action that it represents. The Index action method services requests for the Index action. You can override this behavior using the ActionName attribute, as shown in Listing 14-11.
通常,动作方法的名称确定了它所表示的动作。Index动作方法对Index动作进行服务。你可以用ActionName属性来重写这种行为,如清单14-11所示。
Listing 14-11. Using a Custom Action Name
清单14-11. 使用自定义动作名
using System.Web.Mvc;
namespace ActionInvokers.Controllers {
    public class HomeController : Controller {
        [ActionName("Index")]
        public ActionResult MyAction() {
            return View();
        }
    }
}
In this listing, we have applied the attribute to the MyAction method, passing in a parameter value of Index. When the action invoker receives a request for the Index action, it will now use the MyAction method. Applying the attribute overrides the name of the action. This means that the MyAction method is no longer available to service requests for the MyAction action.
在这个清单中,我们把这个性质运用到MyAction方法,把Index参数值传递到其中。当动作调用器接收一个对Index动作的请求时,它现在将使用 MyAction方法。运用这个性质来重写动作的名字。这意味着MyAction方法不再用来对MyAction动作进行服务。
There are two main reasons why you might want to override a method name in this way:
用这种方式重写一个方法名的原因主要有二:
- You can then accept an action name that wouldn’t be legal as a C# method name (for example, [ActionName(“User-Registration”)]).
你然后可以接收一个不合法的C#方法名(例如,[ActionName(“User-Registration”)])。 - If you want to have two different C# methods that accept the same set of parameters and should handle the same action name, but in response to different HTTP request types (for example, one with [HttpGet] and the other with [HttpPost]), you can give the methods different C# names to satisfy the compiler, but then use [ActionName] to map them both to the same action name.
如果你希望有两个不同的C#方法接收同一组参数,并处理同样的方法名,但却要对不同的HTTP请求类型进行响应(例如,一个为[HttpGet],而另一 个为[HttpPost]),你可以对这些方法用不同的C#名来满足编译器的要求,然后用[ActionName]把它们映射到同一个动作名。
One oddity that arises when using this attribute is that Visual Studio will use the original method name in the Add View dialog box. So, if you right-click the MyAction method and select Add View, you see the dialog box shown in Figure 14-2.
当使用这个性质时,出现的一个奇怪的现象是Visual Studio将在“添加视图”对话框中使用原先的方法名。因此,如果你右击MyAction方法,并选择“添加视图”,你会看到如图14-2所示的对话框。
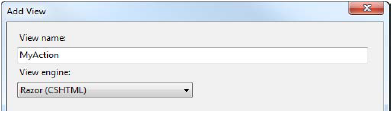 Figure 14-2. Visual Studio doesn’t detect the ActionName attribute
图14-2. Visual Studio并不检测ActionName性质
This is a problem because the MVC Framework will look for the default views based on the action name, which is Index in our example, as defined by the attribute. When creating the default view for an action method that use the ActionName attribute, you must make sure that the name matches the attribute value and not the C# method name.
这是一个问题,因为MVC框架将查找基于动作名的默认视图,在我们的例子中是由这个性质定义的Index。当生成使用ActionName性质的动作方法的默认视图时,你必须确保该名字与此性质的值匹配,而不是C#的方法名。
Using Action Method Selection
使用动作方法选择
It is often the case that a controller will contain several actions with the same name. This can be because there are multiple methods, each with different parameters, or because you used the ActionName attribute so that multiple methods represent the same action.
通常的情况是,一个控制器含有几个同名的动作。这可能是因为有多个方法,每一个带有不同的参数,或是因为你使用ActionName性质以使多个方法表示同一个动作。
In these situations, the MVC Framework needs some help selecting the appropriate action with which to process a request. The mechanism for doing this is called action method selection. It allows you to define kinds of requests that an action is willing to process. You have already seen an example of action method selection when we restricted an action using the HttpPost attribute in Chapter 8. We had two methods called Checkout, and by using the HttpPost attribute, we indicated that one of them was to be used only for HTTP POST requests, as shown in Listing 14-12.
在这些情况下,MVC框架需要一些选择相应动作以处理一个请求的辅助办法。做这种事情的机制称为动作方法选择。它允许你定义一个动作乐于处理的请求的种 类。当我们在第8章用HttpPost性质约束一个动作时,你已经看到了一个动作方法选择的例子。我们有两个名为Checkout的方法,并且,通过使用 HttpPost性质,我们指示其中一个只用于HTTP POST请求,如清单14-2所示。
Listing 14-12. Using the HttpPost Attribute
清单14-12. 使用HttpPost性质
...
[HttpPost]
public ViewResult Checkout(Cart cart, ShippingDetails shippingDetails) {
    // action method body
}
public ViewResult Checkout() {
    // action method body
}
...
The action invoker uses an action method selector to remove ambiguity when selecting an action. In Listing 14-12, there are two candidates for the Checkout action. The invoker gives preference to the actions that have selectors. In this case, the HttpPost selector is evaluated to see if the request can be processed. If it can, then this is the method that will be used. If not, then the other method will be used.
该动作调用器使用了一个动作方法选择器,以便在选择一个动作时消除不明确性。在清单14-12中,对Checkout动作有两个候选。该调用器把优先赋给 了具有选择器的那个动作。在这种情况下,首先评估HttpPost选择器,以考查是否可以处理该请求。如果可以,那么这就是将被使用的方法。如果不行,那 么将使用另一个方法。
There are built-in attributes that work as selectors for the different kinds of HTTP requests: HttpPost for POST requests, HttpGet for GET requests, HttpPut for PUT requests, and so on. Another built-in attribute is NonAction, which indicates to the action invoker that a method that would otherwise be considered a valid action method should not be used, as shown in Listing 14-13.
对不同的HTTP请求,有一些像选择器一样的内建性质:HttpPost用于POST请求、HttpGet用于GET请求、HttpPut用于PUT请求 等等。另一个内建的性质是NonAction,它向动作调用器指出,不要使用一个看上去有效的动作方法,如清单14-13所示。
Listing 14-13. Using the NonAction Selector
清单14-13. 使用NonAction选择器
...
[NonAction]
public ActionResult MyMethod() {
    return View();
}
...
The method in the listing will not be considered as an action method. This is useful for ensuring that you don’t expose the workings of your controller classes as actions. Of course, normally such methods should simply be marked private, which will prevent them from being invoked as actions; however, [NonAction] is useful if for some reason you must mark such as method as public.
在该清单中的方法将不被视为一个动作方法。这对确保你的控制器类不作为动作是有用的。当然,通常这种方法应该被简单地标记为private,这会阻止它们作为动作被调用。然而,如果出于某些原因,你必须把方法标记为public的,则[NonAction]是有用的。
Creating a Custom Action Method Selector
生成一个自定义的动作方法选择器
Action method selectors are derived from the ActionMethodSelectorAttribute class, which is shown in Listing 14-14.
动作方法选择器派生于ActionMethodSelectorAttribute类,它如清单14-14所示。
Listing 14-14. The ActionMethodSelectorAttribute Class
清单14-14. ActionMethodSelectorAttribute类
namespace System.Web.Mvc {
    using System;
    using System.Reflection;
    [AttributeUsage(AttributeTargets.Method, AllowMultiple = false, Inherited = true)]
    public abstract class ActionMethodSelectorAttribute : Attribute {
        public abstract bool IsValidForRequest(ControllerContext controllerContext,
                MethodInfo methodInfo);
    }
}
The ActionMethodSelectorAttribute is abstract and defines one abstract method: IsValidForRequest. The parameters for this method are a ControllerContext object, which allows you to inspect the request, and a MethodInfo object, which you can use to get information about the method to which your selector has been applied. You return true from IsValidForRequest if the method is able to process a request, and false otherwise. Listing 14-15 demonstrates a simple custom action method selector.
ActionMethodSelectorAttribute是一个抽象类,并定义了一个抽象方法:IsValidForRequest。该方法的参数是 一个让你检测请求的ControllerContext对象,和一个MetholdInfo对象,你可以用它来获取运用了选择器的方法的信息。如果该方法 能够处理请求,返回true,否则返回false。清单14-15演示了一个自定义的动作方法选择器。
Listing 14-15. A Custom Action Method Selector
清单14-15. 自定义动作方法选择器
using System.Reflection;
using System.Web.Mvc;
namespace ActionInvokers.Infrastructure {
    public class LocalAttribute : ActionMethodSelectorAttribute {
        public override bool IsValidForRequest(ControllerContext context,
                MethodInfo methodInfo) {
            return context.HttpContext.Request.IsLocal;
        }
    }
}
Our action method selector will return true from the IsValidForRequest method only when the request originates from the local machine.
我们的动作方法选择器将只有在该请求来源于本地机时,才从IsValidForRequest方法返回true。
Listing 14-16 shows how to use the selector to differentiate between two action methods with the same name.
清单14-16演示如何使用这个选择器来区分两个同名的动作方法。
Listing 14-16. Using a Custom Action Method Selector
清单14-16. 使用自定义动作方法选择器
...
[ActionName("Index")]
public ActionResult FirstMethod() {
    return View((object)"Message from FirstMethod");
}
[Local]
[ActionName("Index")]
public ActionResult SecondMethod() {
    return View((object)"Message from SecondMethod");
}
...
When this controller receives a request for the Index action, the Local selector will be evaluated. If the request originates locally, then the selector’s IsValidForRequest method will return true, and SecondMethod will be invoked to handle the request. If the request originates from another computer, then the selector’s IsValidForRequest method will return false, and the action invoker will use FirstMethod instead.
当这个控制器接收到一个对Index动作的请求时,将评估Local选择器。如果该请求是本地发生的,那么该选择器的IsValidForRequest 方法将返回true,而SecondMethol将被用来处理这个请求。如果该请求来源于另一台计算机,那么这个选择器的 IsValidForRequest方法将返回false,而这个动作方法调用器将使用FirstMethod。
Note that we’re not suggesting you should use action selectors as a kind of security check, unless you really enjoy Debugging. To handle user-access control in the intended way, use the authorization attributes covered in the previous chapter.
注,我们不建议你把动作方法选择器用作为一种安全检查,除非你很喜欢调试。要使用预定的方法来处理用户的访问控制,请使用上一章所涉及的authorization性质。
THE ACTION METHOD DISAMBIGUATION PROCESS
动作方法的去歧义过程
Now that you have seen inside the action method selector base class, you can understand how the action invoker selects an action method. The invoker starts the process with a list of possible candidates, which are the controller methods that meet the action method criteria. Then it goes through the following process:
现在,你已经深入了解了动作方法选择器基类,你应该能够理解动作调用器是如何选择一个动作方法的了。动作调用器从一个可能的候选方法列表(满足动作条件的控制器方法)开始进行处理。然后经历以下过程:
- First, the invoker discards any method based on name. Only methods that have the same name as the target action or have a suitable ActionName attribute are kept on the list.
首先,该调用器丢弃任何基于名字的方法。只有与目标动作同名或与ActionName性质相配的方法被保留在这个列表中。 - Second, the invoker discards any method that has an action method selector attribute that returns false for the current request.
其次,该调用器丢弃那些动作方法选择器性质对当前请求返回false的动作方法。 - If there is exactly one action method with a selector left, then this is the method that is used. If there is more than one method with a selector, then an exception is thrown, because the action invoker cannot disambiguate between the available methods.
如果恰好留下一个带有选择器的动作方法,那么这就是要用的方法。如果有多个带有选择器的方法,那么便弹出一个异常,因为该动作调用器不能消除可用方法之间的歧义。 - If there are no action methods with selectors, then the invoker looks at those without selectors. If there is exactly one such method, then this is the one that is invoked. If there is more than one method without a selector, an exception is thrown, because the invoker can’t choose between them.
如果不存在带有选择器的动作方法,那么该调用器便查找不带选择器的那些方法。如果恰好有一个这样的方法,那么这就是要调用的方法。如果有多个不带选择器的方法,便弹出一个异常,因为调用器不能在它们之间作出选择。
Handling Unknown Actions
处理未知动作
If the action invoker is unable to find an action method to invoke, it returns false from its InvokeAction method. When this happens, the Controller class calls its HandleUnknownAction method. By default, this method returns a 404 – Not Found response to the client. This is the most useful thing that a controller can do for most applications, but you can choose to override this method in your controller class if you want to do something special. Listing 14-17 provides a demonstration.
如果动作调用器找不到一个要调用的动作方法,便从它的InvokeAction方法返回false。当这种情况发生时,Controller类便调用它的 HandleUnknownAction方法。默认地,这个方法返回一个“404 — 未找到”对客户端作出响应。这是控制器对大多数应用程序所能做的最有用的事情,但是,如果你想做一些特殊的事情,你可以在你的控制器类中选择采用重写这个 方法。清单14-17提供了一个演示。
Listing 14-17. Overriding the HandleUnknownAction Method
清单14-17. 重写HandleUnknownAction方法
using System.Web.Mvc;
using ActionInvokers.Infrastructure;
namespace ActionInvokers.Controllers {
    public class HomeController : Controller {
        public ActionResult Index() {
            return View();
        }
        protected override void HandleUnknownAction(string actionName) {
            Response.Write(string.Format("You requested the {0} action", actionName));
        }
    }
}
In this example, our controller has an Index action method. It will write a message to the Response object if any other action is requested, as shown in Figure 14-3.
在这个例子中,我们的控制器有一个Index动作方法。它将在其它动作被请求时,把一个消息写到Response对象,如图14-3所示。
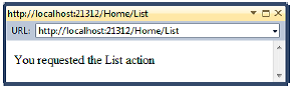 Figure 14-3. Handling requests for unknown actions
图14-3. 处理未知动作的请求
Using Action Method Selectors to Support REST Services
使用动作方法选择器以支持REST服务
Over the past few years, many developers have chosen to implement web services using the Representation State Transfer (REST) style instead of more complex alternatives such as the Simple Object Access Protocol (SOAP).
在过去几年中,许多开发者都选择采用“表现式状态传输(REST)”的风格来实现web服务,而不是采用更复杂的那些方式,如“简单对象访问协议(SOAP)”等。
A REST operation is specified by combination of a URL and an HTTP method. The URL has application-specific meaning. As an example, you might have a URL such as /Staff/1, which refers to the first record in a staff database. The different HTTP methods represent the different operations that can be performed on this record. A GET request retrieves the data, a POST request modifies it, a DELETE request removes it, and so on.
一个REST操作是通过一个URL和一个HTTP方法的组合来指定的。该URL具有应用程序的特定含义。例如,你可能有一个诸如/Staff/1之类的 URL,它指向staff数据库的第一条记录。不同的HTTP方法表示了可以在这条记录上进行的不同操作。GET请求接收数据、POST请求修改它、 DELETE请求删除它,等等。
You can provide REST support by combining the ActionName attribute with action method selectors, as shown in Listing 14-18.
你可以通过用ActionName性质与动作方法选择器组合的办法来提供对REST的支持,如清单14-18所示。
Listing 14-18. Supporting REST Web Services
清单14-18. 支持REST Web服务
public class StaffController : Controller {
    [HttpGet]
    [ActionName("Staff")]
    public ActionResult StaffGet(int id) {
        // ... logic to get and return data item
    }
    [HttpPost]
    [ActionName("Staff")]
    public ActionResult StaffModify(int id, StaffMember person) {
        // ... logic to modify or create data item
    }
    [HttpDelete]
    [ActionName("Staff")]
    public ActionResult StaffDelete(int id) {
        // ... logic to delete data item
    }
}
Suppose we add a routing entry to Global.asax, as follows:
假设我们像下面这样把一个路由条目添加到Global.asax:
public static void RegisterRoutes(RouteCollection routes) {
    routes.IgnoreRoute("{resource}.axd/{*pathInfo}");
    routes.MapRoute(null, "Staff/{id}",
            new { controller = "Staff", action = "Staff" },
            new { id = @"\d+" /* Require ID to be numeric */ });
    routes.MapRoute(
            "Default", // Route name
            "{controller}/{action}/{id}", // URL with parameters
            new { controller = "Home", action = "Index", id = UrlParameter.Optional }
    );
}
Now each StaffMember entity in our application can be uniquely addressed using a URL of the form Staff/123, and a client can use the GET, POST, and DELETE HTTP methods to perform operations on those addresses. This is called a RESTful API, except by people who claim to be experts in REST, who will tell you that nothing is truly RESTful except their own code. (We joke—sort of).
现在,我们应用程序中的每一个StaffMember条目都可以用Staff/123这种格式的URL进行唯一定位,而客户端可以用GET、POST、及 DELETE的HTTP方法对这些地址进行操作。这称为REST化的API,而声称自己是REST专家的那些人,除了他们自己的代码之外,他根本说不出真 正的REST化是什么(我们有点开玩笑了)。
Overriding HTTP Methods
重写HTTP方法
RESTful APIs are great as long as all of your clients are capable of using the full range of HTTP methods. Server-side clients written in a .NET language, Java, or Ruby, for example, will have no problems consuming your service. Similarly, JavaScript AJAX calls made from a recent version of a major browser (such Chrome, Firefox, and Internet Explorer) will have no difficulties. Unfortunately, some mainstream web technologies support only GET and POST methods. This includes HTML forms and Flash applications. Additionally, a lot of firewalls will allow only GET and POST requests to pass.
只要整个客户端能够使用所有HTTP方法,REST化的API是很棒的。例如,以.NET语言、Java、或Ruby编写的服务器端程序使用你的服务将没 有问题。类似地,从当前版本的主浏览器(如Chrome、Firefox、以及Internet Explorer)形成的JavaSctipt的AJAX调用也没有任何困难。不幸的是,有些主流web技术只支持GET和POST方法。这包括HTML 表单(HTML的form)以及Flash应用程序。此外,许多防火墙也只允许GET和POST请求通过。
To address this shortcoming, there is a convention where you include the HTTP method that is required, even though the request hasn’t been made using that method. This is done by including a key/value pair in the request, where the key is X-HTTP-Method-Override, and the value is the method that is desired. The key can be specified as an HTTP header, as a hidden input in an HTML form, or as part of the query string. For example, a POST request can contain a header that specifies that the MVC application should operate as though it had received a DELETE request. The thinking behind this is that most web technologies allow arbitrary headers or form inputs to be set, even if they don’t support the same HTTP methods.
为了解决这种缺陷,有一个约定,在这里你可以纳入所需的HTTP方法,即使该请求不是用这个方法形成的。这是通过在请求中包含一个“键/值”对实现的,这 里,“键”是X-HTTP-Method-Override,“值”是所期望的方法。键可以被指定为一个HTTP报头、HTML表单中的一个隐藏的 input字段、或者是查询字串的一部分。例如,一个POST请求可以含有一个报头,以指示MVC框架应该像接收了一个DELETE请求那样进行操作。其 背后要考虑的事情是,大多数web技术允许任意报头或表单的input设置,即使它们不支持相应的HTTP方法(比如,大多数web技术不支持 DELETE,但仍然可以把报头或表单中的input字段设置为DELETE — 译者注)。
Overriding HTTP Methods in an MVC HTML Form
重写MVC HTML表单中的HTTP方法
The MVC Framework provides support for overriding the HTTP method in both views and controllers. The view support means that you can use RESTful APIs from your HTML forms, and the controller support means that the MVC Framework will treat requests that contain X-HTTP-Method-Override properly. Listing 14-19 shows how to override the HTTP method in a view.
MVC框架在视图和控制器中都提供了对重写HTTP方法的支持。视图支持意味着你可以根据你的HTML表单使用REST化的API,而控制器支持意味着 MVC框架将会适当地处理含有X-HTTP-Methold-Override的请求。清单14-19演示了如何在一个视图中重写HTTP方法。
Listing 14-19. Overriding the HTTP Method in a View
清单14-19. 在视图中重写HTTP方法
...
@using (Html.BeginForm()) {
    @Html.HttpMethodOverride(HttpVerbs.Delete)
<input type="submit" value="Delete" />
}
...
The Html.HttpMethodOverride helper allows you to specify the HTTP method with which you want the request to be processed. In the example, we specified the DELETE method. The helper method adds an input to our form, as follows:
Html.HttpMethodOverride辅助方法允许你指定处理这个请求的HTTP方法。在这个例子中,我们指定了DELETE方法。这个辅助方法把一个input字段添加到我们的表单,像下面这样:
<input name="X-HTTP-Method-Override" type="hidden" value="DELETE" />
The MVC Framework looks for this input when processing a form, and then the overridden HTTP method is available through the Request.GetHttpMethodOverride method.
MVC框架在处理表单时会查找这个input字段,于是,通过Request.GetHttpMethodOverride方法,这个被重写的HTTP方法生效了。
The MVC Framework supports HTTP method overriding only on POST requests. This is consistent with the idea that GET requests are always safe interactions that have no side effects other than data retrieval (see Chapter 11 for more details).
MVC框架支持只对POST请求进行重写的HTTP方法。这与GET请求总是除数据检索而无其它副作用的这种安全交互性是一致的(详见第11章)。
■ Note The value returned by the Request.HttpMethod does not change when an overridden HTTP method is used. So, if a form is submitted with the hidden input shown in Listing 14-19, the HttpMethod property will return POST, and the GetHttpMethodOverride method will return DELETE.
注:在一个重写的HTTP方法被使用时,由Request.HttpMethod返回的值并未改变。因此,如果一个表单被如清单14-19所示的隐藏 input字段所递交,其HttpMethod属性仍返回POST,而GetHttpMethodOverride方法将返回DELETE。
Improving Performance with Specialized Controllers
用特殊控制器改善性能
The MVC Framework provides two special kinds of controllers that may improve the performance of your MVC web applications. Like all performance optimizations, these controllers represent compromises, either in ease of use or with reduced functionality. In the follow sections, we’ll demonstrate both kinds of controllers and outline their benefits and shortcomings.
MVC框架提供了两种可以改善你MVC web应用程序性能的控制器。像所有性能优化一样,这些控制器都表现了一些折衷,或是减弱运用或是减少功能。在以下小节中,我们将演示这两种控制器并概括其优缺点。
Using Sessionless Controllers
使用无会话控制器
By default, controllers support session state, which can be used to store data values across requests, making life easier for the MVC programmer. Creating and maintaining session state is an involved process. Data must be stored and retrieved, and the sessions themselves must be managed so that they expire appropriately. Session data consumes server memory or space in some other storage location, and needing to synchronize the data across multiple web servers makes it harder to run your application on a server farm.
默认地,控制器支持会话状态,这可以用来跨请求地存储数据值,使MVC程序员的工作更轻松。生成和维护会话状态是一个棘手的过程。数据必须被存储和接收, 且会话本身必须被管理,以使它们能适当地终止。会话数据消耗服务器内存或一些其它存储单元的空间,而且,多个web服务器之间数据同步的需求使得在服务器 场上运行应用程序更加困难(服务器场是指联合运行的多个服务器 — 译者注)。
In order to simplify session state, ASP.NET will process only one query for a given session at a time. If the client makes multiple overlapping requests, they will be queued up and processed sequentially by the server. The benefit is that you don’t need to worry about multiple requests modifying the same data. The downside is that you don’t get the request throughput you might like.
为了简化会话状态,ASP.NET对一个给定的会话在某一时刻只处理一个查询。如果客户端形成了多个重叠的请求,它们将被排成队列,并由服务器依序处理。其好处是你不需要担忧修改同一数据的多个请求。缺点是你得不到所希望的请求吞吐量。
Not all controllers use the session state features. In those cases, you can improve the performance of your application by avoiding work involved in maintaining session state. You do this by using sessionless controllers. These are just like regular controllers, with two exceptions: the MVC Framework won’t load or persist session state when they are used to process a request, and overlapping requests can be processed simultaneously.
并不是所有控制器都要使用这种会话状态特性。在这些情况下,你可以通过避免棘手的会话状态维护工作来改善你应用程序的性能。这可以通过无会话控制器来实 现。它们与规则控制器一样,但有两个方面不同:在把它们用于处理一个请求时,MVC框架不加载或不保持会话的状态;重叠请求可以同时处理。
Managing Session State in a Custom IControllerFactory
在一个自定义IControllerFactory中管理会话状态
At the start of this chapter, we showed you that the IControllerFactory interface contains a method called GetControllerSessionBehavior, which returns a value from the SessionStateBehavior enumeration. That enumeration contains four values that control the session state configuration of a controller, as described in Table 14-2.
在本章的开始,我们演示了含有一个名为GetControllerSessionBehavior方法的IControllerFactory接口,这个 方法从SessionStateBehavior枚举返回一个值。这个枚举含有四个控制一个控制器的会话配置的值,如表14-2所述。
| Value 值 |
Description 描述 |
|---|---|
| Default | Use the default ASP.NET behavior, which is to determine the session state configuration from the HttpContext. 使用默认的ASP.NET行为,它根据HttpContext来决定会话状态的配置。 |
| Required | Full read-write session state is enabled. 启用完全的读写会话状态。 |
| ReadOnly | Read-only session state is enabled. 启用只读会话状态 |
| Disabled | Session state is disabled entirely. 完全取消会话状态。 |
A controller factory that implements the IControllerFactory interface directly sets the session state behavior for controllers by returning SessionStateBehavior values from the GetControllerSessionBehavior method. The parameters to this method are a RequestContext object and a string containing the name of the controller. You can return any of the four values shown in Table 14-2, and you can return different values for different controllers, as shown in Listing 14-20.
通过返回GetControllerSessionBehavior方法的SessionStateBehavior的值,一个实现 IControllerFactory接口的控制器工厂直接设置会话状态的行为。传给这个方法的参数是一个RequestContext对象和一个含有控 制器名的字符串。你可以返回表14-2所示的任意一个值,因而你可以对不同的控制器返回不同的值,如清单14-20所示。
Listing 14-20. Defining Session State Behavior for a Controller
清单14-20. 定义一个控制器的会话状态行为
public SessionStateBehavior GetControllerSessionBehavior(
            RequestContext requestContext, string controllerName) {
    switch (controllerName) {
        case "Home":
            return SessionStateBehavior.ReadOnly;
        case "Other":
            return SessionStateBehavior.Required;
        default:
            return SessionStateBehavior.Default;
    }
}
Managing Session State Using DefaultControllerFactory
管理使用DefaultControllerFactory的会话状态
When you are using the built-in controller factory, you can control your controller session state using the SessionState attribute, as shown in Listing 14-21.
当你使用内建的控制器工厂时,你可以用SessionState性质来控制你的控制器会话状态,如清单14-21所示。
Listing 14-21. Using the SessionState Attribute
清单14-21. 使用SessionState性质
using System.Web.Mvc;
using System.Web.SessionState;
namespace SpecialControllers.Controllers {
    [SessionState(SessionStateBehavior.Disabled)]
    public class HomeController : Controller {
        public ActionResult Index() {
            return View();
        }
    }
}
The SessionState attribute is applied to the controller class and affects all of the actions in the controller. The sole parameter to the attribute is a value from the SessionStateBehavior enumeration (see Table 14-2). In the example, we have disabled session state entirely, which means that if we try to set a session value in the controller, like this:
SessionState性质被运用于该控制器类,并影响着该控制器中的所有动作。送给这个性质的唯一参数是SessionStateBehavior枚 举中的一个值(见表14-2)。在这个例子中,我们完全取消了会话状态,意即,如果我们在控制器中设置一个会话值,像这样:
Session["Message"] = "Hello";
or try to read back from the session state in a view, like this:
或试图在一个视图中从会话状态读回,像这样:
Message: @Session["Message"]
the MVC Framework will throw an exception when the action is invoked or the view is rendered. Also, when session state is Disabled, the HttpContext.Session property returns null.
那么在这个动作被调用,或这个视图被渲染时,MVC框架将弹出一个异常。同样,当会话状态是Disabled时,HttpContext.Session属性返回null。
If you have specified the ReadOnly behavior, then you can read values that have been set by other controllers, but you will still get a runtime exception if you try to set or modify a value. You can get details of the session through the HttpContext.Session object, but trying to alter any values causes an error.
如果你已经指定了ReadOnly行为,那么,你可以读取已经由其它控制器设置的值,但如果你试图设置或修改值时,你仍然会得到一个运行时异常。你可以通过HttpContext.Session对象得到该会话的细节,但试图修改任何一个值都会引发一个错误。
■ Tip If you are simply trying to pass data from the controller to the view, consider using the View Bag or View Data feature instead. These are not affected by the SessionState attribute. See Chapter 12 for demonstrations of both features.
提示:如果你只是简单地把数据从控制器传递给视图,请考虑使用View Bag或View Data特性。这些不受SessionState性质的影响。参见第12章对这两个特性的演示。
Using Asynchronous Controllers
使用异步控制器
The core ASP.NET platform maintains a pool of .NET threads that are used to process client requests. This pool is called the worker thread pool, and the threads are called worker threads. When a request is received, a worker thread is taken from the pool and given the job of processing the request. When the request has been processed, the worker thread is returned to the pool, so that it is available to process new requests as they arrive.
ASP.NET平台内核维护着一个用来处理客户端请求的线程池。这个线程池叫做工作线程池,而这些线程叫做工作线程。当接收到一个请求时,将占用线程池中 的一个工作线程,以进行这个请求的处理工作。当这个请求处理完毕后,该工作线程被返回给线程池,以便可用于处理新的请求。
There are two key benefits of using thread pools for ASP.NET applications:
对ASP.NET应用程序使用线程池有两个关键好处:
- By reusing worker threads, you avoid the overhead of creating a new one each time you process a request.
通过重用工作线程,你避免了每次处理一个请求时生成一个新的开销。 - By having a fixed number of worker threads available, you avoid the situation where you are processing more simultaneous requests than your server can handle.
通过具有固定数目的可用工作线程,你避开了多于服务器能够处理的并发请求的情况。
The worker thread pool works best when requests can be processed in a short period of time. This is the case for most MVC applications. However, if you have actions that depend on other servers and take a long time to complete, then you can reach the point where all of your worker threads are tied up waiting for other systems to complete their work. Your server is capable of doing more work—after all, you are just waiting, which takes up very little of your resources—but because you have tied up all of your worker threads, incoming requests are being queued up. You will be in the odd state of your application grinding to a halt while the server is largely idle.
在请求可以被短时间处理完毕情况下,工作线程池的工作方式是很好的。这也是大多数MVC应用程序的情况。但是,如果你有一些依赖于其它服务器、且占用长时 间才能完成的动作,那么,你可能会遇到所有工作线程都被绑定于等待其它系统完成其工作的情况。此刻你的服务器能够做更多工作 — 必竟,你只是在等待,只占用了很少资源 — 但因为所有线程都被绑定,传入的请求都被排成队列。你将陷入应用程序处理停顿、而服务器大片闲置的奇怪状态。
■ Caution At this point, some readers are thinking that they can write a worker thread pool that is tailored to their application. Don’t do it. Writing concurrent code is easy. Writing concurrent code that works is difficult. If you are new to concurrent programming, then you lack the required skills. If you are experienced in concurrent programming, then you already know that the benefits will be marginal compared with the effort of coding and testing a new thread pool. Our advice is to stick with the default pool.
警告:在这种情况下,许多读者认为,他们可以编写适应其应用程序的工作线程池。不要这样做。编写并发代码容易,但编写能够正常工作的并发代码是困难的。如 果你是并发编程新手,那么你会缺乏所需要的技能。如果你有并发编程的经验,那么你应该已经知道,与编写和测试一个新线程池所付出的努力相比,你所得到的好 处是微不足道的。我们的建议是,应当坚持使用默认线程池。
The solution to this problem is to use an asynchronous controller. This increases the overall performance of your application, but doesn’t being any benefits to the execution of your asynchronous operations.
这一问题的解决方案是使用异步控制器。这会提高你应用程序的整体性能,但并不是执行异步操作的好处。
■ Note Asynchronous controllers are useful only for actions that are I/O- or network-bound and not CPU-intensive. The problem you are trying to solve with asynchronous controllers is a mismatch between your pool model and the type of request you are processing. The pool is intended to ensure that each request gets a decent slice of the server resources, but you end up with a set of worker threads that are doing nothing. If you use additional background threads for CPU-intensive actions, then you will dilute the server resources across too many simultaneous requests.
注:异步控制器只对占用I/O或网络、而不是CPU密集型的动作是有用的。你试图用异步控制器解决的问题应当是你的线程池与所处理的请求之间的不协调状 况。线程池意在确保每个请求得到一片服务器资源,但你最终停滞于一组无所事事的工作线程上。如果你对CPU密集型动作使用额外的后台线程,那么你将因涉及 太多的并发请求而削减服务器资源。
Creating an Asynchronous Controller
生成一个异步控制器
To begin our exploration of asynchronous controllers, we are going to show you an example of the kind of problem that they are intended to solve. Listing 14-22 shows a regular synchronous controller.
为了开始异步控制器考察,我们打算向你演示一个意在解决这种问题的例子。清单14-22显示了一个常规的异步控制器。
Listing 14-22. A Problematic Synchronous Controller
清单14-22. 一个有问题的异步控制器
using System.Web.Mvc;
using SpecialControllers.Models;
namespace SpecialControllers.Controllers {
    public class RemoteDataController : Controller {
        public ActionResult Data() {
            RemoteService service = new RemoteService();
            string data = service.GetRemoteData();
            return View((object)data);
        }
    }
}
This controller contains an action method, Data, which creates an instance of the model class RemoteService and calls the GetRemoteData method on it. This method is an example of a time-consuming, low-CPU activity. The RemoteService class is shown in Listing 14-23.
这个控制器含有一个动作方法,Data,它生成模型类RemoteService的一个实例,并调用它上面的GetRemoteData方法。这个方法是一个耗时的、低CPU活动的例子。RemoteService类如清单14-23所示。
Listing 14-23. A Model Entity with a Time-Consuming, Low-CPU Method
清单14-23. 一个带有耗时、低CPU方法的模型实体
using System.Threading;
namespace SpecialControllers.Models {
    public class RemoteService {
        public string GetRemoteData() {
            Thread.Sleep(2000);
            return "Hello from the other side of the world";
        }
    }
}
OK, we admit it—we have faked the GetRemoteData method. In the real world, this method could be retrieving complex data across a slow network connection, but to keep things simple, we have used the Thread.Sleep method to simulate a two-second delay. We have also created a simple view, called Data.cshtml, as follows:
是,我们承认 — 我们伪造了GetRemoteData方法。在现实世界中,这个方法可能是一个通过慢速网络连接以接收复杂数据的过程,但为了使事情简单,我们用 Thread.Sleep方法来模拟一个两秒的延时。我们也生成了一个简单的视图,名为Data.cshtml,如下所示:
@model string
@{
    ViewBag.Title = "Data";
}
Data: @Model
When you run the application and navigate to the /RemoteData/Data URL, the action method is invoked, the RemoteService object is created, and the GetRemoteData method is called. We wait two seconds (simulating a real operation), and then return the data that is passed to the view and rendered.
当你运行这个应用程序,并导航到/RemoteData/Data这个URL时,该动作方法被调用,生成RemoteService对象,并执行GetRemoteData方法。两秒之后,才返回传递给视图进行渲染的数据。
Having shown you the problem we are going to solve, we can now move on to create the asynchronous controller. There are two ways to create an asynchronous controller. One is to implement the System.Web.Mvc.Async.IAsyncController interface, which is the asynchronous equivalent of IController. We are not going to demonstrate that approach, because it requires so much explanation of the .NET concurrent programming facilities.
有了这个我们打算解决的问题之后,现在我们可以继续生成异步控制器。生成异步控制器有两种方式。一种是实现 System.Web.Mvc.Async.IAsyncController接口,这是与IController对等的异步接口。我们不打算演示这种办 法,因为它需要太多的.NET并发编程技能的解释。
■ Tip Not all actions in an asynchronous controller need to be asynchronous. You can include synchronous methods as well, and they will behave as expected.
提示:不是异步控制器中的所有动作都需要被异步。你也可能包含同步方法,它们的行为和预期的一样。
We want to stay focused on the MVC Framework, which is why we’ll demonstrate the second approach: to derive your controller class from System.Web.Mvc.AsyncController, which implements IAsyncController for you. Listing 14-24 shows an asynchronous version of our controller.
我们希望保持专注于MVC框架,这是我们要演示第二种办法的原因:从System.Web.Mvc.AsyncController来派生你的控制器,它为你实现IAsyncController。清单14-24演示了我们的一个异步控制器版本。
Listing 14-24. An Asynchronous Controller
清单14-24. 一个异步控制器
using System.Web.Mvc;
using SpecialControllers.Models;
using System.Threading.Tasks;
namespace SpecialControllers.Controllers {
    public class RemoteDataController : AsyncController {
        public void DataAsync() {
            AsyncManager.OutstandingOperations.Increment();
            Task.Factory.StartNew(() => {
                // create the model object
                RemoteService service = new RemoteService();
                // call the IO-bound, time-consuming function
                string data = service.GetRemoteData();
                AsyncManager.Parameters["data"] = data;
                AsyncManager.OutstandingOperations.Decrement();
            });
        }
        public ActionResult DataCompleted(string data) {
            return View((object)data);
        }
    }
}
There is a lot going on in this class, so we’ll break it down and explain what’s happening step by step.
在这个类中进行了很多事情,因此,我们将把它分解下来,并一步步地解释所发生的事情。
BACKGROUND OPERATIONS AND BLOCKING THREADS
后台操作及线程阻塞
In this and the following few examples, we demonstrate how to use the Task.Factory.StartNew method to move the lengthy operation onto a separate work queue controlled by the Task Parallel Library (TPL). One benefit is that the ASP.NET worker thread doesn’t need to wait while the operation is in progress, and it can immediately return to the worker pool to service other requests. Another benefit is that the TPL lets you control in detail how its workload is queued and executed.
在这个及以下几个例子中,我们将演示,对于由Task Parallel Library(任务并行库 — TPL)控制的各个工作队列,如何用Task.Factory.StartNew方法来消除在这些队列上的漫长操作。一个好处是ASP.NET工作线程在 操作进行时不需要等待,而它可以马上返回给工作池以对其它请求进行服务。另一个好处是TPL让你详细控制它的工作载荷如何排序和执行。
Later in the chapter, in the “Using Asynchronous Controllers” section, we’ll demonstrate how you can use asynchronous controllers to invoke I/O operations without blocking any threads at all, which in some cases offers even more performance benefits. This extra benefit is possible only when invoking APIs that internally use a Windows kernel feature called Input/Output Completion Ports (IOCP) to signal completion without blocking .NET threads.
本章的后面部分,在“使用异步控制器”小节中,我们将演示,你如何才能够使用异步控制器来调用I/O操作,而根本不会阻塞任何线程。在某些情况下,这甚至 提供了更多的性能好处。这种额外的好处只在调用特殊的API才能取得。在这种API中使用了一种叫做“输入/输出完成端口(IOCP)”的Windows 内核特性,该特性可以发送“完成”信号而不会阻塞.NET线程。
Creating the Async and Completed Methods
生成Async和Conpleted方法
Asynchronous action methods come in pairs. The first is called <Action>Async.
异步动作方法是成对出现的。第一个叫做<Action>Async。
In <Action>Async, you create and start your asynchronous operations. When a request for an asynchronous controller arrives, the action invoker knows that the action method will be in two parts and calls the <Action>Async method.
在<Action>Async中,你生成并启动你的异步操作。当一个异步控制器的请求到达时,动作调用器知道这个动作方法将有两部分,并调用这个<Action>Async方法。
In our example, when we navigate to the /RemoteData/Data URL, the invoker calls DataAsync. (Even though the action has been split into two methods, the URL that you navigate to and the route that processes the URL stay the same. For our example, the URL is still /RemoteData/Data.)
在我们的例子中,当我们导航到/RemoteData/Data这个URL时,调用器将调用DataAsync。(即使该动作已经被分成了两个方法,你导 航到的这个URL,以及处理这个URL的路由保持对应。对于我们的例子,这个URL仍然是/RemoteData/Data。)
The Async method always returns void. Any parameters that would be passed into a synchronous action method will be passed into the Async method. The call to the <Action>Async method is done using the worker thread, as you’ll see shortly.
Async方法总是返回void。传递给异步动作方法的任何参数都被传递给这个Async方法。对这个<Action>Async方法的调用是用工作线程完成的,正如你马上要看到的那样。
The other half of the method part is <Action>Completed. In our case, it’s DataCompleted. This method is called when all of your asynchronous operations are complete and you are ready to return a result to the client.
这个方法对的另一部分是<Action>Completed。在我们的例子中,这是DataCompleted。当你的所有异步操作完成、并且已经准备把结果返回给客户端时,这个方法被调用。
■ Note Any filters, method selectors, or other attributes must be applied to the Async method, where they will function as expected. Any attributes on the Completed method will be ignored.
注:任何过滤器、方法选择器、或其它性质必须被运用于这个Async方法,在这里,它们将按预期的起作用。任何运用于Completed方法上的性质都将被忽略。
Starting Asynchronous Tasks
启动异步任务
The Async method is where you create your asynchronous tasks and, critically, tell the MVC Framework how many operations you have started. Here is the skeleton of our DataAsync method:
Async方法是你生成异步任务的地方,而且紧要的是告诉MVC框架,你已经启动了多少操作。以下是我们DataAsync方法的骨架:
public void DataAsync() {
    AsyncManager.OutstandingOperations.Increment();
    Task.Factory.StartNew(() => {
        // ...perform async operation here
        AsyncManager.OutstandingOperations.Decrement();
    });
}
The first thing we do is tell the MVC Framework that we have started an asynchronous operation. We do this though the AsyncManager class, by calling the OutstandingOperations.Increment method.
我们要做的第一件事是告诉MVC框架,我们已经启动了一个异步操作。我们通过AsyncManager类来做这件事,即调用它的OutstandingOperations.Increment方法。
The next thing we do is actually create and start the asynchronous operation. There are a number of different ways of performing asynchronous activities in the .NET Framework. We have chosen to use the Task Parallel Library (TPL), which was introduced with .NET 4. It is a really nice library for creating and managing concurrency in .NET applications. We are not going to go into any detail about the TPL, other than to say that whatever statements we place between the brace characters ({ and}) in the StartNew method will be performed asynchronously using a thread that isn’t part of the ASP.NET worker thread pool.
我们要做的下一件事是实质性地生成并启动这个异步操作。在.NET框架中有许多执行异步活动的不同办法。我们选用任务并行库(Task Parallel Library — TPL),这是随.NET 4引入的。它是在.NET应用程序中用来生成和管理并发的一个很好的库。我们不打算介入TPL的细节,而只说明,我们放置在StartNew方法的花括号 ({及})之间的任何语句都将用不属于ASP.NET工作线程池的一个线程进行异步执行。
■ Tip If you want to learn more about the TPL, see Adam’s book on the topic. It is called Pro .NET 4 Parallel Programming in C# (Apress, 2010).
提示:如果你想了解更多关于TPL的情况,参阅Adam关于这一论题的书籍。书名为Pro .NET 4 Parallel Programming in C# (Apress, 2010)(《精通.NET 4并行编程(C#)》)。
You can start more than one asynchronous task in an Async action method, as Listing 14-25 shows.
在一个Async动作方法中你可以启动不止一个异步任务,如清单14-25所示。
Listing 14-25. Starting More Than One Asynchronous Operation
清单14-25. 启动不止一个的异步操作
public void DataAsync() {
    AsyncManager.OutstandingOperations.Increment(3);
    Task.Factory.StartNew(() => {
        // ...perform async operation here
        AsyncManager.OutstandingOperations.Decrement();
    });
    Task.Factory.StartNew(() => {
        // ...perform async operation here
        AsyncManager.OutstandingOperations.Decrement();
    });
    Task.Factory.StartNew(() => {
        // ...perform async operation here
        AsyncManager.OutstandingOperations.Decrement();
    });
}
In this listing, we have created three asynchronous tasks. Notice how we passed a parameter to the Increment method specifying the number of tasks. Also notice that at the end of each task, we call the Decrement method.
在这个清单中,我们生成了三个异步任务。注意,我们是如何把一个参数传递给Increment方法以指定任务数的。还要注意,每个任务的结尾处,我们调用了Decrement方法。
Finishing Asynchronous Tasks
完成异步任务
The MVC Framework has no way of knowing what you are up to in your <Action>Async method, so you need to give it the information it needs. This is what the calls to the AsyncManager are for. At the end of the Async method, the Increment calls leave the AsyncManager with the number of tasks you have started, and as each task completes, that number is decreased.
MVC框架无法知道你在<Action>Async方法中干些什么,因此你需要给出一些它需要的信息。这便是调用AsyncManager的 目的。在Async方法的末尾,Increment的调用给AsyncManager留下了你已经启动的任务数,而当每个任务完成时,该数目减少。
When the number of outstanding tasks reaches zero, the MVC Framework knows that all of the work that you wanted your Async method to do is finished, and you are ready to create a result to the client. A worker thread from the worker thread pool is assigned to complete your request, which it does by calling the <Action>Completed method. Here is our DataCompleted method:
当未完成任务数达到零时,MVC框架便知道,你希望Async方法去做的所有任务都已完成,而你即将生成一个送给客户端的结果。工作线程池的一个工作线程 被分配,以完成你的请求,这是通过调用<Action>Completed方法来完成的。以下是我们的DataCompleted方法:
public ActionResult DataCompleted(string data) {
    return View((object)data);
}
The DataCompleted method looks more like the synchronous action methods we have used in other chapters. We take the parameters that we are passed and use them to create a result that the MVC Framework can process. We can generate all of the same action result types as for a synchronous action method (see Chapter 12 for details). In our example, we take the string parameter and pass it as a view model object to the View method (casting it to object so that the data value isn’t interpreted as a view name).
DataCompleted方法看上去更像我们在其它章节中使用的同步方法。我们采用传递过来的参数,并用它们生成MVC框架能够处理的结果。我们可以生 成如同同步动作方法的各种动作结果类型(详见第12章)。在我们的例子中,我们采用字符串参数,并把它作为视图模型对象传递给View方法(把它转换为 object,以便该数据值不会被解释成一个视图名)。
Passing Parameters from the Async to the Completed Method
把Async的参数传递给Completed方法
The MVC Framework will perform its usual magic and create the parameters for the Async method from the request, but you are responsible for creating the parameters for the Completed method. You do this through the AsyncManager class, using the Parameters collection to define key/value pairs, as the bold statement in Listing 14-26 shows.
MVC框架将执行它一贯的魔力,并根据该请求为这个Async方法生成参数,但你必须负责为Completed方法生成参数。你通过AsyncManager类,用Parameters集合定义“键/值”对来做这件事,如清单14-26中的黑体语句所示。
Listing 14-26. Creating Parameters in an Asynchronous Action Method
清单14-26. 生成异步动作方法中的参数
public void DataAsync() {
    AsyncManager.OutstandingOperations.Increment();
    Task.Factory.StartNew(() => {
        // create the model object
        RemoteService service = new RemoteService();
        // call the IO-bound, time-consuming function
        string data = service.GetRemoteData();
        AsyncManager.Parameters["data"] = data;
        AsyncManager.OutstandingOperations.Decrement();
    });
}
We have created a parameter called data and assigned it the value of the local variable also called data. When we have finished all of our asynchronous tasks, the MVC Framework uses the keys we put in the AsyncManager.Parameters collection to pass parameter values to the completed method. In this case, that means the value of the local variable data in the Async method will be passed as the value of the data parameter to the completed method:
我们已经生成了一个名为data的参数,并用一个名字也为data的局部变量对它进行赋值。当我们已经完成了所有异步任务时,MVC框架用我们放入 AsyncManager.Parameters集合的键把参数的值传递给Completed方法。在这种情况下,意味着Async方法中局部变量 data的值将作为data参数的值被传递给Completed方法:
...
public ActionResult DataCompleted(string data) {
...
You are responsible for making sure that the type of object you add to the AsyncManager.Parameters collection matches the type of the Completed method parameter. No exception will be thrown if there is a type mismatch. The MVC Framework will still call the Completed method, but the default value (typically null) for the parameter type will be used.
你要负责确保添加到AsyncManager.Parameters集合的对象类型与Completed方法参数的类型匹配。如果类型不匹配,将不会弹出异常。MVC框架将仍然调用Completed方法,但这时将采用该参数类型的默认值(典型地为null)。
■ Caution It is important to set any parameter values using AsyncManager.Parameters before calling AsyncManager.Decrement. You run the risk that the Completed method will be called before you are able to set the parameter value, in which case the Completed parameter value will be null.
注意:重要的是,在调用AsyncManager.Decrement之前,用AsyncManager.Parameters来设置所有参数的值。你处于对参数值设置之前就调用Completed方法的风险之中,在这种情况下,Completed的参数值将是null。
Managing Timeouts
管理超时
By default, the MVC Framework gives you 45 seconds to complete all of your asynchronous operations and reduce the number of outstanding operations in the AsyncManager class to zero. If you have not completed this in 45 seconds, the request is abandoned, and a System.TimeoutException is thrown.
默认地,MVC框架给你45秒来完成所有异步操作,并把AsyncManager类中未完成操作的数目降低到零。如果你没能在45秒内完成这些工作,该请求被放弃,并弹出一个System.TimeoutException(超时异常)。
The timeout exception is handled in the same way as any other exception, and most MVC applications will have an ASP.NET global exception handler. But if you want to treat asynchronous timeouts as a special case, you can override the controller OnException method, as shown in Listing 14-27.
超时异常与其它异常的处理方式相同,而且大多数MVC应用程序都有一个ASP.NET的全局异常处理器。但是,如果你希望把异步超时作为一个特殊情况加以处理,你可以重写控制器的OnException方法,如清单14-27所示。
Listing 14-27. Handling Timeout Exceptions
清单14-27. 处理超时异常
protected override void OnException(ExceptionContext filterContext) {
    if (filterContext.Exception is System.TimeoutException) {
        filterContext.Result = RedirectToAction("TryAgainLater");
        filterContext.ExceptionHandled = true;
    }
}
In this listing, we have chosen to redirect another action that will generate a special “try again later” page.
在这个清单中,我们已经选择了重定向到另一个动作,它将生成一个特定的“稍后重试”页面。
You can change the timeout period using the AsyncTimeout attribute on the <Action>Async method, as Listing 14-28 demonstrates.
你可以用<Action>Async方法上的AsyncTimeout性质来修改超时期限,如清单14-28所示。
Listing 14-28. Changing the Asynchronous Action Timeout Period
清单14-28. 修改异步动作超时周期
...
[AsyncTimeout(10000)]
public void DataAsync() {
...
The parameter for the AsyncTimeout attribute is the number of milliseconds that the MVC Framework should wait for the asynchronous operations started by the <Action>Async method to complete. In the listing, we specified a period of ten seconds.
用于AsyncTimeout性质的参数是,完成由<Action>Async method启动的异步操作,MVC框架应该等待的毫秒数。在这个清单中,我们指定了10秒的期限。
You can eliminate the timeout entirely be using the NoAsyncTimeout attribute, as shown in Listing 14-29.
你可以用NoAsyncTimeout性质完全取消超时,如清单14-29所示。
Listing 14-29. Removing the Asynchronous Action Timeout
清单14-29. 取消异步动作超时
...
[NoAsyncTimeout]
public void DataAsync() {
...
When the NoAsyncTimeout attribute is used, the MVC Framework will wait forever for the outstanding asynchronous operations to complete. This can be a dangerous setting to use. If there is any chance that an operation will fail to complete, and therefore fail to call AsyncManager.OutstandingOperations.Decrement, you risk tying up a thread long after the user has given up waiting.
当NoAsyncTimeout性质被使用时,MVC框架将永久等待未完成异步操作的完成。这样使用可能是危险的。一旦存在一个操作将不能完成,因此就不 能调用AsyncManager.OutstandingOperations.Decrement,那么你就会冒着这样一种风险:用户放弃等待很长时间 之后,都有一个线程被占用着。
■ Note The MVC Framework cannot and does not stop any asynchronous operations when a timeout occurs. Tasks will run to conclusion as they would normally, but the <Action>Completed method won’t be called.
注:在超时发生时,MVC框架不能也不会停止任何异步操作。任务将像它们通常那样达到结束,但<Action>Completed方法却不会被调用。
Aborting Asynchronous Operations
取消异步操作
You can abort your asynchronous action method by calling the AsyncManager.Finish method inside one of your tasks. This tells the MVC Framework that you are ready to call the <Action>Completed method immediately, and that any outstanding operations should be ignored. Any parameter values that have been set using the AsyncManager.Parameters collection will be passed to the Completed method. Parameters for which no values have been set by the time the Finish method is called will be set to the default value for the type (null for objects, 0 for intrinsic numeric types, and so on).
通过在你的一个任务中调用AsyncManager.Finish方法,你可以取消你的异步动作方法。这告诉MVC框架,你准备立即调 用<Action>Completed方法,而任何未完成操作应该被忽略。用AsyncManager.Parameters集合设置的任何 参数值将会被传递给Completed方法。Finish方法被调用的时刻尚未设置值的参数将被设置为其类型的默认值(null用于对象型、0用于数值型 等等)。
■ Note Calling AsyncManager.Finish doesn’t terminate any asynchronous operations that may still be running. They will complete as normal, but any parameter values they create will be discarded.
注:调用AsyncManager.Finish并不终止那些可能仍然在运行的异步操作。它们将正常完成,但它们生成的任何参数值将被丢弃。
Using the .NET Asynchronous Programming Pattern
使用.NET异步编程模式
The .NET Framework supports different approaches to asynchronous programming. One approach is known as the Asynchronous Programming Model (APM). A number of useful classes in the .NET class library follow the APM. You can identify them by the Begin<Operation> and End<Operation> pair of methods.
.NET框架对异步编程支持不同的办法。一种办法称为异步编程模型(Asynchronous Programming Model — APM)。.NET类库中许多有用的类都遵循这个APM。你可以通过Begin<Operation>和 End<Operation>方法来标识它们。
You start the asynchronous operation by calling the Begin method, passing in a callback that will be invoked when the operation is completed. The parameter passed to the callback is an IAsyncResult implementation, which you pass to the End method to get the result of the operation. This is a bit indirect, but you can tidy things up by specifying the callback using a lambda expression.
你通过调用Begin方法、在其中传递一个在操作完成时被调用的回调,来启动异步操作。传递给这个回调的参数是一个IAsyncResult实现,你把它 传递给End方法以获得该操作的结果。这有点不直截了当,但你可以通过采用lambda表达式指定这个回调的办法把事情加以整理。
You don’t need to create a task when using a class that implements the APM from within an asynchronous controller method. This will be taken care of by the class you are using. Listing 14-30 shows an asynchronous action that uses the System.Net.WebRequest class, which implements the APM.
在使用从一个异步控制器方法中实现APM的类时,你不需要生成一个任务。这将由你使用的类来照管。清单14-20演示了使用System.Net.WebRequest类的一个异步动作,这个类实现了APM。
Listing 14-30. Using an APM-Compliant Class from an Asynchronous Controller Method
清单14-30. 通过一个异步控制器方法使用一个APM兼容的类
using System;
using System.IO;
using System.Net;
using System.Threading.Tasks;
using System.Web.Mvc;
using SpecialControllers.Models;
namespace SpecialControllers.Controllers {
    public class RemoteDataController : AsyncController {
        public void PageAsync() {
            AsyncManager.OutstandingOperations.Increment();
            WebRequest req = WebRequest.Create("http://www.asp.net");
            req.BeginGetResponse((IAsyncResult ias) => {
                WebResponse resp = req.EndGetResponse(ias);
                string content = new StreamReader(resp.GetResponseStream()).ReadToEnd();
                AsyncManager.Parameters["html"] = content;
                AsyncManager.OutstandingOperations.Decrement();
            }, null);
        }
        public ContentResult PageCompleted(string html) {
            return Content(html, "text/html");
        }
    }
}
■ Note The WebRequest.BeginGetResponse method is an example of a .NET API call that uses a Windows kernel feature called IOCP we mentioned earlier to signal completion without blocking any .NET threads. Performing I/O in this manner can greatly increase the capacity of your server, because your application can undertake a large number of these operations concurrently, while still keeping all of the .NET threads actively performing useful work, such as processing new requests.
注:WebRequest.BeginGetResponse方法是.NET API调用的一个例子,它使用了我们前面曾提及的、能够发送完成信号而不阻塞任何.NET线程的、叫做IOCP的Windows内核特性。以这种方式执行 I/O能够极大地增加你服务器的能力,因为你的应用程序可以并发地承担大量的这种操作,而仍然保持所有.NET线程有效地执行有用的工作,如处理新请求。
We use the WebRequest object to retrieve the HTML returned by the server for the URL www.asp.net. We start the asynchronous process by calling the BeginGetResponse, passing a callback expressed as a lambda method. This callback calls the EndGetResponse method using the IAsyncResult parameter we receive in the callback. The result from the EndGetResponse method is a WebResponse object, which we use to read the contents of the result from the remote server. We then set the parameter value for the PageCompleted method and decrement the outstanding operations count in the AsyncManager class.
我们使用WebRequest对象来接收由服务器对www.asp.net这个URL返回的HTML。我们通过调用BeginGetResponse来启 动异步过程,传递以lambda方法表示的回调。这个回调用我们在这个回调中接收的IAsyncResult参数来调用EndGetResponse方 法。EndGetResponse方法的结果是一个WebResponse对象,我们用它来读取来自于远程服务器的结果内容。然后我们为 PageCompleted方法设置参数值,并在AsyncManager类中减少未完成操作数。
You can see how neatly the APM and asynchronous controller methods can be used together. You will find classes that follow the APM throughout the .NET Framework class library, particularly those that deal with I/O and network operations.
你可以看出,APM和异步控制器方法能够如何巧妙地一起使用。你将发现,在.NET框架的类库中到处都是遵循APM的类,特别是那些处理I/O和网络操作的类。
Deciding When to Use Asynchronous Controllers
决定何时使用异步控制器
Asynchronous controllers are significantly more complex than regular ones. They require a lot of additional code, and they are harder to read and maintain. Such controllers create opportunities for subtle and insidious bugs that take endless amounts of effort to re-create and fix.
异步控制器明显要比规则控制器更加复杂。它们需要许多额外的代码,而且它们更难以阅读和维护。这种控制器为微妙而难以察觉的缺陷(bugs)提供了生成机会,它们需要花费无尽的努力进行修正和再生。
Asynchronous controllers should be used sparingly and only under the following circumstances:
应该保守地使用异步控制器,而且只在以下情况下使用:
- Your actions are I/O bound and not CPU-bound.
你的动作是I/O范围而不是CPU范围的。 - You are actually experiencing problems due to exhaustion of the worker thread pool.
你正在实际体验着着工作线程池枯竭的问题。 - You understand and accept the additional complexity that asynchronous controllers create.
你理解并接受生成异步控制器的额外复杂性。 - You have tried simpler solutions, such as caching results from actions (see Chapter 13 for details).
你已经试过了较简单的解决方案,如缓存动作的结果(详见第13章)。
We don’t want to scare you away from asynchronous controllers, but they solve a niche problem that most MVC applications don’t suffer from, and the complexity that they introduce is rarely justified.
我们不想让你逃避异步控制器,但它们只解决大多数MVC应用程序不会遭遇到的小环境问题,而且它们所引入的复杂性是很难调整的。
Summary
小结
In this chapter, you have seen how the MVC Framework creates controllers and invokes methods. We have explored and customized the built-in implementations of the key interfaces, and created custom versions to demonstrate how they work. You have learned how action method selectors can be used to differentiate between action methods and seen some specialized kinds of controllers that can be used to increase the request processing capability of your applications.
在本章中,你看到了MVC框架如何生成控制器和调用方法。我们考察并自定义了关键接口的内建实现,也生成了自定义版本以演示它们如何工作。你学习了动作方法选择器能够如何用于区分动作方法,也看到了一些特殊种类的控制器可以提高你应用程序的请求处理能力。
The underlying theme of this chapter is extensibility. Almost every aspect of the MVC Framework can be modified or replaced entirely. For most projects, the default behaviors are entirely sufficient. But having a working knowledge of how the MVC Framework fits together helps you make informed design and coding decisions (and is just plain interesting).
本章的基本主题是可扩展性。几乎MVC框架的每个方面都能够被修改或被完全取代。对于大多数项目,默认的行为是完全足够的。但是,具备一些MVC框架如何组合在一起的工作知识,有助于你形成广泛的设计和编码决策(而且恰恰是简单有趣的)。


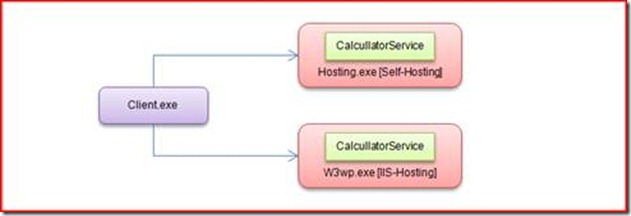
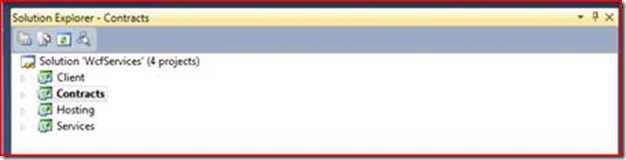
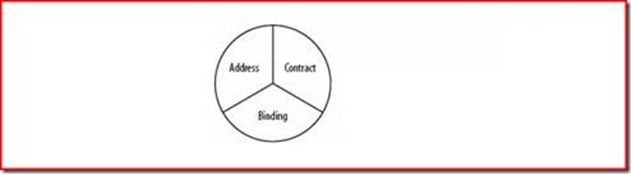 图3 终结点三要素