[转载]推荐8个超棒的学习 jQuery 的网站

mikel阅读(0)

[转载]推荐8个超棒的学习 jQuery 的网站 – 梦想天空 – 博客园.

根据国外科技网站 W3Techs 一项调查了近100万个网站数据显示,JQuery是目前最流行的 JavaScript 库。对于初学者来说,有的时候很难找到一个好的学习JQuery的网站,所以本文收集了8个很棒的 jQuery 学习网站推荐给大家。

1. Learning jQuery

8 Great Websites to Learn Step-by-Step jQuery

最好的 jQuery 资源博客之一,从 jQuery 高手那里获得宝贵的经验。

2. jQuery Mix

8 Great Websites to Learn Step-by-Step jQuery

一个内容非常丰富的网站,有关 jQuery 的各种各样的信息。

3. jQuery for Designers

8 Great Websites to Learn Step-by-Step jQuery

非常棒的一个 jQuery 资源和教程网站,帮助你成长为 jQuery 高手。

4. 15 Days of jQuery

8 Great Websites to Learn Step-by-Step jQuery

这个网站虽然更新不定时,你仍然可以从他们的文章中学到很多东西。

5. jQuery4u

8 Great Websites to Learn Step-by-Step jQuery

jQuery4U 是另外一个有关 jQuery 资源、技巧和发展趋势的博客。

6. jQuery King

8 Great Websites to Learn Step-by-Step jQuery

jQuery King 让你学习 jQuery 更容易、更有趣。

7. jQFundamentals

8 Great Websites to Learn Step-by-Step jQuery

这是一本在线书籍,介绍 jQuery 库的基本内容。

8. jQuery How To

8 Great Websites to Learn Step-by-Step jQuery

这个网站不是每天都更新,不过你可以从他们的教程中学到很多有用的技巧。

(编译来源:梦想天空 原文来自:8 Great Websites to Learn Step-by-Step jQuery

[转载]MongoDB - 分布式文档存储数据库

mikel阅读(859)

[转载]MongoDB – 分布式文档存储数据库 – 开源中国社区.

MongoDB是一个介于关系数据库和非关系数据库之间的产品, 是非关系数据库当中功能最丰富,最像关系数据库的。他支持的数据结构非常松散,是类似json的bjson格式,因此可以存储比较复杂的数据类型。 Mongo最大的特点是他支持的查询语言非常强大,其语法有点类似于面向对象的查询语言,几乎可以实现类似关系数据库单表查询的绝大部分功能,而且还支持 对数据建立索引。

官方网站http://www.mongodb.org/

它的特点是高性能、易部署、易使用,存储数据非常方便。主要功能特性有:

  • 面向集合存储,易存储对象类型的数据。
  • 模式自由。
  • 支持动态查询。
  • 支持完全索引,包含内部对象。
  • 支持查询。
  • 支持复制和故障恢复。
  • 使用高效的二进制数据存储,包括大型对象(如视频等)。
  • 自动处理碎片,以支持云计算层次的扩展性
  • 支持RUBY,PYTHON,JAVA,C++,PHP等多种语言。
  • 文件存储格式为BSON(一种JSON的扩展)
  • 可通过网络访问

所谓“面向集合”(Collenction-Orented),意思是数据被分组存储在数据集中,被称为一个集合(Collenction)。每个 集合在数据库中都有一个唯一的标识名,并且可以包含无限数目的文档。集合的概念类似关系型数据库(RDBMS)里的表(table),不同的是它不需要定 义任何模式(schema)。
模式自由(schema-free),意味着对于存储在mongodb数据库中的文件,我们不需要知道它的任何结构定义。如果需要的话,你完全可以把不同结构的文件存储在同一个数据库里。
存储在集合中的文档,被存储为键-值对的形式。键用于唯一标识一个文档,为字符串类型,而值则可以是各中复杂的文件类型。我们称这种存储形式为BSON(Binary Serialized dOcument Format)。

MongoDB服务端可运行在Linux、Windows或OS X平台,支持32位和64位应用,默认端口为27017。推荐运行在64位平台,因为MongoDB

在32位模式运行时支持的最大文件尺寸为2GB。

MongoDB把数据存储在文件中(默认路径为:/data/db),为提高效率使用内存映射文件进行管理。

[转载]Table锁定行列

mikel阅读(1486)

[转载]Table锁定行列 – KenshinCui’s Blog – 博客园.

摘要:在使用表格显示数据时我们经常会遇到数据过多无法一屏完全显示的问题,这个时候我们就会给用户显示滚动条来拖动。但是多数情况下表格是带有表 头的,纵向拖动往往就看不到表头;而横向拖动又会出现看不到主题列(例如统计某人基本信息时姓名就是主题列),这个时候怎么办呢?答案就是行列锁定。

主要内容:

1.行列锁定的常用方法

2.IE下实现行列锁定

3.使用JQuery开发一个简单的行列锁定插件

一、行列锁定的常用方法

从使用上来看,要实现行列锁定的效果无非就是使用第三方组件和自己从零做起一步步实现。第三方组件一般比较强大,除了行列锁定的功能之外一般还包括 排序、筛选等(例如Ext的Locking-grid扩展组件),但是使用第三方组件也会造成一些其他的问题,或者说有些时候你根本就没有办法使用第三方 组件(我遇到的就是这种情况)。今天我们主要讨论的是如何利用基本的html来自己实现行列锁定。自己实现table锁定行列的方法基本上有两种:一种是 利用多个table拼接,最终”拼”成一个大的table。这种情况一般将表头和主题列分别放到单独的table中,数据行放到另一个table,拖动数 据所在的table时利用js动态实现其他table的同步拖动。第二种就是利用单独的table,通过设置table行和列相对位置来实现行列锁定。两 种方式相比较而言,第一种的方式更加容易控制一些,而且由于它将一个大表格分散到多个table中更有利于完成其他复杂功能;第二种实现比第一种效果要好 一些,而且更有利于封装和扩展。由于我所遇到的情况是必须在原有html基础上实现行列锁定,因此这里就主要说一下第二种方式。

二、IE下实现行列锁定

由于我们下面说的方法主要利用tr、td的position:relative样式,而在新的css标准中没有对tr进行 position:relative定义,因此除了IE在firefox4、chrome等新版本浏览器中都无法使用我们下面所说的方法(事实上IE9也 是使用新标准,只不过其对兼容性做了处理,因此我们这种方法基本在IE所有版本中都是可行的)。我们的实现原理很简单:首先在table最外层包装一个 div用来显示滚动条,接着设置tr和td的position和z-index样式控制其相对显示,然后在滚动的时候动态修改tr和td的top和 left属性使其相对位置保持不表。下面我们来看一下具体的实现:

<!DOCTYPE html PUBLIC "-//W3C//DTD XHTML 1.0 Transitional//EN" "http://www.w3.org/TR/xhtml1/DTD/xhtml1-transitional.dtd">
<html xmlns="http://www.w3.org/1999/xhtml">
<head>
<meta http-equiv="Content-Type" content="text/html; charset=utf-8" />
<title>Table锁定行列</title>
<mce:style type="text/css"><!--
.LockRow /*固定行的样式*/
{
	position: relative;
	top: expression(this.parentElement.parentElement.parentElement.scrollTop);
	/*top:0px;*/
	z-index:2;
}
.LockCell /*固定列的样式*/
{
	position: relative;
	left: expression(this.parentElement.parentElement.parentElement.parentElement.scrollLeft);
	/*left:0px;*/
	z-index:0;
}
.LockCross /*行列交叉处样式*/
{
	z-index:3;
}
.divBoxing /*外出div样式*/
{
	clear:both;
	overflow: scroll;
	position:relative;
}
.tbLock /*设置单元格间隙的样式*/
{
	border-collapse:collapse;
}
.lockRowBg
{
	background-color:#CFF;
}
.lockColumnBg
{
	background-color:#CFF;
}
--></mce:style><style type="text/css" mce_bogus="1">.LockRow /*固定行的样式*/
{
	position: relative;
	top: expression(this.parentElement.parentElement.parentElement.scrollTop);
	/*top:0px;*/
	z-index:2;
}
.LockCell /*固定列的样式*/
{
	position: relative;
	left: expression(this.parentElement.parentElement.parentElement.parentElement.scrollLeft);
	/*left:0px;*/
	z-index:0;
}
.LockCross /*行列交叉处样式*/
{
	z-index:3;
}
.divBoxing /*外出div样式*/
{
	clear:both;
	overflow: scroll;
	position:relative;
}
.tbLock /*设置单元格间隙的样式*/
{
	border-collapse:collapse;
}
.lockRowBg
{
	background-color:#CFF;
}
.lockColumnBg
{
	background-color:#CFF;
}</style>
</head>
<body>
<div class="divBoxing" id:="divBoxing" style="width: 100%; height: 300px;">
	<table width="800" border="0" id="lockTable" class="tbLock">
		  <tbody>
		  <tr class="LockRow lockRowBg">
			<td width="100" align="center" class="LockCell LockCross lockRowBg">第一列</td>
			<td width="100" align="center" class="LockCell LockCross lockRowBg">第二列</td>
			<td width="100" align="center">第三列</td>
			<td width="100" align="center">第四列</td>
			<td width="100" align="center">第五列</td>
			<td width="100" align="center">第六列</td>
			<td width="100" align="center">第七列</td>
			<td width="100" align="center">第八列</td>
		  </tr>
		  <tr>
			<td align="center" class="LockCell lockColumnBg">1-2</td>
			<td align="center" class="LockCell lockColumnBg">2-2</td>
			<td align="center">--</td>
			<td align="center">--</td>
			<td align="center">--</td>
			<td align="center">--</td>
			<td align="center">--</td>
			<td align="center">--</td>
		  </tr>
		  <tr>
			<td align="center" class="LockCell lockColumnBg">1-3</td>
			<td align="center" class="LockCell lockColumnBg">2-3</td>
			<td align="center">--</td>
			<td align="center">--</td>
			<td align="center">--</td>
			<td align="center">--</td>
			<td align="center">--</td>
			<td align="center">--</td>
		  </tr>
		  <tr>
			<td align="center" class="LockCell lockColumnBg">1-4</td>
			<td align="center" class="LockCell lockColumnBg">2-4</td>
			<td align="center">--</td>
			<td align="center">--</td>
			<td align="center">--</td>
			<td align="center">--</td>
			<td align="center">--</td>
			<td align="center">--</td>
		  </tr>
		  <tr>
			<td align="center" class="LockCell lockColumnBg">1-5</td>
			<td align="center" class="LockCell lockColumnBg">2-5</td>
			<td align="center">--</td>
			<td align="center">--</td>
			<td align="center">--</td>
			<td align="center">--</td>
			<td align="center">--</td>
			<td align="center">--</td>
		  </tr>
		  <tr>
			<td align="center" class="LockCell lockColumnBg">1-6</td>
			<td align="center" class="LockCell lockColumnBg">2-6</td>
			<td align="center">--</td>
			<td align="center">--</td>
			<td align="center">--</td>
			<td align="center">--</td>
			<td align="center">--</td>
			<td align="center">--</td>
			</tr>
		  <tr>
			<td align="center" class="LockCell lockColumnBg">1-7</td>
			<td align="center" class="LockCell lockColumnBg">2-7</td>
			<td align="center">--</td>
			<td align="center">--</td>
			<td align="center">--</td>
			<td align="center">--</td>
			<td align="center">--</td>
			<td align="center">--</td>
			</tr>
		  <tr>
			<td align="center" class="LockCell lockColumnBg">1-8</td>
			<td align="center" class="LockCell lockColumnBg">2-8</td>
			<td align="center">--</td>
			<td align="center">--</td>
			<td align="center">--</td>
			<td align="center">--</td>
			<td align="center">--</td>
			<td align="center">--</td>
			</tr>
		  <tr>
			<td align="center" class="LockCell lockColumnBg">1-9</td>
			<td align="center" class="LockCell lockColumnBg">2-9</td>
			<td align="center">--</td>
			<td align="center">--</td>
			<td align="center">--</td>
			<td align="center">--</td>
			<td align="center">--</td>
			<td align="center">--</td>
			</tr>
		  <tr>
			<td align="center" class="LockCell lockColumnBg">1-10</td>
			<td align="center" class="LockCell lockColumnBg">2-10</td>
			<td align="center">--</td>
			<td align="center">--</td>
			<td align="center">--</td>
			<td align="center">--</td>
			<td align="center">--</td>
			<td align="center">--</td>
			</tr>
		  <tr>
			<td align="center" class="LockCell lockColumnBg">1-11</td>
			<td align="center" class="LockCell lockColumnBg">2-11</td>
			<td align="center">--</td>
			<td align="center">--</td>
			<td align="center">--</td>
			<td align="center">--</td>
			<td align="center">--</td>
			<td align="center">--</td>
			</tr>
		  <tr>
			<td align="center" class="LockCell lockColumnBg">1-12</td>
			<td align="center" class="LockCell lockColumnBg">2-12</td>
			<td align="center">--</td>
			<td align="center">--</td>
			<td align="center">--</td>
			<td align="center">--</td>
			<td align="center">--</td>
			<td align="center">--</td>
			</tr>
		  <tr>
			<td align="center" class="LockCell lockColumnBg">1-13</td>
			<td align="center" class="LockCell lockColumnBg">2-13</td>
			<td align="center">--</td>
			<td align="center">--</td>
			<td align="center">--</td>
			<td align="center">--</td>
			<td align="center">--</td>
			<td align="center">--</td>
			</tr>
		  <tr>
			<td align="center" class="LockCell lockColumnBg">1-14</td>
			<td align="center" class="LockCell lockColumnBg">2-14</td>
			<td align="center">--</td>
			<td align="center">--</td>
			<td align="center">--</td>
			<td align="center">--</td>
			<td align="center">--</td>
			<td align="center">--</td>
			</tr>
		  <tr>
			<td align="center" class="LockCell lockColumnBg">1-15</td>
			<td align="center" class="LockCell lockColumnBg">2-15</td>
			<td align="center">--</td>
			<td align="center">--</td>
			<td align="center">--</td>
			<td align="center">--</td>
			<td align="center">--</td>
			<td align="center">--</td>
			</tr>
		</tbody>
	</table>
</div>
</body>
</html>

三、使用JQuery开发一个简单的行列锁定插件

如果仅仅从实现上来说,到了第二部我们今天的内容就结束了。但是聪明的读者或许已经发现上面的用法存在的问题:第一我们需要手动的添加很多的class样式、需要对原有布局修改;第二我们上面使用了expression这个IE所特有的样式(虽然我们上面说过这个差距不适用于其他浏览器新版本,但是不代表不适用于旧版本,如果我们修改expression为纯js方式也就可以使用于其他低版本浏览器)。我们刚才说过第二种方式有一个优点就是便于封装而且几乎不必对原table布局作出修改,因此我们不妨对整个应用进行一下简单的封装,使其只需要简单的添加一行js就能够完美的运行。虽然在这个过程中我们只是将手动添加class样式换成动态添加、将expression表达换成onscroll事件,但是一切看起来确实那么的不一样。

下面就是我们使用JQuery进行封装的代码TableLock.js:

/*
author:KenshinCui
date:2011.03.29
example:$.fn.TableLock({table:'lockTable',lockRow:1,lockColumn:2,width:'100%',height:'300px'});
*/
(function($) {
    $.extend($.fn, {
        TableLock: function(options) {
            var tl = $.extend({
                table:'lockTable',//table的id
				lockRow:1,//固定行数
				lockColumn:1,//固定列数
				width:'100%',//表格显示宽度(实质是外出div宽度)
				height:'100%',//表格显示高度(实质是外出div高度)
				lockRowCss:'lockRowBg',//锁定行的样式
				lockColumnCss:'lockColumnBg'//锁定列的样式
            }, options);

			var tableId=tl.table;
			var table=$('#'+tableId);
			var rowSpan=function(tr){

			}
			if(table){
				var box=$("<div id:='divBoxing' class='divBoxing'></div>").scroll(function(){//在此处添加事件
					$('.LockRow').css('top',$(this).attr('scrollTop')+'px');
					$('.LockCell').css('left',$(this).attr('scrollLeft')+'px');
				});
				box.css('width',tl.width).css('height',tl.height);//设置高度和宽度
				table.wrap(box);
				table.addClass('tbLock');
				var crossNum=tl.lockRow*tl.lockColumn;
				if(tl.lockRow>0){
					var tr;
					for(var r=0;r<tl.lockRow;++r){//添加行锁定
						tr=table.find('tr:eq('+r+')').addClass('LockRow').addClass(tl.lockRowCss);
						for(var c=0;c<tl.lockColumn;++c){//设置交叉单元格样式,除了锁定单元格外还有交叉单元格自身样式
							if(tr)
							tr.find('td:eq('+c+')').addClass('LockCell LockCross').addClass(tl.lockRowCss);
						}
					}
				}
				if(tl.lockColumn>0){
					var rowNum=$('#'+tableId+' tr').length;
					var tr;
					for(var r=(tl.lockRow);r<rowNum;++r){
						tr=table.find('tr:eq('+r+')');
						for(var c=0;c<tl.lockColumn;++c){//添加列锁定
							tr.find('td:eq('+c+')').addClass('LockCell').addClass(tl.lockColumnCss);
						}
					}
				}

				//box.live('scroll',func);
			}else{
				alert('没有找到对应的table元素,请确保table属性正确性!');
			}
        }
    });
})(jQuery);

具体的样式表文件TableLock.css:

.LockRow /*固定行的样式*/
{
	position: relative;
	/*top: expression(this.parentElement.parentElement.parentElement.scrollTop);*/
	top:0px;
	z-index:2;
}
.LockCell /*固定列的样式*/
{
	position: relative;
	/*left: expression(this.parentElement.parentElement.parentElement.parentElement.scrollLeft);*/
	left:0px;
	z-index:0;
}
.LockCross /*行列交叉处样式*/
{
	z-index:3;
}
.divBoxing /*外出div样式*/
{
	clear:both;
	overflow: scroll;
	position:relative;
}
.tbLock /*设置单元格间隙的样式*/
{
	border-collapse:collapse;
}
.lockRowBg
{
	background-color:#CFF;
}
.lockColumnBg
{
	background-color:#CFF;
}

假设现在你有有这样一个页面,当然它不具备锁定行列的功能:

<!DOCTYPE html PUBLIC "-//W3C//DTD XHTML 1.0 Transitional//EN" "http://www.w3.org/TR/xhtml1/DTD/xhtml1-transitional.dtd">
<html xmlns="http://www.w3.org/1999/xhtml">
<head>
<meta http-equiv="Content-Type" content="text/html; charset=utf-8" />
<title>不具备锁定行列功能的Table</title>
</head>
<body>
<table width="800" border="0">
	  <tbody>
	  <tr>
		<td width="100" align="center" >第一列</td>
		<td width="100" align="center" >第二列</td>
		<td width="100" align="center">第三列</td>
		<td width="100" align="center">第四列</td>
		<td width="100" align="center">第五列</td>
		<td width="100" align="center">第六列</td>
		<td width="100" align="center">第七列</td>
		<td width="100" align="center">第八列</td>
	  </tr>
	  <tr>
		<td align="center" >1-2</td>
		<td align="center" >2-2</td>
		<td align="center">--</td>
		<td align="center">--</td>
		<td align="center">--</td>
		<td align="center">--</td>
		<td align="center">--</td>
		<td align="center">--</td>
	  </tr>
	  <tr>
		<td align="center" >1-3</td>
		<td align="center" >2-3</td>
		<td align="center">--</td>
		<td align="center">--</td>
		<td align="center">--</td>
		<td align="center">--</td>
		<td align="center">--</td>
		<td align="center">--</td>
	  </tr>
	  <tr>
		<td align="center" >1-4</td>
		<td align="center" >2-4</td>
		<td align="center">--</td>
		<td align="center">--</td>
		<td align="center">--</td>
		<td align="center">--</td>
		<td align="center">--</td>
		<td align="center">--</td>
	  </tr>
	  <tr>
		<td align="center" >1-5</td>
		<td align="center" >2-5</td>
		<td align="center">--</td>
		<td align="center">--</td>
		<td align="center">--</td>
		<td align="center">--</td>
		<td align="center">--</td>
		<td align="center">--</td>
	  </tr>
	  <tr>
		<td align="center" >1-6</td>
		<td align="center" >2-6</td>
		<td align="center">--</td>
		<td align="center">--</td>
		<td align="center">--</td>
		<td align="center">--</td>
		<td align="center">--</td>
		<td align="center">--</td>
		</tr>
	  <tr>
		<td align="center" >1-7</td>
		<td align="center" >2-7</td>
		<td align="center">--</td>
		<td align="center">--</td>
		<td align="center">--</td>
		<td align="center">--</td>
		<td align="center">--</td>
		<td align="center">--</td>
		</tr>
	  <tr>
		<td align="center" >1-8</td>
		<td align="center" >2-8</td>
		<td align="center">--</td>
		<td align="center">--</td>
		<td align="center">--</td>
		<td align="center">--</td>
		<td align="center">--</td>
		<td align="center">--</td>
		</tr>
	  <tr>
		<td align="center" >1-9</td>
		<td align="center" >2-9</td>
		<td align="center">--</td>
		<td align="center">--</td>
		<td align="center">--</td>
		<td align="center">--</td>
		<td align="center">--</td>
		<td align="center">--</td>
		</tr>
	  <tr>
		<td align="center" >1-10</td>
		<td align="center" >2-10</td>
		<td align="center">--</td>
		<td align="center">--</td>
		<td align="center">--</td>
		<td align="center">--</td>
		<td align="center">--</td>
		<td align="center">--</td>
		</tr>
	  <tr>
		<td align="center" >1-11</td>
		<td align="center" >2-11</td>
		<td align="center">--</td>
		<td align="center">--</td>
		<td align="center">--</td>
		<td align="center">--</td>
		<td align="center">--</td>
		<td align="center">--</td>
		</tr>
	  <tr>
		<td align="center" >1-12</td>
		<td align="center" >2-12</td>
		<td align="center">--</td>
		<td align="center">--</td>
		<td align="center">--</td>
		<td align="center">--</td>
		<td align="center">--</td>
		<td align="center">--</td>
		</tr>
	  <tr>
		<td align="center" >1-13</td>
		<td align="center" >2-13</td>
		<td align="center">--</td>
		<td align="center">--</td>
		<td align="center">--</td>
		<td align="center">--</td>
		<td align="center">--</td>
		<td align="center">--</td>
		</tr>
	  <tr>
		<td align="center" >1-14</td>
		<td align="center" >2-14</td>
		<td align="center">--</td>
		<td align="center">--</td>
		<td align="center">--</td>
		<td align="center">--</td>
		<td align="center">--</td>
		<td align="center">--</td>
		</tr>
	  <tr>
		<td align="center" >1-15</td>
		<td align="center" >2-15</td>
		<td align="center">--</td>
		<td align="center">--</td>
		<td align="center">--</td>
		<td align="center">--</td>
		<td align="center">--</td>
		<td align="center">--</td>
		</tr>
	</tbody>
</table>
</body>
</html>

如果你需要让它拥有锁定行列的功能,只需要引入TableLock.js和TableLock.css(当然不要忘了jQuery类库),然后添加一句简单的代码即可:

<mce:script type="text/javascript" language="javascript"><!--
	$(function(){
		$.fn.TableLock({table:'lockTable',lockRow:1,lockColumn:2,width:'100%',height:'300px'});
	});
// --></mce:script>

下面是完整的页面代码:

<!DOCTYPE html PUBLIC "-//W3C//DTD XHTML 1.0 Transitional//EN" "http://www.w3.org/TR/xhtml1/DTD/xhtml1-transitional.dtd">
<html xmlns="http://www.w3.org/1999/xhtml">
<head>
<meta http-equiv="Content-Type" content="text/html; charset=utf-8" />
<title>TableLock插件演示</title>
<link rel="stylesheet" href="TableLock.css" mce_href="TableLock.css" />
<mce:script type="text/javascript" language="javascript" src="jquery-1.5.1.js" mce_src="jquery-1.5.1.js"></mce:script>
<mce:script type="text/javascript" language="javascript" src="TableLock.js" mce_src="TableLock.js"></mce:script>
<mce:script type="text/javascript" language="javascript"><!--
	$(function(){
		$.fn.TableLock({table:'lockTable',lockRow:1,lockColumn:2,width:'100%',height:'300px'});
	});
// --></mce:script>
</head>
<body>
<table id="lockTable" width="800" border="0">
  <tr>
    <td width="100" align="center">第一列</td>
    <td width="100" align="center">第二列</td>
    <td width="100" align="center">第三列</td>
    <td width="100" align="center">第四列</td>
    <td width="100" align="center">第五列</td>
    <td width="100" align="center">第六列</td>
    <td width="100" align="center">第七列</td>
    <td width="100" align="center">第八列</td>
  </tr>
  <tr>
    <td align="center">1-2</td>
    <td align="center">2-2</td>
    <td align="center">--</td>
    <td align="center">--</td>
    <td align="center">--</td>
    <td align="center">--</td>
    <td align="center">--</td>
    <td align="center">--</td>
  </tr>
  <tr>
    <td align="center">1-3</td>
    <td align="center">2-3</td>
    <td align="center">--</td>
    <td align="center">--</td>
    <td align="center">--</td>
    <td align="center">--</td>
    <td align="center">--</td>
    <td align="center">--</td>
  </tr>
  <tr>
    <td align="center">1-4</td>
    <td align="center">2-4</td>
    <td align="center">--</td>
    <td align="center">--</td>
    <td align="center">--</td>
    <td align="center">--</td>
    <td align="center">--</td>
    <td align="center">--</td>
  </tr>
  <tr>
    <td align="center">1-5</td>
    <td align="center">2-5</td>
    <td align="center">--</td>
    <td align="center">--</td>
    <td align="center">--</td>
    <td align="center">--</td>
    <td align="center">--</td>
    <td align="center">--</td>
  </tr>
  <tr>
    <td align="center">1-6</td>
    <td align="center">2-6</td>
    <td align="center">--</td>
    <td align="center">--</td>
    <td align="center">--</td>
    <td align="center">--</td>
    <td align="center">--</td>
    <td align="center">--</td>
    </tr>
  <tr>
    <td align="center">1-7</td>
    <td align="center">2-7</td>
    <td align="center">--</td>
    <td align="center">--</td>
    <td align="center">--</td>
    <td align="center">--</td>
    <td align="center">--</td>
    <td align="center">--</td>
    </tr>
  <tr>
    <td align="center">1-8</td>
    <td align="center">2-8</td>
    <td align="center">--</td>
    <td align="center">--</td>
    <td align="center">--</td>
    <td align="center">--</td>
    <td align="center">--</td>
    <td align="center">--</td>
    </tr>
  <tr>
    <td align="center">1-9</td>
    <td align="center">2-9</td>
    <td align="center">--</td>
    <td align="center">--</td>
    <td align="center">--</td>
    <td align="center">--</td>
    <td align="center">--</td>
    <td align="center">--</td>
    </tr>
  <tr>
    <td align="center">1-10</td>
    <td align="center">2-10</td>
    <td align="center">--</td>
    <td align="center">--</td>
    <td align="center">--</td>
    <td align="center">--</td>
    <td align="center">--</td>
    <td align="center">--</td>
    </tr>
  <tr>
    <td align="center">1-11</td>
    <td align="center">2-11</td>
    <td align="center">--</td>
    <td align="center">--</td>
    <td align="center">--</td>
    <td align="center">--</td>
    <td align="center">--</td>
    <td align="center">--</td>
    </tr>
  <tr>
    <td align="center">1-12</td>
    <td align="center">2-12</td>
    <td align="center">--</td>
    <td align="center">--</td>
    <td align="center">--</td>
    <td align="center">--</td>
    <td align="center">--</td>
    <td align="center">--</td>
    </tr>
  <tr>
    <td align="center">1-13</td>
    <td align="center">2-13</td>
    <td align="center">--</td>
    <td align="center">--</td>
    <td align="center">--</td>
    <td align="center">--</td>
    <td align="center">--</td>
    <td align="center">--</td>
    </tr>
  <tr>
    <td align="center">1-14</td>
    <td align="center">2-14</td>
    <td align="center">--</td>
    <td align="center">--</td>
    <td align="center">--</td>
    <td align="center">--</td>
    <td align="center">--</td>
    <td align="center">--</td>
    </tr>
  <tr>
    <td align="center">1-15</td>
    <td align="center">2-15</td>
    <td align="center">--</td>
    <td align="center">--</td>
    <td align="center">--</td>
    <td align="center">--</td>
    <td align="center">--</td>
    <td align="center">--</td>
    </tr>
</table>
</body>
</html>

下面是运行后的效果:

注意:请确保在IE下.divBoxing具有position:relative;样式,否则在IE6和IE7中锁定行列将会溢出外层div,具体参见IE6 bug with overflow and position:relative 。

[转载]How to Build Applications Based On AndAR

mikel阅读(1077)

[转载]HowToBuildApplicationsBasedOnAndAR – andar – This page describes how someone can build augmented reality applications using AndAR. – AndAR – Android Augmented Reality – Google Project Hosting.

AndAR项目是Andorid的(Augmented Reality)增强现实开源项目

项目地址:http://code.google.com/p/andar/

License

The whole project is released under the GNU General Public License. This means it can be used in any project that is itself released under the GPL. If you would like to create a commercial application based on AndAR please contact ARToolworks.

Eclipse sample project Howto

This section is about the Eclipse sample project, alternatively you may check out the source code from the SVN repository.

AndAR Architecture

AndAR is an Augmented Reality Framework for Android. It not only offers a pure Java API but is also object oriented. The figure above shows a simplied class diagram of an application that makes use of AndAR.

Every Android application consists of one or more Activities. An Activity is a visual user interface, targeted to a single purpose. Only one may be active at a time. In order to write an Augmented Reality application, one has to extend the abstract class AndARActivity. This class already handles everything Augmented Reality related, like opening the camera, detecting the markers and displaying the video stream. The application would run already, by just doing that. However it would not detect any markers.

In order to do so, you have to register ARObjects to an instance of ARToolkit. This instance can be retrieved from the AndARActivity. The ARObject class itself is abstract. This means, it has to be extended, too. It expects the file name of a pattern file in it’s constructor. This file must be located in the assets folder of the Eclipse project.

Pattern files can be created by a tool called mk_patt, as described here. They are used to distinguish different markers. In order to draw a custom object, the method draw has to be overridden. Before this method is invoked a transformation matrix will already have been applied. This means the object will be alligned to the marker, without any further steps. This method will not be invoked, if the marker belonging to this object is not visible.

The class ARRenderer is reponsible for everything OpenGL related. If you want to mix augmented with non augmented 3D objects you may provide a class implementing the OpenGLRenderer interface. There are three methods defined by this interface. initGL being called only once, when the OpenGL surface is initialized. Whereas setupEnv is called once before the augmented objects are drawn. It can be used to issue OpenGL commands that shall effect all ARObjects, like initializing the lighting. In the draw method you may draw any non augmented 3D objects. It will be called once for every frame. Specifying such the described renderer is optional. The AndARActivity furthermore offers a method that allows the application to take screenshots.

[转载]How to Build Applications Based On AndAR

mikel阅读(953)

[转载]HowToBuildApplicationsBasedOnAndAR – andar – This page describes how someone can build augmented reality applications using AndAR. – AndAR – Android Augmented Reality – Google Project Hosting.

AndAR项目是Andorid的(Augmented Reality)增强现实开源项目

项目地址:http://code.google.com/p/andar/

License

The whole project is released under the GNU General Public License. This means it can be used in any project that is itself released under the GPL. If you would like to create a commercial application based on AndAR please contact ARToolworks.

Eclipse sample project Howto

This section is about the Eclipse sample project, alternatively you may check out the source code from the SVN repository.

AndAR Architecture

AndAR is an Augmented Reality Framework for Android. It not only offers a pure Java API but is also object oriented. The figure above shows a simplied class diagram of an application that makes use of AndAR.

Every Android application consists of one or more Activities. An Activity is a visual user interface, targeted to a single purpose. Only one may be active at a time. In order to write an Augmented Reality application, one has to extend the abstract class AndARActivity. This class already handles everything Augmented Reality related, like opening the camera, detecting the markers and displaying the video stream. The application would run already, by just doing that. However it would not detect any markers.

In order to do so, you have to register ARObjects to an instance of ARToolkit. This instance can be retrieved from the AndARActivity. The ARObject class itself is abstract. This means, it has to be extended, too. It expects the file name of a pattern file in it’s constructor. This file must be located in the assets folder of the Eclipse project.

Pattern files can be created by a tool called mk_patt, as described here. They are used to distinguish different markers. In order to draw a custom object, the method draw has to be overridden. Before this method is invoked a transformation matrix will already have been applied. This means the object will be alligned to the marker, without any further steps. This method will not be invoked, if the marker belonging to this object is not visible.

The class ARRenderer is reponsible for everything OpenGL related. If you want to mix augmented with non augmented 3D objects you may provide a class implementing the OpenGLRenderer interface. There are three methods defined by this interface. initGL being called only once, when the OpenGL surface is initialized. Whereas setupEnv is called once before the augmented objects are drawn. It can be used to issue OpenGL commands that shall effect all ARObjects, like initializing the lighting. In the draw method you may draw any non augmented 3D objects. It will be called once for every frame. Specifying such the described renderer is optional. The AndARActivity furthermore offers a method that allows the application to take screenshots.

[转载]实战 HTML5 WebSocket 聊天室.net实现

mikel阅读(1417)

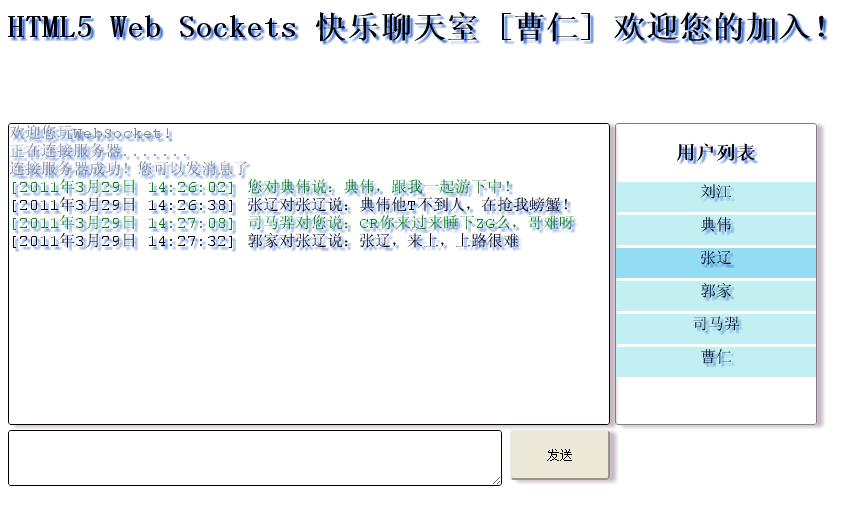
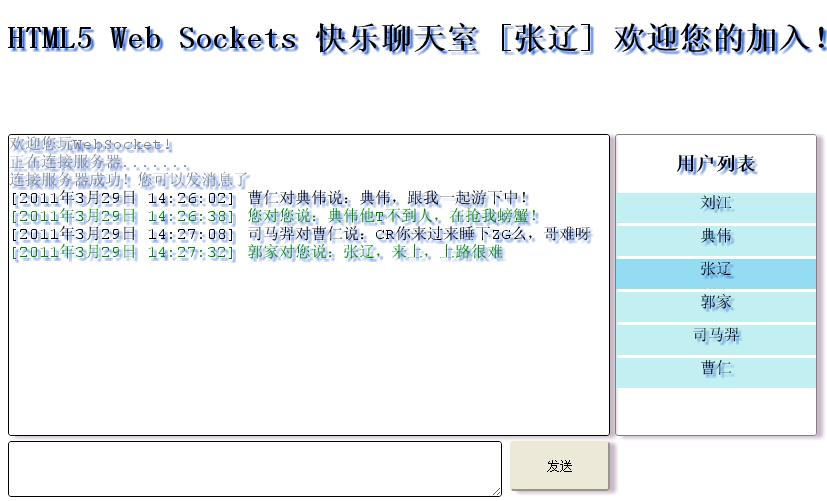
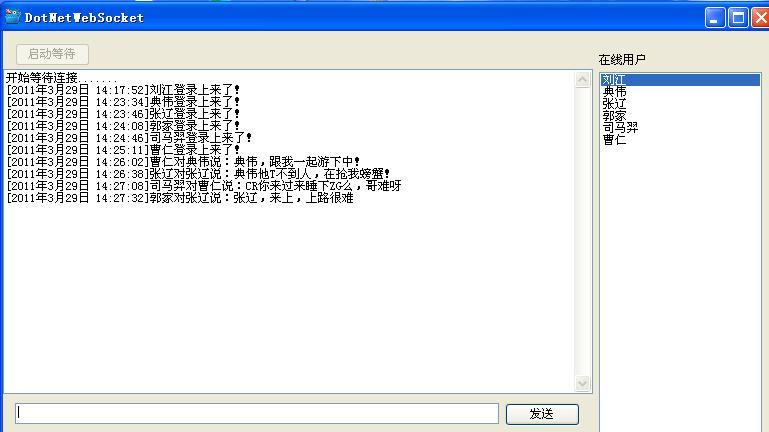
[转载]实战 HTML5 WebSocket 聊天室.net实现 – 大月&小年 – 博客园.

WebSocket protocol 是HTML5一种新的协议(protocol)。目前紧测试了三个浏览器支持(Chrome,Firefox4,Safari)

客户端:

var ws = new WebSocket(con);

//与服务器握手成功
ws.onopen = onOpen;
//接收到服务器消息
ws.onmessage = onMessage;
//断开连接消息
ws.onclose = onClose;
//通读错误

ws.onerror = onError;

进入代码正题服务端

using System;
using System.Collections.Generic;
using System.Text;
using System.Net.Sockets;
using System.Net;
using System.Threading;

namespace DotNetWebSocket.Engine
{
    //广播事件
    public delegate void BroadcastEvent(MessageEntity me);

    public class WebSocketServer:IDisposable
    {
        private Socket serverListener;
        //回调,用于消息传给上层应用
        ICallback callback = null;
        //广播事件
        public BroadcastEvent BroadcastMessage=null;
        //客户端连接列表
        List<ClientSocketInstance> listConnection = new List<ClientSocketInstance>();


        public WebSocketServer(ICallback callback)
        {
            this.callback = callback;
        }

        /// <summary>
        /// 启动等待连接
        /// </summary>
        public void StartConnection()
        {
            serverListener = new Socket(AddressFamily.InterNetwork, SocketType.Stream, ProtocolType.IP);  // Start the socket

            string[] ip = WebSocketProtocol.GetInstance.ServerId.Split('.');
            IPAddress localIp = new IPAddress(new byte[] { Convert.ToByte(ip[0]), Convert.ToByte(ip[1]), Convert.ToByte(ip[2]),Convert.ToByte(ip[3]) });
            serverListener.Bind(new IPEndPoint(localIp, WebSocketProtocol.GetInstance.ServerPort));
            
            serverListener.Listen(WebSocketProtocol.GetInstance.ConnectionsCount);
            while (true)
            {
                //等待客户端请求
               Socket sc = serverListener.Accept();
               if (sc != null)
                {
                    Thread.Sleep(100);
                    ClientSocketInstance ci = new ClientSocketInstance();
                    ci.ClientSocket = sc;
                    //初始化三个事件
                    ci.NewUserConnection += new ClientSocketEvent(Ci_NewUserConnection);
                    ci.ReceiveData += new ClientSocketEvent(Ci_ReceiveData);
                    ci.DisConnection += new ClientSocketEvent(Ci_DisConnection);
                    //开始与客户端握手[握手成功,即可通讯了]
                    ci.ClientSocket.BeginReceive(ci.receivedDataBuffer, 0, ci.receivedDataBuffer.Length, 0, new AsyncCallback(ci.StartHandshake), ci.ClientSocket.Available);
                    listConnection.Add(ci);

                }
                               
            }
           
        }      

     
        /// <summary>
        /// 断开服务端Socket
        /// </summary>
        /// <param name="sender"></param>
        /// <param name="me"></param>
        private void Ci_DisConnection(object sender, MessageEntity me)
        {
            callback.DisConnection(sender as ClientSocketInstance, me);
        }
        
        /// <summary>
        /// 接收数据
        /// </summary>
        /// <param name="sender"></param>
        /// <param name="me"></param>
        private void Ci_ReceiveData(object sender, MessageEntity me)
        {
            callback.Read(sender as ClientSocketInstance, me);
        }
        
        /// <summary>
        /// 握手成功手的连接
        /// </summary>
        /// <param name="sender"></param>
        /// <param name="me"></param>
        private void Ci_NewUserConnection(object sender, MessageEntity me)
        {
            ClientSocketInstance ci=sender as ClientSocketInstance;
            BroadcastMessage += new BroadcastEvent(ci.SendMessage);
            callback.NewUserConnectionJoin(ci, me);

        }

        #region IDisposable 成员

        public void Dispose()
        {
            serverListener = null;
        }

        #endregion
    }
using System.Collections.Generic;
using System.Text;
using System.Net.Sockets;
using Newtonsoft.Json;
using DotNetWebSocket.Engine.Message;

namespace DotNetWebSocket.Engine
{
    
    public delegate void ClientSocketEvent(object sender,MessageEntity me);

    public class ClientSocketInstance
    {
        private byte[] ServerKey1;
        private byte[] ServerKey2;

        public string name;
        public string Name
        {
            get { return name; }
            set { name = value; }
        }
        public Socket ClientSocket;

        public byte[] receivedDataBuffer;


        public event ClientSocketEvent NewUserConnection;
        public event ClientSocketEvent ReceiveData;
        public event ClientSocketEvent DisConnection;

        public ClientSocketInstance()
        {
            receivedDataBuffer = new byte[WebSocketProtocol.GetInstance.MaxBufferSize];
            ServerKey1 = new byte[4];
            ServerKey2 = new byte[4];
           
        }

        /// <summary>
        /// 接收数据
        /// </summary>
        /// <param name="result"></param>
        private void Read(IAsyncResult result)
        {
            if (!ClientSocket.Connected) return;
            try
            {
                // Web Socket protocol: 0x00开头,0xFF结尾
                System.Text.UTF8Encoding decoder = new System.Text.UTF8Encoding();
                int startIndex = 0;
                int endIndex = 0;

                //查找起启位置
                while (receivedDataBuffer[startIndex] == 0x00) startIndex++;
                // 查找结束位置
                endIndex = startIndex + 1;
                while (receivedDataBuffer[endIndex] != 0xff && endIndex != WebSocketProtocol.GetInstance.MaxBufferSize - 1) endIndex++;
                if (endIndex == WebSocketProtocol.GetInstance.MaxBufferSize - 1) endIndex = WebSocketProtocol.GetInstance.MaxBufferSize;

               
                string messageReceived = decoder.GetString(receivedDataBuffer, startIndex, endIndex - startIndex);

                MessageEntity me = JsonConvert.DeserializeObject(messageReceived, typeof(MessageEntity)) as MessageEntity;
                if (!string.IsNullOrEmpty(this.Name))
                {
                    ReceiveData(this, me);
                }
                else if (me.MessageId.ToLower() == "login")
                {
                    if (NewUserConnection != null)
                    {

                        this.Name = (Newtonsoft.Json.JsonConvert.DeserializeObject(me.MessageContent,typeof(ChartMessage)) as ChartMessage).Message;
                        NewUserConnection(this, me);
                    }
                }             

               /* MessageEntity me=new MessageEntity();
                me.MessageContent = messageReceived;
                ReceiveData(this, me);*/
                Array.Clear(receivedDataBuffer, 0, receivedDataBuffer.Length);
                ClientSocket.BeginReceive(receivedDataBuffer, 0, receivedDataBuffer.Length, 0, new AsyncCallback(Read), null);
            }
            catch(Exception ex)
            {
                DisConnection(this,null);
            }
        }
        
        /// <summary>
        /// 发送与客户端握手信息
        /// </summary>
        /// <param name="status"></param>
        public void  StartHandshake(IAsyncResult status)
        {
           int ClientHandshakeLength = (int) status.AsyncState;          
            byte[] last8Bytes = new byte[8];
            Array.Copy(receivedDataBuffer, ClientHandshakeLength - 8, last8Bytes, 0, 8); 
            ASCIIEncoding decoder = new System.Text.ASCIIEncoding();
            string ClientHandshake = decoder.GetString(receivedDataBuffer, 0, ClientHandshakeLength - 8);
            string[] ClientHandshakeLines = ClientHandshake.Split(new string[] { Environment.NewLine }, System.StringSplitOptions.RemoveEmptyEntries);
                      
            
            /*请求中的Sec-WebSocket-Key1中所有的数字连在一起
             * 然后除以空格的个数,得到结果1。
             * 然后从Key2同样的得到结果2,
             * 这两个结果取整后切断为32位整数,
             * 然后转成大头的网络顺序(Big-Endian),
             * 这两个结果和请求中最后的8个字节拼在一起,
             * 然后计算MD5。
              这个MD5的16字节结果就是服务器的反馈key*/

            //计算16位的服务端Key
            foreach (string Line in ClientHandshakeLines)
            {
              
                if (Line.Contains("Sec-WebSocket-Key1:"))
                    BuildServerSecKey(1, Line.Substring(Line.IndexOf(":") + 2));
                if (Line.Contains("Sec-WebSocket-Key2:"))
                    BuildServerSecKey(2, Line.Substring(Line.IndexOf(":") + 2));
            }

            //握手头信息
            byte[] HandshakeText = Encoding.ASCII.GetBytes(WebSocketProtocol.GetInstance.ServerHandshake);

            byte[] serverHandshakeResponse = new byte[HandshakeText.Length + 16];
            byte[] serverKey = BuildFullServerSecKey(last8Bytes);
            Array.Copy(HandshakeText, serverHandshakeResponse, HandshakeText.Length);
            Array.Copy(serverKey, 0, serverHandshakeResponse, HandshakeText.Length, 16);
            ClientSocket.BeginSend(serverHandshakeResponse, 0, HandshakeText.Length + 16, 0, HandshakeSuccess, null);          
        }

        /// <summary>
        /// 根据客户端握手Key生成客户端响应给客户端的安全Key
        /// </summary>
        /// <param name="keyNum"></param>
        /// <param name="clientKey"></param>
        private void BuildServerSecKey(int keyNum, string clientKey)
        {
            string partialServerKey = "";
            byte[] currentKey;
            int spacesNum = 0;
            char[] keyChars = clientKey.ToCharArray();
            //根据客户端Key获取得其中的空格数及其中的数字
            foreach (char currentChar in keyChars)
            {
                if (char.IsDigit(currentChar)) partialServerKey += currentChar;
                if (char.IsWhiteSpace(currentChar)) spacesNum++;
            }
            try
            {
                //用获取的数字除于空格数,再转成大头网络数据
                currentKey = BitConverter.GetBytes((int)(Int64.Parse(partialServerKey) / spacesNum));
                if (BitConverter.IsLittleEndian) Array.Reverse(currentKey); 

                if (keyNum == 1) ServerKey1 = currentKey;
                else ServerKey2 = currentKey;
            }
            catch
            {
                if (ServerKey1 != null) Array.Clear(ServerKey1, 0, ServerKey1.Length);
                if (ServerKey2 != null) Array.Clear(ServerKey2, 0, ServerKey2.Length);
            }
        }


        /// <summary>
        ///生成完整的16位安全Key[将Key1和Key2加在一起再加客户端握手信息的手八位] MD5后返回
        /// </summary>
        /// <returns></returns>
        private byte[] BuildFullServerSecKey(byte[] last8Bytes)
        {
            byte[] concatenatedKeys = new byte[16];
            Array.Copy(ServerKey1, 0, concatenatedKeys, 0, 4);
            Array.Copy(ServerKey2, 0, concatenatedKeys, 4, 4);
            Array.Copy(last8Bytes, 0, concatenatedKeys, 8, 8);

            // MD5 Hash
            System.Security.Cryptography.MD5 MD5Service = System.Security.Cryptography.MD5.Create();
            return MD5Service.ComputeHash(concatenatedKeys);
        }

        /// <summary>
        /// 握手成功,此时客户端与服务端建立接连,可进行通讯
        /// </summary>
        /// <param name="result"></param>
        private void HandshakeSuccess(IAsyncResult result)
        {
            ClientSocket.EndSend(result);
           
            ClientSocket.BeginReceive(receivedDataBuffer, 0, receivedDataBuffer.Length, 0, new AsyncCallback(Read), null);
        }

        /// <summary>
        /// 发送消息
        /// </summary>
        /// <param name="me"></param>
        public void SendMessage(MessageEntity me)
        {
            ClientSocket.Send(new byte[] {0x00});
          
            ClientSocket.Send(Encoding.UTF8.GetBytes(JsonConvert.SerializeObject(me)));
            ClientSocket.Send(new byte[] { 0xff });
        }

      
    }

[转载]ASP.NET MVC3缓存之二:页面缓存中的局部动态

mikel阅读(1061)

[转载]MVC3缓存之二:页面缓存中的局部动态 – 好记性不如烂键盘 – 博客园.

上一篇我们讨论了MVC中使用页面缓存的一些方法,而其中由于页面缓存的粒度太粗,不能对页面进行局部的缓存,或者说,如果我们想在页面缓存的同时对局部进行动态输出该怎么办?下面我们看下这类问题的处理。

MVC中有一个Post-cache substitution的东西,可以对缓存的内容进行替换。

使用Post-Cache Substitution

  • 定义一个返回需要显示的动态内容string的方法。
  • 调用HttpResponse.WriteSubstitution()方法即可。

示例,我们在Model层中定义一个随机返回新闻的方法。

using System;
using System.Collections.Generic;
using System.Web;

namespace MvcApplication1.Models
{
public class News
{
public static string RenderNews(HttpContext context)
{
var news = new List
{
"Gas prices go up!",
"Life discovered on Mars!",
"Moon disappears!"
};

var rnd = new Random();
return news[rnd.Next(news.Count)];
}
}

}

然后在页面中需要动态显示内容的地方调用。

&lt;%@ Page Language="C#" AutoEventWireup="true" CodeBehind="Index.aspx.cs" Inherits="MvcApplication1.Views.Home.Index" %&gt;
&lt;%@ Import Namespace="MvcApplication1.Models" %&gt;


Index
<div>&lt;% Response.WriteSubstitution(News.RenderNews); %&gt;
<hr />
The content of this page is output cached.
&lt;%= DateTime.Now %&gt;</div>

如在上一篇文章中说明的那样,给Controller加上缓存属性。

using System.Web.Mvc;

namespace MvcApplication1.Controllers
{
[HandleError]
public class HomeController : Controller
{
[OutputCache(Duration=60, VaryByParam="none")]
public ActionResult Index()
{
return View();
}
}

}
[/chsarp]
可以发现,程序对整个页面进行了缓存60s的处理,但调用WriteSubstitution方法的地方还是进行了随机动态显示内容。
对Post-Cache Substitution的封装

将静态显示广告Banner的方法封装在AdHelper中。

using System;
using System.Collections.Generic;
using System.Web;
using System.Web.Mvc;

namespace MvcApplication1.Helpers
{
public static class AdHelper
{
public static void RenderBanner(this HtmlHelper helper)
{
var context = helper.ViewContext.HttpContext;
context.Response.WriteSubstitution(RenderBannerInternal);
}

private static string RenderBannerInternal(HttpContext context)
{
var ads = new List
{
"/ads/banner1.gif",
"/ads/banner2.gif",
"/ads/banner3.gif"
};

var rnd = new Random();
var ad = ads[rnd.Next(ads.Count)];
return String.Format("<img src="{0}" alt="" />", ad);
}
}

}

这样在页面中只要进行这样的调用,记得需要在头部导入命名空间。

&lt;%@ Page Language="C#" AutoEventWireup="true" CodeBehind="Index.aspx.cs" Inherits="MvcApplication1.Views.Home.Index" %&gt;
&lt;%@ Import Namespace="MvcApplication1.Models" %&gt;
&lt;%@ Import Namespace="MvcApplication1.Helpers" %&gt;


Index
<div>&lt;% Response.WriteSubstitution(News.RenderNews); %&gt;
<hr />
&lt;% Html.RenderBanner(); %&gt;
<hr />
The content of this page is output cached.
&lt;%= DateTime.Now %&gt;</div>

使用这样的方法可以使得内部逻辑对外呈现出更好的封装。

[转载]百度地图API国内首款团购网站的地图插件

mikel阅读(805)

[转载]【百度地图API】——国内首款团购网站的地图插件 – 酸奶小妹 – 博客园.

摘要:

本文介绍了一款应用在团购网站上的地图插件,适用于目前非常流行的团购网站。使用这款地图插件,无需任何编程技术,你就把商家的位置轻松地标注在地图上。

前台地址

http://map.baidu.com/fwmap/upload/r/map/fwmap/tuangou/user.html

后台地址

http://map.baidu.com/fwmap/upload/r/map/fwmap/tuangou/admin.html

———————————————————————————————————

团购网站地图插件使用说明:

前台用户浏览页面:

1、首先要在页面中放一个DOM容器

例如:

<div id="BAIDUMAPCONTENT"></div>

2、在页面的最下方(后前)加上下面的脚本

<script type="text/javascript">

//需要展示地图的元素ID

var BAIDUMAPCONTENT = "BAIDUMAPCONTENT";

//地图上需要展示的点信息

var BAIDUPOINTS = [{"name":"麻辣诱惑(十里堡店)新开张中新开张中","address":"北京市朝阳区十里堡甲3号都会国际A座2(华堂商场西)","tel":"(010)65579989","point":"116.510133,39.923652","citycode":131}];

</script>

<script type="text/javascript" src="http://map.baidu.com/fwmap/upload/r/map/fwmap/tuangou/js/user.js"></script>


3、这时候浏览页面就会在页面上创建出一个小地图来

详细说明:

步骤2中,两个变量必须提供且名字不能改,值可以改;

var BAIDUMAPCONTENT = "BAIDUMAPCONTENT";

这个变量的值为1中DOM容器的ID,可以更改,但要跟DOM容器的ID保持一致,并且保证DOM容器存在

var BAIDUPOINTS = [{"name":"麻辣诱惑(十里堡店)新开张中新开张中","address":"北京市朝阳区十里堡甲3号都会国际A座2(华堂商场西)","tel":"(010)65579989","point":"116.510133,39.923652","citycode":131}];

这个变量的值的类型为数组,里面存放的是点对象(目前最多只能存放10个点对象)

点对象:

{
"name":"麻辣诱惑(十里堡店)新开张中新开张中", // 名称 必填

"address":"北京市朝阳区十里堡甲3号都会国际A座2(华堂商场西)", //地址 必填

"tel":"(010)65579989", //电话 选填

"point":"116.510133,39.923652", //坐标 必填

"citycode":131 //城市代码 必填

}

点对象中包括 name、address、tel、point、citycode 5个属性,其中 name 、address、point、citycode 4个属性是必填的,tel是选填的,如果4个必填属性中有一个值为空或不存在,那这个点,将不会标注在地图上显示

示例地址:

http://map.baidu.com/fwmap/upload/r/map/fwmap/tuangou/user.html

——————————————————————————————————————————-

后台管理页面:

1、首先要在页面上放一个textarea元素和一个DOM容器

<textarea style="width:280px;" id="BAIDUMAPINFO">[{"name":"麻辣诱惑(十里堡店)新开张中新开张中","address":"北京市朝阳区十里堡甲3号都会国际A座2(华堂商场西)","tel":"(010)65579989"}]</textarea>;


<span id="BDMAPBUTTON"></span>


2、在页面的最下方(后前)加上下面的脚本

<script type="text/javascript">

    var BAIDUMAPINFO = 'BAIDUMAPINFO';//存放点信息的textarea的ID

    var BDMAPBUTTON = 'BDMAPBUTTON';//存放地图标注按钮的容器ID

</script>

<script type="text/javascript" src="http://map.baidu.com/fwmap/upload/r/map/fwmap/tuangou/js/admin.js"></script>

3、这时候浏览页面就会在页面上创建出一个 小按钮,点击按钮会弹出个地图

详细说明:

步骤2中,两个变量必须提供且名字不能改,值可以改;

var BAIDUMAPINFO = 'BAIDUMAPINFO';//存放点信息的textarea的ID

这个变量的值为1中textarea容器的ID,修改时需同时修改;

var BDMAPBUTTON = 'BDMAPBUTTON';//存放地图标注按钮的容器ID

这个变量的值为1中DOM容器的ID,修改时需同时修改;

textarea中存放的是一个数组,数组中存放的是点对象(目前最多只能存放10个点对象)

点对象:

{

"name":"麻辣诱惑(十里堡店)新开张中新开张中", // 名称 必填

"address":"北京市朝阳区十里堡甲3号都会国际A座2(华堂商场西)", //地址 必填

"tel":"(010)65579989", //电话 选填

"point":"116.510133,39.923652", //坐标 选填 没有时会根据 地址(address)自动生成

"citycode":131 //城市代码 选填 没有时会根据 地址(address)自动生成

}

点对象中包括 name、address、tel、point、citycode 5个属性,其中 name 、address 2个属性是必填的,tel、point、citycode是选填的,如果2个必填属性中有一个值为空或不存在,那这个点,将不会标注在地图上显示和编辑,point、citycode 2个属性如果不存在时,会根据地址(address)自动生成出来

point、citycode 2个属性生成说明:如果这两个属性存在时,则直接读取使用,如果不存在会自动生成出来,当查看完地图,关闭地图时会将textarea的值用重新生成后的内容替换掉

如何修改点坐标:

打开地图后,地图会自动将符合条件的点显示在地图上,点击左侧的 详情 会将该条信息在地图上对应的点的气泡打开,用鼠标左键按住气泡下方的 Marker (有A、B、C、D、E、F、G、H、I、J显示的元素)移动,就可以改变改点的坐标,移动完成后,点击左侧列表中改点对应的信息框中的 确定 按钮,该点坐标就修改成功了,如果想取消移动,点击 对应的 取消 按钮 就可以了

示例地址:

http://map.baidu.com/fwmap/upload/r/map/fwmap/tuangou/admin.html

———————————————————————————————————-

前台页面的图示:

[转载]HTML5标准学习 - 文档结构

mikel阅读(846)

[转载]HTML5标准学习 – 文档结构 – Novice Doodle from Gray Zhang – 博客园.

说起HTML的结构,很多人都能说得头头是道,一般来说答案可能是这样的:

一个DOCTYPE,一个html,里面有head和body元素。

这当然不能说是不正确的,但是如果问到一个最小的HTML源文件必须有哪一些东西的话,恐怕很少有人能正确地做出回答。

先来回答一下这个问题,一个最简的HTML5源码文件需要的内容如下:

<!DOCTYPE html>

是的,就这样,一个字符不多,一个字符不少,除了大小写可任意变化外,其他的任何内容都是不能变动的。

那么究竟是怎么样的规则,导致一个最简的源码文件必须有doctype声明呢?根据标准,一个HTML文档有如下内容组成(严格按照顺序):

  1. 一个BOM标记,且这个BOM标记必须为U+FEFF。
  2. 0-n个空格或注释。
  3. DOCTYPE声明。
  4. 0-n个空格或注释。
  5. 一个HTML元素。
  6. 0-n个空格或注释。

这里存在着一些和HTML4的不同,一个HTML4的最简源码文件是这样的:

<!DOCTYPE HTML PUBLIC "-//W3C//DTD HTML 4.01 Transitional//EN"
                      "http://www.w3.org/TR/html4/loose.dtd">
<title>这里是标题</title>

两者的区别是显而易见的:

  • HTML5把DOCTYPE修改为更简单的<!DOCTYPE html>,这个已经众所周知了。
  • 在HTML4中多了一个<title>标签。

这里的重点就是<title>标签了,关于这个标签,在HTML4.01标准中是这么说的:

Every HTML document must have a TITLE element in the HEAD section.

也即是说,HTML4要求<title>标签是必须存在的。

而在HTML5的标准中,又是这么说的:

There must be no more than one title element per document.

HTML5中只设定了<title>标签数量的上限,却没有指明下限,也就是说,没有<title>的文档已经被视为一个合法的文档了。

对于DOCTYPE,HTML4中设定了6种DOCTYPE,HTML5中将DOCTYPE分为3种,这个在以后的章节中再具体说明。

再回过来看一下文档组成,除去0-n个空格或注释这样并没有多大意义的元素之外,组成的列表中还说明有一个HTML元素,但是最简的源码中却没有这东西。这是因为在HTML的规范中,一直存在“隐式标签”这样的概念,关于隐式标签,大致可以这么解释:

一部分元素,当满足特定的前提条件时,其开始标签或结束标签可以在源码中省略。在这种情况下,被省略的标签称为“隐式标签”。

需要注意的是,此处的省略指的是在源码中省略,而在最终成型的DOM树中,这个标签是存在的,因此才称为隐式标签。因此上面最简的源码结构,在生成DOM树后,其真正的结构是这样的:

<!DOCTYPE html>
<html>
    <head></head>
    <body></body>
</html>

最后,再总结一下XHTML中的一些规范:

  • 因为是XML,所以为了表示这是一个HTML文档,必须有一个命名空间,其值为http://www.w3.org/1999/xhtml
  • 因为是XML,所以MIME type不能是text/html了,text/xmlapplication/xmlapplication/xml+html都是比较好的选择。
  • 因为是XML,必须有根元素,根元素为<html>,即<html>的开始和结束标签不能省略了。
  • 因为是XML,所有元素只要有了开始标签,就不能没有结束标签,或者自闭合。
  • 因为是XML,所有元素都得严格遵守大小写,元素名称必须为小写。

因为是XML,文档变得严格了很多,也因为是XML,其可读性和规范性提高了不少。但最终,我们始终要在HTML的宽容性和XML的规范性之间找到最佳的平衡点,一味地追求极端始终是一个错误。

[转载]HTML5标准学习 - 文档结构

mikel阅读(864)

[转载]HTML5标准学习 – 文档结构 – Novice Doodle from Gray Zhang – 博客园.

说起HTML的结构,很多人都能说得头头是道,一般来说答案可能是这样的:

一个DOCTYPE,一个html,里面有head和body元素。

这当然不能说是不正确的,但是如果问到一个最小的HTML源文件必须有哪一些东西的话,恐怕很少有人能正确地做出回答。

先来回答一下这个问题,一个最简的HTML5源码文件需要的内容如下:

<!DOCTYPE html>

是的,就这样,一个字符不多,一个字符不少,除了大小写可任意变化外,其他的任何内容都是不能变动的。

那么究竟是怎么样的规则,导致一个最简的源码文件必须有doctype声明呢?根据标准,一个HTML文档有如下内容组成(严格按照顺序):

  1. 一个BOM标记,且这个BOM标记必须为U+FEFF。
  2. 0-n个空格或注释。
  3. DOCTYPE声明。
  4. 0-n个空格或注释。
  5. 一个HTML元素。
  6. 0-n个空格或注释。

这里存在着一些和HTML4的不同,一个HTML4的最简源码文件是这样的:

<!DOCTYPE HTML PUBLIC "-//W3C//DTD HTML 4.01 Transitional//EN"
                      "http://www.w3.org/TR/html4/loose.dtd">
<title>这里是标题</title>

两者的区别是显而易见的:

  • HTML5把DOCTYPE修改为更简单的<!DOCTYPE html>,这个已经众所周知了。
  • 在HTML4中多了一个<title>标签。

这里的重点就是<title>标签了,关于这个标签,在HTML4.01标准中是这么说的:

Every HTML document must have a TITLE element in the HEAD section.

也即是说,HTML4要求<title>标签是必须存在的。

而在HTML5的标准中,又是这么说的:

There must be no more than one title element per document.

HTML5中只设定了<title>标签数量的上限,却没有指明下限,也就是说,没有<title>的文档已经被视为一个合法的文档了。

对于DOCTYPE,HTML4中设定了6种DOCTYPE,HTML5中将DOCTYPE分为3种,这个在以后的章节中再具体说明。

再回过来看一下文档组成,除去0-n个空格或注释这样并没有多大意义的元素之外,组成的列表中还说明有一个HTML元素,但是最简的源码中却没有这东西。这是因为在HTML的规范中,一直存在“隐式标签”这样的概念,关于隐式标签,大致可以这么解释:

一部分元素,当满足特定的前提条件时,其开始标签或结束标签可以在源码中省略。在这种情况下,被省略的标签称为“隐式标签”。

需要注意的是,此处的省略指的是在源码中省略,而在最终成型的DOM树中,这个标签是存在的,因此才称为隐式标签。因此上面最简的源码结构,在生成DOM树后,其真正的结构是这样的:

<!DOCTYPE html>
<html>
    <head></head>
    <body></body>
</html>

最后,再总结一下XHTML中的一些规范:

  • 因为是XML,所以为了表示这是一个HTML文档,必须有一个命名空间,其值为http://www.w3.org/1999/xhtml
  • 因为是XML,所以MIME type不能是text/html了,text/xmlapplication/xmlapplication/xml+html都是比较好的选择。
  • 因为是XML,必须有根元素,根元素为<html>,即<html>的开始和结束标签不能省略了。
  • 因为是XML,所有元素只要有了开始标签,就不能没有结束标签,或者自闭合。
  • 因为是XML,所有元素都得严格遵守大小写,元素名称必须为小写。

因为是XML,文档变得严格了很多,也因为是XML,其可读性和规范性提高了不少。但最终,我们始终要在HTML的宽容性和XML的规范性之间找到最佳的平衡点,一味地追求极端始终是一个错误。