[转载]网站架构之缓存应用(3)实现篇 – ASP.NET – 博客园.
这篇来讲如何利用memcached实现一级缓存,以及如何让一级缓存组件支持在企业库,memcached或者其它第三方实施方案之间的切换。 memcached本人并没有太多经验,如果文中有说的不对的地方,还希望批评指出,且文中关于memcached的代码大多来自网络。
创建memcached实现类MemcachedWebCacheProvider,由它来继承缓存提供者接口IWebCacheProvider,主里 memcached客户端我采用.NET memcached client library ,这个类库很久没有更新这过了,没有和java版同步,有部分功能目前没有实现。
1:初始化memcached服务,这段初始化代码在程序中保证执行一次就够,一般可以放在gloabl文件中,或者是设置一个静态变量来存储服务的状态。
 代码
代码
{
String[] serverlist = { “127.0.0.1:11211“ };
this._pool = SockIOPool.GetInstance(“default“);
this._pool.SetServers(serverlist); //设置服务器列
//各服务器之间负载均衡的设置
this._pool.SetWeights(new int[] { 1 });
//socket pool设置
this._pool.InitConnections = 5; //初始化时创建的连接数
this._pool.MinConnections = 5; //最小连接数
this._pool.MaxConnections = 250; //最大连接数
//连接的最大空闲时间,下面设置为6个小时(单位ms),超过这个设置时间,连接会被释放掉
this._pool.MaxIdle = 1000 * 60 * 60 * 6;
//通讯的超时时间,下面设置为3秒(单位ms),.NET版本没有实现
this._pool.SocketTimeout = 1000 * 3;
//socket连接的超时时间,下面设置表示连接不超时,即一直保持连接状态
this._pool.SocketConnectTimeout = 0;
this._pool.Nagle = false; //是否对TCP/IP通讯使用Nalgle算法,.NET版本没有实现
//维护线程的间隔激活时间,下面设置为60秒(单位s),设置为0表示不启用维护线程
this._pool.MaintenanceSleep = 60;
//socket单次任务的最大时间,超过这个时间socket会被强行中断掉(当前任务失败)
this._pool.MaxBusy = 1000 * 10;
this._pool.Initialize();
}
2:获取一个memcached客户端。
{
MemcachedClient client = new MemcachedClient();
client.PoolName = “default“;
return client;
}
3:根据memcached提供的功能实现IWebCacheProvider,代码就不贴了,大家可以自己去试试。
到此我们就利用memcached实现了一级缓存,由于.NET memcached client library 实现了分布式,我们只需要在多台服务器上安装上memcached服务,在初始化memcached代码中增加了服务器相关配置即可。 String[] serverlist = { “127.0.0.1:11211“ };
如何让一级缓存组件支持多实现方案之间的切换。
MyWebCacheServiceClient:客户端缓存组件实例,它来完成一级缓存与二级缓存之间的联系,以及根据配置文件来选择一级缓存的实施方案。
第一:CacheServiceMode,根据它就可以决定缓存是只缓存二级缓存还是两级都缓存。
1:LocalCacheOnlyMode,只启用web server上的二级缓存。
2:BufferedLCacheServerMode,即启用web server上的二级缓存也启用cache server上的缓存。
3:Off,关闭缓存功能。
第二:IWebCacheProvider service = this .GetPrimaryCacheProvider(hashKey);方式决定了一级缓存的实施方案。
代码
/// 获取一级缓存
/// </summary>
/// <param name=”hashKey”></param>
/// <param name=”configFilePath”></param>
/// <returns></returns>
private IWebCacheProvider GetPrimaryCacheProvider(uint hashKey)
{
IWebCacheProvider provider = null;
string cacheType = WebConfig.ChannelConfig[“CacheType“].ToString().ToLower();
switch (cacheType)
{
case “memcached“:
provider = WebCacheProviderFactory.GetMemcachedWebCacheProvider(configFilePath);
break;
case “entlib“:
provider = servicePool.GetServiceClient(hashKey) as IWebCacheProvider;
break;
} return provider;
}
插入缓存的逻辑:原理就是根据配置文件中的CacheMode来完成缓存级别的判定以及一级缓存的方案。
 代码
代码
{
if (string.IsNullOrEmpty(key) || value == null)
return;
//关闭模式,不使用缓存
if (Options.CacheServiceMode == ECacheServiceMode.Off)
{
return;
}
else if (Options.CacheServiceMode == ECacheServiceMode.BufferedLCacheServerMode
|| Options.CacheServiceMode == ECacheServiceMode.LocalAndCacheServerAndSQL
|| Options.CacheServiceMode == ECacheServiceMode.LocalCacheOnlyMode)
{//使用带缓冲的模式
if (Options.BufferType == ECacheDependencyType.SlidingTime)
{
SecondaryCacheProvider.Insert(key, value, region, subRegion, MyCacheItemPriority.Normal, Options.BufferSlidingTime);
}
else if (Options.BufferType == ECacheDependencyType.AbsoluteTime)
{
SecondaryCacheProvider.Insert(key, value, region, subRegion, MyCacheItemPriority.Normal, Options.BufferAbsoluteTime);
} if (Options.CacheServiceMode == ECacheServiceMode.LocalCacheOnlyMode)
{//只使用本地缓存
return;
}
}
checkKey(key);
{
if (Options.CacheServiceMode == ECacheServiceMode.CacheServerMode
|| Options.CacheServiceMode == ECacheServiceMode.BufferedLCacheServerMode
|| Options.CacheServiceMode == ECacheServiceMode.CacheServerAndSQL
|| Options.CacheServiceMode == ECacheServiceMode.LocalAndCacheServerAndSQL)
{//CacheServer模式使用Cache服务器保存Cache
IWebCacheProvider service = this .GetPrimaryCacheProvider(hashKey);
byte[] byteValue = SerializationHelper.SaveToBinaryBytes(value);
var cachePriority = ModelConverter.ToRefClass(cacheItemConfig.CachePriority);
if (cacheItemConfig.CacheType == ECacheDependencyType.AbsoluteTime)
{
AbsoluteTimeCacheDependency absTime = new AbsoluteTimeCacheDependency();
absTime.AbsoluteTime = DateTime.Now.AddMinutes(cacheItemConfig.CacheTimeMinutes);
service.Insert(key, byteValue, region, subRegion, cachePriority, absTime);
}
else if (cacheItemConfig.CacheType == ECacheDependencyType.SlidingTime)
{
SlidingTimeCacheDependency slTime = new SlidingTimeCacheDependency();
slTime.SlidingTime = new TimeSpan(0, cacheItemConfig.CacheTimeMinutes, 0);
service.Insert(key, byteValue, region, subRegion, cachePriority, slTime);
}
}
}
catch (Exception ex)
{//出现异常,保存到数据库中
servicePool.ReplaceServiceClient(hashKey);
this.SendLogEmail(ex);
}
}
客户端调用代码:为了调用方便,创建一个CacheHelper来帮助完成:
代码
{
/// <summary>
/// 主分区
/// </summary>
public const string REGION = “MyBlog“;
/// <summary>
/// 子分区
/// </summary>
public const string SUB_REGION = “default“;
public const string BlogListConfigKey = “BlogListConfigKey“;
#region 页面间数据传递
/// <summary>
/// 新增页面间传递数据到WebCache
/// </summary>
/// <returns>返回PageKeyID,用于页面间传递的键值</returns>
public static string InsertPageParams(string configKey, object obj,string pageKey)
{
string result = null;
MyWebCacheServiceClient cacheClient
= CacheClientFactory.GetWebCacheServiceClient(REGION, SUB_REGION, configKey);cacheClient.Insert(
MyWebCacheServiceClient.BuildKey(configKey,pageKey),
obj,
REGION,
SUB_REGION); return result;
}
/// <summary>
/// 从Cache里获取页面传递Cache
/// </summary>
/// <param name=”key”>FlightCacheKey里的常量</param>
/// <param name=”pageKeyID”>页面传递的键值</param>
public static object GetPageParams(string configKey, string pageKey)
{
object result = null;
MyWebCacheServiceClient cacheClient = CacheClientFactory.GetWebCacheServiceClient(REGION,
SUB_REGION, configKey);
result = cacheClient.Get(
MyWebCacheServiceClient.BuildKey(configKey, pageKey),
REGION,
SUB_REGION); return result;
}
}
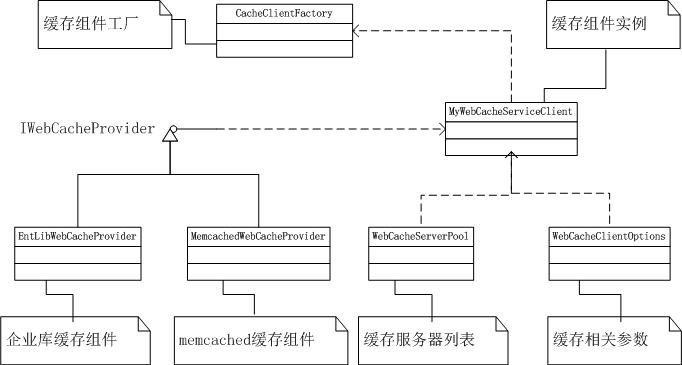
两级缓存类结构图:
以上代码贴出来看起来有点乱,这里贴出网站两级缓存类结构图: