[转载]web.py连接新浪微博

mikel阅读(1220)

[转载]web.py连接新浪微博 – 三块石头 – 博客园.

前段时间研究了下新浪微博的API,采用oauth登入(不懂oauth的童鞋请移步http://blog.csdn.net/hereweare2009/archive/2009/03/08/3968582.aspx)。也许是人笨,折腾了良久,算是用web.py成功接入到了新浪。不过在使用过程中,发现新浪微博的python api有点小bug,简单修正了下就OK了。废话不说,上代码:

sina_twitter.py

1 #coding=utf-8 2  import os 3 import sys 4 import key 5 import web 6 from weibopy.auth import OAuthHandler 7 from weibopy.api import API 8 from jinja2 import Environment,FileSystemLoader 9 10 #日志对象 11 def initlog(): 12 import logging 13 logger=logging.getLogger("sina_twitter") 14 hd=logging.StreamHandler(sys.stdout) 15 fmt = logging.Formatter('%(asctime)s %(levelname)s %(message)s') 16 hd.setFormatter(fmt) 17 logger.addHandler(hd) 18 logger.setLevel(logging.DEBUG) 19 return logger 20 21 logger=initlog() 22 23 #url映射配置 24 urls = ( 25 '/', 'Index', 26 '/callback','CallBack', 27 '/logout','LogOut' 28 ) 29 30 app=web.application(urls,globals()) 31 32 if web.config.get('_session') is None: 33 #web.py中有三种session机制,本应用采用session保存在本地文件的机制 34 session = web.session.Session(app,web.session.DiskStore("sina_twitter")) 35 web.config._session = session 36 else: 37 session = web.config._session 38 39 #使用jinja2模板渲染文件 40 def render_template(template_name,**context): 41 extensions=context.pop('extensions',[]) 42 globals=context.pop("globals",{}) 43 jinja_env=Environment( 44 loader=FileSystemLoader(os.path.join(os.path.dirname(__file__),'templates')), 45 extensions=extensions) 46 jinja_env.globals.update(globals) 47 return jinja_env.get_template(template_name).render(context) 48 49 #首页 50 #首先从session中获取access_token,没有就转向新浪微博页面认证 51 #认证成功后将access_token保存在session中 52 class Index: 53 def GET(self): 54 access_token=session.get('access_token',None) 55 if not access_token: 56 auth = OAuthHandler(key.CONSUME_KEY, key.CONSUME_SECRET,web.ctx.get('homedomain')+'/callback') 57 #获得新浪微博的认证url地址 58 auth_url = auth.get_authorization_url() 59 logger.debug("认证地址为:%s"%auth_url) 60 #在session中保存request_token,用于在新浪微博认证通过后换取access_token 61 session.request_token=auth.request_token 62 web.seeother(auth_url) 63 else: 64 auth = OAuthHandler(key.CONSUME_KEY, key.CONSUME_SECRET) 65 auth.access_token=access_token 66 api=API(auth) 67 user=api.verify_credentials() 68 friends=api.friends() 69 return render_template('index.html',friends=friends,user=user) 70 71 #页面回调,新浪微博验证成功后会返回本页面 72 class CallBack: 73 def GET(self): 74 try: 75 ins=web.input() 76 oauth_verifier=ins.get('oauth_verifier',None) 77 request_token=session.get('request_token',None) 78 auth=OAuthHandler(key.CONSUME_KEY, key.CONSUME_SECRET) 79 auth.request_token=request_token 80 #通过oauth_verifier来获取access_token 81 access_token=auth.get_access_token(oauth_verifier) 82 session.access_token=access_token 83 web.seeother("/") 84 except Exception: 85 web.header("Content-Type", "text/html;charset=utf-8") 86 return ':-( 出错了' 87 88 #退出微博,返回到首页 89 class LogOut: 90 def GET(self): 91 del session['access_token'] 92 del session['request_token'] 93 web.seeother('/') 94 95 if __name__=='__main__': 96 logger.debug("web.py服务开始启动……") 97 app.run()

接下来是新浪的密钥文件,或者说是api key,大家在申请新浪应用时可以得到。比如我的是:

1 CONSUME_KEY= "1610911722" 2 CONSUME_SECRET ="f56165fa429843c63d8fcd8ef80eef8a"

由于个人不喜欢web.py模板,所以换成jinja2,感觉后者更直观更好用点:)

index.html

<!DOCTYPE HTML PUBLIC "-//W3C//DTD HTML 4.01//EN" "http://www.w3.org/TR/html4/strict.dtd"> <html> <head> <meta http-equiv="Content-Type" content="text/html; charset=utf-8"> <title>Hello</title> </head> <body> Hello,<b>{{user.screen_name}}</b>,您的朋友信息如下: <a href='/logout'>退出</a><p></p> {% for friend in friends %} {{friend.screen_name}}-->{{friend.description}}-->{{friend.province}}-->{{friend.city}}<p></p> {% endfor %} </body> </html>

运行city_twitter.py后,访问http://localhost:8080/,页面就会调转到新浪微博授权页面:

点击”授权”后,页面跳转到首页:

顺便说下新浪微博python api的一个小问题,就是认证成功后页面新浪微博页面不跳转,需要修改下weibopy文件下的auth.py中的第98行,改为:

1 request = oauth.OAuthRequest.from_token_and_callback( 2 token=self.request_token,http_url=url,callback=self.callback 3 )

即传入callback属性。

[转载]Flex 通过Blazeds上传文件

mikel阅读(930)

[转载]Flex 通过Blazeds上传文件 – 宅男Johnny – 博客园.

本文讲的是通过Blazeds实现Flex文件上传,关于Blazeds的配置在这里就不赘述了,下面直接开讲。

说到Flex上传文件,就不得不用到FileReference了,下图是FileReference的属性:

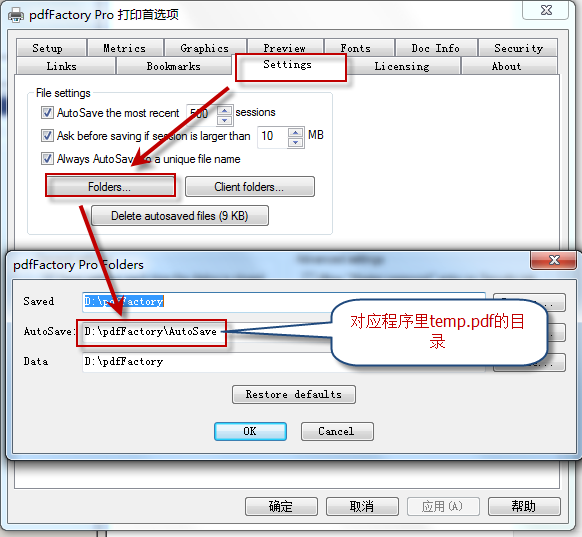
可见data属性是ByteArray格式的,由其可以想到如果我们要上传文件,必然是将文件已比特流的形式通过网络上传到服务器。既然如此,我们就在服务器端写一个接受数据的JAVA类UploadFile。

UploadFile.java

1 package upload; 2 3  import java.io.File; 4  import java.io.FileOutputStream; 5 6  public class UploadFile { 7 public void uploadFile(byte[] content, String fileName) 8 throws Exception{ 9 File file = new File("路径"+fileName); 10 FileOutputStream stream = new FileOutputStream(file); 11 if(content != null) 12 stream.write(content); 13 stream.close(); 14 } 15 }

我在做的时候新建文件路径使用的是相对路径,在部署到blazeds之后发现文件总是上传不成功,改成绝对路径之后问题解决。其次,我用的 Flex IDE是Flash Builder4(从4代开始不再叫Flex Builder),经常莫名其妙地出现上传文件的data属性为null的情况,因此加了一个判断content是否为null的语句,各位可以忽略。

做完服务器的接收部分了,现在可以开始写我们的上传代码了。

PopUpImage.mxml

1 <?xml version="1.0" encoding="utf-8"?> 2  <s:TitleWindow xmlns:fx="http://ns.adobe.com/mxml/2009" 3 xmlns:s="library://ns.adobe.com/flex/spark" 4 xmlns:mx="library://ns.adobe.com/flex/mx" width="240" height="120" 5 close="titleWindow_close()" 6 creationComplete="titleWindow_creationComplete()" 7 currentState="pre_upload"> 8 <fx:Script> 9 <![CDATA[ 10 import event.ImageUploadedEvent; 11 import flash.events.Event; 12 import flash.net.FileFilter; 13 import flash.net.FileReference; 14 import mx.controls.Alert; 15 import mx.events.CloseEvent; 16 import mx.managers.PopUpManager; 17 import mx.rpc.events.FaultEvent; 18 import mx.rpc.events.ResultEvent; 19 20 private var fileRef:FileReference = new FileReference(); 21 22 private function titleWindow_close():void 23 { 24 PopUpManager.removePopUp(this); 25 } 26 27 private function titleWindow_creationComplete():void 28 { 29 PopUpManager.centerPopUp(this); 30 } 31 32 private function pickFile(evt:MouseEvent):void 33 { 34 var imageTypes:FileFilter = new FileFilter("图片 (*.jpg, *.jpeg, *.gif,*.png)", "*.jpg; *.jpeg; *.gif; *.png"); 35 var allTypes:Array = new Array(imageTypes); 36 fileRef.addEventListener(Event.SELECT, selectHandler); 37 fileRef.addEventListener(ProgressEvent.PROGRESS, progressHandler); 38 fileRef.addEventListener(Event.COMPLETE, completeHandler); 39 try{ 40 fileRef.browse(allTypes); 41 }catch (error:Error){ 42 trace("Unable to browse for files."+error.toString()); 43 } 44 } 45 46 private function progressHandler(evt:ProgressEvent):void 47 { 48 lb_progress.text = " 已上传 " + (evt.bytesLoaded/1024).toFixed(2)+ " K,共 " + (evt.bytesTotal/1024).toFixed(2) + " K"; 49 var proc: uint = evt.bytesLoaded / evt.bytesTotal * 100; 50 progress.setProgress(proc, 100); 51 progress.label= "当前进度: " + " " + proc + "%"; 52 } 53 54 private function selectHandler(evt:Event):void 55 { 56 currentState = "uploading"; 57 fileRef.load(); 58 } 59 60 private function completeHandler(evt:Event):void{ 61 currentState = "post_upload"; 62 upload.uploadFile(fileRef.data,fileRef.name); 63 image_post_upload.source = fileRef.data; 64 } 65 66 ]]> 67 </fx:Script> 68 <fx:Declarations> 69 <s:RemoteObject id="upload" destination="uploadFile"/> 70 </fx:Declarations> 71 <s:states> 72 <s:State name = "pre_upload"/> 73 <s:State name = "uploading"/> 74 <s:State name = "post_upload"/> 75 </s:states> 76 <s:Button includeIn="pre_upload" label="从电脑上上传图片" width="119" click="pickFile(event)" horizontalCenter="-1" y="29"/> 77 <mx:ProgressBar id="progress" includeIn="uploading" x="43" y="43" width="153"/> 78 <s:Label id="lb_progress" includeIn="uploading" x="45" y="10" width="149" height="25"/> 79 <s:Label id="lb_post_upload" includeIn="post_upload" x="108" y="21" width="124" height="32" fontSize="16" text="upload success!" fontFamily="Arial" color="#3374DE"/> 80 <s:Button includeIn="post_upload" x="159" y="60" label="返回" click="titleWindow_close()"/> 81 <mx:Image id="image_post_upload" includeIn="post_upload" x="10" y="10" width="67" height="67"/> 82  </s:TitleWindow> 83  

这个文件是我写的一个组件,并不是一个可执行的mxml文件。组件有三个状态,分别为upload前、中、后期。

这里重点说的是RemoteObject,需要在remoting-config.xml文件中进行配置。

1 <destination id="uploadFile" channels="my-amf"> 2 <properties> 3 <source>upload.UploadFile</source> 4 </properties> 5  </destination>

以上就是一个完整的Flex通过Blazeds上传文件的过程。

[转载]深入理解ASP.NET MVC(6)

mikel阅读(995)

[转载]深入理解ASP.NET MVC(6) – P_Chou Go deep and Keep learning – 博客园.

Action全局观

在上一篇最后,我们进行到了Action调用的“门口”:

1 if (!ActionInvoker.InvokeAction(ControllerContext, actionName))

在深入研究调用过程的细节前,先有一个总体的认识是很有帮助的。InvokeAction方法大致是按照这样的顺序进行的:

image

查找action:MVC内部查找action的方法似乎有点复杂,涉及到一个ActionDescriptor的东西,但是原理上是通过反射,在以后的文章中会有所涉及。

验证和过滤:众所周知的IActionFilterIAuthorizationFilter在这部分生效,它们在真正执行action之前,事实上对于IResultFilterIExceptionFilter这样的过滤器是在action执行之后执行的,图中对于这个没有画出。

执行action:真正进入用户代码执行,通过反射调用,调用之前还涉及到复杂的参数提供和绑定,在以后的文章中会涉及。

执行结果:ActionResult在这部起到了关键的作用,ActionResult有多个派生,其中最为常见的就是ViewResult。ActionResult是前面步骤执行的最终“果实”,通过执行ActionResult的ExecuteResult抽象方法,一个HttpRespose被正确的构造好,准备传回客户端。

从ActionResult开始说起

就像上一篇讲到的,我们可以在ControllerExecute方法中直接对HttpContext.Response操作,绕过action;即便我们走了action这一路,仍然可以在action中像下面这样直接操作Response:

01 public class SimpleController : Controller
02 {
03 public void MyActionMethod()
04 {
05 Response.Write("I'll never stop using the <blink>blink</blink> tag");
06 // ... or ...
07 Response.Redirect("/Some/Other/Url");
08 // ... or ...
09 Response.TransmitFile(@"c:\files\somefile.zip");
10 }
11 }

然而这种方式难以维护,而且难以单元测试,于是MVC框架建议action返回ActionResult,并由框架调用ActionResultExecuteResult方法,这类似于设计模式中的command模式。你会看到这种设计模式在这里的运用实在是十分精辟的。

Action是一个十足的抽象类,抽象到不能再抽象了,它定义了唯一的ExecuteResult方法,参数为一个ControllerContext,其中封装了包括HttpContext在内的许多对象,也是重写这个方法唯一的上下文信息:

1 namespace System.Web.Mvc {
2
3 public abstract class ActionResult {
4
5 public abstract void ExecuteResult(ControllerContext context);
6
7 }
8
9 }

MVC内置了很多实用的ActionResult,如下图:

image

我们可以看个简单的实现类RedirectResult是如何实现ExecuteResult的。在这里我发现了我曾经遇到过的一个异常的原因:Child actions are not allowed to perform redirect actions,意思是在子action不允许重定向。

01 public override void ExecuteResult(ControllerContext context) {
02 if (context == null) {
03 throw new ArgumentNullException("context");
04 }
05 if (context.IsChildAction) {
06 throw new InvalidOperationException(MvcResources.RedirectAction_CannotRedirectInChildAction);
07 }
08
09 string destinationUrl = UrlHelper.GenerateContentUrl(Url, context.HttpContext);
10 context.Controller.TempData.Keep();
11 context.HttpContext.Response.Redirect(destinationUrl, false /* endResponse */);
12 }

在这段代码中ExecuteResult的实现相对简单的多,事实上像ViewResult的实现就复杂很多,关于ViewResult将在视图中涉及到。

在Controller中有很多辅助方法便于我们在action中返回需要的ActionResult,下面列出:

Content():返回ContentResult

大家都很少用到这个ActionResult,因为它的基本用法是返回文本,也许下面这段代码可以说服你

01 public ContentResult RSSFeed()
02 {
03 Story[] stories = GetAllStories(); // Fetch them from the database or wherever
04
05 // Build the RSS feed document
06 string encoding = Response.ContentEncoding.WebName;
07 XDocument rss = new XDocument(new XDeclaration("1.0", encoding, "yes"),
08 new XElement("rss", new XAttribute("version", "2.0"),
09 new XElement("channel", new XElement("title", "Example RSS 2.0 feed"),
10 from story in stories
11 select new XElement("item",
12 new XElement("title", story.Title),
13 new XElement("description", story.Description),
14 new XElement("link", story.Url)
15 )
16 )
17 )
18 );
19 return Content(rss.ToString(), "application/rss+xml");
20 }

上面的代码返回了一个RSS。值得注意的是,Content的第二个参数是个contentType(MIME类型,参见www.iana.org/assignments/media-types),如果不指定这个参数将使用text/html的contentType。

事实上我们的action可以返回一个非ActionResult,MVC在执行action的返回结果前,会确保将返回值转换成一个 ActionResult,其中一步,就是对非空和非ActionResult的结果转换成string,并包装成ContentResult:

1 protected virtual ActionResult CreateActionResult(ControllerContext controllerContext, ActionDescriptor actionDescriptor, object actionReturnValue) {
2 if (actionReturnValue == null) {
3 return new EmptyResult();
4 }
5
6 ActionResult actionResult = (actionReturnValue as ActionResult) ??
7 new ContentResult { Content = Convert.ToString(actionReturnValue, CultureInfo.InvariantCulture) };
8 return actionResult;
9 }

Json():返回JsonResult

Controller的Json方法能返回一个JsonResult,出于安全性的考虑JsonResult只支持POST方式,设置response.ContentType = “application/json”;并利用JavaScriptSerializer序列化对象,并返回给客户端。像下面这样使用JsonResult:

01 class CityData { public string city; public int temperature; }
02
03 [HttpPost]
04 public JsonResult WeatherData()
05 {
06 var citiesArray = new[] {
07 new CityData { city = "London", temperature = 68 },
08 new CityData { city = "Hong Kong", temperature = 84 }
09 };
10
11 return Json(citiesArray);
12 }

JavaScript():返回JavaScriptResult

JavaScript方法实例化一个JavaScriptResult,JavaScriptResult只是简单的设置response.ContentType = “application/x-javascript”;

File():返回二进制数据或文件

FileResult是个抽象类,File方法的多个重载返回不同的FileResult:

FilePathResult:直接将一个文件发送给客户端

1 public FilePathResult DownloadReport()
2 {
3 string filename = @"c:\files\somefile.pdf";
4 return File(filename, "application/pdf", "AnnualReport.pdf");
5 }

FileContentResult:返回byte字节给客户端比如图片

1 public FileContentResult GetImage(int productId)
2 {
3 var product = productsRepository.Products.First(x => x.ProductID == productId);
4 return File(product.ImageData, product.ImageMimeType);
5 }
1 <img src="<%: Url.Action("GetImage", "Products",  new { Model.ProductID }) %>" />

FileStreamResult:返回流

1 public FileStreamResult ProxyExampleDotCom()
2 {
3 WebClient wc = new WebClient();
4 Stream stream = wc.OpenRead("http://www.example.com/");
5 return File(stream, "text/html");
6 }

PartialView()和View():分别返回PartialViewResult和ViewResult

PartialViewResult和ViewResult十分复杂,涉及到视图,将在以后详细讨论。

Redirect():返回RedirectResult

产生重定向结果,上面已经展示了RedirectResult的实现了。

RedirectToAction(),RedirectToRoute():返回RedirectToRouteResult

RedirectToRouteResult同样是产生跳转的结果,但是它具有“路由表遍历能力”,也就是具有Url outbound的特点,参见深入理解ASP.NET MVC(3)

更多关于ActionResult的派生类的细节,可以参看MVC源码文件。

劳动果实,转载请注明出处:http://www.cnblogs.com/P_Chou/archive/2010/11/26/details-asp-net-mvc-06.html

[转载]文档在线预览:文档生成技术细节

mikel阅读(1092)

[转载]文档在线预览:文档生成技术细节 – I can being – 博客园.

之前的“文档在线预览:总体思路”受到很多朋友的欢迎,为此我继续讲一下文档在线预览两个步骤的一些技术细节。以下我以C#语言和Windows平台为例展开做一些介绍。
请记住,本文讲的是文档转化为pdf再转化为其他格式的方法,不讨论转化成的flash如何展示的问题(暂且假设用FlexPaper来展示吧)。文章后面附带本文讲到的相关操作的源码和软件下载,有些软件需要购买授权才能使用。
四项基本操作
1、调用Windows打印机打印文档
PrintDocument docToPrint = new PrintDocument();
docToPrint.DocumentName
= GetPath(sourcePath);
//开始打印
docToPrint.Print();
2、调用命令行执行CMD命令
代码

/// <summary>
/// 运行命令
/// </summary>
/// <param name=”strShellCommand”>命令字符串</param>
/// <returns>命令运行时间</returns>
private static double RunShell(string strShellCommand)
{
double spanMilliseconds = 0;
DateTime beginTime
= DateTime.Now;

Process cmd = new Process();
cmd.StartInfo.FileName
= cmd.exe;
cmd.StartInfo.UseShellExecute
= false;
cmd.StartInfo.CreateNoWindow
= true;
cmd.StartInfo.Arguments
= String.Format(@”/c {0}, strShellCommand);
cmd.Start();
cmd.WaitForExit();

DateTime endTime = DateTime.Now;
TimeSpan timeSpan
= endTime beginTime;
spanMilliseconds
= timeSpan.TotalMilliseconds;

return spanMilliseconds;
}

3、检查文件是否生成完毕

代码

/// <summary>
/// 检查是否转换成功(文件是否生成完毕)
/// </summary>
/// <param name=”sourcePath”>要检查文件地址</param>
/// <param name=”targetPath”>要复制到的地址(如果不需要真正复制,请跟sourcePath一致)</param>
/// <param name=”timeout”>最大等待时间</param>
/// <returns></returns>
private static bool IsParseSuccess(string sourcePath, string targetPath, int timeout)
{
bool isSuccess = false;

if (timeout <= 0)
timeout
= 30;

int i = 0;
while (!RenameFile(sourcePath, targetPath))
{
Thread.Sleep(
1000);
i
++;
if (i == timeout)
break;
}
if (i < timeout)
isSuccess
= true;

return isSuccess;
}

/// <summary>
/// 重命名文件(用来检查文件是否生成完成)
/// </summary>
/// <param name=”sourePath”>源地址</param>
/// <param name=”targetPath”>目标地址</param>
/// <returns></returns>
private static bool RenameFile(string sourePath, string targetPath)
{
bool isOpen = false;

//如果是相同地址,直接移动检查是否文件已经生成,否则进行复制(因为目标文件存在的话会有问题)
if (sourePath.Equals(targetPath))
{
try
{
//移动文件
File.Move(sourePath, targetPath);
isOpen
= true;
}
catch (Exception e)
{

}
}
else
{
bool isCopySuccess = false;
try
{
//复制文件
File.Copy(sourePath, targetPath, true);
isCopySuccess
= true;
}
catch (Exception e)
{
isCopySuccess
= false;
}
if (isCopySuccess)
{
//如果复制成功,删除源文件
File.Delete(sourePath);
}
}

return isOpen;
}

4、杀掉进行函数

代码

/// <summary>
/// 根据进程名称来关闭进程
/// </summary>
/// <param name=”processName”></param>
private static void KillPrecess(string processName)
{
foreach (Process p in Process.GetProcesses())
{
if (p.ProcessName == processName)
{
p.Kill();
}
}
}
文档转pdf
我们介绍的文档转化为pdf的方法,要求是较为通用,即不需要根据具体文档写具体的程序,且不仅要支持Office文档,最好还要支持txt、html等其他文档。
1、使用pdfFactory(见源码方法:ParsePDFWithPdfFactory)
说明:软件需要注册才能使用
原理:
a. 调用系统默认打印机(pdfFactory)打印文档;
b. 从打印机的临时目录里将pdf拷贝到目标路径;
pdfFactory的设置:
a. 打开打印机,设置“pdfFactory Pro”为默认打印机;
b. 打开“pdfFactory Pro”的“打印机首选项”,在“Licensing”选项卡里注册打印机;
c. 打开“pdfFactory Pro”的“打印机首选项”,结合程序,进行如下两个图的设置;

优点:
a. 只要支持打印的文件均可以用此法转化为pdf;
不足:
a. 服务器上经常会弹出文件打印窗口;
b. 一些损坏的文件或者格式不正确的文档会中止生成过程;
c. 如果遇到带病毒宏的文档,会对服务器产生破坏;
注意事项:
a. 打印过程中会产生大量临时文件在用户目录,需要及时清理垃圾文件,或者将对应目录迁移到磁盘空间较大的位置;
b. Windows Server需要安装Server版pdfFactory;
2、使用FlashPaper(见源码方法:ParsePDFWithFlashPrinter)
原理:调用命令行“flashprinter c:\document.doc -o c:\document.pdf”进行打印;
优点:
a. 只要支持打印的文件均可以用此法转化为pdf;
b. 操作简单
不足:
a. 由于程序本身问题,有时可能导致打印不能结束,几百个进程同时运行拖垮系统的情况;
3、其他方法(未附源码)
使用其他虚拟打印机,例如:Virtual PDF Printer
使用jcom或其它方式调用Office的Component进行转化,具体请参考:将office文档(word,excel,powerpoint)转换为pdf
调用使用JodConverter调用OpenOffice转化,具体请参考:JodConverter实现Office转化PDF格式
pdf转flash(见源码方法:ParseSWF)
原 理:使用SWFTools的pdf2swf,调用命令行“pdf2swf.exe -T 9 -p 1-3 -s languagedir=D:\xpdf-3.02pl5\xpdf-chinese-simplified D:\document.pdf -o D:\document.swf”进行转换;
常见问题:
1、部分文档转化后乱码,控制台提示:找不到“Adobe-GB1”字体
解决办法:在pdf2swf命令中带上语言包,详情请看:http://cqfish.blog.51cto.com/622299/163566
2、部分文档可能无法在FlexPaper里无法显示
解决办法:flash版本的问题,在pdf2swf命令中带上参数,设置生成的版本为9(参数为:-T 9),这样兼容性最好。
pdf转图片(见源码方法:ParseCoverImage)
原理:使用“VeryPDF PDF To Image Converter”软件,调用命令行“pdf2img.exe -r 25 -f 1 -l 1 -i c:\1.pdf -o c:\11.jpg ”进行转换;
pdf转文本(见源码方法:ParseText)
有时为了生成摘要或者索引文档内容,需要将文档里的文本读取进来,xpdf是一个不错的工具。
原理:使用“xpdf”软件,调用命令行“pdftotext.exe c:\1.pdf c:\1.txt”进行转化;
常见问题:要让xpdf支持中文,还需要下载中文语言包并做一些配置,xpdf中文化详细配置请参考:http://emily2ly.javaeye.com/blog/743552
本文涉及软件及源码下载:document-preview-online-demo-canbeing.rar

[转载]通过源代码研究ASP.NET MVC中的Controller和View(六)

mikel阅读(1001)

[转载]通过源代码研究ASP.NET MVC中的Controller和View(六) – Ivony… – 博客园.

通过源代码研究ASP.NET MVC中的Controller和View(一)

通过源代码研究ASP.NET MVC中的Controller和View(二)

通过源代码研究ASP.NET MVC中的Controller和View(三)

通过源代码研究ASP.NET MVC中的Controller和View(四)

通过源代码研究ASP.NET MVC中的Controller和View(五)

上篇谈到Controller最终把执行的操作外包给了ActionInvoker,其默认实现大体上是这么一个过程:

  • 查找Action(FindAction)
  • 获取参数
  • InvokeActionMethod
  • InvokeActionResult

那我先从查找Action入手研究其逻辑,其相关代码如下:

      ControllerDescriptor controllerDescriptor = GetControllerDescriptor( controllerContext );
      ActionDescriptor actionDescriptor = FindAction( controllerContext, controllerDescriptor, actionName );

首先获取了一个Controllerdescriptor,然后借助ControllerDescriptor查找ActionDescriptor。

先来看看这两个类型分别代表什么,从名称来看,应该是控制器和行为的描述符,那么具体描述了一些什么东西呢?

image

GetCustomAttributes和IsDefined三个方法是用于实现ICustomAttributeProvider(实现这个接口 用于获取附着在描述对象的特性,System.Reflection下大部分描述元数据的类型都实现了这个接口,如Assembly、 MethodInfo等)的,除此之外,主要就是FindAction和GetCanonicalActions(获取经典的行为?)。

继续来看看ActionDescriptor:

image

除去实现ICustomAttributeProvider之外的三个方法,我看到还有这样几个方法:

  • Execute( ControllerContext, IDictionary<string,string> )
  • GetFilters() : FilterInfo
  • GetParameters() : ParameterDescriptor[]
  • GetSelectors() : ICollection<ActionSelector>

我注意到了两个方法,Execute和FindFilters,这两个方法我都曾经见过,一个是IController的,一个是 ControllerActionInvoker的。方法名称相同,意味着他们可能是类似或者相同的逻辑,或者存在被调用的关系。不过我现在暂且不研究这 些实现。

同时我发现了一个有趣的事实,ControllerDescriptor通过FindAction方法可以获得一个 ActionDescriptor,而ActionDescriptor又可以GetParameters来获取一个 ParameterDescriptor的数组。换言之,ControllerDescriptor是一个ActionDescriptor的抽象容器, 而ActionDescriptor是一个ParameterDescriptor的抽象容器。从这些名称你能看出啥?

考虑到ControllerDescriptor.ControllerType的存在,我有理由相信,ControllerDescriptor 是一个依赖具体类型的描述符,换言之这是一个TypeDescriptor,而从名称来看,ParameterDescriptor应该是参数的描述符, 类型描述符包含操作描述符集合,操作描述符包含参数描述符集合。直接推论:ActionDescriptor应该是一个方法描述符 (MethodDescriptor),至少是一个被抽象的方法的描述符。它可以传递一些parameter来被Execute,得到一个object。 即使ActionDescriptor没有对应某个具体的方法,从GetParamters和Execute来看,它至少可以被当作一个方法来发现、绑定 (Bind,利用ParameterDescriptor[])以及调用执行(Execute)。不妨顺便来看看 ParameterDescriptor:

image

这个东西看起来的确就是一个参数描述符。思路大体上能够理顺了,那么接下来,是研究实现的时间。

看看GetControllerDescription的实现:

    protected virtual ControllerDescriptor GetControllerDescriptor( ControllerContext controllerContext )
    {
      Type controllerType = controllerContext.Controller.GetType();
      ControllerDescriptor controllerDescriptor = DescriptorCache.GetDescriptor( controllerType, () => new ReflectedControllerDescriptor( controllerType ) );
      return controllerDescriptor;
    }

首先是获取Controller的运行时类型,然后这个DescriptorCache.GetDescriptor从名字和调用上可以大体上猜 测,这个方法会首先到缓存中根据controllerType查找有没有缓存的东东,如果没有,就调用后面的匿名方法创建实例返回并缓存,来证实一下:

  internal sealed class ControllerDescriptorCache : ReaderWriterCache<Type, ControllerDescriptor>
  {
 
    public ControllerDescriptorCache()
    {
    }
 
    public ControllerDescriptor GetDescriptor( Type controllerType, Func<ControllerDescriptor> creator )
    {
      return FetchOrCreateItem( controllerType, creator );
    }
 
  }

FetchOrCreateItem这个方法名进一步的证实了猜测,我们继续看这个方法的实现:

    protected TValue FetchOrCreateItem( TKey key, Func<TValue> creator )
    {
      // first, see if the item already exists in the cache
      _rwLock.EnterReadLock();
      try
      {
        TValue existingEntry;
        if ( _cache.TryGetValue( key, out existingEntry ) )
        {
          return existingEntry;
        }
      }
      finally
      {
        _rwLock.ExitReadLock();
      }
 
      // insert the new item into the cache
      TValue newEntry = creator();
      _rwLock.EnterWriteLock();
      try
      {
        TValue existingEntry;
        if ( _cache.TryGetValue( key, out existingEntry ) )
        {
          // another thread already inserted an item, so use that one
          return existingEntry;
        }
 
        _cache[key] = newEntry;
        return newEntry;
      }
      finally
      {
        _rwLock.ExitWriteLock();
      }
    }

结果已经非常明朗,_rwLock的EnterXXX和ExitXXX方法显然是进入和退出读锁以及写锁。去掉这些同步代码看起来就会是这样:

    protected TValue FetchOrCreateItem( TKey key, Func<TValue> creator )
    {
 
      TValue existingEntry;
      if ( _cache.TryGetValue( key, out existingEntry ) )
        return existingEntry;
 
      TValue newEntry = creator();
      _cache[key] = newEntry;
      return newEntry;
    }

现在答案就是一目了然的了。

缓存的逻辑并非主线,还是回到GetControllerDescriptor继续分析。根据之前被证实的猜测,最终创建ControllerDescriptor的,就是这个匿名方法:

() => new ReflectedControllerDescriptor( controllerType )

换言之,其实的GetControllerDescriptor的实现大体上就是这样:

protected virtual ControllerDescriptor GetControllerDescriptor( ControllerContext controllerContext )
{
return new ReflectedControllerDescriptor( controllerContext.Controller.GetType() ) );
}

创 建ControllerDescriptor也就是利用Controller的运行时类型创建一个 ReflectedControllerDescriptor的实例而已。这进一步证实了ControllerDescriptor其实是一个 TypeDescriptor的猜测。

接下来看FindAction的实现:

    protected virtual ActionDescriptor FindAction( ControllerContext controllerContext, ControllerDescriptor controllerDescriptor, string actionName )
    {
      ActionDescriptor actionDescriptor = controllerDescriptor.FindAction( controllerContext, actionName );
      return actionDescriptor;
    }

FindAction啥活儿也没干,直接把工作又外包给了刚创建的ControllerDescriptor对象,我们知道 ControllerDescriptor其实是一个ReflectedControllerDescriptor的实例,所以来看看这个实例的实现:

    public override ActionDescriptor FindAction( ControllerContext controllerContext, string actionName )
    {
      if ( controllerContext == null )
      {
        throw new ArgumentNullException( "controllerContext" );
      }
      if ( String.IsNullOrEmpty( actionName ) )
      {
        throw new ArgumentException( MvcResources.Common_NullOrEmpty, "actionName" );
      }
 
      MethodInfo matched = _selector.FindActionMethod( controllerContext, actionName );
      if ( matched == null )
      {
        return null;
      }
 
      return new ReflectedActionDescriptor( matched, actionName, this );
    }

调用了_selector的FindActionMethod方法来得到一个方法信息(MethodInfo)然后用这个方法来创建一个 ReflectedActionDescriptor的实例。看来刚才的猜测一点没错,ActionDescriptor的确是一个方法的描述符。那么, 这个_selector又是什么?

    private readonly ActionMethodSelector _selector;

哈,又引入了一个新的类型ActionMethodSelector,从名字来看,这个类完全是为了Select一个Method而存在的。这个类 型没有任何派生类,也不派生自任何类,并且还是一个密封类(sealed),职责也非常明确,就是选择ActionMethod,而这个 ActionMethod应该就是我们在控制器中写的什么Index或是 About方法。

还是来看看FindActionMethod的实现:

public MethodInfo FindActionMethod( ControllerContext controllerContext, string actionName )
{
List<MethodInfo> methodsMatchingName = GetMatchingAliasedMethods( controllerContext, actionName );
methodsMatchingName.AddRange( NonAliasedMethods[actionName] );
List<MethodInfo> finalMethods = RunSelectionFilters( controllerContext, methodsMatchingName );

switch ( finalMethods.Count )
{
case 0:
return null;

case 1:
return finalMethods[0];

default:
throw CreateAmbiguousMatchException( finalMethods, actionName );
}
}

先调用了GetMatchingAliasedMethods方法,然后再将这个方法的结果与NonAliasedMethods[actionName]合并,最后RunSelectionFilters(运行选择筛选器)。最后看获取的方法恰好一个的话就返回。

这里的Matching和Aliased容易把人搞晕,求助谷歌大神,matching是一个形容词,相匹配的意思。aliased谷歌大神也没办 法帮我,但我知道alias是别名的意思,推测aliased是alias的过去式,那就是已经alias的意思,或者被alias的意思。也许,就是被 别名的意思吧。

所以GetMatchingAliasedMethod的解释就是:获取 相匹配的 被别名的 方法。

呃,,,先不看方法,因为我看到有一个很奇怪的对象叫做NonAliasedMethods,这个东西是哪来的?值是什么?

    public ILookup<string, MethodInfo> NonAliasedMethods
    {
      get;
      private set;
    }

哈,这玩意儿竟然是个ILookup,不常见啊,那么他的值是哪里来的,看看构造函数:

    public ActionMethodSelector( Type controllerType )
    {
      ControllerType = controllerType;
      PopulateLookupTables();
    }

然后:

    private void PopulateLookupTables()
    {
      MethodInfo[] allMethods = ControllerType.GetMethods( BindingFlags.InvokeMethod | BindingFlags.Instance | BindingFlags.Public );
      MethodInfo[] actionMethods = Array.FindAll( allMethods, IsValidActionMethod );
 
      AliasedMethods = Array.FindAll( actionMethods, IsMethodDecoratedWithAliasingAttribute );
      NonAliasedMethods = actionMethods.Except( AliasedMethods ).ToLookup( method => method.Name, StringComparer.OrdinalIgnoreCase );
    }

哈,在这里看到了两个熟悉的东西,AliasedMethods和NonAliasedMethods。他们分别是这么来的:

首先allMethods是ControllerType的所有公开的实例方法集合。然后对这个集合进行了一次筛选,Array.FindAll其实就类似于Where方法,后面的那个IsValidActionMethod是筛选条件,这个方法的实现是这样的:

    private static bool IsValidActionMethod( MethodInfo methodInfo )
    {
      return !(methodInfo.IsSpecialName ||
               methodInfo.GetBaseDefinition().DeclaringType.IsAssignableFrom( typeof( Controller ) ));
    }

那么这里定义了几种情况不是合法的ActionMethod(会被筛掉):

  • 是特殊的名称(编译器生成的方法、构造函数等)
  • 方法的原始声明类型(假设一个类型A有一个虚方法virtual Test,被派生类B重写为override Test,则GetBaseDefinition获取到A中定义的虚方法Test,即为原始声明类型)是Controller或是Controller的 基类(IsAssignableFrom)。

简单的说,编译器生成的方法和定义在Controller里面的方法,就不是合法的ActionMethod,除此之外,都是。

结合起来:ControllerType里面所有公开的实例方法,除去编译器生成的、构造函数、Controller及其基类定义的方法及他们的重写之外,剩下的都是ActionMethod(看来返回值没什么限制哦,但也许限制不在这里)。

然后,合法的ActionMethod(actionMethods)被分成两拨,一拨是满足 IsMethodDecoratedWithAliasingAttribute的(AliasedMethods),另一拨是剩下的(Except)。 来看看这个名字很长的方法的实现:

    private static bool IsMethodDecoratedWithAliasingAttribute( MethodInfo methodInfo )
    {
      return methodInfo.IsDefined( typeof( ActionNameSelectorAttribute ), true /* inherit */);
    }

如果你记心好的话,应该会记得这个IsDefine刚才出现过,没错,这是ICustomAttributeProvider接口的一个成员。他用 于检查方法是否定义了(附着了)某个类型的特性,这里这个类型是ActionNameSelectorAttribute,后面的true表示如果定义了 这个特性类的派生类(派生特性)也算在内。

那么这里的逻辑可以理清了,所有定义了ActionNameSelectorAttribute特性的方法,都是AliasedMethod(被别名的方法),除此之外,都是NonAliasedMethod(没被别名的方法)。

没有被别名的方法会被转换为一个ILookup对象,ILookup说白了,就是GroupBy的结果的可检索Key版本。ILookup首先是一 个IEnumerable<IGrouping<TKey,TValue>>(继承于它),其次,ILookup提供了一个索引 器,用于获取Key等于特定值的IGrouping。下图说明了ILookup:

image

好了,ILookup并不是重点,我看到这里作为Key的是method.Name(方法名),并且传入了一个StringComparer.OrdinalIgnoreCase,不区分大小写的字符串比较器。也就是说这里的Key将不区分大小写。

回到FindActionMethod方法,那么NonAliasedMethods[actionName]就可以理解了,由于ILookup的 Key是method.Name,所以NonAliasedMethods[actionName]就是获取所有名字和actionName一样的方法 (不区分大小写)。

那么继续来看看GetMatchingAliasMethods的实现:

internal List<MethodInfo> GetMatchingAliasedMethods( ControllerContext controllerContext, string actionName )
{
// find all aliased methods which are opting in to this request
// to opt in, all attributes defined on the method must return true

var methods = from methodInfo in AliasedMethods
let attrs = (ActionNameSelectorAttribute[]) methodInfo.GetCustomAttributes( typeof( ActionNameSelectorAttribute ), true /* inherit */)
where attrs.All( attr => attr.IsValidName( controllerContext, actionName, methodInfo ) )
select methodInfo;
return methods.ToList();
}

LINQ表达式的描述性很强,我很喜欢,这段LINQ表达式直接描述是这样的:

从AliasedMethod集合中获取一个个methodInfo,获取methodInfo的 ActionNameSelectorAttribute特性集合并命名为attrs,从中所有这些methodInfo中筛选出attrs集合中每一项 都满足IsValidName的项。

简单的说,选择AliasedMethod中,所有ActionNameSelectorAttribute特性都满足IsValidName的methodInfo,那么,IsValidName又是什么逻辑?

这个方法在ActionNameSelectorAttribute中是一个抽象方法,这个类只有一个实现类ActionNameAttribute,所以这个方法也就只有一份实现(至少在 MVC框架里):


ActionNameAttribute:

public override bool IsValidName( ControllerContext controllerContext, string actionName, MethodInfo methodInfo )
{
return String.Equals( actionName, Name, StringComparison.OrdinalIgnoreCase );
}

那么这里就是简单的比较了一下actionName和自己的Name属性。这个特性干什么用的基本上也就能推导出来了,如果你想给方法取一个别名(不用方法名作为actionName),就可以应用这个特性,然后取一个你喜欢的名字。

这里的实现似乎存在一个非常明显的Bug,如果我为一个方法取了两个别名,那么这个方法应该就不可能被映射到了。因为这里的判断逻 辑是所有(All)的Attribute都要IsValidName,换言之这个actionName要同时等于两个别名,才会被选择,这显然不可能。所 以这里的All应该改为Any才对。

不过事实上,一个方法不能被附着两个ActionNameAttribute,因为这个特性是不能多次应用的(在这个类型和基类的 AttributeUsage定义了AllowMultiple = false),所以不可能出现两个这样的特性,但即使是这样,这里的实现也存在问题,哪天微软心情好,把AllowMultiple开放了,或者我们自己 实现了一个ActionNameSelectorAttribute支持AllowMultiple。。。

OK,至此,已经可以完全了解FindActionMethod前段的逻辑了:

  1. 从被取了别名的(Aliased)方法中找别名(ActionNameAttribute.Name)与actionName相匹配的方法
  2. 再从没有取别名的方法中找方法名与actionName相匹配的方法
  3. 把这两个结果整合(AddRange)。
  4. 再运行SelectionFilter(选择筛选器?)
  5. 最后如果结果集里只有一个方法,那么返回,有多个则异常,没有则返回空。

最后来看看选择筛选器干了些什么:

    private static List<MethodInfo> RunSelectionFilters( ControllerContext controllerContext, List<MethodInfo> methodInfos )
    {
      // remove all methods which are opting out of this request
      // to opt out, at least one attribute defined on the method must return false
 
      List<MethodInfo> matchesWithSelectionAttributes = new List<MethodInfo>();
      List<MethodInfo> matchesWithoutSelectionAttributes = new List<MethodInfo>();
 
      foreach ( MethodInfo methodInfo in methodInfos )
      {
        ActionMethodSelectorAttribute[] attrs = (ActionMethodSelectorAttribute[]) methodInfo.GetCustomAttributes( typeof( ActionMethodSelectorAttribute ), true /* inherit */);
        if ( attrs.Length == 0 )
        {
          matchesWithoutSelectionAttributes.Add( methodInfo );
        }
        else if ( attrs.All( attr => attr.IsValidForRequest( controllerContext, methodInfo ) ) )
        {
          matchesWithSelectionAttributes.Add( methodInfo );
        }
      }
 
      // if a matching action method had a selection attribute, consider it more specific than a matching action method
      // without a selection attribute
      return ( matchesWithSelectionAttributes.Count > 0 ) ? matchesWithSelectionAttributes : matchesWithoutSelectionAttributes;
    }

首先定义了两个列表,With和Without Selection Attributes,然后遍历所有的方法,获取方法上附着的ActionMethodSelectorAttribute,如果方法上没有这个特性 (attrs.Length == 0),那么归入matchesWithoutSelectionAttributes这一拨,如果方法上有这个特性,那么调用特性的 IsValidForRequest,为true的归入matchesWithSelectionAttributes这一拨,其他的方法抛弃。

最后,如果With这一拨有任何方法,返回With这一拨,否则返回Without这一拨。

简单的说:

如果有方法附着了ActionMethodSelectorAttribute,而又IsValidForRequest的话,那么就返回这些方法。否则,返回没有附着ActionMethodSelectorAttribute的方法。

当然,ActionMethodSelectorAttribute也是一个抽象类,但他的派生类很多:

image

不过这不要紧,因为我看到了HttpPostAttribute,其实那就是[HttpPost]么,在MVC范例网站的AccountController里面就能看到:

    [HttpPost]
    public ActionResult LogOn( LogOnModel model, string returnUrl )
    {
      if ( ModelState.IsValid )
      {
        if ( MembershipService.ValidateUser( model.UserName, model.Password ) )
        {
          FormsService.SignIn( model.UserName, model.RememberMe );
          if ( !String.IsNullOrEmpty( returnUrl ) )
          {
            return Redirect( returnUrl );
          }
          else
    ......

我知道HttpPost是用来标识仅当请求是以Post方式提交的时候才调用这个方法,那么这个Attribute的 IsValidForRequest的实现则可以简单的检查请求是不是POST提交过来的达到所需要的效果。其实现我瞄了一眼,比较麻烦,就不在这里展开 了,还是尽快走主线逻辑吧,这些内容大家如果有兴趣完全可以自行研究。

写在最后,这里的逻辑非常值得注意,由于在SelectionFilters之后,如果方法组中还存在有多个方法,则会直接抛出异常。可以知道(最重要结论):

  1. 同名(方法名或别名)的方法一定要有不同性质的ActionMethodSelectorAttribute(没有也算一种性质)。
  2. 如果同一个性质的ActionMethodSelectorAttribute被应用到两个同名的方法,当这个Attribute验证通过时,将出错,这很危险,也是容易造成隐患的地方。
  3. MVC框架内所有的这些ActionMethosSelectorAttribute除了AcceptVerbsAttribute之外都是互斥 的(不可能同时满足),这样的好处是只要两个同名方法没有附着一样类型的特性,就一定不会同时列入候选列表而抛出异常。但如果你自己加入了一些 ActionMethodSelector而又与现有的不互斥,你要注意会不会有一种特定的情况导致两个同名方法同时满足,这将是很难检出的隐患。
  4. 方法的签名在FindAction的过程中是被无视的,除非你自己写一个ActionMethodSelectorAttribute来判断方法签名与当前请求的匹配程度。
  5. 最重要的一点,综上所述,没事别整同名的方法。

这一篇就到这里了。

在结束之前,我分享一个非常搞笑的ActionMethodSelectorAttribute实现:

namespace System.Web.Mvc
{
  using System.Reflection;
 
  [AttributeUsage( AttributeTargets.Method, AllowMultiple = false, Inherited = true )]
  public sealed class *******Attribute : ActionMethodSelectorAttribute
  {
    public override bool IsValidForRequest( ControllerContext controllerContext, MethodInfo methodInfo )
    {
      return false;
    }
  }
}

这是MVC框架里面的一个类型的源代码,类型的的名字被打上了马赛克,不妨猜猜这个Attribute到底是干啥用的,以及,它的名字是什么。。。。

[转载]新浪微博PC客户端(DotNet WinForm版)

mikel阅读(1211)

[转载]新浪微博PC客户端(DotNet WinForm版)—— 初探 – Ferry’s blogs – 博客园.

最近兴趣使然尝试了一下使用DotNet技术实现新浪微博PC客户端,几天时间,目前实现登录、微博列表、发布纯文本微博功能,新浪API调用基本没什么难度,在微博列表形式处理上着实让我烦躁了一阵子,Windows Form使用不多,这次开发也感觉有些捉襟见肘。

环境:

操作系统:Windows 7 Ultimate

集成开发环境:Visual Studio 2010 Ultimate

.NET Framework:3.5

先看一下截图:

1、登录界面

2、 登录

3、第一次运行主界面加载

4、主页面

5、翻页

6)如果博文中有图,点击小图可以查看大图

新浪微博API返回的数据类型有两种:XML和JSON。在登录时,我直接用DataSet读的XML数据存储到一个静态用户信息类中;而博客列表数据我读取的是JSON格式的数据,并将JSON格式的数据反序列化为泛型对象(类)集合,这里的类是嵌套类。

然后绘制列表,显示数据的控件全部是动态添加的,这里最烦的是位置,可能也是这个原因导致每页20条数据加载比较慢(接口默认一页返回20条),最 快也要2秒,经常要4-6秒,后面提供下载,大家可以试试。另外,影响速度的原因可能还有:1)网速;2)输出图片,有的是直接输出大图,在回复的源微博 中如果有图片,总是获取不到缩略图,只好依次判断小图、中图、大图,先有哪个输出哪个。 用Label显示文本行间距没法调,只好做了个自定义控件,主要 是根据字体大小了增大行距。

界面虽然使用皮肤(ssk),比Window Form原始的界面好看的多,但是比起Adobe的那个AIR还是有差距,或许可以尝试使用WPF。

后续要实现的功能(还没全部看API,有的功能不一定提供API):

1)转发、收藏、回复

2)发帖可以使用表情、可以上传图片

3)关注、粉丝列表

4)查看自己微博、他人微博列表

5)个人的一些配置信息

6)主界面左边想放新浪微博登录后,个人首页右边的内容

… …

工作量还挺大:(的。

目前经过处理,程序运行后占用的内存在4M-25M这样的一个范围 ,如果不处理会一直攀升,100M、200M、… … 。

在翻页时,加载显示瞬时CPU占用率能够达到30%左右,一般比较低,5%以下。

滚屏时,CPU占用率一般18%以下,都是瞬时的。

大家看到的数据异步加载使用了多线程,主要是使用了BackgroundWorker。

除了上面的问题,在滚屏时,滚动的内容有点闪,还没找到好的解决办法。

欢迎有兴趣的人一起讨论,提宝贵意见。有经验的人做个指导:)。

最后附上读取新浪微博API的部分代码:

using System;
using System.Collections.Generic;
using System.Text;
using System.IO;
using System.Net;
using MBClient.Entities;
using System.Runtime.Serialization.Json;
using System.Data;
using System.Drawing;

namespace MBClient.API
{
internal class ReadDataBySinaAPI
{
internal ReadDataBySinaAPI() { }

/// <summary>
/// 根据用户登录信息登录并读取用户信息到DataSet
/// 如果用户新浪通行证身份验证成功且用户已经开通微博则返回 http状态为 200;
/// 如果是不则返回401的状态和错误信息。此方法用了判断用户身份是否合法且已经开通微博。
/// http://open.t.sina.com.cn/wiki/index.php/Account/verify_credentials
/// </summary>
/// <param name=”url”>API URL (XML Format)http://api.t.sina.com.cn/account/verify_credentials.xml?source=AppKey
/// </param>
/// <returns></returns>
internal static DataSet ReadXMLDataToDataSet(string url)
{
CredentialCache mycache
= new CredentialCache();
mycache.Add(
new Uri(url), Basic, new NetworkCredential(UserInfo.UserName, UserInfo.Password));
WebRequest myReq
= WebRequest.Create(url);

myReq.Credentials = mycache;
myReq.Headers.Add(
Authorization, Basic + Convert.ToBase64String(new ASCIIEncoding().GetBytes(UserInfo.UserNamePassword)));

WebResponse wr = myReq.GetResponse();

DataSet ds = new DataSet();
using (Stream receiveStream = wr.GetResponseStream())
{
StreamReader reader
= new StreamReader(receiveStream, Encoding.UTF8);
//string content = reader.ReadToEnd();
ds.ReadXml(reader);
reader.Close();
reader.Dispose();
}
wr.Close();
return ds;
}

internal static string ReadXMLDataToString(string url)
{
CredentialCache mycache
= new CredentialCache();
mycache.Add(
new Uri(url), Basic, new NetworkCredential(UserInfo.UserName, UserInfo.Password));
WebRequest myReq
= WebRequest.Create(url);

myReq.Credentials = mycache;
myReq.Headers.Add(
Authorization, Basic + Convert.ToBase64String(new ASCIIEncoding().GetBytes(UserInfo.UserNamePassword)));

WebResponse wr = myReq.GetResponse();
string strData = null;
using (Stream receiveStream = wr.GetResponseStream())
{
StreamReader reader
= new StreamReader(receiveStream, Encoding.UTF8);
strData
= reader.ReadToEnd();
}
wr.Close();
return strData;
}

/// <summary>
/// 以JSON格式字符串返回用户所有关注用户最新n条微博信息。和用户“我的首页”返回内容相同。
/// http://open.t.sina.com.cn/wiki/index.php/Statuses/friends_timeline
/// </summary>
/// <param name=”url”>API URL (JSON Format) http://api.t.sina.com.cn/statuses/friends_timeline.json?source=AppKey
/// </param>
/// <returns></returns>
internal static string ReadJsonDataToString(string url)
{
CredentialCache mycache
= new CredentialCache();
mycache.Add(
new Uri(url), Basic, new NetworkCredential(UserInfo.UserName, UserInfo.Password));
WebRequest myReq
= WebRequest.Create(url);

myReq.Credentials = mycache;
myReq.Headers.Add(
Authorization, Basic + Convert.ToBase64String(new ASCIIEncoding().GetBytes(UserInfo.UserNamePassword)));

WebResponse wr = myReq.GetResponse();
string content = null;
using (Stream receiveStream = wr.GetResponseStream())
{
StreamReader reader
= new StreamReader(receiveStream, Encoding.UTF8);
content
= reader.ReadToEnd();
reader.Close();
reader.Dispose();
}
wr.Close();
return content;
}

/// <summary>
/// 将JSON格式字符串反序列化为Status集合对象
/// </summary>
/// <param name=”url”>同ReadJsonDataToString()</param>
/// <returns></returns>
internal static List<Status> DeserializeJsonToListObject(string url)
{
List
<Status> listObj;
using (MemoryStream stream = new MemoryStream())
{
DataContractJsonSerializer ser
= new DataContractJsonSerializer(typeof(List<Status>));
StreamWriter wr
= new StreamWriter(stream);
string strJson = ReadJsonDataToString(url);
wr.Write(strJson);
wr.Flush();
stream.Position
= 0;
Object obj
= ser.ReadObject(stream);
listObj
= (List<Status>)obj;
wr.Close();
wr.Dispose();
}

return listObj;
}

/// <summary>
/// 获取并输出图片
/// </summary>
/// <param name=”imgUrl”>图片URL地址</param>
/// <returns></returns>
internal static Image GetAvatarImage(string imgUrl)
{
//头像
Uri myUri = new Uri(imgUrl);
WebRequest webRequest
= WebRequest.Create(myUri);
WebResponse webResponse
= webRequest.GetResponse();
Bitmap myImage
= new Bitmap(webResponse.GetResponseStream());

return (Image)myImage;
}

/// <summary>
/// 发表一条微博
/// </summary>
/// <param name=”url”>API地址
/// http://api.t.sina.com.cn/statuses/update.json
/// </param>
/// <param name=”data”>AppKey和微博内容
/// “source=123456&status=” + System.Web.HttpUtility.UrlEncode(微博内容);
/// </param>
/// <returns></returns>
internal static bool PostBlog(string url,string data)
{
try
{
System.Net.WebRequest webRequest
= System.Net.WebRequest.Create(url);
System.Net.HttpWebRequest httpRequest
= webRequest as System.Net.HttpWebRequest;

System.Net.CredentialCache myCache = new System.Net.CredentialCache();
myCache.Add(
new Uri(url), Basic,
new System.Net.NetworkCredential(UserInfo.UserName, UserInfo.Password));
httpRequest.Credentials
= myCache;
httpRequest.Headers.Add(
Authorization, Basic + Convert.ToBase64String(
new System.Text.ASCIIEncoding().GetBytes(UserInfo.UserName + : +
UserInfo.Password)));

httpRequest.Method = POST;
httpRequest.ContentType
= application/x-www-form-urlencoded;
System.Text.Encoding encoding
= System.Text.Encoding.UTF8;//System.Text.Encoding.ASCII
byte[] bytesToPost = encoding.GetBytes(data);//System.Web.HttpUtility.UrlEncode(data)
httpRequest.ContentLength = bytesToPost.Length;
System.IO.Stream requestStream
= httpRequest.GetRequestStream();
requestStream.Write(bytesToPost,
0, bytesToPost.Length);
requestStream.Close();
return true;
}
catch
{
return false;
}
}
}
}

感谢博客园的这篇文章,参考价值很大:http://www.cnblogs.com/cmt/archive/2010/05/13/1733904.html

注:AppKey以内置,是我申请的,每IP每用户一小时内限调用350次API。

PS:别拿来干坏事… …

附一条完整的博客内容数据(XML格式)

<status>
<created_at>Wed Nov 24 21:24:04 +0800 2010</created_at>
<id>3858478793</id>
<text>很好的推论。 //@白手套的小咪:这是罗永浩流传最广的名言之一。给他改一改:没有哪只鸟来到世间是为了躲枪子儿的。所以,手上拿着枪,并用“枪打出头鸟”这样的道理教训人的那些人,一定要明白,每只鸟都梦想出头,你打到老死也打不完的。</text>
<source>
<a href=”http://t.sina.com.cn”>新浪微博</a>
</source>
<favorited>false</favorited>
<truncated>false</truncated>
<geo/>
<in_reply_to_status_id></in_reply_to_status_id>
<in_reply_to_user_id></in_reply_to_user_id>
<in_reply_to_screen_name></in_reply_to_screen_name>
<user>
<id>1197161814</id>
<screen_name>李开复</screen_name>
<name>李开复</name>
<province>11</province>
<city>1000</city>
<location>北京</location>
<description>创新工场CEO</description>
<url>http://blog.sina.com.cn/kaifulee</url>
<profile_image_url>http://tp3.sinaimg.cn/1197161814/50/1290146312/1</profile_image_url>
<domain>kaifulee</domain>
<gender>m</gender>
<followers_count>2384862</followers_count>
<friends_count>132</friends_count>
<statuses_count>1039</statuses_count>
<favourites_count>2</favourites_count>
<created_at>Fri Aug 28 00:00:00 +0800 2009</created_at>
<following>false</following>
<verified>true</verified>
<allow_all_act_msg>false</allow_all_act_msg>
<geo_enabled>true</geo_enabled>
</user>
<retweeted_status>
<created_at>Wed Nov 24 17:35:07 +0800 2010</created_at>
<id>3853748245</id>
<text>“希望那些喜欢用“枪打出头鸟”这样的道理教训年轻人,并且因此觉得自己很成熟的中国人有一天能够明白这样一个事实,那就是:有的鸟来到世间,是为了做它该做的事,而不是专门躲枪子儿的。”</text>
<source>
<a href=”http://t.sina.com.cn”>新浪微博</a>
</source>
<favorited>false</favorited>
<truncated>false</truncated>
<geo/>
<in_reply_to_status_id></in_reply_to_status_id>
<in_reply_to_user_id></in_reply_to_user_id>
<in_reply_to_screen_name></in_reply_to_screen_name>
<user>
<id>1672204023</id>
<screen_name>Ran-w</screen_name>
<name>Ran-w</name>
<province>11</province>
<city>5</city>
<location>北京 朝阳区</location>
<description>什么都不知道总比什么都知道要好。慢慢经历那个不知道的未来。</description>
<url>http://blog.sina.com.cn/wongr11</url>
<profile_image_url>http://tp4.sinaimg.cn/1672204023/50/1290577674/0</profile_image_url>
<domain>wongr</domain>
<gender>f</gender>
<followers_count>757</followers_count>
<friends_count>178</friends_count>
<statuses_count>521</statuses_count>
<favourites_count>4</favourites_count>
<created_at>Mon Dec 21 00:00:00 +0800 2009</created_at>
<following>false</following>
<verified>false</verified>
<allow_all_act_msg>false</allow_all_act_msg>
<geo_enabled>true</geo_enabled>
</user>
</retweeted_status>
</status>

status是博主发表的博文,retweeted_status是回复或者转发了哪条博文。

下载微博客户端

[转载]ASP.NET MVC单元测试时如何对含有ModelState.IsValid的Action进行测试

mikel阅读(1024)

[转载]ASP.NET MVC单元测试时如何对含有ModelState.IsValid的Action进行测试 – 我们需要什么 – 博客园.

下面的例子来至ASP.NET MVC 2的项目模板。

首先是一个实体类:

实体类

[PropertiesMustMatch("Password", "ConfirmPassword", ErrorMessage = "The password and confirmation password do not match.")] public class RegisterModel { [Required] [DisplayName("User name")] public string UserName { get; set; } [Required] [DataType(DataType.EmailAddress)] [DisplayName("Email address")] public string Email { get; set; } [Required] [ValidatePasswordLength] [DataType(DataType.Password)] [DisplayName("Password")] public string Password { get; set; } [Required] [DataType(DataType.Password)] [DisplayName("Confirm password")] public string ConfirmPassword { get; set; } }

然后是Action:

代码

[HttpPost] public ActionResult Register(RegisterModel model) { if (ModelState.IsValid) { // Attempt to register the user MembershipCreateStatus createStatus = MembershipService.CreateUser(model.UserName, model.Password, model.Email); if (createStatus == MembershipCreateStatus.Success) { FormsService.SignIn(model.UserName, false /* createPersistentCookie */); return RedirectToAction("Index", "Home"); } else { ModelState.AddModelError("", AccountValidation.ErrorCodeToString(createStatus)); } } // If we got this far, something failed, redisplay form ViewData["PasswordLength"] = MembershipService.MinPasswordLength; return View(model); }

如果你对这个Action写单元测试,你会发现没办法测试输入不完整的情况,比如下面的代码:

单元测试

[TestMethod()] public void RegisterTest() { AccountController target = new AccountController() RegisterModel model = new RegisterModel(); ActionResult actual; actual = target.Register(model); var view = actual as ViewResult; Assert.IsNotNull(view); Assert.IsNotNull(view.ViewData.ModelState["PasswordLength"]); }

这个单元测试不会跑完,因为注册的时候由于用户名是null,会抛出异常。因为这个判断:

if (ModelState.IsValid)

没有起作用,原因是ASP.NET MVC框架会在调用这个Action之前进行模型验证,由于单元测试直接测试这个Action,并没有进行模型验证的步骤,所以ModelState.IsValid仍然是默认值true,这个场景下无法验证传入的参数是否符合预期。

解决办法有2个,第一是编写单元测试的人知道模型是否正确,只要改变ModelState.ISValid的值即可。如下代码:

方法一

/// <summary> ///Register 的测试 ///</summary> [TestMethod()] public void RegisterTest() { AccountController target = new AccountController() RegisterModel model = new RegisterModel(); ActionResult actual; target.ViewData.ModelState.AddModelError("", "模型没有正确赋值"); actual = target.Register(model); var view = actual as ViewResult; Assert.IsNotNull(view); Assert.IsNotNull(view.ViewData.ModelState["PasswordLength"]); }

通过增加一个错误信息,ModelState.IsValid值就会被置位false,这样就可以测试Action中模型不正确的流程。这种解决办法的思 路是模型验证已经由微软ASP.NET MVC团队测试过了,无需再测试。如果你需要测试你配置的Attribute是否正确,可以在另外的地方测试,这和Action无关。

另外一种思路就是主动验证模型,并把验证结果添加到ModelState集合中去,这也就是ASP.NET MVC框架内部所作的工作。如果使用.Net 4.0,在System.ComponentModel.DataAnnotations命名空间中新增了ValidationContext类,可以在任何需要的地方对模型进行验证。这样只需要简单的写个帮助类,在单元测试中手动调用这个方法即可验证模型:

模型验证帮助类

public static void AddValidationErrors(this ModelStateDictionary modelState, object model) { var context = new ValidationContext(model, null, null); var results = new List<ValidationResult>(); Validator.TryValidateObject(model, context, results, true); foreach (var result in results) { var name = result.MemberNames.First(); modelState.AddModelError(name, result.ErrorMessage); } }

如果使用.Net 3.5,很遗憾,没有这个类,但是可以使用ASP.NET MVC内部框架的验证机制。Controller类中定义了一个方法:

protected internal bool TryValidateModel(object model); 这个方法对正确的模型,返回true,错误的返回false。这个方法并不是公开的,可以公开一个新的方法调用它。

public bool InvokeValidateModel(object model) { return TryValidateModel(model); }

最后代码如下:

最终代码

[TestMethod()] public void RegisterTest() { AccountController target = new AccountController() RegisterModel model = new RegisterModel(); ActionResult actual; target.InvokeValidateModel(model); actual = target.Register(model); var view = actual as ViewResult; Assert.IsNotNull(view); Assert.IsNotNull(view.ViewData.ModelState["PasswordLength"]); }

为了方便,可以把InvokeValidateModel方法定义在一个继承Controller的父类中。

通过上面两种办法,现在我们可以正确的测试包含了ModelState.IsValid代码的Action方法了。

[转载]c#导出Excel文件,多表加分页

mikel阅读(966)

[转载]c#导出Excel文件,多表加分页。。。 – {{°莪乖乖 – 博客园.

最近项目中需要导出Excel文件:

要求是这样的:

实现的没啥技术,就是调用了几个方法工具方法而已,以后备用


——————————-

——————————–

先看下基本功能吧–:

——————————–

——————————–

——————————–

——————————–

前台页面,只有俩按钮–~!

<%@ Page Language="C#" AutoEventWireup="true" CodeFile="ToExcle.aspx.cs" Inherits="Maps_ToExcle" %> <!DOCTYPE html PUBLIC "-//W3C//DTD XHTML 1.0 Transitional//EN" "http://www.w3.org/TR/xhtml1/DTD/xhtml1-transitional.dtd"> <html xmlns="http://www.w3.org/1999/xhtml"> <head runat="server"> <title></title> <script type="text/javascript" src="static/jquery-1.4.1.min.js"></script> <script type="text/javascript"> var currpage; var downurl = ""; //下载文件地址 var timer = ""; //定时器 var runcount = 0; //要输出的>个数 $(function() {//初始化绑定 $("#btn_toExcel").click(function() { $(this).attr("disabled", "disabled"); saveToExcelData(); }); $("#btn_downExcel").click(function() { btn_downExcel() }); }) function getAjax(_url) {//ajax操作 $.ajax({ url: _url, type: 'get', beforeSend: function(XMLHttpRequest) { $('#ajaxloadimg,#ajax_msg').show(); timer = window.setInterval("intervalRun()", 500); }, success: function(data, textStatus) { downurl = data; $('#ajaxloadimg').hide(); $("#btn_downExcel").attr("disabled", ""); window.clearInterval(timer); $('#ajax_msg').text("生成完毕,如没有自动下载,请点击下载按钮。"); openfile(data); }, error: function(XMLHttpRequest, textStatus) { $("#btn_toExcel").attr("disabled", ""); $('#ajaxloadimg').hide(); window.clearInterval(timer); $('#ajax_msg').text("生成错误,请重试。"); }, complete: function(XMLHttpRequest, textStatus) { window.clearInterval(timer); } }); } function saveToExcelData() {//设置要请求的地址数据 var url = 'ToExcelHandler.ashx?' + new Date() + '&action=test'; getAjax(url); } function openfile(_serverPath) {//打开下载对话框 var _left = (screen.width - 350) / 2; var _top = (screen.height - 130 - 63) / 2; var a = window.open(_serverPath, "_blank", "scrollbars=yes, resizable=yes,menubar=no,toolbar=yes,width=350,height=130,left=" + _left + ",top=" + _top); a.document.execCommand("SaveAs"); //a.close(); } function intervalRun() {//定时运行方法,提示用 runcount++; if (runcount > 3) { runcount = 0; } var _str = ""; for (var _i = 1; _i <= runcount; _i++) { _str += ">"; } $("#ajax_msg").text("正在生成打印文件,请稍后" + _str); } function btn_downExcel() {//下载按钮事件 openfile(downurl); } </script> </head> <body> <form id="form1" runat="server"> <div> <input id="btn_toExcel" type="button" value="导出" /> <input id="btn_downExcel" type="button" value="下载" disabled="disabled" /> <img style='display: none;' id='ajaxloadimg' src='image/ajax-loader.gif' alt="请稍后" />&nbsp;&nbsp;<span style="display: none; font-size: 12px; height: 20px; line-height: 20px;" id="ajax_msg"></span> </div> </form> </body> </html>

后台处理代码:

using System; using System.Web; using System.Reflection; using Microsoft.Office.Interop.Excel; using System.IO; using System.Collections; using System.Collections.Generic; using System.Web.SessionState; namespace prientExcel { public class ToExcelHandler : IHttpHandler, IRequiresSessionState { #region HttpRequest request = null; HttpResponse response = null; string action = string.Empty; object miss = Missing.Value; Dictionary<string, string> diction = new Dictionary<string, string>(); ArrayList arrayColName; ArrayList arrayShowName; ArrayList arrayType; dbcommeninit dbcmm = new dbcommeninit(); Application excelApp = null; Worksheet workSheet = null; string FilePath = @"打印数据.xls"; string DirPath = @"Download"; int TYPE = 0; System.Data.DataTable dt = null; List<string> tablename_list = new List<string>(); int recount = 0; int onpage = 1; int pagesize = 8; string tablename = ""; int LOOP1 = 1;//需要输出的分类数量 int LOOP2 = 1;//需要输出的工作表数量 #endregion public void ProcessRequest(HttpContext context) { request = context.Request; response = context.Response; action = request.Params["action"]; codeHandle(action); } #region 请求处理 private void codeHandle(string _action) { switch (_action) { case "test": createExcel(); break; default: break; } } #endregion private void DataTest() { tablename_list.Add("YG_PL_RPTDWZD"); tablename_list.Add("YG_PL_DIARYLEDGER"); tablename_list.Add("YG_PL_DWLEDGER"); //tablename_list.Add("YG_PL_KMYE"); //tablename_list.Add("YG_PL_WLLEDGER"); //tablename_list.Add("yg_pl_voucher"); } private void getDataTable(string _tablename) { recount = Convert.ToInt32(YG.DBUtility.DbHelperOra.ExecuteSql_obj("select count(*) from " + _tablename)); if (TYPE == 1) { recount = 10; } dt = YG.DBUtility.DbHelperOra.PageBind(_tablename, "", getColumns(_tablename), " id DESC", 20, onpage, out recount); dt.Columns.Remove("rk"); } #region Excel文件操作 /// <summary> /// 创建excel /// </summary> private void createExcel() { excelApp = new Application(); excelApp.Workbooks.Add(miss); DataTest(); int _workSheetCount = getWorkSheetCount();//获取需要的工作表数量 this.initExcel();//初始化EXCEL try { do { TYPE = LOOP1; workSheet = (Worksheet)excelApp.Worksheets[LOOP2]; workSheet.Activate(); tablename = tablename_list[LOOP1 - 1];//测试 getDataTable(tablename_list[LOOP1 - 1]); addDataExcelSheet(); LOOP1++; if (LOOP1 != tablename_list.Count + 1) { excelApp.Worksheets.Add(miss, (Worksheet)excelApp.Worksheets[LOOP2], miss, miss); LOOP2++; } workSheet = null; } while (LOOP1 != tablename_list.Count + 1); } catch (Exception ex) { } finally { getFilePath(); saveExcel(); resExcelStream(); } } /// <summary> /// Excel初始化,删除初始工作表,只留一个 /// </summary> /// <param name="_excelApp"></param> private void initExcel() { for (int i = excelApp.Worksheets.Count; i > 1; i--) { workSheet = (Worksheet)excelApp.Worksheets[i]; workSheet.Delete(); } } /// <summary> /// 保存excel文件 /// </summary> private void saveExcel() { workSheet = (Worksheet)excelApp.Worksheets[1]; workSheet.Activate(); Workbook _workBook = excelApp.Workbooks[1]; _workBook.RefreshAll(); string _truepath = HttpContext.Current.Server.MapPath(FilePath); System.IO.FileInfo _fi = new System.IO.FileInfo(_truepath); if (!Directory.Exists(_fi.DirectoryName))//判断目录是否存在 { Directory.CreateDirectory(_fi.DirectoryName); } if (System.IO.File.Exists(_truepath))//判断文件是否存在 { System.IO.File.Delete(_truepath); } _workBook.SaveAs(_truepath, miss, miss, miss, miss, miss, XlSaveAsAccessMode.xlNoChange, miss, miss, miss, miss, miss); _workBook.Close(false, miss, miss); _workBook = null; Kill(); GC.Collect(); } /// <summary> /// 杀死EXCEL进程 /// </summary> /// <param name="_eApp"></param> private void Kill() { IntPtr t = new IntPtr(excelApp.Hwnd); int k = 0; GetWindowThreadProcessId(t, out k); //得到本进程唯一标志k System.Diagnostics.Process p = System.Diagnostics.Process.GetProcessById(k); //得到对进程k的引用 p.Kill(); //关闭进程k } [System.Runtime.InteropServices.DllImport("User32.dll", CharSet = System.Runtime.InteropServices.CharSet.Auto)] public static extern int GetWindowThreadProcessId(IntPtr hwnd, out int ID); /// <summary> /// 输出生成的EXCEL地址 /// </summary> /// <param name="_path">相对路径</param> private void resExcelStream() { System.IO.FileInfo _fi = new System.IO.FileInfo(HttpContext.Current.Server.MapPath(FilePath));//FilePath为文件在服务器上的地址 response.Clear(); response.Buffer = true; response.Charset = "GBK"; //设置了类型为中文防止乱码的出现 //response.AppendHeader("Content-Disposition", String.Format("attachment;filename={0}", _path)); //定义输出文件和文件名 //response.AppendHeader("Content-Length", _fi.Length.ToString()); response.ContentEncoding = System.Text.Encoding.Default; response.ContentType = "text/HTML";//设置输出文件类型。因为是ajax接收不了文件流,只能返回文件地址了。 response.Write(reques t.UrlReferrer.OriginalString.Substring(0, request.UrlReferrer.OriginalString.LastIndexOf("/") + 1) + FilePath); response.Flush(); response.End(); } #endregion #region 工作表样式设置及初始化 /// <summary> /// Sheet样式初始化 /// </summary> /// <param name="_type">标志哪一类工作表,如果为1,则是第一张工作表</param> /// <param name="_workSheet"></param> private void initExcelSheet(int _rowCount, int _colCount) { switch (TYPE) { case 1: this.setStyleSheet_1(_rowCount, _colCount); break; default: this.setStyleSheet_default(_rowCount, _colCount); break; } } /// <summary> /// 设置公共样式 /// </summary> /// <param name="_workSheet"></param> /// <param name="_rowCount"></param> /// <param name="_colCount"></param> private void setStyleSheet(int _rowCount, int _colCount) { workSheet.get_Range(workSheet.Cells[1, 1], workSheet.Cells[_rowCount, _colCount]).Columns.AutoFit();//自动适应宽度 workSheet.get_Range(workSheet.Cells[1, 1], workSheet.Cells[_rowCount, _colCount]).Borders.LineStyle = 1; workSheet.get_Range(workSheet.Cells[1, 1], workSheet.Cells[_rowCount, _colCount]).HorizontalAlignment = Microsoft.Office.Interop.Excel.Constants.xlLeft; //_workSheet.get_Range(_workSheet.Cells[1, 1], _workSheet.Cells[_rowCount, 1]).Borders[XlBordersIndex.xlEdgeLeft].Weight = XlBorderWeight.xlThick;//设置左边线加粗 //_workSheet.get_Range(_workSheet.Cells[1, 1], _workSheet.Cells[1, _colCount]).Borders[XlBordersIndex.xlEdgeTop].Weight = XlBorderWeight.xlThick;//设置上边线加粗 //_workSheet.get_Range(_workSheet.Cells[1, _colCount], _workSheet.Cells[_rowCount, _colCount]).Borders[XlBordersIndex.xlEdgeRight].Weight = XlBorderWeight.xlThick;//设置右边线加粗 //_workSheet.get_Range(_workSheet.Cells[_rowCount, 1], _workSheet.Cells[_rowCount, _colCount]).Borders[XlBordersIndex.xlEdgeBottom].Weight = XlBorderWeight.xlThick;//设置下边线加粗 //double top = 0;//上边距 //double left = 0;//左边距 //double right = 0;//右边距 //double footer = 0; //下边距 //workSheet.PageSetup.TopMargin = excelApp.InchesToPoints(top / 2.54);////workSheet.PageSetup.BottomMargin = excelApp.InchesToPoints(footer / 2.54);////workSheet.PageSetup.LeftMargin = excelApp.InchesToPoints(left / 2.54);////workSheet.PageSetup.RightMargin = excelApp.InchesToPoints(right / 2.54);// workSheet.DisplayAutomaticPageBreaks = true;//显示分页线 workSheet.PageSetup.CenterFooter = "第 &P 页,共 &N 页"; workSheet.PageSetup.CenterHorizontally = true;//水平居中 //_workSheet.PageSetup.PrintTitleRows = "$1:$1";//顶端标题行 workSheet.PageSetup.PaperSize = Microsoft.Office.Interop.Excel.XlPaperSize.xlPaperA4;//A4纸张大小 workSheet.PageSetup.Orientation = Microsoft.Office.Interop.Excel.XlPageOrientation.xlPortrait;//纸张方向.纵向 } private void setStyleSheet_1(int _rowCount, int _colCount)//首页待打印属于特例,需要单独设置 { setStyleSheet(12 + _rowCount, 8);//页面设置 workSheet.get_Range(workSheet.Cells[1, 1], workSheet.Cells[12 + _rowCount, 8]).Borders.LineStyle = 0;//去掉所有边框 //实体数据上部表格设置 workSheet.get_Range(workSheet.Cells[1, 1], workSheet.Cells[1, 8]).MergeCells = true; workSheet.get_Range(workSheet.Cells[2, 1], workSheet.Cells[2, 8]).MergeCells = true; workSheet.get_Range(workSheet.Cells[3, 2], workSheet.Cells[3, 4]).MergeCells = true; workSheet.get_Range(workSheet.Cells[4, 2], workSheet.Cells[4, 4]).MergeCells = true; workSheet.get_Range(workSheet.Cells[3, 6], workSheet.Cells[3, 8]).MergeCells = true; workSheet.get_Range(workSheet.Cells[4, 6], workSheet.Cells[4, 8]).MergeCells = true; workSheet.get_Range(workSheet.Cells[5, 1], workSheet.Cells[5, 8]).MergeCells = true; workSheet.get_Range(workSheet.Cells[6, 1], workSheet.Cells[6, 8]).MergeCells = true; workSheet.get_Range(workSheet.Cells[7, 1], workSheet.Cells[7, 8]).MergeCells = true; //实体数据部分 for (int i = 7; i <= _rowCount + 7 + 1; i++) { workSheet.get_Range(workSheet.Cells[i, 1], workSheet.Cells[i, 4]).MergeCells = true; //workSheet.get_Range(workSheet.Cells[i, 3], workSheet.Cells[i, 4]).MergeCells = true; workSheet.get_Range(workSheet.Cells[i, 5], workSheet.Cells[i, 8]).MergeCells = true; } workSheet.get_Range(workSheet.Cells[8, 1], workSheet.Cells[7 + _rowCount, 8]).Borders.LineStyle = 1; //接收人上下表格设置 workSheet.get_Range(workSheet.Cells[8 + _rowCount, 1], workSheet.Cells[8 + _rowCount, 8]).MergeCells = true; workSheet.get_Range(workSheet.Cells[9 + _rowCount, 1], workSheet.Cells[9 + _rowCount, 8]).MergeCells = false; workSheet.get_Range(workSheet.Cells[9 + _rowCount, 2], workSheet.Cells[9 + _rowCount, 8]).MergeCells = true; //workSheet.get_Range(workSheet.Cells[9 + _rowCount, 2], workSheet.Cells[9 + _rowCount, 8]).Borders.LineStyle = 1; workSheet.get_Range(workSheet.Cells[10 + _rowCount, 1], workSheet.Cells[10 + _rowCount, 8]).MergeCells = true; //审核接收意见部分设置 workSheet.get_Range(workSheet.Cells[11 + _rowCount, 1], workSheet.Cells[11 + _rowCount, 8]).MergeCells = true; workSheet.get_Range(workSheet.Cells[12 + _rowCount, 1], workSheet.Cells[12 + _rowCount, 1]).MergeCells = true; workSheet.get_Range(workSheet.Cells[12 + _rowCount, 2], workSheet.Cells[12 + _rowCount, 4]).MergeCells = true; workSheet.get_Range(workSheet.Cells[12 + _rowCount, 5], workSheet.Cells[12 + _rowCount, 5]).MergeCells = true; workSheet.get_Range(workSheet.Cells[12 + _rowCount, 6], workSheet.Cells[12 + _rowCount, 8]).MergeCells = true; workSheet.get_Range(workSheet.Cells[1, 1], workSheet.Cells[1, 8]).Font.Size = 28; workSheet.get_Range(workSheet.Cells[5, 1], workSheet.Cells[5, 1]).Font.Size = 16; workSheet.get_Range(workSheet.Cells[1, 1], workSheet.Cells[1, 8]).Font.Bold = true; workSheet.get_Range(workSheet.Cells[6, 1], workSheet.Cells[6, 1]).Font.Bold = true; workSheet.get_Range(workSheet.Cells[1, 1], workSheet.Cells[1, 8]).HorizontalAlignment = Microsoft.Office.Interop.Excel.Constants.xlCenter; workSheet.get_Range(workSheet.Cells[8, 1], workSheet.Cells[8, 8]).Interior.ColorIndex = 15; workSheet.Cells[1, 1] = "移交单"; workSheet.Cells[2, 1] = "移交信息:"; workSheet.Cells[3, 1] = "移交单号:"; workSheet.Cells[3, 2] = "_________________________"; workSheet.Cells[3, 5] = "移交日期:"; workSheet.Cells[3, 6] = "_________________________"; workSheet.Cells[4, 1] = "移 交 人:"; workSheet.Cells[4, 2] = "_________________________"; workSheet.Cells[4, 5] = "所属部门:"; workSheet.Cells[4, 6] = "_________________________"; workSheet.Cells[6, 1] = @"目录结构\..\.."; workSheet.Cells[7, 1] = @"移交内容:"; workSheet.Cells[8, 1] = @"分类"; workSheet.Cells[8, 5] = @"数量"; workSheet.Cells[9 + _rowCount, 1] = @"接收人:"; workSheet.Cells[9 + _rowCount, 2] = "_________________________"; workSheet.Cells[11 + _rowCount, 1] = @"意见:"; workSheet.Cells[12 + _rowCount, 1] = @"提交意见"; workSheet.Cells[12 + _rowCount, 2] = "_________________________"; workSheet.Cells[12 + _rowCount, 5] = @"接收意见"; workSheet.Cells[12 + _rowCount, 6] = "_________________________"; } private void setStyleSheet_default(int _rowCount, int _colCount) { this.setStyleSheet(_rowCount, _colCount); workSheet.get_Range(workSheet.Cells[1, 1], workSheet.Cells[1, _colCount]).Font.Bold = true; workSheet.PageSetup.PrintTitleRows = "$1:$1";//设置打印表头 } #endregion #region 向工作表添加数据 /// <summary> /// 向工作表添加数据 /// </summary> /// <param name="_type"></param> /// <param name="_workSheet"></param> /// <param name="_dt"></param> private void addDataExcelSheet() { switch (TYPE) { case 1: this.addDataSheet_1(); break; default: this.addDataSheet_default(); break; } } private void addDataSheet_1() { workSheet.Name = "移交单"; initExcelSheet(dt.Rows.Count, dt.Columns.Count); } private void addDataSheet_default() { int _pagecount = getPageCount(pagesize, dt.Rows.Count); System.Data.DataTable _dt = null; for (int _i = 1; _i <= _pagecount; _i++)//分页打印数据 { workSheet.Name = tablename + "-" + _i;//重命名工作表 _dt = new System.Data.DataTable(); _dt = GetPagedTable(pagesize, _i);//获取分页(工作表)数据 initExcelSheet(_dt.Rows.Count + 1, _dt.Columns.Count);//当前工作表初始化 for (int i = 1; i <= _dt.Rows.Count + 1; i++)//要打印的工作表行数(由于加上表头,所以加1) { for (int j = 1; j <= _dt.Columns.Count; j++)//待打印数据的列数 { if (i == 1)//设置表头数据 { workSheet.Cells[i, j] = diction.ContainsKey(_dt.Columns[j - 1].ColumnName.ToLower()) ? diction[_dt.Columns[j - 1].ColumnName.ToLower()] : ""; } else//其余行 { workSheet.Cells[i, j] = _dt.Rows[i - 2][j - 1]; } } } if (_i != _pagecount)//判断待打印数据的当前页是不是最后一页,不是则在当前工作表后添加一张工作表 { excelApp.Worksheets.Add(miss, (Worksheet)excelApp.Worksheets[LOOP2], miss, miss); LOOP2++; workSheet = (Worksheet)excelApp.Worksheets[LOOP2]; workSheet.Activate(); } } } #endregion #region GetPagedTable DataTable分页 /// <summary> /// DataTable分页 /// </summary> /// <param name="dt">DataTable</param> /// <param name="PageIndex">页索引,注意:从1开始</param> /// <param name="PageSize">每页大小</param> /// <returns></returns> public System.Data.DataTable GetPagedTable(int _PageSize, int _PageIndex) { if (_PageIndex == 0) return dt; System.Data.DataTable newdt = dt.Copy(); newdt.Clear(); int rowbegin = (_PageIndex - 1) * _PageSize; int rowend = _PageIndex * _PageSize; if (rowbegin >= dt.Rows.Count) return newdt; if (rowend > dt.Rows.Count) rowend = dt.Rows.Count; for (int i = rowbegin; i <= rowend - 1; i++) { System.Data.DataRow newdr = newdt.NewRow(); System.Data.DataRow dr = dt.Rows[i]; foreach (System.Data.DataColumn column in dt.Columns) { newdr[column.ColumnName] = dr[column.ColumnName]; } newdt.Rows.Add(newdr); } return newdt; } #endregion /// <summary> ///计算总页数,循环添加数据 /// </summary> /// <param name="_pagesize"></param> /// <param name="_recount"></param> /// <returns></returns> private int getPageCount(int _pagesize, int _recount) { int _pagecount = 0; _pagecount = (_recount + _pagesize - 1) / _pagesize; if (_pagecount == 0) { _pagecount = 1; } return _pagecount; } /// <summary> /// 计算工作表数量(此时返回数量不包括将来分页后的数量) /// </summary> private int getWorkSheetCount() { int _workSheetCount = tablename_list.Count; if (_workSheetCount > excelApp.Sheets.Count) { return _workSheetCount; } return _workSheetCount; } /// <summary> /// 添加表头,作废,暂时只用于插入一行改变dt的行数 /// </summary> private void insertTableName() { System.Data.DataRow _dr = dt.NewRow(); //for (int i = 0; i < _dt.Columns.Count; i++) //{ // _dr[i] = diction.ContainsKey(_dt.Columns[i].ColumnName.ToLower()) ? diction[_dt.Columns[i].ColumnName.ToLower()] : _dt.Columns[i].ColumnName; //} dt.Rows.InsertAt(_dr, 0); } /// <summary> /// 检索表信息,取得汉化表头信息 /// </summary> /// <returns>返回select字段</returns> private string getColumns(string _tabName) { string allColumns = dbcmm.f_str0(_tabName).ToLower(); arrayColName = dbcmm.getFieldName0(allColumns, 0); arrayShowName = dbcmm.getFieldName0(allColumns, 1); arrayType = dbcmm.getFieldName0(allColumns, 2); string _select = dbcmm.getColsName0(arrayColName, arrayType); ArryToDict(arrayColName, arrayShowName); return _select; } /// <summary> /// 获取ColName和ShowName键值对 /// </summary> /// <param name="_arrayColName">列名</param> /// <param name="_arrayShowName">汉化名</param> private void ArryToDict(ArrayList _arrayColName, ArrayList _arrayShowName) { for (int _i = 0; _i < _arrayColName.Count; _i++) { if (!diction.ContainsKey(_arrayColName[_i].ToString())) { diction.Add(_arrayColName[_i].ToString(), _arrayShowName[_i].ToString()); } } } private void getFilePath() { string _fileName = string.Empty; _fileName = DateTime.Now.ToString("yyyyMMddhhmmss"); FilePath = DirPath + "/" + _fileName + ".xls"; } public bool IsReusable { get { return false; } } } }

[转载]c#导出Excel文件,多表加分页

mikel阅读(1097)

[转载]c#导出Excel文件,多表加分页。。。 – {{°莪乖乖 – 博客园.

最近项目中需要导出Excel文件:

要求是这样的:

实现的没啥技术,就是调用了几个方法工具方法而已,以后备用


——————————-

——————————–

先看下基本功能吧–:

——————————–

——————————–

——————————–

——————————–

前台页面,只有俩按钮–~!

<%@ Page Language="C#" AutoEventWireup="true" CodeFile="ToExcle.aspx.cs" Inherits="Maps_ToExcle" %> <!DOCTYPE html PUBLIC "-//W3C//DTD XHTML 1.0 Transitional//EN" "http://www.w3.org/TR/xhtml1/DTD/xhtml1-transitional.dtd"> <html xmlns="http://www.w3.org/1999/xhtml"> <head runat="server"> <title></title> <script type="text/javascript" src="static/jquery-1.4.1.min.js"></script> <script type="text/javascript"> var currpage; var downurl = ""; //下载文件地址 var timer = ""; //定时器 var runcount = 0; //要输出的>个数 $(function() {//初始化绑定 $("#btn_toExcel").click(function() { $(this).attr("disabled", "disabled"); saveToExcelData(); }); $("#btn_downExcel").click(function() { btn_downExcel() }); }) function getAjax(_url) {//ajax操作 $.ajax({ url: _url, type: 'get', beforeSend: function(XMLHttpRequest) { $('#ajaxloadimg,#ajax_msg').show(); timer = window.setInterval("intervalRun()", 500); }, success: function(data, textStatus) { downurl = data; $('#ajaxloadimg').hide(); $("#btn_downExcel").attr("disabled", ""); window.clearInterval(timer); $('#ajax_msg').text("生成完毕,如没有自动下载,请点击下载按钮。"); openfile(data); }, error: function(XMLHttpRequest, textStatus) { $("#btn_toExcel").attr("disabled", ""); $('#ajaxloadimg').hide(); window.clearInterval(timer); $('#ajax_msg').text("生成错误,请重试。"); }, complete: function(XMLHttpRequest, textStatus) { window.clearInterval(timer); } }); } function saveToExcelData() {//设置要请求的地址数据 var url = 'ToExcelHandler.ashx?' + new Date() + '&action=test'; getAjax(url); } function openfile(_serverPath) {//打开下载对话框 var _left = (screen.width - 350) / 2; var _top = (screen.height - 130 - 63) / 2; var a = window.open(_serverPath, "_blank", "scrollbars=yes, resizable=yes,menubar=no,toolbar=yes,width=350,height=130,left=" + _left + ",top=" + _top); a.document.execCommand("SaveAs"); //a.close(); } function intervalRun() {//定时运行方法,提示用 runcount++; if (runcount > 3) { runcount = 0; } var _str = ""; for (var _i = 1; _i <= runcount; _i++) { _str += ">"; } $("#ajax_msg").text("正在生成打印文件,请稍后" + _str); } function btn_downExcel() {//下载按钮事件 openfile(downurl); } </script> </head> <body> <form id="form1" runat="server"> <div> <input id="btn_toExcel" type="button" value="导出" /> <input id="btn_downExcel" type="button" value="下载" disabled="disabled" /> <img style='display: none;' id='ajaxloadimg' src='image/ajax-loader.gif' alt="请稍后" />&nbsp;&nbsp;<span style="display: none; font-size: 12px; height: 20px; line-height: 20px;" id="ajax_msg"></span> </div> </form> </body> </html>

后台处理代码:

using System; using System.Web; using System.Reflection; using Microsoft.Office.Interop.Excel; using System.IO; using System.Collections; using System.Collections.Generic; using System.Web.SessionState; namespace prientExcel { public class ToExcelHandler : IHttpHandler, IRequiresSessionState { #region HttpRequest request = null; HttpResponse response = null; string action = string.Empty; object miss = Missing.Value; Dictionary<string, string> diction = new Dictionary<string, string>(); ArrayList arrayColName; ArrayList arrayShowName; ArrayList arrayType; dbcommeninit dbcmm = new dbcommeninit(); Application excelApp = null; Worksheet workSheet = null; string FilePath = @"打印数据.xls"; string DirPath = @"Download"; int TYPE = 0; System.Data.DataTable dt = null; List<string> tablename_list = new List<string>(); int recount = 0; int onpage = 1; int pagesize = 8; string tablename = ""; int LOOP1 = 1;//需要输出的分类数量 int LOOP2 = 1;//需要输出的工作表数量 #endregion public void ProcessRequest(HttpContext context) { request = context.Request; response = context.Response; action = request.Params["action"]; codeHandle(action); } #region 请求处理 private void codeHandle(string _action) { switch (_action) { case "test": createExcel(); break; default: break; } } #endregion private void DataTest() { tablename_list.Add("YG_PL_RPTDWZD"); tablename_list.Add("YG_PL_DIARYLEDGER"); tablename_list.Add("YG_PL_DWLEDGER"); //tablename_list.Add("YG_PL_KMYE"); //tablename_list.Add("YG_PL_WLLEDGER"); //tablename_list.Add("yg_pl_voucher"); } private void getDataTable(string _tablename) { recount = Convert.ToInt32(YG.DBUtility.DbHelperOra.ExecuteSql_obj("select count(*) from " + _tablename)); if (TYPE == 1) { recount = 10; } dt = YG.DBUtility.DbHelperOra.PageBind(_tablename, "", getColumns(_tablename), " id DESC", 20, onpage, out recount); dt.Columns.Remove("rk"); } #region Excel文件操作 /// <summary> /// 创建excel /// </summary> private void createExcel() { excelApp = new Application(); excelApp.Workbooks.Add(miss); DataTest(); int _workSheetCount = getWorkSheetCount();//获取需要的工作表数量 this.initExcel();//初始化EXCEL try { do { TYPE = LOOP1; workSheet = (Worksheet)excelApp.Worksheets[LOOP2]; workSheet.Activate(); tablename = tablename_list[LOOP1 - 1];//测试 getDataTable(tablename_list[LOOP1 - 1]); addDataExcelSheet(); LOOP1++; if (LOOP1 != tablename_list.Count + 1) { excelApp.Worksheets.Add(miss, (Worksheet)excelApp.Worksheets[LOOP2], miss, miss); LOOP2++; } workSheet = null; } while (LOOP1 != tablename_list.Count + 1); } catch (Exception ex) { } finally { getFilePath(); saveExcel(); resExcelStream(); } } /// <summary> /// Excel初始化,删除初始工作表,只留一个 /// </summary> /// <param name="_excelApp"></param> private void initExcel() { for (int i = excelApp.Worksheets.Count; i > 1; i--) { workSheet = (Worksheet)excelApp.Worksheets[i]; workSheet.Delete(); } } /// <summary> /// 保存excel文件 /// </summary> private void saveExcel() { workSheet = (Worksheet)excelApp.Worksheets[1]; workSheet.Activate(); Workbook _workBook = excelApp.Workbooks[1]; _workBook.RefreshAll(); string _truepath = HttpContext.Current.Server.MapPath(FilePath); System.IO.FileInfo _fi = new System.IO.FileInfo(_truepath); if (!Directory.Exists(_fi.DirectoryName))//判断目录是否存在 { Directory.CreateDirectory(_fi.DirectoryName); } if (System.IO.File.Exists(_truepath))//判断文件是否存在 { System.IO.File.Delete(_truepath); } _workBook.SaveAs(_truepath, miss, miss, miss, miss, miss, XlSaveAsAccessMode.xlNoChange, miss, miss, miss, miss, miss); _workBook.Close(false, miss, miss); _workBook = null; Kill(); GC.Collect(); } /// <summary> /// 杀死EXCEL进程 /// </summary> /// <param name="_eApp"></param> private void Kill() { IntPtr t = new IntPtr(excelApp.Hwnd); int k = 0; GetWindowThreadProcessId(t, out k); //得到本进程唯一标志k System.Diagnostics.Process p = System.Diagnostics.Process.GetProcessById(k); //得到对进程k的引用 p.Kill(); //关闭进程k } [System.Runtime.InteropServices.DllImport("User32.dll", CharSet = System.Runtime.InteropServices.CharSet.Auto)] public static extern int GetWindowThreadProcessId(IntPtr hwnd, out int ID); /// <summary> /// 输出生成的EXCEL地址 /// </summary> /// <param name="_path">相对路径</param> private void resExcelStream() { System.IO.FileInfo _fi = new System.IO.FileInfo(HttpContext.Current.Server.MapPath(FilePath));//FilePath为文件在服务器上的地址 response.Clear(); response.Buffer = true; response.Charset = "GBK"; //设置了类型为中文防止乱码的出现 //response.AppendHeader("Content-Disposition", String.Format("attachment;filename={0}", _path)); //定义输出文件和文件名 //response.AppendHeader("Content-Length", _fi.Length.ToString()); response.ContentEncoding = System.Text.Encoding.Default; response.ContentType = "text/HTML";//设置输出文件类型。因为是ajax接收不了文件流,只能返回文件地址了。 response.Write(reques t.UrlReferrer.OriginalString.Substring(0, request.UrlReferrer.OriginalString.LastIndexOf("/") + 1) + FilePath); response.Flush(); response.End(); } #endregion #region 工作表样式设置及初始化 /// <summary> /// Sheet样式初始化 /// </summary> /// <param name="_type">标志哪一类工作表,如果为1,则是第一张工作表</param> /// <param name="_workSheet"></param> private void initExcelSheet(int _rowCount, int _colCount) { switch (TYPE) { case 1: this.setStyleSheet_1(_rowCount, _colCount); break; default: this.setStyleSheet_default(_rowCount, _colCount); break; } } /// <summary> /// 设置公共样式 /// </summary> /// <param name="_workSheet"></param> /// <param name="_rowCount"></param> /// <param name="_colCount"></param> private void setStyleSheet(int _rowCount, int _colCount) { workSheet.get_Range(workSheet.Cells[1, 1], workSheet.Cells[_rowCount, _colCount]).Columns.AutoFit();//自动适应宽度 workSheet.get_Range(workSheet.Cells[1, 1], workSheet.Cells[_rowCount, _colCount]).Borders.LineStyle = 1; workSheet.get_Range(workSheet.Cells[1, 1], workSheet.Cells[_rowCount, _colCount]).HorizontalAlignment = Microsoft.Office.Interop.Excel.Constants.xlLeft; //_workSheet.get_Range(_workSheet.Cells[1, 1], _workSheet.Cells[_rowCount, 1]).Borders[XlBordersIndex.xlEdgeLeft].Weight = XlBorderWeight.xlThick;//设置左边线加粗 //_workSheet.get_Range(_workSheet.Cells[1, 1], _workSheet.Cells[1, _colCount]).Borders[XlBordersIndex.xlEdgeTop].Weight = XlBorderWeight.xlThick;//设置上边线加粗 //_workSheet.get_Range(_workSheet.Cells[1, _colCount], _workSheet.Cells[_rowCount, _colCount]).Borders[XlBordersIndex.xlEdgeRight].Weight = XlBorderWeight.xlThick;//设置右边线加粗 //_workSheet.get_Range(_workSheet.Cells[_rowCount, 1], _workSheet.Cells[_rowCount, _colCount]).Borders[XlBordersIndex.xlEdgeBottom].Weight = XlBorderWeight.xlThick;//设置下边线加粗 //double top = 0;//上边距 //double left = 0;//左边距 //double right = 0;//右边距 //double footer = 0; //下边距 //workSheet.PageSetup.TopMargin = excelApp.InchesToPoints(top / 2.54);////workSheet.PageSetup.BottomMargin = excelApp.InchesToPoints(footer / 2.54);////workSheet.PageSetup.LeftMargin = excelApp.InchesToPoints(left / 2.54);////workSheet.PageSetup.RightMargin = excelApp.InchesToPoints(right / 2.54);// workSheet.DisplayAutomaticPageBreaks = true;//显示分页线 workSheet.PageSetup.CenterFooter = "第 &P 页,共 &N 页"; workSheet.PageSetup.CenterHorizontally = true;//水平居中 //_workSheet.PageSetup.PrintTitleRows = "$1:$1";//顶端标题行 workSheet.PageSetup.PaperSize = Microsoft.Office.Interop.Excel.XlPaperSize.xlPaperA4;//A4纸张大小 workSheet.PageSetup.Orientation = Microsoft.Office.Interop.Excel.XlPageOrientation.xlPortrait;//纸张方向.纵向 } private void setStyleSheet_1(int _rowCount, int _colCount)//首页待打印属于特例,需要单独设置 { setStyleSheet(12 + _rowCount, 8);//页面设置 workSheet.get_Range(workSheet.Cells[1, 1], workSheet.Cells[12 + _rowCount, 8]).Borders.LineStyle = 0;//去掉所有边框 //实体数据上部表格设置 workSheet.get_Range(workSheet.Cells[1, 1], workSheet.Cells[1, 8]).MergeCells = true; workSheet.get_Range(workSheet.Cells[2, 1], workSheet.Cells[2, 8]).MergeCells = true; workSheet.get_Range(workSheet.Cells[3, 2], workSheet.Cells[3, 4]).MergeCells = true; workSheet.get_Range(workSheet.Cells[4, 2], workSheet.Cells[4, 4]).MergeCells = true; workSheet.get_Range(workSheet.Cells[3, 6], workSheet.Cells[3, 8]).MergeCells = true; workSheet.get_Range(workSheet.Cells[4, 6], workSheet.Cells[4, 8]).MergeCells = true; workSheet.get_Range(workSheet.Cells[5, 1], workSheet.Cells[5, 8]).MergeCells = true; workSheet.get_Range(workSheet.Cells[6, 1], workSheet.Cells[6, 8]).MergeCells = true; workSheet.get_Range(workSheet.Cells[7, 1], workSheet.Cells[7, 8]).MergeCells = true; //实体数据部分 for (int i = 7; i <= _rowCount + 7 + 1; i++) { workSheet.get_Range(workSheet.Cells[i, 1], workSheet.Cells[i, 4]).MergeCells = true; //workSheet.get_Range(workSheet.Cells[i, 3], workSheet.Cells[i, 4]).MergeCells = true; workSheet.get_Range(workSheet.Cells[i, 5], workSheet.Cells[i, 8]).MergeCells = true; } workSheet.get_Range(workSheet.Cells[8, 1], workSheet.Cells[7 + _rowCount, 8]).Borders.LineStyle = 1; //接收人上下表格设置 workSheet.get_Range(workSheet.Cells[8 + _rowCount, 1], workSheet.Cells[8 + _rowCount, 8]).MergeCells = true; workSheet.get_Range(workSheet.Cells[9 + _rowCount, 1], workSheet.Cells[9 + _rowCount, 8]).MergeCells = false; workSheet.get_Range(workSheet.Cells[9 + _rowCount, 2], workSheet.Cells[9 + _rowCount, 8]).MergeCells = true; //workSheet.get_Range(workSheet.Cells[9 + _rowCount, 2], workSheet.Cells[9 + _rowCount, 8]).Borders.LineStyle = 1; workSheet.get_Range(workSheet.Cells[10 + _rowCount, 1], workSheet.Cells[10 + _rowCount, 8]).MergeCells = true; //审核接收意见部分设置 workSheet.get_Range(workSheet.Cells[11 + _rowCount, 1], workSheet.Cells[11 + _rowCount, 8]).MergeCells = true; workSheet.get_Range(workSheet.Cells[12 + _rowCount, 1], workSheet.Cells[12 + _rowCount, 1]).MergeCells = true; workSheet.get_Range(workSheet.Cells[12 + _rowCount, 2], workSheet.Cells[12 + _rowCount, 4]).MergeCells = true; workSheet.get_Range(workSheet.Cells[12 + _rowCount, 5], workSheet.Cells[12 + _rowCount, 5]).MergeCells = true; workSheet.get_Range(workSheet.Cells[12 + _rowCount, 6], workSheet.Cells[12 + _rowCount, 8]).MergeCells = true; workSheet.get_Range(workSheet.Cells[1, 1], workSheet.Cells[1, 8]).Font.Size = 28; workSheet.get_Range(workSheet.Cells[5, 1], workSheet.Cells[5, 1]).Font.Size = 16; workSheet.get_Range(workSheet.Cells[1, 1], workSheet.Cells[1, 8]).Font.Bold = true; workSheet.get_Range(workSheet.Cells[6, 1], workSheet.Cells[6, 1]).Font.Bold = true; workSheet.get_Range(workSheet.Cells[1, 1], workSheet.Cells[1, 8]).HorizontalAlignment = Microsoft.Office.Interop.Excel.Constants.xlCenter; workSheet.get_Range(workSheet.Cells[8, 1], workSheet.Cells[8, 8]).Interior.ColorIndex = 15; workSheet.Cells[1, 1] = "移交单"; workSheet.Cells[2, 1] = "移交信息:"; workSheet.Cells[3, 1] = "移交单号:"; workSheet.Cells[3, 2] = "_________________________"; workSheet.Cells[3, 5] = "移交日期:"; workSheet.Cells[3, 6] = "_________________________"; workSheet.Cells[4, 1] = "移 交 人:"; workSheet.Cells[4, 2] = "_________________________"; workSheet.Cells[4, 5] = "所属部门:"; workSheet.Cells[4, 6] = "_________________________"; workSheet.Cells[6, 1] = @"目录结构\..\.."; workSheet.Cells[7, 1] = @"移交内容:"; workSheet.Cells[8, 1] = @"分类"; workSheet.Cells[8, 5] = @"数量"; workSheet.Cells[9 + _rowCount, 1] = @"接收人:"; workSheet.Cells[9 + _rowCount, 2] = "_________________________"; workSheet.Cells[11 + _rowCount, 1] = @"意见:"; workSheet.Cells[12 + _rowCount, 1] = @"提交意见"; workSheet.Cells[12 + _rowCount, 2] = "_________________________"; workSheet.Cells[12 + _rowCount, 5] = @"接收意见"; workSheet.Cells[12 + _rowCount, 6] = "_________________________"; } private void setStyleSheet_default(int _rowCount, int _colCount) { this.setStyleSheet(_rowCount, _colCount); workSheet.get_Range(workSheet.Cells[1, 1], workSheet.Cells[1, _colCount]).Font.Bold = true; workSheet.PageSetup.PrintTitleRows = "$1:$1";//设置打印表头 } #endregion #region 向工作表添加数据 /// <summary> /// 向工作表添加数据 /// </summary> /// <param name="_type"></param> /// <param name="_workSheet"></param> /// <param name="_dt"></param> private void addDataExcelSheet() { switch (TYPE) { case 1: this.addDataSheet_1(); break; default: this.addDataSheet_default(); break; } } private void addDataSheet_1() { workSheet.Name = "移交单"; initExcelSheet(dt.Rows.Count, dt.Columns.Count); } private void addDataSheet_default() { int _pagecount = getPageCount(pagesize, dt.Rows.Count); System.Data.DataTable _dt = null; for (int _i = 1; _i <= _pagecount; _i++)//分页打印数据 { workSheet.Name = tablename + "-" + _i;//重命名工作表 _dt = new System.Data.DataTable(); _dt = GetPagedTable(pagesize, _i);//获取分页(工作表)数据 initExcelSheet(_dt.Rows.Count + 1, _dt.Columns.Count);//当前工作表初始化 for (int i = 1; i <= _dt.Rows.Count + 1; i++)//要打印的工作表行数(由于加上表头,所以加1) { for (int j = 1; j <= _dt.Columns.Count; j++)//待打印数据的列数 { if (i == 1)//设置表头数据 { workSheet.Cells[i, j] = diction.ContainsKey(_dt.Columns[j - 1].ColumnName.ToLower()) ? diction[_dt.Columns[j - 1].ColumnName.ToLower()] : ""; } else//其余行 { workSheet.Cells[i, j] = _dt.Rows[i - 2][j - 1]; } } } if (_i != _pagecount)//判断待打印数据的当前页是不是最后一页,不是则在当前工作表后添加一张工作表 { excelApp.Worksheets.Add(miss, (Worksheet)excelApp.Worksheets[LOOP2], miss, miss); LOOP2++; workSheet = (Worksheet)excelApp.Worksheets[LOOP2]; workSheet.Activate(); } } } #endregion #region GetPagedTable DataTable分页 /// <summary> /// DataTable分页 /// </summary> /// <param name="dt">DataTable</param> /// <param name="PageIndex">页索引,注意:从1开始</param> /// <param name="PageSize">每页大小</param> /// <returns></returns> public System.Data.DataTable GetPagedTable(int _PageSize, int _PageIndex) { if (_PageIndex == 0) return dt; System.Data.DataTable newdt = dt.Copy(); newdt.Clear(); int rowbegin = (_PageIndex - 1) * _PageSize; int rowend = _PageIndex * _PageSize; if (rowbegin >= dt.Rows.Count) return newdt; if (rowend > dt.Rows.Count) rowend = dt.Rows.Count; for (int i = rowbegin; i <= rowend - 1; i++) { System.Data.DataRow newdr = newdt.NewRow(); System.Data.DataRow dr = dt.Rows[i]; foreach (System.Data.DataColumn column in dt.Columns) { newdr[column.ColumnName] = dr[column.ColumnName]; } newdt.Rows.Add(newdr); } return newdt; } #endregion /// <summary> ///计算总页数,循环添加数据 /// </summary> /// <param name="_pagesize"></param> /// <param name="_recount"></param> /// <returns></returns> private int getPageCount(int _pagesize, int _recount) { int _pagecount = 0; _pagecount = (_recount + _pagesize - 1) / _pagesize; if (_pagecount == 0) { _pagecount = 1; } return _pagecount; } /// <summary> /// 计算工作表数量(此时返回数量不包括将来分页后的数量) /// </summary> private int getWorkSheetCount() { int _workSheetCount = tablename_list.Count; if (_workSheetCount > excelApp.Sheets.Count) { return _workSheetCount; } return _workSheetCount; } /// <summary> /// 添加表头,作废,暂时只用于插入一行改变dt的行数 /// </summary> private void insertTableName() { System.Data.DataRow _dr = dt.NewRow(); //for (int i = 0; i < _dt.Columns.Count; i++) //{ // _dr[i] = diction.ContainsKey(_dt.Columns[i].ColumnName.ToLower()) ? diction[_dt.Columns[i].ColumnName.ToLower()] : _dt.Columns[i].ColumnName; //} dt.Rows.InsertAt(_dr, 0); } /// <summary> /// 检索表信息,取得汉化表头信息 /// </summary> /// <returns>返回select字段</returns> private string getColumns(string _tabName) { string allColumns = dbcmm.f_str0(_tabName).ToLower(); arrayColName = dbcmm.getFieldName0(allColumns, 0); arrayShowName = dbcmm.getFieldName0(allColumns, 1); arrayType = dbcmm.getFieldName0(allColumns, 2); string _select = dbcmm.getColsName0(arrayColName, arrayType); ArryToDict(arrayColName, arrayShowName); return _select; } /// <summary> /// 获取ColName和ShowName键值对 /// </summary> /// <param name="_arrayColName">列名</param> /// <param name="_arrayShowName">汉化名</param> private void ArryToDict(ArrayList _arrayColName, ArrayList _arrayShowName) { for (int _i = 0; _i < _arrayColName.Count; _i++) { if (!diction.ContainsKey(_arrayColName[_i].ToString())) { diction.Add(_arrayColName[_i].ToString(), _arrayShowName[_i].ToString()); } } } private void getFilePath() { string _fileName = string.Empty; _fileName = DateTime.Now.ToString("yyyyMMddhhmmss"); FilePath = DirPath + "/" + _fileName + ".xls"; } public bool IsReusable { get { return false; } } } }

[转载]新浪微博客户端开发笔记(3) 如何添加异步测试并模拟异步方法

mikel阅读(921)

[转载]新浪微博客户端围脖七开发笔记(3) 如何添加异步测试并模拟异步方法 – 上尉 – 博客园.

这几天在研究如何进行异步测试, silverlight unit test framework提供了相应支持,异步在这个framework中的含义就是把一些额外的任务排队并稍后执行。 比如有一个request()方法是异步的,一般情况下呼叫这个方法之后无法直接测试返回的结果;但在测试方法TestRequest()中,呼叫 request()后可以加入一些额外任务到一个队列中,在退出TestRequest()后执行这些任务。说起来有些拗口看下图会明白些:

左边是正常的测试方法,右边是异步测试

一般运用下面四个方法添加任务到队列中:

EnqueueTestComplete() – 添加一个TestComplete()到队列中,这个方法告知framework测试结束了。
EnqueueCallback() – 添加一个任务到队列
EnqueueConditional() – 添加一个条件判断到队列,如果为true才继续执行
EnqueueDelay() – 添加一些等待时间到队列

下图演示了如何实际使用:

下面回到项目中,看看具体如何做:

1.添加一个MockSinaService:

代码

public class MockSinaService : ISinaService { public List<Status> StatusList{get;set;} public void GetStatuses(System.Action<IEnumerable<Status>> onGetStatusesCompleted = null, System.Action<System.Exception> onError = null, System.Action onFinally = null) { DispatcherTimer timer = new DispatcherTimer(); timer.Interval = TimeSpan.FromSeconds(2); timer.Tick += delegate(object sender, EventArgs e) { Status testStatus = new Status { Text = "this is test status", CreatedAt = DateTime.Now }; onGetStatusesCompleted(new List<Status>() { testStatus }); timer.Stop(); }; timer.Start(); } }

这个类是为了模拟SinaService,减少MainPageViewModel对它的依赖。因为实际中SinaService会调用 webclient异步取得数据,但MainPageViewModel其实并不关心数据是怎么来的,添加这个mock会方便单元测试。注意在实现中使用 定时器来模拟webclient的异步行为。

2. 添加一个公共属性SinaService到MainPageViewModel中,这样测试项目可以把它指向mock类

代码

public ISinaService SinaService { get { if (_sinaService == null) { _sinaService = new SinaService(); } return _sinaService; } set { if (value != _sinaService) { _sinaService = value; } } }

3. 添加RefreshHomeList()方法到MainPageViewModel中

代码

public void RefreshHomeList() { Trace.DetailMsg("RefreshHomeList"); IsHomeRefreshing = true; SinaService.GetStatuses( delegate(IEnumerable<Status> statuses) { IsHomeRefreshing = false; foreach (Status status in statuses) { HomeList.Add(status); } }, delegate(Exception exception) { IsHomeRefreshing = false; }); }

4. 修改TestInitialize如下,植入mock类

代码

[TestInitialize] public void Initialize() { _mainViewModel = new MainPageViewModel(); _mockSinaService = new MockSinaService(); _mainViewModel.SinaService = _mockSinaService; }

5. 添加测试方法:

代码

[TestMethod] [Asynchronous] public void Refresh_HomeList_Success() { bool isHomeListRefreshed = false; _mainViewModel.HomeList.CollectionChanged += (s, e) => { isHomeListRefreshed = true; Assert.AreEqual(NotifyCollectionChangedAction.Add, e.Action); Assert.AreEqual(1, e.NewItems.Count, "only should be +1 item"); }; _mainViewModel.RefreshHomeList(); EnqueueConditional(() => isHomeListRefreshed); EnqueueCallback(() => Assert.AreEqual(_mainViewModel.HomeList.Count, 1, "Expected non-empty products list.")); EnqueueTestComplete();

注意这里的Asynchronous关键字,而且要让MainPageViewModelTests这个类继承SilverlightTest。

最后测试结果如下:

References:

1. silverlight2-unit-testing by jeff wilcox

2. Asynchronous test support – Silverlight unit test framework and the UI thread by jeff wilcox

3. Silverlight Unit Testing, RhinoMocks, Unity and Resharper by Justin Angel