[转载]ASP.NET MVC表单的组件化

mikel阅读(1100)

[转载]ASP.NET MVC表单的组件化 – 阿不 – 博客园.

ASP.NET WebForm最重要的特性之一就是它的界面元素的组件化,简单的输入控件就不必多说,特别是那些类似于Repeater,GridView这样的模板控 件,真的给开发人员带来了极大的方便。而在ASP.NET MVC的视图中,虽然技术上我们仍然可以使用这WebForm的Server Control,但是从理念上,我们是必须要完全避免这种情况的发生。很多习惯WebForm开发模式的开发人员,除了不习惯没有Postback外,可 能最大的抱怨就是MVC的表单开发方式。在大部分情况,他们需要自己完全去控件HTML标签。在显示数据列表时,需要通过foreach控制数据的输出, 当有一些特殊的输出控制时(比如奇偶行不同模板),还要做额外的工作,在界面上定义各种临时变量。这样重复的工作,除了会让开发人员烦躁不说,当一个表单 开发下来,充斥着if..else这样的逻辑判断,不规则的“{”“}”,也给我们阅读和日后的修改带来相当大的麻烦。本文的目的就是为解决这些问题提供 一些思路。

输入表单

对于输入表单的组件化,我们的解决思路来源于MvccontribMvccontrib是一个致力于改善和提高开发人员在使用ASP.NET MVC框架开发Web时的开发体验和开发效率的辅助框架。在里面有一个InputBuilder的功能,Mvccontrib首先根据不同的数据类型定义了一些常用的输入,输出模板。在开发人员在设计Model时,预先设置好一些必须的元数据供View使用,这样就可以提高HTML代码的复用性,更多细节请阅读:http://www.lostechies.com/blogs/hex/archive/2009/06/09/opinionated-input-builders-for-asp-net-mvc-using-partials-part-i.aspx

这种通过在Model添加元数据,来支持View开发的模型在ASP.NET MVC2中得到了极大的应用。下面的代码就是MVC2项目模板的例子:

01 [PropertiesMustMatch("Password", "ConfirmPassword", ErrorMessage = "The password and confirmation password do not match.")]
02 public class RegisterModel
03 {
04 [Required]
05 [DisplayName("User name")]
06 public string UserName { get; set; }
07
08 [Required]
09 [DataType(DataType.EmailAddress)]
10 [DisplayName("Email address")]
11 public string Email { get; set; }
12
13 [Required]
14 [ValidatePasswordLength]
15 [DataType(DataType.Password)]
16 [DisplayName("Password")]
17 public string Password { get; set; }
18
19 [Required]
20 [DataType(DataType.Password)]
21 [DisplayName("Confirm password")]
22 public string ConfirmPassword { get; set; }
23 }

View是这样的:

1 <div class="editor-label">
2 <%: Html.LabelFor(m => m.UserName) %>
3 </div>
4 <div class="editor-field">
5 <%: Html.TextBoxFor(m => m.UserName) %>
6 <%: Html.ValidationMessageFor(m => m.UserName) %>
7 </div>

以上的LabelFor,就会从UserName这个属性的元数据中去得到[DisplayName(“User name”)],显示作为label。TextBoxFor会自动生成input标签,并且把UserName的值也赋给标签值。添加<%: Html.ValidationMessageFor(m => m.UserName) %> ,则会把数据验证消息输出到这里。我们会发现这样,虽然已经可以帮我节省了大量了时间。但是你会也发现,每一个字段都复制和拷贝这两个DIV的内容,这部 分也是一个相当重复和繁琐的工作。当我们把TextBoxFor替换成EditorFor,就会进一步发现原来每个字段都是这样的结构和内容,我们根本不 需要任何修改,那为何还要去复制呢?如果我们能直接使用EditorFor来代替上面的两个Div,根据不同的输入类型,定义不同的输入控件模板。于是, 我们的输入表单就变成这样:

01 <%Html.EnableClientValidation();%>
02 <% using (this.Html.BeginForm())
03 {  %>
04 <%: Html.EditorFor(m=>m.UserName)%>
05 <%: Html.EditorFor(m=>m.Password) %>
06 <%: Html.EditorFor(m=>m.Password)%>
07 <%: Html.EditorFor(m=>m.ConfirmPassword) %>
08 <%: Html.EditorFor(m=>m.Email) %>
09 <input type="submit" value="Submit" />
10 <%} %>

对于这样一个高度模式化的表单,一行一行去写代码也是相当的讨厌,特别是我可能必须要去检查一下有没有哪一个字段漏掉了。我们还可以进一步简化开发,写一个VS扩展,得到当前强类型模板所使用的Model类型,自动生成所有的字段模板,然后再根据需要手工去调整:

捕获

这篇博客就是为了写这个扩展时,得到当前上文Model类型实例而遇到的难题的记录。

列表表单

相对于输入表单,列表表单一般情况都是一行一行的输出数据。在WebForm中,我们可以使用Repeater,GridView这样的模板,给我们提供了非常大的便利。但是在MVC中,目前还没有一个非常好,非常方便的办法让我们方便快速去显示一个列表。在Mvccontrib中,给我们提供了一个强类型的Grid扩展,让我们可以以强类型的方式来输出table,但我并不喜欢那样的做法,要生成一个字段相对多点的列表,那个表达式写起来没有HTML标签来的轻松。

继承元数据和控件模板的做法,我把Model中,要显示在Grid的字段,都加上特定的元数据:

01 [GridAction(ActionName = "Delete", DisplayName = "Delete", RouteValueProperties = "UserName")]
02 public class RegisterModel
03 {
04 [GridColumn]
05 [Required]
06 [DisplayName("User name")]
07 public string UserName { get; set; }
08
09 [GridColumn]
10 [Required]
11 [DataType(DataType.EmailAddress)]
12 [DisplayName("Email address")]
13 public string Email { get; set; }
14
15 [Required]
16 [DataType(DataType.Password)]
17 [DisplayName("Password")]
18 public string Password { get; set; }
19
20 [Required]
21 [DataType(DataType.Password)]
22 [DisplayName("Confirm password")]
23 public string ConfirmPassword { get; set; }
24 }

以上加GridColumn的两个字段就是将来会被显示在grid的字段。同时Grid中的每一行都有一种操作,Delete。我们在列表中这样来写模板:

01 <%@ Page Title="" Language="C#" MasterPageFile="~/Views/Shared/Site.Master" Inherits="System.Web.Mvc.ViewPage<System.Collections.Generic.IEnumerable<MvcFormSample.Models.RegisterModel>>" %>
02
03 <asp:Content ID="Content1" ContentPlaceHolderID="TitleContent" runat="server">
04 List
05 </asp:Content>
06 <asp:Content ID="Content2" ContentPlaceHolderID="MainContent" runat="server">
07 <h2>
08 List</h2>
09 <%: Html.GridForModel() %>
10 </asp:Content>

在Views\Share写一个默认的Grid模板:

通过以上的封装,我们就可以大大减少在写列表表格时的HTML复制。有时间,字段在列表中的显示并不是简单的把值显示出来,有可能还需要格式化等操作。这时,我们可以通过在GridColumnAttribute添加相应的设置来进行输出的控制。

总之,我们总是希望找到一种就为经济实惠并且可行的表单开发方式。以上的做法,View Model的元数据是基础。而很多时候这些与视图相关的元数据并不会在设计业务模型时被设计好,这篇博客就是针对这种情况扩展。

上文的例子请从这里下载。

阿不 http://hjf1223.cnblogs.com

[转载]ASP.NET MVC 之如何创建自定义路由约束

mikel阅读(1064)

[转载]ASP.NET MVC 之如何创建自定义路由约束 – JasenKin – 博客园.

本文将讲解如何创建一个路由约束以及创建一个自定义路由约束

创建一个路由约束(C#)

你能够使用路由约束来限制匹配一个特殊路径的浏览器请求。你能够使用一个正则表达式来制定一个路由约束。
例如,假设你已经定义路由如下:

Listing 1 – Global.asax.cs

routes.MapRoute(
“Product”,
“Product/{productId}”,
new {controller=”Product”, action=”Details”}
);

Listing 1 包含一个命名为Product的路由. 你能够使用这个 Product route来将将浏览器请求映射到ProductController,如下:

Listing 2 – Controllers\ProductController.cs

using System.Web.Mvc;

namespace MvcApplication1.Controllers
{
public class ProductController : Controller
{

public ActionResult Details(int productId)
{
return View();
}

}
}

注意:Details() action 接收一个命名为 productId的单一参数. 这个参数是整型参数.

在Listing 1 will中定义的route将匹配一下的任何一个URLs:

?/Product/23
?/Product/7
遗憾的,这个route也同样匹配以下的URLs:

?/Product/blah
?/Product/apple

因为Details() action预期接收一个整型的参数,当请求中包含的内容不同于整数时,它将导致一个错误。

你真正想要做的,仅仅是匹配包含一个的整数productId的URLs。当你定义一个route时,你能够使用一个限制条件来限制URLs,使它匹配这个route。在Listing 3中,这个route包含一个只匹配整数的正则表达式约束。

Listing 3 – Global.asax.cs

routes.MapRoute(
“Product”,
“Product/{productId}”,
new {controller=”Product”, action=”Details”},
new {productId = @”\d+” }
);

这个真正表达式约束\d+ 匹配一个或多个整数. 这个约束导致Product route匹配如下的URLs:

?/Product/3
?/Product/8999

但不是如下的URLs:

?/Product/apple
?/Product

这个浏览器请求将被另一个route处理。或者,如果没有匹配的routes, “The resource could not be found ”错误将被返回.

创建一个自定义路由约束 (C#)

演示如何创建一个自定义的路由约束.约束接口中的Match方法如下:

IRouteConstraint.Match Method
bool Match(
HttpContextBase httpContext,
Route route,
string parameterName,
RouteValueDictionary values,
RouteDirection routeDirection
)
你可以通过实现IRouteConstraint接口来创建一个路径约束,并且通过几个步骤把它添加到你的路径中。IRouteConstraint仅有一个Match方法,它返回一个布尔值。这个布尔值决定该请求是否应该被route对象处理。

如何创建一个ASP.NET MVC应用程序来模拟一个仅仅在视图中显示年份,月份,日期的文章系统,类似于博客系统的路径?

(一)首先,创建一个ArchiveController,它包含一个仅仅显示年份,月份,日期值的Index action 方法。

namespace MvcAppRouting.Controllers
{
public class ArchiveController : Controller
{
//
// GET: /Archive
public ActionResult Index(int year, int month, int day)
{
ViewData[
Year] = year;
ViewData[
Month] = month;
ViewData[
Day] = day;
return View();
}
}
}

(二)创建一个显示数据的view。

<%@ Page Title=“” Language=C# MasterPageFile=~/Views/Shared/Site.Master Inherits=System.Web.Mvc.ViewPage %>
<asp:Content ID=Content1 ContentPlaceHolderID=TitleContent runat=server>
Index
</asp:Content>
<asp:Content ID=Content2 ContentPlaceHolderID=MainContent runat=server>
<h2>Index</h2>
<fieldset>
<legend>Fields</legend>
<p>Year:
<%= ViewData[Year] %>
</p> <p>
Month:
<%= ViewData[Month]%>
</p> <p>
Day:
<%= ViewData[Day]%></p>
</fieldset>
</asp:Content>

(三)最主要的步骤,需要创建年份,月份,日期验证的三个分离的约束。它们将在路径定义中应用。以创建一个DayConstraint来开始。

using System.Web.Routing;
using System.Globalization;

namespace MvcAppRouting.RouteConstraints
{
public class DayConstraint:System.Web.Routing.IRouteConstraint
{
public bool Match(HttpContextBase httpContext, Route route, string parameterName, RouteValueDictionary values, RouteDirection routeDirection)
{
if ((routeDirection == RouteDirection.IncomingRequest) && (parameterName.ToLower(CultureInfo.InvariantCulture) == day))
{
try {
int month = int.Parse(values[Month].ToString());
int day = int.Parse(values[Day].ToString());
if (month <= 0 || month > 12) return false;
if(day<1)return false;
switch (month)
{
case 1:
case 3:
case 5:
case 7:
case 8:
case 10:
case 12:
if (day< 32) return true;
break;
case 2:
if (day < 29) return true;
break;
case 4:
case 6:
case 9:
case 11:
if(day<31) return true;
break;
}
}
catch {
return false;
}
}
return false;
}
}
}

年份数据限制为1950-2010。同样,月份的值在1-12之间,此处不再叙述,详见源代码。

(四)最后一步是将所有的联系在一起,使ASP.NET MVC 应用程序能够运行。这里仅仅是定义一个routes。

namespace MvcAppRouting
{
// 注意: 有关启用 IIS6 或 IIS7 经典模式的说明,
// 请访问 http://go.microsoft.com/?LinkId=9394801

public class MvcApplication : System.Web.HttpApplication
{
public static void RegisterRoutes(RouteCollection routes)
{
routes.IgnoreRoute(
{resource}.axd/{*pathInfo});

routes.MapRoute(
Default, // 路由名称
{controller}/{action}/{id}, // 带有参数的 URL
new { controller = Home, action = Index, id = UrlParameter.Optional } // 参数默认值
);

routes.MapRoute(
Archive,
archive/{year}/{month}/{day},
new
{
controller
= Archive,
action
= Index,
year
= “”,
month
= “”,
day
= “”
},
new
{
year = new RouteConstraints.YearConstraint(),
month = new RouteConstraints.MonthConstraint(),
day = new RouteConstraints.DayConstraint()
}
);
}
protected void Application_Start()
{
AreaRegistration.RegisterAllAreas();

RegisterRoutes(RouteTable.Routes);
}
}
}

实例中的“archive/{year}/{month}/{day}”模式,像正常的routes一样,同样为route设置了默认的值,并且增加了一个约束对象。这个约束对象将模式中的参数映射至它的约束实例中,因此这些值能够被验证。

现在我用一个验证的请求模式来运行这个应用程序,展示的页面如下。

同样,发送一个archive/2000/2/30这个请求,它是不能通过验证,并且得到一个错误。

总结:
应该注意约束条件必须继承IRouteConstraint,并且实现Match方法。

源代码下载: MvcAppRouting源代码

[转载]社交游戏(Social Game)开发简单教程与粗略总结之基础篇

mikel阅读(1058)

[转载]社交游戏(Social Game)开发简单教程与粗略总结之基础篇 – Minds book of my CS Road – 博客园.

为了使得整个系列文章的逻辑性更加严密,本文旨在介绍一些社交游戏的相关基础,当前的市场状况,发展情况,以及对未来的展望。当然文中的一些数字与表述可能不太准确,在不影响传达数字表意的前提下,读者可对数字做一些上下浮动的估量,或许会更准确些Smile

引入

当无数人在谈论微博时代的到来中国SNS去泡沫化之时,依附于SNS平台之上的社交游戏也开始展露出头角,在互联网的大蛋糕上寻找着自己的那块cheese,而随着年利润达若干亿美元的zynga高调地宣称自己的玩家过亿时,大家才真正开始注意起这个不起眼的蓝海来,当然如今已是大红海了(下文会详细的说明)。

当facebook定义了SNS时,zynga也定义了社交游戏,随后便是数不尽的跟随者,如myspace,orkut,开心网,如 playdom,6waves,五分钟等,当然也只有facebook和zynga赚的盆满钵满,跟随只能有残羹剩饭的份,但是那已是相当诱人的了。

与其它游戏形式的关系

那么社交游戏又是一种怎样的游戏类型,它与传统游戏、网络游戏、网页游戏有什么不同,下面对这几个问题加以分析。

社交游戏,即social game,从组词来看它由soical和game组成,game决定了其只是游戏的一个类别而已,与其它游戏类别也并无大的差别;而关键是social, 也即说明社交游戏是基于社会关系之上的一种游戏新类型,其建立在依附的SNS平台庞大的用户群之上,在具有某种社会关系的玩家之间,基于一定的社交元素来 保证与这些玩家之间的互动,最终将游戏的趣味娱乐性本质延展至社交层次。所以说,除了需要具有游戏本身的趣味性、娱乐性等基本元素外,将用户的游戏行为导向为社交行为则是一款社交游戏能否成功的根本因素,例如风靡的“偷菜”,许多玩家偷的已不是菜,而是一种社交目的,如暧昧,亲昵,友谊等。

当然你也许会说,网游也具有同样互动的因素呀,且不闻借某款游戏来赢得一辈子幸福的同学也不在少数哈,还有大量的公会,还有“贾君鹏,你妈喊你吃饭”,这 不是社交吗?我不否认这种网游建立起的关系的存在和普遍性,但相比于建立在已有大量关系基础上的社交游戏,网游的社交性显得少了许多。试想,你去玩偷菜 时,你的邻居列表都是自己所熟知的人,其中不乏自己喜欢或者厌恶的人,你不是更有欲望去他们地里做些什么动作吗?当你去偷菜时只是为了简单的得到经验和升 级吗?显然,网游这方面具有先天的单薄性。总之,网游的社交性相比于社交游戏更显松弛和单薄。

同样,有很多同学或许也称开心网上的游戏为网页游戏,所以有必要区分下这两个概念。从词的范畴来说,网页游戏与社交游戏定义的角度不同,前者是基于游戏的呈现载体,而后者是基于游戏的功能目的,其从属关系可从下图简单说明。

web_vs_social_game

其中相交的部分即是定义的角度相同时二者的重合关系,换句话说,以社交为目的的网页游戏即是社交游戏,而以网页形式为呈现载体的社交游戏也是网页游戏,当然,网页游戏也可只是单机版,而同样社交游戏也可出现在ipad,ps等载体上。

作为本小节的结束语,社交游戏从传统游戏的追求游戏的乐趣与娱乐的基础上,延展至追求一种实际社会关系的某种影响上,而马斯洛的五种需求层次之中的“社交需求”也正解释了为什么社交游戏会得到强劲的发展的原因。看图不说话。

游戏与需求

市场状况

市场容量的分析通常由第三方的咨询公司来给出,这里引用相关的新闻(或者“所谓的”新闻)来给个直观的感受:

  1. 美国社交游戏的市场在2012年超过20亿美元
  2. zynga今年收入将达8.5亿美元,明年将达10亿美元
  3. 日本社交游戏市场规模将达10亿美元
  4. 据艾瑞统计,2008年中国休闲类社交网络市场规模为1.9亿元,较2007年的1.2亿元增长64.0%。2009年达到3.7亿元,并在2012年达到16.1亿元。这个增幅是每一个淘金者都会看红眼的。

除此而外,我们可以看看下面艾瑞关于社交游戏市场规模的一些预测,虽然各个版本的数字有一定的差异,但总体趋势是相同的。

社交游戏市场规模

本图引用自http://www.iresearch.com.cn/View/121267.html

而在CNNIC的2010年中国网页游戏调查报告有如下一段研究发现:

  1. 中国网页游戏用户规模达1.05 亿,其中社交类网页游戏用户规模最大,达到9209
    ,大型网页游戏用户规模2384万,网页单机游戏用户规模3791 万。
  2. 19岁到 30 岁用户构成网页游戏最大用户群体,比例为64.5%。
  3. 网页游戏用户的有收入人群比例较大,为77.1%, 其中平均月收入在1000元到 3000
    的用户比例最大,占到总体用户的43.7%。
  4. 朋友介绍与搜索引擎是网页游戏信息获取的主要渠道,比例均为71.5%。

推荐朋友可以阅读下CNNIC的报告

营利模式

社交游戏在营利上也采取与当下免费网游同样的策略,即游戏本身免费,而以出售道具或者增值产品来获得收入,当然随着游戏本身的发展相应的营利模式也在不断拓展,例如植入广告,周边产品的开发。具体可用下表来总结:

营利方式 典型示例 备注
道具出售 开心农场的道具 如种子等
植入广告 tikiisland中的可口可乐广告 还有开心网的相关广告植入等。
周边产品 泡泡鱼的淘宝店 不过似乎销售不是特别理想。

当然,社交游戏的社交性决定其必须依附于具有大量用户的SNS网络,如国外的facebook,myspace,国内的开心网,人人网等,平台商自不会看 着你独自享用这样的赢利机会,于是人人网,facebook等平台相继收取30%左右分成来压榨开发商的利润空间,这也是之前不久zynga与facebook之间以生掐架的原因。

除了平台商的分成外,如果开发商使用第三方的支付系统,仍需向其提供10%左右不等的分成。

当然上面是说开发商自己开发,自己运营所涉及到的额外支出,如果开发商是通过第三方的发布商来在某个平台上进行发布(原因是开发商的人力和财力所限,或者 发布商与平台商的关系等),那么发布商通常要分去50%左右的分成(如plinga在VZ上发布游戏),所以到头来能够回到游戏开发商的收入已是少之又少 了。

市场发展情况

正如文首说所的,社交游戏市场已经从蓝海变成了血腥的红海,而随着EA对playfish,Disney对playdom以及zynga对若干公司的收 购,整个社交游戏市场已经开始了新一轮的格局调整,在此过程中竞争力差的公司会相继出局,遗留的只能是那些有大量资源(流量,高质量产品)的开发商、发布 商等。

在如今的市场环境下,大量的开发商不再试图去创新,而是所谓的“山寨”(当然我们公司也逃不出),zynga出了款挖宝的游戏,国内的厂商开始也开 发;playdom出了款城市建造的游戏,国内连忙跟进,于是市场上充斥了大量的同类型的城市类游戏。更为可怕的是,其它领域在市场格局调整时的惨剧也同 样在社交游戏上上演——恶性的竞争与拷贝,这点在社交游戏上更为突出。从技术角度来讲,社交游戏前端通常采用flash,而拥有网络的任一个人都可将其下 载,使用反编译工具查看相关的源码,如果下载反编译的是一个公司,那么后果可想而知,原厂家用6个月心血开发而来的游戏,你(或者某个厂家)只用几周调通 前端写个后端即可,当然技术的话题可留作本系列文章的技术篇中细说。

在市场不断成熟的条件下,开发商的日子并不好过,特别是话语权低的小开发商,你不断要受到平台商的无理压榨,甚至随时删除你的游戏,也要小心同行的恶意拷贝,在受尽压榨的处境下充满中成为另一个中国zynga的美好梦想,当然或许仅是梦想而已。

未来的展望

一次去中关村买移动硬盘时,发现了一个有趣的事情,我循着海龙各个商贩的展台过时,看到的是各个店员“忙时则招揽生意,闲时则偷偷菜”,甚至我询问生意的声音也没能把沉迷的店员从泡泡龙中拉出来。

市场仍在向好发展,社会对社交游戏的认可也越来越高,对于购买道具也越来越习惯和接受(应该感谢QQ的市场培育),而且购买渠道也十分畅通(各个第三方的支付系统),相信社交游戏市场在剧烈的调整下正在逐步走向成熟和稳定,并且会构成游戏中的一个重要的分支。

当然,未来社交游戏的属性也会有一定的调整,除了更少的急功近利和恶性竞争,还需要建立起一定的行业标准,以及协调与各个利益方的关系,这样整个社交游戏产业才能更好的、保持良性的发展。

最后说一个小故事,说,某一天,大家都在公司上班,为成为中国的zynga在努力,突然一个同事震惊地要我们去看个东西,原来是在人人上看到了一款与 social city完全一样的游戏(叫A游戏吧),美工UI等完全相同(显然是直接拿人家的),不同的只是语言和开发商署名,我们在好奇版权问题时,这时一个同事冒 出个句,“人人网是山寨,A游戏也是山寨,山寨上的山寨,山寨中的山寨,严格的审核不是自己抽自己?”于是我们大呼经典继而继续努力。

最后附一张世界sns的布局图,当然或许太过粗略,也不完全符合实际,但是欣欣向荣的形势还是看得见的。

world-social-network-map

本图摘自http://www.mapsofworld.com/images/world-social-network-map.jpg

更多参考

  1. 全世界sns平台图
  2. social game的市场规模
  3. 2010年中国网页游戏调查报告

[转载]在 ASP.NET MVC Web 应用程序中输出 RSS Feeds

mikel阅读(1003)

[转载]在 ASP.NET MVC Web 应用程序中输出 RSS Feeds – 雪的梦幻 – 博客园.

RSS全称Really Simple Syndication。一些更新频率较高的网站可以通过RSS让订阅者快速获取更新信息。RSS文档需遵守XML规范的,其中必需包含标题、链接、描述信息,还可以包含发布时间、最后更新时间等信息。

本文将介绍通过LINQ to XML生成XML文档,并在ASP.NET MVC Web应用程序中输出。

在生成RSS文档前,先简单了解一下RSS的结构。根节点rss下有channel节点,channel节点的一些子节点 (title,link,description)包含了该RSS的部分描述信息。channel下可包含多个item节点用来表示多个内容信息,如博客 中的文章、论坛中的帖子。

代码

1 <rss version=”2.0″>
2 <channel>
3 <title>channel标题</title>
4 <link>网页地址</link>
5 <description>channel描述</description>
6 <item>
7 <title>内容1标题</title>
8 <description>内容1描述</description>
9 <link>内容1链接</link>
10 </item>
11 <item>
12 <title>内容2标题</title>
13 <description>内容2描述</description>
14 <link>内容2链接</link> </item>
15 </channel>
16 </rss>

1. 用LINQ to XML生成类似上述的文档。

1.1 新建一个XDocument,添加根节点和相关属性描述。

代码

1 XDocument doc = new XDocument(
2 new XDeclaration(1.0, utf-8, yes), // XML文档声明
3 new XElement(rss, // 根节点
4 new XAttribute(version, 2.0), // rss节点的属性
5 new XElement(channel // rss的子节点channel
6 )));                    )));

1.2 处理channel节点和它的相关描述。

代码

1 XElement channel = new XElement(channel); // channel节点
2 channel.Add(new XElement[]{
3 new XElement(title,Test), // channel标题
4 new XElement(link,http://localhost), // 页面链接
5 new XElement(description,Test RSS) // channel描述
6 });

1.3 往channel节点增加内容信息,rssFeedList是 List<RssFeed>类型的。由于item数量不固定,这里用了foreach将list中的每一个内容信息都加到channel。

代码

1 foreach (var rssFeed in rssFeedList) // 对rssFeed集合中的每个元素进行处理
2 {
3 XElement item = new XElement(item, new XElement[]{ // 生成一个新的item节点
4 new XElement(title,rssFeed.Title), // 为新的item节点添加子节点
5 new XElement(description,rssFeed.Description),
6 new XElement(link,rssFeed.Link),
7 new XElement(pubDate,rssFeed.PublishDate)
8 });
9 channel.Add(item); // 将新的item节点添加到channel中
10 }

2. 创建RssFeedResult类

我们写一个RssFeedResult类,继承自ActionResult,以便在ASP.NET MVC的controller中返回RSS。关于这部分内容可参考之前的一篇文章《让ASP.NET MVC页面返回不同类型的内容》。

代码

1 public class RssFeedResult : ActionResult
2 {
3 List<RssFeed> Data { get; set; }
4
5 public RssFeedResult(List<RssFeed> data)
6 {
7 Data = data;
8 }
9
10 public override void ExecuteResult(ControllerContext context)
11 {
12 if (context == null)
13 {
14 throw new ArgumentNullException(context);
15 }
16
17 HttpResponseBase response = context.HttpContext.Response;
18 response.ContentType = text/xml; // 设置HTTP头中的ContentType
19 XDocument result= RssFeedHelper.GetRssFeed(Data); // 获取XML数据
20 response.Write(result.ToString()); // 将XML数据写入response中
21 }
22 }

3. 在controller中使用

我们只要在controller中调用RssFeedResult(rssFeedList)方法即可返回RSS页面了。

代码

public RssFeedResult Rss()
{
// 添加2个测试用的数据
RssFeed r1 = new RssFeed { Description = Test1, Link = http://localhost/1, Title = Test1, PublishDate = DateTime.Now };
RssFeed r2
= new RssFeed { Description = Test2, Link = http://localhost/2, Title = Test2, PublishDate = DateTime.Now };
List
<RssFeed> rssFeedList = new List<RssFeed>();
rssFeedList.Add(r1);
rssFeedList.Add(r2);

// 返回RSS
return new RssFeedResult(rssFeedList);
}

示例下载 (Visual Studio 2010)

另外,还有一个工具ASP.NET RSS Toolkit,有需要的可以参考一下。

[转载]用Delphi从内存流中判断图片格式

mikel阅读(1013)

[转载]用Delphi从内存流中判断图片格式 – chybaby的专栏 – CSDN博客.

废话不多说了,利用内存流来判断文件的格式,其实判断文件的前几个字节就可以简单的判断这个文件是什么类型的文件,例如

jpg文件 是 FFD8 (从低位到高位就要反过来 D8FF 下面都是一样)

BMP文件 是 424D —4D42

其他的我就不一一列举了,想知道跟多文件类型分别是用什么字符作为文件的开头的话,下载个C32asm或者UE等这类16进制编辑器就可以看到了。

procedure TForm1.Button1Click(Sender: TObject); //Button1的单击事件
var
//声明变量
MyImage:TMemoryStream;   //内存流对象
Buffer:Word;
i:integer;
begin
if OpenDialog1.Execute then
//OpenDialog1是一个文件打开对话框,在Delphi组件面版的Dialog页中可以找到。
begin
MyImage:=TMemoryStream.Create; //建立内存流对象

try
MyImage.LoadFromFile(OpenDialog1.FileName);
//把刚刚用户选择的文件载入到内存流中
MyImage.Position := 0;
//移动指针到最开头的位置
if MyImage.Size = 0 then
//如果文件大小等于0,那么
begin
//错误
ShowMessage(‘错误‘);
Exit;
end;
MyImage.ReadBuffer(Buffer,2);
//读取文件的前2个字节,放到Buffer里面

if Buffer=$4D42 then
//如果前两个字节是以4D42[低位到高位]
begin
ShowMessage(‘BMP‘);
//那么这个是BMP格式的文件
end
else if Buffer=$D8FF
then //如果前两个字节是以D8FF[低位到高位]
begin
//JPEG
ShowMessage(‘JPEG‘); //……..一样 下面不注释了
end
else if Buffer=$4947
then
begin
//GIF
ShowMessage(‘GIF‘);
end
else if
Buffer=$050A
then
begin
//PCX
ShowMessage(‘PCX‘);
end
else if
Buffer=$5089
then
begin
//PNG
ShowMessage(‘PNG‘);
end
else if
Buffer=$4238
then
begin
//PSD
ShowMessage(‘PSD‘);
end
else if
Buffer=$A659
then
begin
//RAS
ShowMessage(‘RAS‘);
end
else if
Buffer=$DA01
then
begin
//SGI
ShowMessage(‘SGI‘);
end
else if
Buffer=$4949
then
begin
//TIFF
ShowMessage(‘TIFF‘);
end
else
//如是其他类型的文件的话,直接显示错误
begin
//ERR
ShowMessage(‘ERR‘);
end;
//if
end; //if

finally

MyImage.Free;   //释放内存流对象

end;
end;

上面的过程只是简单的判断文件的前2个字节,如果想更加精确一点的话,可以把文件最后2个字节也判断上。

[转载]actionscript3.0中的MVC,EventDispather,IEventDispather的学习

mikel阅读(1093)

[转载]actionscript3.0中的MVC,EventDispather,IEventDispather的学习 – bigbigdotnet – 博客园.

在as3.0中使用mvc来构建项目的时候,在model层,总免不了使用事件。在这个例子里,使用MVC创建了一个简单的数字时钟的功能。在model层,使用了4种方式来处理事件发送。并简单对比了一下。

方法1.model类继承自EventDispather

方法2.model类复合EventDispather

方法3.model类继承自Sprite

方法4.model类实现IEventDispatcher

当前代码注释默认设置方法1来实现,若设置对应的注释可以的尝试使用4种方法来实现这个简单的例子。

自我感觉除了方法2不太好以外,其它方法的都可行。

环境:Flash build4 ,sdk3.5

代码下载地址:http://www.helloshp.cn/bigbigdotnet.cnblogs.com_jpg/mvc.rar

QQ截图未命名

程序运行效果:

文档类(程序入口):

Main.cs

package
{
import Control.*;
import Model.*;
import View.*;
import flash.display.Sprite;
[SWF(width=”200″,height=”100″)]
public class Main extends Sprite
{
public function Main()
{
var model:Model_A = new Model_A();
//var model:Model_B = new Model_B();
//var model:Model_C = new Model_C();
//var model:Model_D = new Model_D();
var controller:Controller = new Controller(model);
var view:View = new View(model,controller);
addChild(view);
view.x = 30;
view.y = 30;
}
}
}

控制器(control):

Controller.cs

package Control
{
import flash.utils.Timer;
import flash.events.TimerEvent;
import Model.*;

public class Controller
{
private var model:Model_A;
//private var model:Model_B;
//private var model:Model_C;
//private var model:Model_D;
private var timer:Timer;
public function Controller(model:Model_A):void{
this.model = model;
}

public function startTime():void{
model.startTime();
}
}
}

视图器(view):

View.cs

package View
{
import Control.*;
import Model.*;
import flash.display.Sprite;
import flash.events.Event;
import flash.text.TextField;
public class View extends Sprite
{
private var model:Model_A;
//private var model:Model_B;
//private var model:Model_C;
//private var model:Model_D;
private var controller:Controller;
private var tf:TextField;
public function View(model:Model_A,controller:Controller):void{
this.controller = controller;
tf = new TextField();
addChild(tf);
controller.startTime();
this.model = model;
//Mode层为Model_A时使用:
model.addEventListener(“action”,onActionHandler);
//Mode层为Model_B时使用:
//model.getSender().addEventListener(“action”,onActionHandler);
//Mode层为Model_C时使用:
//model.addEventListener(“action”,onActionHandler);
//Mode层为Model_D时使用:
//model.addEventListener(“action”,onActionHandler);
}
private function onActionHandler(e:Event):void{
tf.text = “时间:” + model.hour+” : “+model.minutes+” : “+model.second;
trace(e.target);
//当使用方法2的时候,以下这段代码,将会报错!这是因为mode_B中创建_dispather的时候,没有将this的引用注入到_dispatcher里面,
//即是说,没有把mode_B类的引用注入到_dispatcher里,侦听函数的target对象指向的是dispatcher,而不是mode_B本身
//尽管在mode_B类中发送消息,可以这样写:dispatcher = new EventDispatcher();,但以下代码就会报错!
//而如果mode_B类中实现IEventDispather接口,同时这样写:dispatcher = new EventDispatcher( this );以下代码就会正确执行。
trace(e.target.hour);
}
}
}

模型器(model):

方法一:Model_A.cs

package Model
{
import flash.events.*;
import flash.utils.Timer;

//方法1:Model继承自EventDispatcher
public class Model_A  extends EventDispatcher
{
public var hour    :String;
public var minutes    :String;
public var second    :String;
public var timer    :Timer;
public function Model_A(){}
public function startTime():void{
timer = new Timer(1000);
timer.addEventListener(TimerEvent.TIMER,onTimerHandler);
timer.start();
}
private function onTimerHandler(e:TimerEvent):void{
var nowDate:Date = new Date();
hour     = nowDate.getHours()    >9    ?    String(nowDate.getHours())    :”0″    +    nowDate.getHours();
minutes = nowDate.getMinutes()    >9    ?    String(nowDate.getMinutes()):”0″    +    nowDate.getMinutes();
second     = nowDate.getSeconds()    >9    ?    String(nowDate.getSeconds()):”0″    +    nowDate.getSeconds();
//直接继承自EventDispatcher所以直接调用dispatchEvent广播事件
dispatchEvent(new Event(“action”));
}
}
}

方法二:Model_B.cs

package Model
{
import flash.events.*;
import flash.utils.Timer;
//方法1:Model没有继承自EventDispatcher
public class Model_B
{
public var hour    :String;
public var minutes    :String;
public var second    :String;
public var timer    :Timer;
//定义一个EventDispatcher对象
public var _dispatcher    :EventDispatcher;
public function Model_B(){
initSender();
}
public function startTime():void{
timer = new Timer(1000);
timer.addEventListener(TimerEvent.TIMER,onTimerHandler);
timer.start();
}
public function getSender():EventDispatcher{
return _dispatcher;
}
private function initSender():void{
_dispatcher = new EventDispatcher();
}
private function onTimerHandler(e:TimerEvent):void{
var nowDate:Date = new Date();
hour     = nowDate.getHours()    >9    ?    String(nowDate.getHours())    :”0″    +    nowDate.getHours();
minutes = nowDate.getMinutes()    >9    ?    String(nowDate.getMinutes()):”0″    +    nowDate.getMinutes();
second     = nowDate.getSeconds()    >9    ?    String(nowDate.getSeconds()):”0″    +    nowDate.getSeconds();
//调用_dispatchEvent广播事件
_dispatcher.dispatchEvent(new Event(“action”));
}
}
}

方法三:Model_C.cs

package Model
{
import flash.display.Sprite;
import flash.events.*;
import flash.utils.Timer;
//方法3:继承自Sprite,同时Sprite也是属于EventDispather类的子类,
public class Model_C extends Sprite
{
public var hour    :String;
public var minutes    :String;
public var second    :String;
public var timer    :Timer;
public function Model_C(){
}
public function startTime():void{
timer = new Timer(1000);
timer.addEventListener(TimerEvent.TIMER,onTimerHandler);
timer.start();
}
private function onTimerHandler(e:TimerEvent):void{
var nowDate:Date = new Date();
hour     = nowDate.getHours()    >9    ?    String(nowDate.getHours())    :”0″    +    nowDate.getHours();
minutes = nowDate.getMinutes()    >9    ?    String(nowDate.getMinutes()):”0″    +    nowDate.getMinutes();
second     = nowDate.getSeconds()    >9    ?    String(nowDate.getSeconds()):”0″    +    nowDate.getSeconds();
//直接调用Spreite所继承的EventDispather类的dispatchEvent广播事件
super.dispatchEvent(new Event(“action”));
}
}
}

方法四:Model_C.cs

package Model
{
import flash.events.*;
import flash.utils.Timer;
//方法4,Model直接实现IEventDispatcher,但要实现5个必须的方法
public class Model_D implements IEventDispatcher
{
public var hour    :String;
public var minutes    :String;
public var second    :String;
public var timer    :Timer;
private var _dispatcher:EventDispatcher;
public function Model_D(){
//this传进来很重要。也即是说把该类的引用传递给EventDispatcher.
//监听函数的target对象指向Model_D类的引用而不是_dispatcher;
_dispatcher = new EventDispatcher(this);
}
public function addEventListener(type:String, listener:Function, useCapture:Boolean=false, priority:int=0, useWeakReference:Boolean=false):void
{
_dispatcher.addEventListener(type,listener,useCapture,priority,useWeakReference);
}
public function removeEventListener(type:String, listener:Function, useCapture:Boolean=false):void
{
_dispatcher.removeEventListener(type,listener,useCapture);
}
public function dispatchEvent(event:Event):Boolean
{
return _dispatcher.dispatchEvent(event);
}
public function hasEventListener(type:String):Boolean
{
return _dispatcher.hasEventListener(type);
}
public function willTrigger(type:String):Boolean
{
return _dispatcher.willTrigger(type);
}
public function startTime():void{
timer = new Timer(1000);
timer.addEventListener(TimerEvent.TIMER,onTimerHandler);
timer.start();
}
private function onTimerHandler(e:TimerEvent):void{
var nowDate:Date = new Date();
hour     = nowDate.getHours()    >9    ?    String(nowDate.getHours())    :”0″    +    nowDate.getHours();
minutes = nowDate.getMinutes()    >9    ?    String(nowDate.getMinutes()):”0″    +    nowDate.getMinutes();
second     = nowDate.getSeconds()    >9    ?    String(nowDate.getSeconds()):”0″    +    nowDate.getSeconds();
//调用dispatchEvent广播事件
_dispatcher.dispatchEvent(new Event(“action”));
}
}
}

[转载]用一个最简单方法解决asp.net页面刷新导致数据的重复提交

mikel阅读(813)

[转载]用一个最简单方法解决asp.net页面刷新导致数据的重复提交 – 该死的代码 – 博客园.

页面刷新导致数据重复提交这个问题困扰我也很久了,在网上搜了一个大家把解决的办法多聚焦在了如何判定是刷新还是正常提交上了。这个方法通过Session放一些识别数据也可以解决问题。

这里我只是想提供另外一个思路,供博友们参考。

“GET”与“POST”想必大家已经了解很多了,也只有在post时,才会担心刷新致使重复提交。自从ASP.NET出世,大家肯定大量 的烂用post。我觉得,大部分情况还是用get,大不了多加几个querystring,只有数据操作时才用post, 一量数据提交完毕之后,立即切换成get方式,这样用户都没有机会使用刷新重复提交数据。

每次执行完一次事件,立即调用Reload,用GET方法重新查看已经提交数据。当然,如果这个提交的过程很久,其间用户点了刷新,这段代码就无能为力了。

protected void Button1_Click(object sender, EventArgs e)
{
count
++;
this.Button1.Text = count.ToString();
Reload(
run success!);
}

private void Reload(string message)
{
string script1 = <script>alert(\{0}\);window.location.href='{0}’;</script>;
string script2 = <script>window.location.href=\{0}\;</script>;
string outstring;

if (string.IsNullOrEmpty(message))
{
outstring
= string.Format(script2, this.Request.Url.OriginalString);
}
else
{
outstring
= string.Format(script1, message, this.Request.Url.OriginalString);
}

Response.Write(outstring);
Response.End();
}

[转载]jQuery实现的几个你可能没用过的功能

mikel阅读(892)

[转载]jQuery实现的几个你可能没用过的功能 – 爱因斯坦的小脑 – 博客园.

JQuery好久了,都做了两个项目了。今儿晚上喝咖啡喝多了,这都两点多了睡不着,给大家分享下我在项目中用到的一些用JQuery实现的一些比较好的功能。希望对一些新手有点用。。。高手们可以拍砖哈。。。。我头很硬不怕疼。。。呵呵。

一.创建一个自己的dropdownlist

说到dropdown list,在html中你会想到

1 <select>
2 <option>hello 1</option>
3 </select>

但是它的显示会不大好看,我们可以使用div+ul来自己做一个drop down list,而且有很苦的slidedown和slideup功能。

在IE8下的效果对比:

image

首先说说思路,很简单的思路,

a. 需要用一个Div来代替drop down list中选中记录显示的那个容器,通过offset来得到这个Div应该显示的位置,offtset.top和offset.left。

b. 通过一个UL以及它的孩子们li来模拟下拉框。这里需要注意几个问题,

i:一定要把UL放在一个新建好的Div里面,而且这个Div的位置距离top的数据上一步中的Div(我们叫它iDiv)的top+iDiv.height;

ii:每次在点击一个li元件后一定要清空它,不然你的drop down list会越来越长。。。

iii:当鼠标在别的地方点击时,一点要隐藏掉dropdown list。

下面我来一步一步结合代码来给说明如何实现这个功能:

1.创建iDiv来作为drop down list选中值的容器。

在创建iDiv之前我们需要先来得到要显示这个drop down list的位置:

1 // get the select list ‘s position using offset,width and height
2 var offset = $(.select_css).offset();
3 var width = $(.select_css).width();
4 var height = $(.select_css).height();

接下来是创建iDivb并使用css()方法来为iDiv添加格式。

1 var iDiv = $(<Div id=’iDiv’ class=’iDiv’>).css({
top: offset.top,
left: offset.left,
width: width,
height: height,
border: 1px solid #aaaaaa,
fontSize: 12px,
textIndent: 4px,
cursor: default }).text(hello);

iDiv也给加了个class=’iDiv’,本来不需要的,但是后来我发现JQuery的css()无法去搞定背景图片的no-repeat 属性,google了半天老外也没有例子,所以只有通过这个clas=’iDiv’来设定:

1 .iDiv
2 {
3 background-image:url(‘images/select_right.gif’);
4 background-position:right;
5 background-repeat:no-repeat;
6 }

效果如下;

image

2.在iDiv发生点击事件时,来创建一个下拉框,并使用slidedown效果。

首先我们需要创建一个cDiv并把它添加到html的body,它的位置刚好是在iDiv的下面,所以需要cDiv的创建如下:

1 var cDiv = $(<div id=’cDiv’>).css({
2 position: absolute,
3 width: width,
4 top: offset.top + 22,
5 left: offset.left,
6 background: #f7f7f7,
7 border: 1px solid silver
8 }).hide();

而且默认我们要它隐藏掉。

有了这个cDiv,我们只需要在iDiv发生Click事件时创建一个UL列表,并把它append倒cDiv。

1 var UL = $(<ul style=’list-style:none;margin:0;padding:0;’></ul>).appendTo(cDiv);
2 for (var i = 1; i < 10; i++) {
3 $(<li style=’testIndent:4px;height:20px;lineheight:20px; cursor:pointer;’>).appendTo(UL).text(hello + i).mouSEOver(function () {
4 $(this).css(
5 {
6 color: white,
7 background: gray
8 }
9 );
10 }).mouSEOut(function () {
11 $(this).css(
12 {
13 color: black,
14 background: white
15 });
16 }).click(function () {
17 // disvisualble the cDiv and set the selected crrent li’s text as iDiv’s text
18 $(#cDiv).slideUp().hide();
19 $(#iDiv).html($(this).html());
20 });
21 }
22 // slide show the cDiv now
23 $(#cDiv).slideDown(slow);

可以看到在添加每条li记录时都为它添加了mouSEOver,mouseout和click事件。

在click事件发生时,我们不仅要把cDiv给slideUp还需要把它隐藏掉,并且在下次点击iDiv之前先清空cDiv。这两点非常重要。你可以试试不做这两点时会出现什么效果。

在click li时别忘了把当前li的html内容复制给iDiv,不然我们的控件就没实际作用啦。。。。。

3.使用Ajax从服务器获取下拉列表的值。

很多时候我们需要动态的从服务器获取下拉列表的值,这样就需要在点击iDiv时先通过jQuey的ajax方法(或者其他的ajax方法)从服务器load数据,在数据load完成时我们才开始创建UL列表。

我这里使用的是WCF Servece作为ajax请求的数据源。

image

为了增加用户友好型,在从服务器取数据时,我们让iDiv显示为一个load的图片。。。。。。。。。。。。

image

二.使用jQuery的append功能来无刷新切换播放的视频文件(flash或Silverlight播放器)。

之前有个minisite需要用到这个东西。我就试着研究了下,还真行的通。

http://haokan.lafaso.com/pretty.html 大家可以看一下。我这个不算做广告吧,大家基本都是男的基本上不会看这个的。呵呵。只是这个方法我觉得你说不定以后可以用到的。

由于这些播放器都是一个embed控件,所以我们可以通过替换embed的src属性来播放不同的视频。例如:

image

使用jQuery的append()方法我们来个偷梁换柱,就可以把embed的src给换掉,并重新把div1的html给换掉,在页面上就像是使用ajax技术。

1 $(#div1 embed).empty();
2 var placeHolder = $(<div />);
3 var tempParent = $(<div />);
4 var embed = $(#div1 embed);
5 embed.replaceWith(placeHolder);
6 tempParent.append(embed);
7 embed.attr(src, http://player.ku6.com/refer/DMFZdNYzKDEosiPG/v.swf&auto=1);
8 placeHolder.replaceWith(tempParent.html());

三.用jQuery来为HTML实现header和footer功能。

在php,ASP.NET中都有header和footer这种控件,php中用include,而在ASP.NET中我们用master或者是ascx都行。

在html中呢?我相信一直没有。但是客户要求我们做的页面必须是html,说是怕用户太多。。。。。

用footer和header的好处就是当需要修改这些部分的内容时,我们只需要修改一个页面,所有的页面就都会变化。

后来找到个办法是使用jquery的load()方法。

首先我们需要在html中添加两个Div一个在<body>的最上面,一个在最下面,最好是一个Id=’header’,一个id=’footer’。

然后在服务器端我们只需要创建一个header.html和一个footer.html。

在页面加载时我们会用jquery的load方法来loadheader.html和footer.html。

image

代码:

1 $(#header).load(controls/header.html, function (response, status, xhr) {
2 if (status == error) {
3 var msg = 服务器数据传输错误,请刷新页面;
4 // $(“#error”).html(msg + xhr.status + + xhr.statusText);
5 alert(msg);
6 }
7 });
8
9 // load footer from server
10 $(#footer).load(controls/footer.html, function (response, status, xhr) {
11 if (status == error) {
12 var msg = 服务器数据传输错误,请刷新页面;
13 // $(“#error”).html(msg + xhr.status + + xhr.statusText);
14 alert(msg);
15 }
16 });
17
18

后面有可能的话我会接着总结点jQuery的技巧和大家分享。。。。。。。。还有那个下拉框的代码我稍后给大家提供下载地址。

Cheers

Nic

[转载]通过SQL Server 2008数据库复制实现数据库同步备份

mikel阅读(906)

[转载]通过SQL Server 2008数据库复制实现数据库同步备份 – dudu – 博客园.

SQL Server 2008数据库复制是通过发布/订阅的机制进行多台服务器之间的数据同步,我们把它用于数据库的同步备份。这里的同步备份指的是备份服务器与主服务器进行 实时数据同步,正常情况下只使用主数据库服务器,备份服务器只在主服务器出现故障时投入使用。它是一种优于文件备份的数据库备份解决方案。

在选择数据库同步备份解决方案时,我们评估了两种方式:SQL Server 2008的数据库镜像和SQL Server 2008数据库复制。数据库镜像的优点是系统能自动发现主服务器故障,并且自动切换至镜像服务器。但缺点是配置复杂,镜像数据库中的数据不可见(在SQL Server Management Studio中,只能看到镜像数据库处于镜像状态,无法进行任何数据库操作,最简单的查询也不行。想眼见为实,看看镜像数据库中的数据是否正确都不行。只 有将镜像数据库切换主数据库才可见)。如果你要使用数据库镜像,强烈推荐killkill写的SQL Server 2005 镜像构建手册,我们就是按照这篇文章完成了数据库镜像部署测试。

最终,我们选择了SQL Server 2008数据库复制。

下面通过一个示例和大家一起学习一下如何部署SQL Server 2008数据库复制。

测试环境:Windows Server 2008 R2 + SQL Server 2008 R2(英文版),两台服务器,一台主数据库服务器CNBlogsDB1,一台备份数据库服务器CNBlogsDB2。

复制原理:我们采用的是基于快照的事务复制。主数据库服务器生成快照,备份库服务器读取并加载该快照,然后不停地从主数据库服务器复制事务日志。见下图:

grid.ai

图片来自SQL Server联机丛书

安装与配置步骤:

一、在两台服务器上安装好SQL Server 2008 R2,主要安装的组件:Database Engine(含SQL Server Replication),Management Tools。

二、主数据库服务器(发布服务器)的配置:

1. 在主数据库服务器CNBlogsDB1新建示例数据库CNBlogsDemo(注意Recovery mode要使用默认值Full,只有这个模式才能进行事务复制),然后建立一张测试表,比如:CNBlogsTest。

cnblogs_test

2. 设置存放快照的文件夹:

创建发布之前,先设置一下存放快照的文件夹,创建发布后会在该文件夹生成快照文件,订阅服务器需要在初始化时加载该快照文件。

选择Replication》Local Publications》属性,在出现的窗口中选择Publishers,如下图:

20100826-8

点击红框处的按钮,出现设置窗口:

20100826-9

在Default Snapshot Folder中设置快照文件存放路径。

3. 在主数据库服务器创建发布:

在Replication》Local Publications中选择New Publication,出现一个向导。先选择要发布的数据库CNBlogsDemo,然后选择发布类型Transational publication,如下图:

Transationalpublication

点击Next,出现错误:

20100826-1

原来所有要复制的表都需要有主键,刚才建CNBlogsTest表时,没有建主键。建一下主键,并重新启动向导就可以了。

接着选择要复制的对象:

20100826-2

点Next,Next,进入Snapshot Agent窗口,选择Create a snapshot immediately and keep the snapshot available to initialize subscriptions,见下图:

20100826-3

Next,进入Agent Security:

20100826-4

选择Security Settings,进行相应的帐户设置:

20100826-5

一个是设置运行Snapshot Agent的Windows帐户,我们这里选择与SQL Server Agent同样的帐户。

一个是设置连接发布服务器的SQL帐户,我们这里就用主数据库服务器的sa帐户。

继续:OK,Next,Next,为这个发布起个名字:

20100826-7

点击Finish,就开始正式创建发布,创建成功就会出现如下窗口:

20100826-10

这时查看快照文件夹,就会看到unc文件夹,快照文件就在这个文件夹中。

这里要考虑这样一个问题,如何让订阅服务器通过网络访问这个快照文件夹。

我们在这个问题上折腾了一些时间,本来想通过共享文件夹的方式,但又不想打开匿名共享,折腾了半天,没搞定订阅服务器访问共享文件夹用户验证的问题。于是采用了FTP的方式,所以,下面介绍一下如何让订阅服务器通过FTP访问快照文件。

4. 设置快照的FTP访问

首先在主数据库服务器上开通FTP服务,建立一个指向快照文件夹的FTP站点,设置好可以远程连接的FTP帐户。然后在这台发布服务器设置一下FTP客户端配置。配置方法如下:

在Replication》Local Publications中选择刚才创建的发布[CNBlogsDemo]:CNBlogsDemo_Publication,选择属性》FTP Snapshot,如下图:

20100826-11

选中Allow Subscribers to download snapshot files using FTP,并设置一下FTP客户端连接参数,订阅服务器就是通过这里的设置连接FTP服务器的(注:Path from the FTP root folder的设置要和上图一样,设置为:/ftp)。

点击OK,这时会在快照文件夹中创建一个ftp文件夹,并在该文件夹中生成快照文件。

这样,发布服务器就配置好了,下面配置订阅服务器。

三、备份数据库服务器(订阅服务器)的配置:

进入订阅服务器CNBlogsDB2,创建与发布服务器同名的数据库CNBlogsDemo,使用完全恢复模式。

在Replication》Local Subscriptions中选择New Subscriptions,进入向导。

Next,进入选择发布服务器的窗口,选择Find SQL Server Publisher,出现服务器连接窗口:

20100826-12

这里要注意的是Server Name中一定要填写发布服务器的计算机名,如果计算机名连接不上,要在hosts文件中加一个IP地址解析。

成功连接发布服务器之后,就可以看到刚才在主数据库服务器上创建的发布:

20100826-13

Next,进入“分发代理工作位置”的选择窗口:

20100826-14

我们这里选择pull subscriptions,把数据给拉过来,这样主数据库服务器的负担会轻些。

Next,选择订阅服务器上的数据库,之前我们已经建好同名的数据库,所以系统自己会找到。

Next,进入分发代理安全设置窗口:

20100826-15

点击红框内的按钮,进入设置窗口:

20100826-16

设置如上图,Connect to the Distributor处设置的是发布服务器的sa帐户。

OK, Next, Next, Next:

20100826-17

Next, Finish, Success:

20100826-18

备份数据库的订阅就建好了!

现在来瞧一瞧订阅服务器CNBlogsDB2上的用于复制的数据库CNBlogsDemo:

20100826-19

看!我们在发布服务器上建立的表CNBlogsTest复制过来了。

现在我们去发布服务器CNBlogsDB1上添加一条记录:

20100826-20

再去订阅服务器CNBlogsDB2瞧一瞧:

20100826-21

数据立即同步过来了!搞定!

20791975316932

遇到的问题:

在测试过程中被两个问题折腾了很长时间。

1)发布服务器的Log Reader Agent不能启动,错误信息:

· The process could not execute ‘sp_replcmds’ on ‘YCSERVER006’. (Source: MSSQL_REPL, Error number: MSSQL_REPL20011)
Get help: http://help/MSSQL_REPL20011
· Cannot execute as the database principal because the principal “dbo” does not exist, this type of principal cannot be impersonated, or you do not have permission. (Source: MSSQLServer, Error number: 15517)
Get help: http://help/15517
· The process could not execute ‘sp_replcmds’ on ‘YCSERVER006’. (Source: MSSQL_REPL, Error number: MSSQL_REPL22037)
Get help: http://help/MSSQL_REPL22037

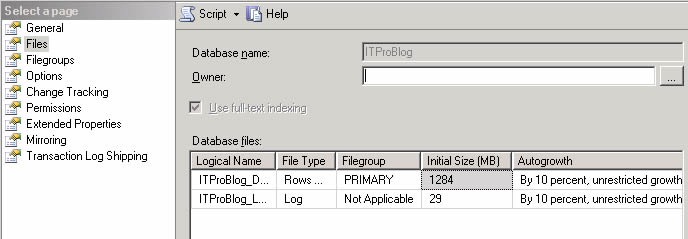
开始测试时,附加了一个现有数据库进行复制遇到了这个问题,附加的是一下SQL Server 2005数据库文件,Owner为空,改为sa问题就解决了,如下图:

2)第二个问题就是前面已经描述过的订阅服务器访问发布服务器上的快照文件夹的问题,后来通过FTP的方式解决的。

对于SQL Server 2008数据库复制,目前我就学习了这些,期待园子里有这方面经验的朋友也来分享一下,在分享过程中你也会学到很多。

[转载]C#.NET发EMAIL的几种方法 MailMessage/SmtpClient/CDO.Message - 熊哥 www.relaxlife.net - 博客园

mikel阅读(880)

[转载]C#.NET发EMAIL的几种方法 MailMessage/SmtpClient/CDO.Message – 熊哥 www.relaxlife.net – 博客园.

C#.NET发EMAIL的几种方法 MailMessage/SmtpClient/CDO.Message

源代码如下:

using System; using System.Collections.Generic; using System.Text; using System.Web; using System.Net.Mail; using System.Net; namespace Pub.Class { /// <summary> /// 发送Email类 /// </summary> public class Email { #region 私有成员 private static object lockHelper = new object(); private string _From; private string _FromEmail; private string _Subject; private string _Body; private string _SmtpServer; private string _SmtpPort = "25"; private string _SmtpUserName; private string _SmtpPassword; private System.Web.Mail.MailFormat _Format = System.Web.Mail.MailFormat.Html; private System.Text.Encoding _Encoding = System.Text.Encoding.Default; #endregion #region 属性 /// <summary> /// 正文内容类型 /// </summary> public System.Web.Mail.MailFormat Format { set { _Format = value; } } /// <summary> /// 正文内容编码 /// </summary> public System.Text.Encoding Encoding { set { _Encoding = value; } } /// <summary> /// FromEmail 发送方地址(如test@163.com) /// </summary> public string FromEmail { set { _FromEmail = value; } } /// <summary> /// From /// </summary> public string From { set { _From = value; } } /// <summary> /// 主题 /// </summary> public string Subject { set { _Subject = value; } } /// <summary> /// 内容 /// </summary> public string Body { set { _Body = value; } } /// <summary> /// SmtpServer /// </summary> public string SmtpServer { set { _SmtpServer = value; } } /// <summary> /// SmtpPort /// </summary> public string SmtpPort { set { _SmtpPort = value; } } /// <summary> /// SmtpUserName /// </summary> public string SmtpUserName { set { _SmtpUserName = value; } } /// <summary> /// SmtpPassword /// </summary> public string SmtpPassword { set { _SmtpPassword = value; } } #endregion #region 构造器 /// <summary> /// 构造器 /// </summary> public Email() { } #endregion #region Send /// <summary> /// 发送EMAIL /// </summary> /// <example> /// <code> /// Email _Email = new Email(); /// _Email.FromEmail = "test@163.com"; /// _Email.Subject = "&lt;div>aaaa&lt;/div>"; /// _Email.Body = "aaaaaaaaaaaaa"; /// _Email.SmtpServer = "smtp.163.com"; /// _Email.SmtpUserName = "aaa"; /// _Email.SmtpPassword = "aaa"; /// _Email.Send("test@163.com"); /// </code> /// </example> /// <param name="toEmail">收信人 接收方地址</param> /// <returns>成功否</returns> public bool SmtpMailSend(string toEmail) { lock (lockHelper) { System.Web.Mail.MailMessage msg = new System.Web.Mail.MailMessage(); try { msg.From = _FromEmail;//发送方地址(如test@163.com) msg.To = toEmail;//接收方地址 msg.BodyFormat = _Format;//正文内容类型 msg.BodyEncoding = _Encoding;//正文内容编码 msg.Subject = _Subject;//主题 msg.Body = _Body;//内容 msg.Fields.Add("http://schemas.microsoft.com/cdo/configuration/smtpauthenticate", "1");//设置为需要用户验证 if (!_SmtpPort.Equals("25")) msg.Fields.Add("http://schemas.microsoft.com/cdo/configuration/smtpserverport", _SmtpPort);//设置端口 msg.Fields.Add("http://schemas.microsoft.com/cdo/configuration/sendusername", _SmtpUserName);//设置验证用户名 msg.Fields.Add("http://schemas.microsoft.com/cdo/configuration/sendpassword", _SmtpPassword);//设置验证密码 System.Web.Mail.SmtpMail.SmtpServer = _SmtpServer;//邮件服务器地址(如smtp.163.com) System.Web.Mail.SmtpMail.Send(msg);//发送 return true; } catch { } finally { } } return false; } /// <summary> /// 发送EMAIL /// </summary> /// <param name="toEmail">Email</param> /// <returns>是否成功</returns> public bool CDOMessageSend(string toEmail) { lock (lockHelper) { CDO.Message objMail = new CDO.Message(); try { objMail.To = toEmail; objMail.From = _FromEmail; objMail.Subject = _Subject; if (_Format.Equals(System.Web.Mail.MailFormat.Html)) objMail.HTMLBody = _Body; else objMail.TextBody = _Body; //if (!_SmtpPort.Equals("25")) objMail.Configuration.Fields["http://schemas.microsoft.com/cdo/configuration/smtpserverport"].Value = _SmtpPort; //设置端口 objMail.Configuration.Fields["http://schemas.microsoft.com/cdo/configuration/smtpserver"].Value = _SmtpServer; objMail.Configuration.Fields["http://schemas.microsoft.com/cdo/configuration/sendusing"].Value = 1; objMail.Configuration.Fields["http://schemas.microsoft.com/cdo/configuration/smtpconnectiontimeout"].Value = 10; objMail.Configuration.Fields.Update(); objMail.Send(); return true; } catch {} finally{ } System.Runtime.InteropServices.Marshal.ReleaseComObject(objMail); objMail = null; } return false; } /// <summary> /// CDOMessageSend /// </summary> /// <param name="toEmail"></param> /// <param name="sendusing"></param> /// <returns></returns> public bool CDOMessageSend(string toEmail,int sendusing) { lock (lockHelper) { CDO.Message objMail = new CDO.Message(); try { objMail.To = toEmail; objMail.From = _FromEmail; objMail.Subject = _Subject; if (_Format.Equals(System.Web.Mail.MailFormat.Html)) objMail.HTMLBody = _Body; else objMail.TextBody = _Body; if (!_SmtpPort.Equals("25")) objMail.Configuration.Fields["http://schemas.microsoft.com/cdo/configuration/smtpserverport"].Value = _SmtpPort; //设置端口 objMail.Configuration.Fields["http://schemas.microsoft.com/cdo/configuration/smtpserver"].Value = _SmtpServer; objMail.Configuration.Fields["http://schemas.microsoft.com/cdo/configuration/sendusing"].Value = sendusing; objMail.Configuration.Fields["http://schemas.microsoft.com/cdo/configuration/sendemailaddress"].Value = _FromEmail; objMail.Configuration.Fields["http://schemas.microsoft.com/cdo/configuration/smtpuserreplyemailaddress"].Value = _FromEmail; objMail.Configuration.Fields["http://schemas.microsoft.com/cdo/configuration/smtpaccountname"].Value = _SmtpUserName; objMail.Configuration.Fields["http://schemas.microsoft.com/cdo/configuration/sendusername"].Value = _SmtpUserName; objMail.Configuration.Fields["http://schemas.microsoft.com/cdo/configuration/sendpassword"].Value = _SmtpPassword; objMail.Configuration.Fields["http://schemas.microsoft.com/cdo/configuration/smtpauthenticate"].Value=1; objMail.Configuration.Fields.Update(); objMail.Send(); return true; } catch { } finally{ } System.Runtime.InteropServices.Marshal.ReleaseComObject(objMail); objMail = null; } return false; } /// <summary> /// SmtpClientSend /// </summary> /// <param name="toEmail"></param> /// <returns></returns> public bool SmtpClientSend(string toEmail) { lock (lockHelper) { System.Net.Mail.MailMessage message = new MailMessage(_FromEmail, toEmail, _Subject, _Body); message.SubjectEncoding = _Encoding; message.BodyEncoding = _Encoding; message.IsBodyHtml = true; message.Priority = MailPriority.High; SmtpClient client = new SmtpClient(_SmtpServer); client.UseDefaultCredentials = false; client.Credentials = new NetworkCredential(_SmtpUserName, _SmtpPassword); client.DeliveryMethod = SmtpDeliveryMethod.Network; client.Port = Str.ToInt(_SmtpPort, 587); client.EnableSsl = true; try { client.Send(message); } catch { return false; } return true; } } #endregion } }

多线程服务调用:

using System; using System.Collections.Generic; using System.ComponentModel; using System.Configuration.Install; using System.ServiceProcess; using System.Collections; using System.Threading; using System.Xml; using System.IO; using System.Net.Mail; using System.Runtime.Remoting.Channels.Tcp; using System.Runtime.Remoting.Channels; using System.Runtime.Remoting; using Pub.Class; using System.Diagnostics; namespace MailService { [RunInstaller(true)] public partial class MService : ServiceBase { public static bool isRun = false; public Queue emailQueue = new Queue(); private Thread readEmailThread; private Thread[] sendEmailThread; private string[] strList = new string[] { "MailService 启动成功!", "MailService 停止!", "{2} {1} - [{0}] - 发送失败!", "{2} {1} - [{0}] - 发送成功!", "LiveRemotingService 已启动,服务端口6669。", "LiveRemotingService 停止!" }; private struct Config { public string Conn; public string LogFile; public string SmtpServer; public string UserName; public string Password; public string FromAddress; public int AmountThread; public int RecordCount; public int TimeInterval; } private Config config = new Config(); public MService() { System.Windows.Forms.Control.CheckForIllegalCrossThreadCalls = false; InitializeComponent(); if (!System.Diagnostics.EventLog.SourceExists("MailSource")) System.Diagnostics.EventLog.CreateEventSource("MailSource", "MailServiceLog"); this.eventLog1.Source = "MailSource"; this.eventLog1.Log = "MailServiceLog"; this.eventLog2.Source = "LiveRemotingSource"; this.eventLog2.Log = "MailServiceLog"; } protected override void OnStart(string[] args) { try { InitConfig(); this.eventLog1.WriteEntry(strList[0], System.Diagnostics.EventLogEntryType.SuccessAudit); this.timer1.Interval = config.TimeInterval * 1000; this.timer1.Enabled = true; sendEmailThread = new Thread[config.AmountThread]; } catch (Exception e) { this.eventLog1.WriteEntry(e.ToString(), System.Diagnostics.EventLogEntryType.Error); } } protected override void OnStop() { this.eventLog1.WriteEntry(strList[1], System.Diagnostics.EventLogEntryType.SuccessAudit); GC.Collect(); this.timer1.Enabled = false; } private void timer1_Elapsed(object sender, System.Timers.ElapsedEventArgs e) { if (isRun) return; timer1.Enabled = false; readEmailThread = new Thread(new ThreadStart(ReadEmailQuque)); readEmailThread.IsBackground = true; readEmailThread.Start(); } private void InitConfig(){ config.Conn = Pub.Class.WebConfig.GetApp("ConnString"); config.LogFile = Pub.Class.WebConfig.GetApp("logFile"); config.SmtpServer = Pub.Class.WebConfig.GetApp("SmtpServer"); config.UserName = Pub.Class.WebConfig.GetApp("UserName"); config.Password = Pub.Class.WebConfig.GetApp("Password"); config.FromAddress = Pub.Class.WebConfig.GetApp("FromAddress"); string amountThread = Pub.Class.WebConfig.GetApp("AmountThread"); config.AmountThread = amountThread.Equals("") ? 1 : Convert.ToInt32(amountThread); config.AmountThread = config.AmountThread < 1 ? 1 : config.AmountThread; string recordCount = Pub.Class.WebConfig.GetApp("RecordCount"); config.RecordCount = recordCount.Equals("") ? 1000 : Convert.ToInt32(recordCount); config.RecordCount = config.RecordCount < 1000 ? 1000 : config.RecordCount; string timeInterval = Pub.Class.WebConfig.GetApp("TimeInterval"); config.TimeInterval = timeInterval.Equals("") ? 1000 : Convert.ToInt32(timeInterval); config.TimeInterval = config.TimeInterval < 2 ? 2 : config.TimeInterval; } private void ReadEmailQuque(){ timer1.Enabled = true; IList<EC_EmailList> list = EC_EmailListFactory.Instance().SelectListByTop(config.RecordCount); if (list.Count == 0) return; isRun = true; for (int i = 0; i < list.Count; i++) { emailQueue.Enqueue(list[i]); } for (int i = 0; i < config.AmountThread; i++) { sendEmailThread[i] = new Thread(new ThreadStart(DoSendEmail)); sendEmailThread[i].Name = "Thread" + (i+1).ToString(); sendEmailThread[i].Start(); } list = null; } private void DoSendEmail(){ while (true) { EC_EmailList objMail; lock(this){ if (emailQueue.Count>0) { objMail = (EC_EmailList)emailQueue.Dequeue(); } else { isRun = false; return; } } int mailID = (int)objMail.EmailID; string strTo = objMail.To; string strSubject = objMail.Subject; string strBody = objMail.Body; string strFrom = objMail.From; string smtpServer = objMail.SmtpServer; string userName = objMail.UserName; string password = objMail.Password; bool isTrue = SendMail(strTo, strSubject, strBody, strFrom, smtpServer, userName, password, ""); EC_EmailListFactory.Instance().DeleteByID(mailID); } } public bool SendMail(string strTo, string strSubject, string strBody, string strFrom, string smtpServer, string userName, string password, string attachments) { Email email = new Email(); string strSmtpServer = smtpServer.Length > 0 ? smtpServer : config.SmtpServer.Trim(); email.SmtpServer = strSmtpServer; email.SmtpUserName = userName.Length > 0 ? userName : config.UserName.Trim(); email.SmtpPassword = password.Length > 0 ? password : config.Password.Trim(); email.SmtpPort = strSmtpServer.ToLower().Contains("gmail") ? "587" : "25"; email.EnableSsl = strSmtpServer.ToLower().Contains("gmail") ? true : false; email.FromEmail = strFrom.Length > 0 ? strFrom : config.FromAddress.Trim(); email.Subject = strSubject; email.Body = strBody; email.Encoding = System.Text.Encoding.UTF8; bool isSuccess = email.SmtpClientSend(strTo); return isSuccess; } public void ErrorLog(string strMessage) { lock(this){ StreamWriter sw = new StreamWriter(config.LogFile + "MailLog.txt", true); sw.WriteLine(strMessage); sw.Flush(); sw.Close(); } } } }

曾经运行在MSN的MCLUB的服务器上跑发EMAIL的服务。应该是安全无死锁调用。