[转载]初试jQuery EasyUI
- JavaScript
- 2011-10-22
- 191热度
- 0评论
[转载]初试jQuery EasyUI - GWPBrian - 博客园.
想必关注jQuery的同学们对jQuery EasyUI已经有所耳闻了,目前已经更新到1.0.5版本,风格与EXTJS有点相似,可以很好的满足开发人员对UI的需求。
![]() jQuery EasyUI
jQuery EasyUI
jQuery EasyUI是一组基于jQuery的UI插件集合,而jQuery EasyUI的目标就是帮助web开发者更轻松的打造出功能丰富并且美观的UI界面。开发者不需要编写复杂的javascript,也不需要对css样式 有深入的了解,开发者需要了解的只有一些简单的html标签。

jQuery EasyUI为我们提供了大多数UI控件的使用,如:accordion,combobox,menu,dialog,tabs,tree,window等等。
OK,下面就开始我们的初探之旅。
![]() jQuery EasyUI---Accordion
jQuery EasyUI---Accordion
手风琴效果,大家应该很熟悉。
基本代码:
 代码
代码
<head>
<title>Accordion</title>
<script src="../jquery-1.4.2.min.js" type="text/javascript"></script>
<script src="../jquery.easyui.min.js" type="text/javascript"></script> <link href="../themes/default/easyui.css" rel="stylesheet" type="text/css" />
<link href="../themes/icon.css" rel="stylesheet" type="text/css" /> <script type="text/javascript"></script>
</head>
<body>
<div style="overflow:auto;width:600px;height:300px;padding:10px;border:1px solid #ccc;">
<div id="aa" class="easyui-accordion" fit="true" style="width:300px;height:200px;">
<div title="Title1" style="overflow:auto;padding:10px;">
<h3>Accordion1</h3>
</div>
<div title="Title2" style="padding:10px;">
<h3>Accordion2</h3>
</div>
<div title="Title3">
<h3>Accordion3</h3>
</div>
</div>
</div>
</body>
</html>
代码非常简单,只需要简单的html就可以实现。这里最重要的就是首先要引用jquery-1.4.2.min.js和jquery.easyui.min.js。
效果:
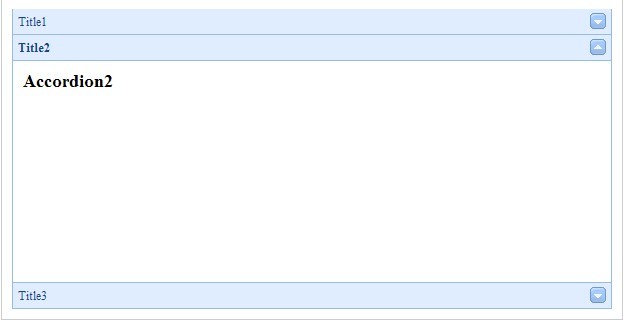
由于只是简单的html,所以我们可以通过js轻松的对Accordion进行操控,控制大小,位置等等。
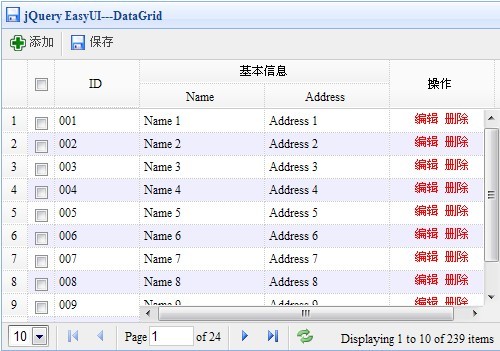
![]() jQuery EasyUI---DataGrid
jQuery EasyUI---DataGrid
从名字就可以知道这是个数据的绑定和显示控件。
基本代码:
代码
<head>
<title>DataGrid</title>
<meta http-equiv="Content-Type" content="text/html; charset=UTF-8">
<script src="../jquery-1.4.2.min.js" type="text/javascript"></script>
<script src="../jquery.easyui.min.js" type="text/javascript"></script> <link href="../themes/default/easyui.css" rel="stylesheet" type="text/css" />
<link href="../themes/icon.css" rel="stylesheet" type="text/css" /> <script type="text/javascript">
$(function() {
$('#test').datagrid({
title: 'jQuery EasyUI---DataGrid',
iconCls: 'icon-save',
width: 500,
height: 350,
nowrap: false,
striped: true,
url: '../Data/datagrid_data.json',
sortName: 'ID',
sortOrder: 'desc',
idField: 'ID',
frozenColumns: [[
{ field: 'ck', checkbox: true },
{ title: 'ID', field: 'ID', width: 80, sortable: true }
]],
columns: [[
{ title: '基本信息', colspan: 2 },
{ field: 'opt', title: '操作', width: 100, align: 'center', rowspan: 2,
formatter: function(value, rec) {
return '<span style="color:red">编辑 删除</span>';
}
}
], [
{ field: 'name', title: 'Name', width: 120 },
{ field: 'addr', title: 'Address', width: 120, rowspan: 2, sortable: true }
]],
pagination: true,
rownumbers: true,
singleSelect: false,
toolbar: [{
text: '添加',
iconCls: 'icon-add',
handler: function() {
alert('添加数据')
}
}, '-', {
text: '保存',
iconCls: 'icon-save',
handler: function() {
alert('保存数据')
}
}]
});
}); </script>
</head>
<body>
<table id="test"></table>
</body>
</html>
这里我们从datagrid_data.json中获取数据,代码的编写风格同EXTIS十分相似。ExtJS开发实践
效果:
![]() jQuery EasyUI---Dialog
jQuery EasyUI---Dialog
网页窗体效果。
基本代码:
代码
<head>
<title>Dialog</title> <script src="../jquery-1.4.2.min.js" type="text/javascript"></script>
<script src="../jquery.easyui.min.js" type="text/javascript"></script> <link href="../themes/default/easyui.css" rel="stylesheet" type="text/css" />
<link href="../themes/icon.css" rel="stylesheet" type="text/css" /> <script>
$(function(){
$('#dd').dialog({
toolbar:[{
text:'添加',
iconCls:'icon-add',
handler:function(){
alert('添加数据')
}
},'-',{
text:'保存',
iconCls:'icon-save',
handler:function(){
alert('保存数据')
}
}],
buttons:[{
text:'提交',
iconCls:'icon-ok',
handler:function(){
alert('提交数据');
}
},{
text:'取消',
handler:function(){
$('#dd').dialog('取消');
}
}]
});
}); </script>
</head>
<body>
<div id="dd" style="padding:5px;width:400px;height:200px;">
<p>jQuery EasyUI---Dialog</p>
</div>
</body>
</html>
效果:

![]() jQuery EasyUI---Tabs
jQuery EasyUI---Tabs
无论是网站还是管理软件,我们越来越多的使用Tabs,EasyUI自然也进行了支持。
基本代码:
代码
<head>
<title>Tabs</title> <script src="../jquery-1.4.2.min.js" type="text/javascript"></script>
<script src="../jquery.easyui.min.js" type="text/javascript"></script> <link href="../themes/default/easyui.css" rel="stylesheet" type="text/css" />
<link href="../themes/icon.css" rel="stylesheet" type="text/css" />
</head>
<body>
<div id="tt" class="easyui-tabs" style="width:500px;height:250px;">
<div title="Tab1" style="padding:20px;display:none;">
<h1>Tab1 Content</h1>
</div> <div title="Tab5" closable="true" style="padding:10px;display:none;">
<div class="easyui-tabs" fit="true" plain="true" style="height:100px;width:300px;">
<div title="Title1">Content 1</div>
<div title="Title2">Content 2</div>
<div title="Title3">Content 3</div>
</div>
</div>
</div>
</body>
</html>
效果:

![]() jQuery EasyUI---Messager
jQuery EasyUI---Messager
信息提示控件,可以很好的进行数据的提示,推荐。
基本代码:
代码
<head>
<title>Messager</title>
<script src="../jquery-1.4.2.min.js" type="text/javascript"></script>
<script src="../jquery.easyui.min.js" type="text/javascript"></script> <link href="../themes/default/easyui.css" rel="stylesheet" type="text/css" />
<link href="../themes/icon.css" rel="stylesheet" type="text/css" />
<script>
function show1() {
$.messager.show({
title: '提示信息1',
msg: '信息1',
showType: 'show'
});
}
function show2() {
$.messager.show({
title: '提示信息2',
msg: '信息5分钟后消失.',
timeout: 5000,
showType: 'slide'
});
}
function show3() {
$.messager.show({
title: '渐进显示信息3',
msg: '渐进显示信息3',
timeout: 0,
showType: 'fade'
});
}
</script>
</head>
<body>
<h1>信息提示</h1>
<div>
<a href="javascript:void(0)" onclick="show1()">显示</a> |
<a href="#" onclick="show2()">滑动</a> |
<a href="#" onclick="show3()">渐进显示</a> |
</div>
</body>
</html>
效果:
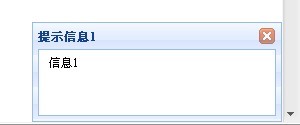 页面左下角信息提示
![]() jQuery EasyUI---ValidateBox
jQuery EasyUI---ValidateBox
数据验证控件,可以很好的对表单数据进行验证。
基本代码:
代码
<head>
<title>ValidateBox</title> <script src="../jquery-1.4.2.min.js" type="text/javascript"></script>
<script src="../jquery.easyui.min.js" type="text/javascript"></script> <link href="../themes/default/easyui.css" rel="stylesheet" type="text/css" />
<link href="../themes/icon.css" rel="stylesheet" type="text/css" />
</head>
<body>
<div>
<table>
<tr>
<td>姓名:</td>
<td><input class="easyui-validatebox" required="true" validType="length[1,3]"></td>
</tr>
<tr>
<td>电子邮件:</td>
<td><input class="easyui-validatebox" required="true" validType="email"></td>
</tr>
<tr>
<td>URL:</td>
<td><input class="easyui-validatebox" required="true" validType="url"></td>
</tr>
<tr>
<td>说明:</td>
<td><textarea class="easyui-validatebox" required="true" style="height:100px;"></textarea></td>
</tr>
</table>
</div>
</body>
</html>
不需要写任何函数,只需对要验证的控件required="true" validType="url"就可以。
效果:

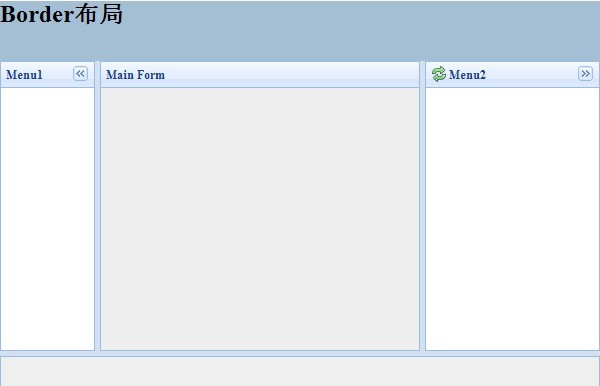
![]() jQuery EasyUI---LayOut
jQuery EasyUI---LayOut
页面布局,可以将整个页面划分成几个区域。类似ExtJS中的Border布局。
基本代码:
代码
<head>
<title>LayOut</title>
<script src="../jquery-1.4.2.min.js" type="text/javascript"></script>
<script src="../jquery.easyui.min.js" type="text/javascript"></script> <link href="../themes/default/easyui.css" rel="stylesheet" type="text/css" />
<link href="../themes/icon.css" rel="stylesheet" type="text/css" />
</head>
<body>
<div class="easyui-layout" style="width:600px;height:400px;">
<div region="north" border="false" style="overflow:hidden;height:60px;background:#A4BED4;">
<h2>Border布局</h2>
</div>
<div region="south" split="true" style="height:50px;background:#efefef;">
</div>
<div region="east" icon="icon-reload" title="Menu2" split="true" style="width:180px;">
</div>
<div region="west" split="true" title="Menu1" style="width:100px;">
</div>
<div region="center" title="Main Form" style="background:#eee;">
</div>
</div>
</body>
</html>
效果:
![]() jQuery EasyUI---换肤
jQuery EasyUI---换肤
jQuery EasyUI使用了统一的CSS样式,在修改方面也很是方便:

如图所示,对于每一个控件,都有专有的CSS。相应对其修改就可以,只需简单的了解CSS即可。
小结:jQuery EasyUI的体验就到这里,还有一些控件这里没有介绍,比如:combobox,splitbutton等等。
官方网站:http://jquery-easyui.wikidot.com/start