简述
HTTPS对比HTTP就多了一个安全层SSL/TLS,具体就是验证服务端的证书和对内容进行加密。
先来看看HTTP和HTTPS的区别
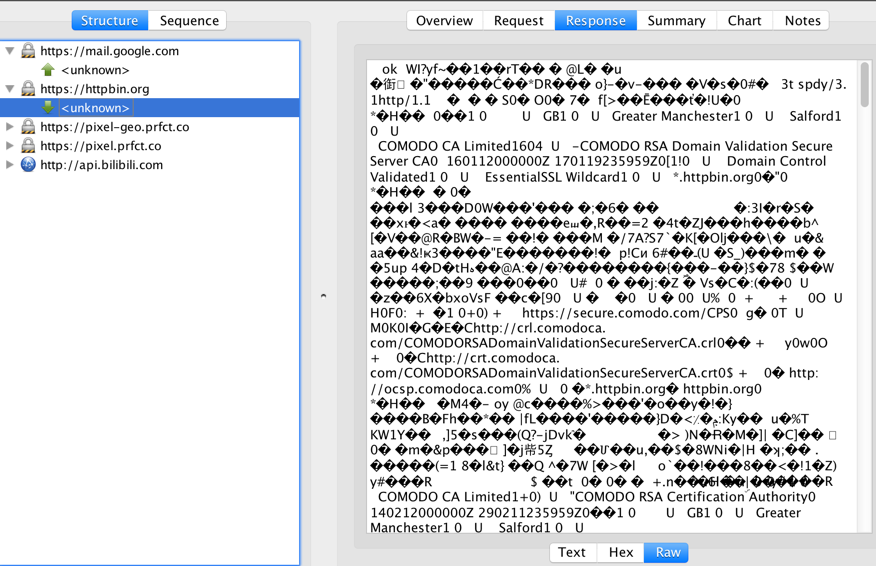
我用AFN访问http下的httpbin.org/image/png
然后用Charles抓一下包,可以看到传输的图片
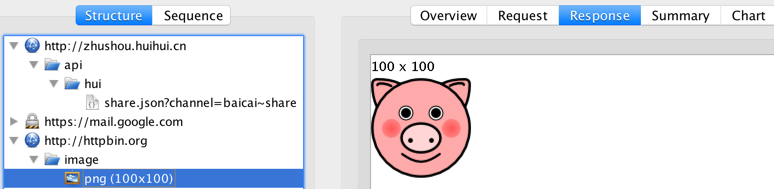
然后访问HTTPS下的https://httpbin.org/image/png
再抓包,看到数据是乱码,这就是加密过后的数据
关于加密算法
1)对称加密:密钥只有一个,加密解密为同一个密码,且加解密速度快,典型的对称加密算法有DES、AES等;
2)非对称加密:非对称加密算法需要两个密钥:公开密钥(publickey)和私有密钥(privatekey)。公开密钥与私有密钥是一对,如 果用公开密钥对数据进行加密,只有用对应的私有密钥才能解密;如果用私有密钥对数据进行加密,那么只有用对应的公开密钥才能解密。因为加密和解密使用的是 两个不同的密钥,所以这种算法叫作非对称加密算法。
过程就像我们用github的时候也是这样,我们电脑这里生成私钥和公钥,公钥上传到github,私钥添加到我们电脑的ssh里,这样github给我们传输数据就是用我们上传的公钥来加密,我们获得数据后会用私钥去解密。
什么是SSL/TLS
TLS是 Transport Layer Security的缩写,传输层安全性协议,SSL是Secure Sockets Layer的缩写,安全sokects层协议。SSL/TLS有很多好处,强大的验证,算法灵活,容易部署和使用。缺点是增加处理器的负担,但是消耗的性 能很小,对比安全性来说可以忽略不计。
通信过程
通信过程有四次握手。
1、客户端发送请求,服务器返回公钥给客户端;
2、客户端生成对称加密秘钥,用公钥对其进行加密后,返回给服务器;
3、服务器收到后,利用私钥解开得到对称加密秘钥,保存;
4、之后的交互都使用对称加密后的数据进行交互。
HTTPS通信的优点
1)客户端产生的密钥只有客户端和服务器端能得到;
2)加密的数据只有客户端和服务器端才能得到明文;
3)客户端到服务端的通信是安全的。
如何获得证书
2.自制证书
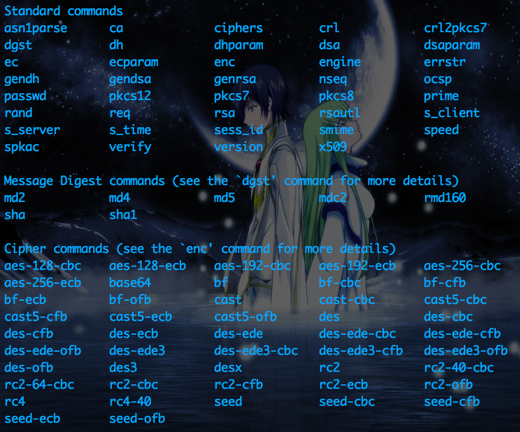
还有一种方式就是自制证书,自制证书的证书是用OpenSSL生成的。OpenSSL 是一个强大的安全套接字层密码库,囊括主要的密码算法、常用的密钥和证书封装管理功能及SSL协议,并且已经在github上开源。
OpenSSL的各种指令
自制证书的命令是
|
1
|
openssl req -x509 -newkey rsa:2048 -keyout key.pem -out cert.pem -days XXX |
刚开始输入命令就会自动生成key.pem
输入命令后会让你输入密码、国家、省市、组织(公司)、名字等信息
输入完成便会生成证书cert.pem
关于命令的一些选项:
- req 是证书请求和生成的程序
- -x509 一种证书标准
- -newkey arg,arg是参数,例如rsa:2048是指生成2048位的rsa key
- -keyout filename 输出的根证书文件名
- -out filename 输出的标准证书文件吗
- -day n 用X.509标准的话要指定验证多少天,默认30
*
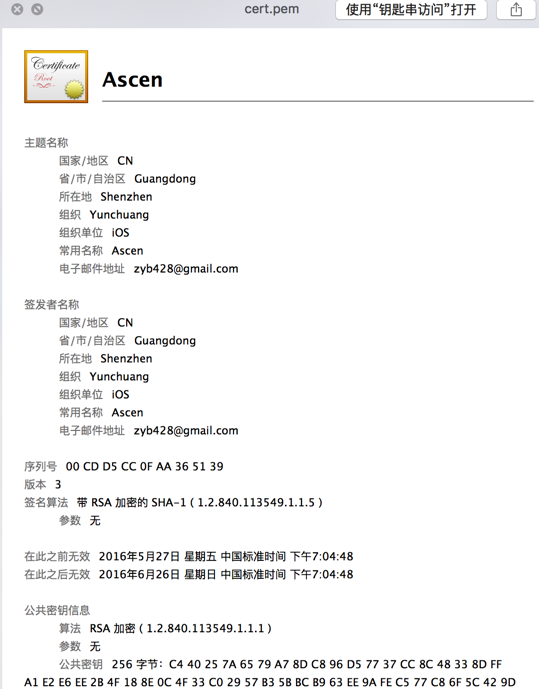
预览cert.pem可以看到刚才输入的信息
pem可以转换成cer格式,可以用命令
|
1
|
openssl x509 -in <你的服务器证书>.pem -outform der -out server.cer |
也可以双击 cert.pem,这样是导入到钥匙串,打开钥匙串便可导出cer格式的证书。
以上 部分自制证书资料参考的是stackoverflow的这个问题
关于Security框架
看了一下苹果的官方文档,Security框架是C语言写的,提供了一些管理标识码,证书,数字签名,信任等的API。
这里介绍一下几个常用的对象。SecIdentityRef 代码一个标识码对象,struct类型,包含一个SecKeyRef类型和一个SecCertificateRef类型。SecKeyRef就是一个非对称的key对象。SecCertificateRef是一个遵循X.509标准的证书对象。如果这两个对象没有存储到keychain中,则会把它们转换成SecKeychainItemRef对象还会使Keychain Services的函数返回错误。
要生成p12证书,这让我想起配置推送证书的时候,导出证书的时候便是把cer格式的证书转换成p12格式的证书。
iOS实现HTTPS传输
因为项目都是用AFN,所以就大概说下AFN的实现方法
如果是CA认证的证书,则直接用AFN请求便可。
|
1
2
3
4
5
6
7
8
9
10
11
|
AFSecurityPolicy * securityPolicy = [AFSecurityPolicy policyWithPinningMode:AFSSLPinningModeCertificate];//allowInvalidCertificates 是否允许无效证书(也就是自建的证书),默认为NO//如果是需要验证自建证书,需要设置为YESsecurityPolicy.allowInvalidCertificates = YES;//validatesDomainName 是否需要验证域名,默认为YES;//假如证书的域名与你请求的域名不一致,需把该项设置为NO;如设成NO的话,即服务器使用其他可信任机构颁发的证书,也可以建立连接,这个非常危险,建议打开。// 置为NO,主要用于这种情况:客户端请求的是子域名,而证书上的是另外一个域名。因为SSL证书上的域名是独立的,假如证书上注册的域名是 www.google.com,那么mail.google.com是无法验证通过的;当然,有钱可以注册通配符的域名*.google.com,但这个 还是比较贵的。//如置为NO,建议自己添加对应域名的校验逻辑。securityPolicy.validatesDomainName = YES; |
如果是自制证书,则客户端需要导入服务端的公钥,把公钥拖进Xocde里,这里要用到把证书从pem转换成p12格式,参见上面的方法
2.修改验证方式
|
1
2
3
4
5
6
7
8
9
10
11
12
13
14
15
16
17
18
19
20
21
22
23
24
25
26
27
28
29
30
31
32
33
34
35
36
37
38
39
40
41
42
43
44
45
46
47
48
49
50
51
52
53
|
- (void)testClientCertificate { SecIdentityRef identity = NULL; SecTrustRef trust = NULL; NSString *p12 = [[NSBundle mainBundle] pathForResource:@"testClient" ofType:@"p12"]; NSData *PKCS12Data = [NSData dataWithContentsOfFile:p12]; [[self class] extractIdentity:&identity andTrust:&trust fromPKCS12Data:PKCS12Data]; NSDictionary *dic = @{@"request" : @{ @"orderNo" : @"1409282102222110030643", @"type" : @(2) } }; _signString = nil; NSData *postData = [NSJSONSerialization dataWithJSONObject:dic options:NSJSONWritingPrettyPrinted error:nil]; NSString *sign = [self signWithSignKey:@"test" params:dic]; NSMutableData *body = [postData mutableCopy]; NSLog(@"%@", [[NSString alloc] initWithData:body encoding:NSUTF8StringEncoding]); url = [NSString stringWithFormat:url, sign]; AFHTTPRequestOperationManager *manager = [AFHTTPRequestOperationManager manager]; manager.requestSerializer = [AFJSONRequestSerializer serializer]; manager.responseSerializer = [AFJSONResponseSerializer serializer]; [manager.requestSerializer setValue:@"application/json" forHTTPHeaderField:@"Accept"]; [manager.requestSerializer setValue:@"application/json" forHTTPHeaderField:@"Content-Type"]; manager.responseSerializer.acceptableContentTypes = [NSSet setWithArray:@[@"application/json", @"text/plain"]]; manager.securityPolicy = [self customSecurityPolicy]; } failure:^(AFHTTPRequestOperation *operation, NSError *error) { NSLog(@"Error: %@", error); }];}// 下面这段代码是处理SSL安全性问题的:/**** SSL Pinning ****/- (AFSecurityPolicy*)customSecurityPolicy { NSString *cerPath = [[NSBundle mainBundle] pathForResource:@"testClient" ofType:@"cer"]; NSData *certData = [NSData dataWithContentsOfFile:cerPath]; AFSecurityPolicy *securityPolicy = [AFSecurityPolicy defaultPolicy]; [securityPolicy setAllowInvalidCertificates:YES]; [securityPolicy setPinnedCertificates:@[certData]]; [securityPolicy setSSLPinningMode:AFSSLPinningModeCertificate]; /**** SSL Pinning ****/ return securityPolicy;} |
这段代码来自参考资料3,写的很好,没必要再说一次了
总结
在现在网络越来越发达的情况下,安全性越来越重要。不多说,https是趋势。
参考资料:
1.聊聊 iOS 中的网络加密 / 滕先洪
2.iOS安全系列之一:HTTPS / Jaminzzhang
3.iOS访问HTTPS SSL和TLS双向加密 / 标哥的技术博客
4.苹果相关官方文档