提高软件开发效率三板斧之二
利用CMP模式
上一章给大家总体介绍了一些提高软件开发效率的技术和技巧,在这里将给大家演示一个软件体系结构的应用,我们引用《ASP.NET电子商务高级编程》的一句话来解释“体系结构”这个词,因为演示的这个架构正是这本书中提到的。
“我们通常将体系结构看作一系列服务的集合,用来执行其他代码,这些服务应当提供有效的功能和特性来完成一些特定目标。”建立体系结构时必须牢记几个目标
1. 尽量创建可重用的代码
2. 加强设计模式和最佳实践
3. 提供通用功能
4. 提供开发基础
了解了设计体系结构的目标后,还应该明确体系结构应该提供的服务,在深入讨论之前建议大家先研究一下IbuySpy,Nile,Pet Shop等站点的体系结构,这些站点都非常好,也很正确。但这个架构要构建一个易于维护,升级,增强功能的架构。先列举一下需要架构提供的服务列表。
1. 数据服务
这里用到的时托管容器式持久性模型(CMP),它是一种设计模式,这种模式下业务对象不考虑数据从何处来,以及如何存放。业务对象可以是纯粹的业务对象,它们维护业务数据并根据业务规则判断这些数据是否正确,并且和数据库访问层没有丝毫关系。关于CMP的更多详细的信息,可以去买一本清华出版的《ASP.NET电子商务高级编程》以及相关网站资料,这里给出两个相关链接。
2. 监测服务
这里提供一套标准的服务来完成软件的监测任务。这里的监测是指记录,跟踪,错误处理,还有其它与跟踪系统正在做什么以及谁正在使用系统等相关的任务。这些服务包括跟踪变量,记录不同来源的错误和其它信息,以及使用自定义异常等
3. 安全服务
设计安全服务是为了提供足够的安全,不过这里用到的安全服务非常简单,仅仅实现了身份验证的功能,其实安全在开发过程中是一项不容忽视且相当艰巨的任务,包括防止脚本注入,数据库注入,实现数字签名,混淆代码以防止代码斜路以及web服务中的一些安全实现等。最近我买了一本《ASP.NET安全性高级编程》,那本书对在asp.net开发过程中如何实现安全性这个问题有很完整的阐述,建议大家可以买一本看看。
4. 配置服务
配置服务是用来控制应用程序所需要的配置选项的。这里的配置服务也是比较简单的,不过可以以后根据需求改进设计并加强体系结构中的这个部分。
因为篇幅有限,不可能对架构中的每个项目的每个类都逐一分析讨论,这里给出一个简单的类的功能列表,以方便你理解和使用这个架构,当然还有好多更吸引人和有用的技巧在里面,建议你下载源代码后慢慢研究一下,就这个架构我零零碎碎的看了3个多月才开始真正的使用它并把它用到实际开发中去,源代码可以去wrox的网站去下载,也可以在本篇文章提供的地址去下载,前面说了,这个架构有足够的扩展性,你完全可以根据你的需要来写一个针对access和oracle的SQLPersistenceContainer类,或者在实现安全服务的
1. CMPServices项目
|
CMPServices项目 |
|
|
类 |
功能 |
|
CMPConfigurationHandler.cs |
它负责从web.config文件的自定义配置部分加载元数据配置信息 |
|
ContainerMappingSet.cs |
元数据配置的顶层是XML根结点,包含一个容器映射的列表,这个容器映射的集合保存在ContainerMappingSet类的一个实例中。它具有基于XML结点进行自身初始化的功能,以及用于调试的手动装载功能 |
|
ContainerMapping.cs |
实现容器映射,对单个对象关系映射的抽象。它允许一个容器(如SQL持久性容器或XML容器等)获得对象实例的足够信息,该对象实例可用于执行对象关系映射,它可以让对象实例保持对底层数据源的持久性。一个容器映射最多包含4个命令映射(限于CRUD标准的4个命令)。 |
|
CommandMapping.cs |
命令映射是CRUD动作的表现,可以被底层数据源执行,对于SQL容器,定义了4个CommandMapping,分别实现Insert,Update,Select,Delete方法的支持.它还包含一个参数列表,并使属性总是显示命令的名称(可以映射到某个存储过程)和提供者提示,并允许在同一个容器和数据源中从不同的数据库得到不同的命令。 |
|
CommandParameter.cs |
它包含的信息可以将类示例的公共属性和字段映射到数据源上使用的特定命令参数,它包括下列属性:类属性,参数名称,数据类型,大小,参数方向。 |
|
PersistableObject.cs |
这是一个基类,它提供一系列让对象参与托管容器式持久性的基本功能,任何希望它的实例参与托管容器式持久性的类都必须继承这个类,它提供单条需要保持的数据。如果需要从数据库或者其它数据源获得多条数据查询结果,可以利用这个类。 |
|
PersistableObjectSet.cs |
这个类继承自PersistableObject类如果不能提前返回数据集的大小,就需要用这个类来维护一个内部数据集,这个内部数据集相当于容器执行命令后的返回数据的存储处。容器可以事先知道它处理的是PersistableObject类还是PersistableObjectSet类可以动态决定命令执行后将返回的数据结果保存在哪里。 |
|
StdPersistenceContainer.cs |
StdPersistenceContainer类是一个基类,它定义了所有容器必须提供的核心功能。这里采用类而不是接口,所以可以实现一些默认的功能,并且可以在整个架构中利用它的多态性使问题简化。 |
|
SqlPersistenceContainer.cs |
SqlPersistenceContainer是持久性容器的一个实现,是专门为SQLServer设计的,可以针对SQLServer数据库的select,insert,update,delete操作方法。该类的其它内部容器映射来分析对象的关系映射,在对象实例和数据源之间交换数据。 |
2. ConfigurationServices项目
|
ConfigurationServices项目 |
|
|
类 |
功能 |
|
SiteProfile.cs |
在这里主要提供了一些程序运行的所有对象可以用到的静态属性,比如加载元数据,CMP数据引擎的数据库类型集合,指明默认数据源的连接字符串等。这些静态成员在应用程序启动时被加载起来,也就是在Global.asax文件里实现的,下面我会讲的。
|
3. MonitorServices项目
|
MonitorServices项目 |
|
|
类 |
功能 |
|
GWTrace.cs |
GWTrace.类负责提供标准的跟踪功能。该类统一了跟踪信息的存放位置。它知道web.config文件里的一个跟踪级别开关,但跟踪不同等级详细信息时会进行识别。合理应用该类的方法可以大大方便你在开发中对代码运行的跟踪。 |
|
MonitorUtilities.cs |
该类提供了一些工具类方法,在监测系统中对其它方法非常有用,例如包含了返回机器名,应用程序名称,进程信息的方法它还提供了一个SafeFormat方法,它提供了一个安全,不引起错误的办法把对象参数转换成标准格式的字符串。 |
4. MonitorServicesLogging项目
|
MonitorServicesLogging项目 |
|
|
类 |
功能 |
|
DbErrorEntry.cs |
该类是一个PersistableObject类,在存储一条错误信息记录到数据库时,它用作与数据库的接口。它只是写入数据库或者读出的错误记录信息的一个简单的占位符号。 |
|
DbErrorEntrySet.cs |
该类时一个PersistableObjectSet类,包含了在一定数据范围内返回一列错误所需的参数信息。为了管理而检查一个特定时间段的错误记录的时候,该类非常有用 |
|
DbErrorLog.cs |
该类负责在数据库中维护错误记录信息,这些错误记录包含错误来源,运行时返回的进程等详细信息,以及实际的异常内容 |
|
FileErrorLog.cs |
该类只是简单的把错误信息记录到一个文件,虽然该类可以单独使用,但开发者不应该单独调用它,而应该调用ErrorLog类。ErrorLog类会把错误先记录到数据库,只把文本文件作为一种数据库出问题时的备份 |
|
ErrorLog.cs |
该类用于筛选错误记录,它首先尝试把错误记录送到数据库中。如果失败,他会把错误信息写入文件;如果成功,他会在文件中留下信息指出错误记录已经成功保存在数据库,并附带一个合适的错误ID。 |
|
GWException.cs |
这是一个自定义异常类,当实例化改类时,类实例可获得的错误信息就会发送给ErrorLog类,以将其持久保存到数据库或相应的文本文件中,这样就保证了开发者在任何时候实例化改类或其子类对应的异常时,错误信息都能够以可靠的形式保存下来。它还有个方法将基于一个数字键在内部资源文件ErrorMessages.resx中检索异常信息。这个数字键由GWExceptionMessages的枚举项提供 |
|
GWExceptionMessages.cs |
改类时包含了证书值的枚举项,在加载错误信息字符串时,这些证书值在资源文件内被用做键。 |
架构已经有了,现在想办法把这个架构利用到实际的开发中,这里演示一个简单的留言板程序,其中也实现了对数据库的添加,删除,修改,选择等基本功能。其实一个大的项目也无非是由这样小的独立的功能模块构建起来的,这里只是抛砖引玉。闲话不说,我们来一步一步进行。
1. 构建项目
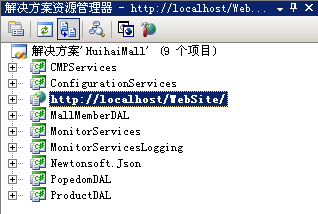
新建立一个web项目,这里是wawabook.然后把CMPServices,ConfigurationServices,MonitorServices,MonitorServicesLogging这4个文件夹拷贝到项目根目录下,并在解决方案里添加已有项目,把那这个项目添加进去。另外还有SharedAssemblyInfo.cs,GadgetsWarehouse.snk也拷贝到根目录下,一个是版权信息,一个是程序集的强名键。不用改动直接复制过来就可以。完成后解决方案管理器大致如下图。注意一下各个项目之间的依赖性,因为各个项目之间有交叉引用,关于各个项目之间的关系可以在源代码中看出来。

2. 建立数据库和相关表,存储过程
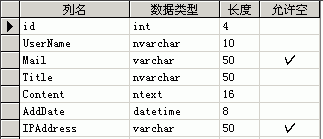
按实际的需求在SQLServer里建立数据库,表以及相应的存储过程。这里的数据库名叫wawabook,表名叫GuestBook,在创建表时最好把字段的描述信息写上,这时很有用的,方便以后查看和理解,完成后如下图。
分别建立对GuestBook表的Insert,Select,Update,Delete的存储过程如图
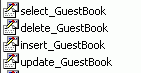
这里只给出insert_GuestBook的存储过程源码供参考,其它存储过程可以在本文附带的数据库源码中查看
 Create PROCEDURE [insert_GuestBook](@UserName [nvarchar](10), @Mail [varchar](50), @Title [nvarchar](50), @Content [ntext], @AddDate [datetime], @IPAddress [varchar](50)) AS Insert INTO [wawabook].[dbo].[GuestBook] ( [UserName], [Mail], [Title], [Content], [AddDate], [IPAddress]) VALUES ( @UserName, @Mail, @Title, @Content, @AddDate, @IPAddress)GO
另外把SystemErrors表,GW_Insert_ERRORLOG_SP存储过程复制到你新建的数据库里,因为程序出错的时候会用到这个表和存储过程来记录错误日志。 你可以自己写一个GW_GET_ERRORLOG_SP存储过程来在出错误的时候查看错误日志以分析错误的原因所在。
3. 配置web.config
这里要配置几个地方,数据库连接字符串,跟踪级别开关,元数据等,这里只说一下额外需要特殊配置的地方,具体的web.config配置根据你的程序需要而定,比如说安全小节,身份验证小节,http小节等。
1)因为元数据在web.config文件保存,而web.config是个固定格式的文件,这就要指定这个自定义节点。
<configSections> <section name="GWConfig" type="GW.CMPServices.CMPConfigurationHandler, GW.CMPServices" /></configSections>2)为了让跟踪项目能够合理的工作,需要定义项目跟踪级别,下面的小节定义了项目的跟踪级别,具体可以根据你项目实际需求来设置。要了解TraceSwitch更多的消息请查阅MSDN文档
<system.diagnostics> <switches> <add name="GWTrace" value="4" /> </switches></system.diagnostics>需要注意的是上面两个小节都在system.web节点上面
3)刚才定义了GwCfonfig自定义节点,这里用来放置CMP元数据,因为架构里的错误处理功能需要把错误信息保存到数据库里,所以错误处理所需要的元数据是必须的。另外这里给出了GuestBook容器的insert的元数据。你可以看一下元数据的结构,理解一下。因为很简单,相信你能很快写出相应的update,select,delete的元数据,记着,这些元数据和你刚刚写的存储过程是对应的。
<GWConfig> <ContainerMappingSet> <ContainerMapping> <ContainerMappingId>ERROR_LOG</ContainerMappingId> <ContainedClass>DbErrorEntry</ContainedClass> <Insert> <CommandName>GW_Insert_ERRORLOG_SP</CommandName> <Parameter> <ClassMember>ErrorMessage</ClassMember> <ParameterName>@ErrorMessage</ParameterName> <DbTypeHint>Varchar</DbTypeHint> <ParamDirection>Input</ParamDirection> <Size>4000</Size> </Parameter> <Parameter> <ClassMember>ExtendedInfo</ClassMember> <ParameterName>@ExtendedInfo</ParameterName> <DbTypeHint>Varchar</DbTypeHint> <ParamDirection>Input</ParamDirection> <Size>4000</Size> </Parameter> <Parameter> <ClassMember>ServerName</ClassMember> <ParameterName>@ServerName</ParameterName> <DbTypeHint>Varchar</DbTypeHint> <ParamDirection>Input</ParamDirection> <Size>50</Size> </Parameter> <Parameter> <ClassMember>ErrorId</ClassMember> <ParameterName>@ErrorId</ParameterName> <DbTypeHint>Int</DbTypeHint> <ParamDirection>Output</ParamDirection> <Size>4</Size> </Parameter> </Insert> <Select> <CommandName>GW_GET_ERRORLOG_SP</CommandName> <Parameter> <ClassMember>StartDate</ClassMember> <ParameterName>@StartDate</ParameterName> <DbTypeHint>Date</DbTypeHint> <ParamDirection>Input</ParamDirection> <Size>8</Size> </Parameter> <Parameter> <ClassMember>EndDate</ClassMember> <ParameterName>@EndDate</ParameterName> <DbTypeHint>Date</DbTypeHint> <ParamDirection>Input</ParamDirection> <Size>8</Size> </Parameter> </Select> </ContainerMapping> <ContainerMapping> <ContainerMappingId>GuestBook</ContainerMappingId> <ContainedClass>GuestBookSet</ContainedClass> <Insert> <CommandName>insert_GuestBook</CommandName> <Parameter> <ClassMember>UserName</ClassMember> <ParameterName>@UserName</ParameterName> <DbTypeHint>NVarChar</DbTypeHint> <ParamDirection>Input</ParamDirection> <Size>10</Size> </Parameter> <Parameter> <ClassMember>Mail</ClassMember> <ParameterName>@Mail</ParameterName> <DbTypeHint>Varchar</DbTypeHint> <ParamDirection>Input</ParamDirection> <Size>50</Size> </Parameter> <Parameter> <ClassMember>Title</ClassMember> <ParameterName>@Title</ParameterName> <DbTypeHint>NVarChar</DbTypeHint> <ParamDirection>Input</ParamDirection> <Size>50</Size> </Parameter> <Parameter> <ClassMember>Content</ClassMember> <ParameterName>@Content</ParameterName> <DbTypeHint>NText</DbTypeHint> <ParamDirection>Input</ParamDirection> <Size>10000</Size> </Parameter> <Parameter> <ClassMember>AddDate</ClassMember> <ParameterName>@AddDate</ParameterName> <DbTypeHint>Date</DbTypeHint> <ParamDirection>Input</ParamDirection> <Size>50</Size> </Parameter> <Parameter> <ClassMember>IPAddress</ClassMember> <ParameterName>@IPAddress</ParameterName> <DbTypeHint>Varchar</DbTypeHint> <ParamDirection>Input</ParamDirection> <Size>50</Size> </Parameter> </Insert> </ContainerMapping> </ContainerMappingSet> </GWConfig>4)其它固定配置
这里包括文本类型错误日志保存的目录和数据库链接字符串,这些东西一般保存在appSeettings小节里,值得注意的是为了安全考虑数据库链接字符串可以加密后再保存。Windows提供了一些API来增强安全性,.NET框架也提供了若干个加密相关的类,关于数据库连接字符串的加密可以参考一下PetShop3的DataProtector类和ConnectionInfo类,这两个类都在Utility项目下。
<appSettings> <add key="ErrorViewUrlPrefix" value="/GWSetup/ErrorLog/" /> <add key="ErrorLogBaseDir" value="E:\me\web.net\GWSetup\Errors\" /> <add key="DefaultDataSource" value="user id=sa; password=sa; database=wawabook; server=(local);" /></appSettings>当应用程序出错的时候错误处理程序会先试图在数据库做错误日志记录,如果记录成功,会在一个文本文件里做一个标志,这个文本文件的存放位置由ErrorViewUrlPrefix小节配置,如果在往数据库写错误日志也出错的话会以文本的形式记录错误日志,这个文本文件的存放位置由ErrorLogBaseDir小节来配置。
4. 修改Global.asax.cs里面的一些地方
这里要解决的问题是要在应用程序启动的时把CMP元数据加载起来,还有一些全局的变量也要在这里加载,比如说元数据映射的SQL数据类型。我们主要看一下Application_Start方法。
protected void Application_Start(Object sender, EventArgs e) {
{

 System.Configuration.ConfigurationSettings.GetConfig("GWConfig"); SiteProfile.DefaultDataSource = System.Configuration.ConfigurationSettings.AppSettings["DefaultDataSource"]; SiteProfile.DbTypeHints["Varchar"] = System.Data.SqlDbType.VarChar; SiteProfile.DbTypeHints["Int"] = System.Data.SqlDbType.Int; SiteProfile.DbTypeHints["Date"] = System.Data.SqlDbType.DateTime; SiteProfile.DbTypeHints["Text"] = System.Data.SqlDbType.Text; SiteProfile.DbTypeHints["Bit"] = System.Data.SqlDbType.Bit; SiteProfile.DbTypeHints["Money"] = System.Data.SqlDbType.Money; SiteProfile.DbTypeHints["NVarChar"] = System.Data.SqlDbType.NVarChar; SiteProfile.DbTypeHints["NText"] = System.Data.SqlDbType.NText;
 }
}如果你的程序里需要加载其它的sql类型,你可以对这个方法做适当的修改。
5. 建立BLL层和数据实体类
为了简单,我把业务逻辑层和数据库实体层放在了一个项目里。建立GuestBookBLL项目,并在里面添加两个类GuestBook和GuestBookSet.。GuestBookSet类时数据实体类,必须继承自PersistableObject类或者PersistableObjectSet.类,因为这里要用到一些大数据集,所以继承自PersistableObjectSet.类
using System;using System.Data;using System.Xml; using GW.CMPServices; namespace GuestBookBLL{ /// <summary>
 /// GuestBookSet 的摘要说明。
 /// </summary> public class GuestBookSet:PersistableObjectSet { private int _id ; private string _UserName; private string _Mail; private string _Title; private string _Content; private DateTime _AddDate; private string _IPAddress; public GuestBookSet() { // // TODO: 在此处添加构造函数逻辑 // } public int id { get { return this._id; } set { this._id = value; } } public string UserName { get { return this._UserName; } set { this._UserName = value; } } public string Mail { get { return this._Mail; } set { this._Mail = value; } } public string Title { get { return this._Title; } set { this._Title = value; } } public string Content { get { return this._Content; } set { this._Content = value; } } public DateTime AddDate { get { return this._AddDate; } set { this._AddDate = value; } } public string IPAddress { get { return this._IPAddress; } set { this._IPAddress = value; } } }}
可以看出这个类和刚才我们建立的数据库是对应的。需要注意的是你在定义类的属性时要和数据库的类型相对应,比如说数据库的字段时VarChar类型,对应的C#类型就是string类型,如果字段类型是DateTime类型,对应的C#类型是System.DateTime结构类型。关于更多的类型对应关系在MSDN里可以查到。
有了数据库实体类,我们就可以写业务逻辑了,业务逻辑我们在GuestBook类里实现,这里先看一下怎样利用架构来向数据库里写入数据,也就是填写留言功能。
public static void insert_GuestBook( string UserName,string Mail,string Title,string Content,DateTime AddDate,string IPAddress ) { GWTrace.EnteringMethod( MethodBase.GetCurrentMethod() ); SqlPersistenceContainer spc = new SqlPersistenceContainer(CMPConfigurationHandler.ContainerMaps["GuestBook"]); GuestBookSet gbs = new GuestBookSet(); gbs.UserName=UserName; gbs.Mail=Mail; gbs.Title=Title; gbs.Content=Content; gbs.AddDate=AddDate; gbs.IPAddress=IPAddress; spc.Insert( gbs ); }可以看到,先实例化一个SqlPersistenceContainer容器类,然后实例化一个GuestBookSet类,并设置这个类相应的属性,最后运行sql容器类的Insert()方法就可以完成数据插入功能了,因为SqlPersistenceContainer类已经继承了跟踪机制,所以直接在调用这个方法的时候如果.aspx页面启用了Trace就可以看到每个参数详细的赋值过程,为你跟踪应用程序提供了非常有价值的信息,如果出错你会看到程序停止在哪一步,或者能看到是由于哪个参数导致了程序运行错误。这个方法里还用到了GWTrace.EnteringMethod方法,这个方法是跟踪本方法的运行情况的,如果你想跟踪某个方法的运行情况就可以直接用那个方法,前提是你引入了以下名字控件
using GW.CMPServices;using GW.MonitorServices;using System.Reflection;using System.Diagnostics;using GW.MonitorServices.Logging;我们来看一下前台页面在调用这个方法是trace里显示的信息。
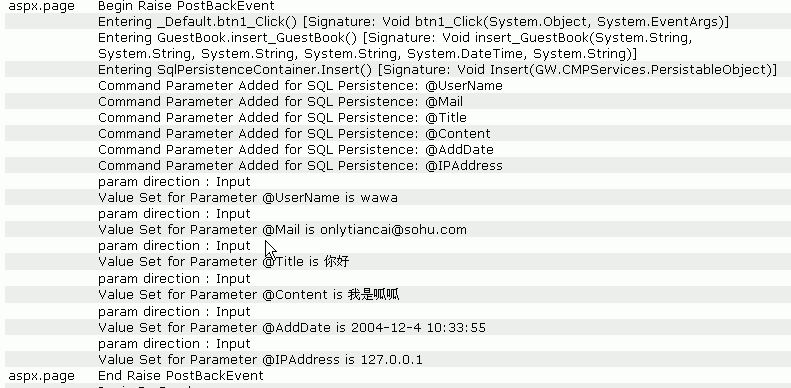
看到了吗,是不是和我说的一样,根据这里显示的信息你可以知道到底是哪里出了错误,比如说是存储过程还是页面传入的非法参数。
我们再看一下Select方法的实现,先看存储过程。
Create PROCEDURE [select_GuestBook] (@id [int]) AS if @id=-1 select * from [wawabook].[dbo].[GuestBook] else select * from [wawabook].[dbo].[GuestBook] Where ( [id] = @id )GO再来看元数据
<Select> <CommandName>select_GuestBook</CommandName> <Parameter> <ClassMember>id</ClassMember> <ParameterName>@id</ParameterName> <DbTypeHint>Int</DbTypeHint> <ParamDirection>Input</ParamDirection> <Size>4</Size> </Parameter></Select>再来看业务逻辑层对应代码
public static DataSet select_GuestBook(int id) { GWTrace.EnteringMethod( MethodBase.GetCurrentMethod() ); SqlPersistenceContainer spc = new SqlPersistenceContainer(CMPConfigurationHandler.ContainerMaps["GuestBook"]); GuestBookSet gbs = new GuestBookSet(); gbs.id=id; spc.Select( gbs ); return gbs.ResultSet; }最后看一下页面的编码类中相应的代码
private void bind_dgrd1() { //获取所有记录用来作为DataGrid的数据源 dgrd1.DataSource=GuestBook.select_GuestBook(–1); dgrd1.DataBind(); } private void dgrd1_SelectedIndexChanged(object sender, System.EventArgs e) { //当选择DataGrid上的一列是选择这列数据绑定到Label的Text属性上 int id=(int)dgrd1.DataKeys[dgrd1.SelectedIndex]; System.Text.StringBuilder sb=new System.Text.StringBuilder(); DataRow dr=GuestBook.select_GuestBook(id).Tables[0].Rows[0]; sb.AppendFormat("Title:{0}<br>Content:{1}",dr["Title"].ToString(),dr["Content"].ToString()); lbl1.Text=sb.ToString();}流程已经很明显了,你每添加一条业务规则,都要建立数据表,写存储过程,配置元数据,写业务逻辑代码,在aspx.cs调用逻辑层代码。你可以试着把留言的修改和删除功能也做出来,也就是试着使用SqlPersistenceContainer类的Update方法和Delete方法,记住操作流程了吗?先实例一个SqlPersistenceContainer类,接着实例化一个业务实体类,设置业务实体类属性,最后执行SqlPersistenceContainer类的某个方法,错误处理已经继承了,可以方便你查看出错的地方,另外你还可以抛出自定义异常GWException来自动记录应用程序正式运行后所发生的错误日志。
最后建议大家再下载架构源代码后仔细研究一下,这个 架构在你开发的整个周期都在起作用,无论是前期的调试测试还是后期的编码部署和运行,利用好它会给你带来很多的好处,我这里没有引入实现安全的项目,因为 那几个类非常简单,也不具有相当的通用性,你可以利用现有的架构来构建一个适合你自己的安全的类库,另外你也可以继续扩展你的架构中可以重复利用的功能, 比如说建立一个tools类库,把上传文件,发送邮件,过滤危险字符等通用功能集成到里面,以便其它人员随时调用,而不是再从新写一个,一般服务性的类多做一些静态方法以便不用实例化就可以调用。其实你可能已经发现了,存储过程,CMP元数据和数据实体类以及业务逻辑类大多都是和数据库的某个表相对应的,我们每次都需要一边看着数据库的字段一边来构建自己的代码,如果字段非常的多,将会是一个非常繁琐的工作,下次我会和大家一起DIY一个代码生成器,帮助你生成一部分相关代码,免除你一些重复工作。
《asp.net电子商务高级编程》源码下载如下
http://support.apress.com/books.asp?bID=1861008031&s=0&Go=Select+Book