[转载]C# 构建可扩展的应用程序(插件)

mikel阅读(872)

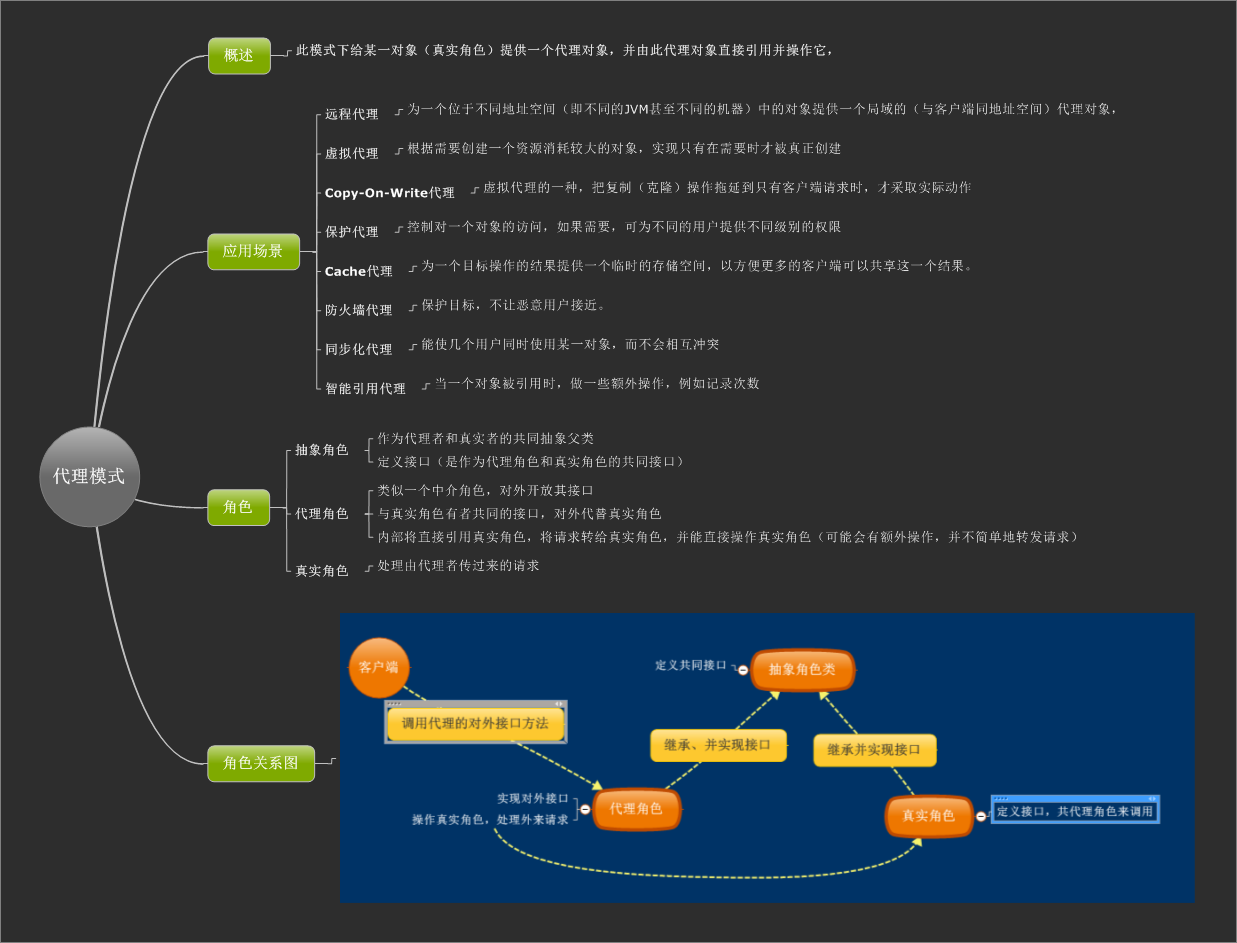
[转载]C# 构建可扩展的应用程序(插件) – suxin – 博客园.

构建可扩展的应用程序,特别是对于WinForm应用程序是特别有好处的。我们知道,企业的需求是瞬息万变的,企业在使用软件的过程中,很可能对于现有的 需求有变动甚至是提出新的需求来,可是我们的软件已经部署在企业的各个客户端中,要想将根据企业新的需求编写的模块集成到现有程序中去,我们必须重新编译 整个软件,然后打包再进行重新部署,这无疑有非常大的工作量。怎样才能将新编写的模块集成到现有程序中去,而又不用重新编译整个应用程序?这就是我们接下 来要讨论的话题。

利用C# 构建可扩展的应用程序,就是利用.Net的反射机制以及特性编程实现,原理我就不介绍了,很多C#的书籍都说的很清楚,接下来,我将演示如何搭建可扩展的应用程序。

一、首先建立一个类库IplugTypes

该类库定义了插件程序必须遵循的接口Iplug和一个自定义特性,在该类库中导入System.Windows.Forms的引用,代码如下:

1 using System; 2  using System.Collections.Generic; 3  using System.Linq; 4  using System.Text; 5 using System.Windows.Forms; 6 7 namespace IplugTypes 8 { 9 /// <summary> 10 /// 插件必须继承该接口规范 11 /// </summary> 12 public interface Iplug 13 { 14 void FormShow(Form mainForm); 15 } 16 [AttributeUsage(AttributeTargets.Class)] 17 public sealed class AssemblyInfoAndCompanyInfoAttribute : System.Attribute 18 { 19 /// <summary> 20 /// 程序集名称(不包括扩展名) 21 /// </summary> 22 public string AssemblyName { get; set; } 23 /// <summary> 24 /// 程序集版本 25 /// </summary> 26 public string AssemblyVersion { get; set; } 27 /// <summary> 28 /// 公司名称 29 /// </summary> 30 public string CompanyName { get; set; } 31 /// <summary> 32 /// 菜单名(在承载的主程序中要显示的名称) 33 /// </summary> 34 public string MenuName { get; set; } 35 public AssemblyInfoAndCompanyInfoAttribute() 36 { 37 38 } 39 40 } 41 }

二、建立WinForm插件程序

建立一个WinForm窗体程序,引入上面建立的IplugTypes类库的引用,如下图:

在该窗体类中继承IPlug接口,在Iplug接口的FormShow方法中实例化本窗体,同时用AssemblyInfoAndCompanyInfo自定义属性类描述该窗体类,代码如下:

1 using System.Drawing; 2 using System.Linq; 3 using System.Text; 4 using System.Windows.Forms; 5 using IplugTypes; 6 7 namespace WinFormIPlug 8 { 9 [AssemblyInfoAndCompanyInfo(AssemblyName = "WinFormIPlug",AssemblyVersion="1.0.0.0",CompanyName="DTXY",MenuName="C#插件")] 10 public partial class Form1 : Form,Iplug 11 { 12 public Form1() 13 { 14 InitializeComponent(); 15 } 16 17 private void button1_Click(object sender, EventArgs e) 18 { 19 MessageBox.Show("这是一个插件程序!"); 20 } 21 22 void Iplug.FormShow(Form mainForm) 23 { 24 Form1 fm = new Form1(); 25 fm.MdiParent = mainForm; 26 fm.Show(); 27 // throw new NotImplementedException(); 28 } 29 } 30 }

将该窗体的输出类型设置为类库,然后进行编译,如下图

三、构建可扩展的应用程序

建立一个名称为WindowsFormMain的窗体应用程序,添加menuStrip控件,并设置该窗体的IsMdiContainer属性为True,指示该窗体为MDI对文档父窗体。如下图:

引入对程序集IplugTypes的引用,导入System.Reflection的命名空间。然后,添加FrmAdd窗体,用于导入插件程序,如下图:

同样在FrmAdd窗体类中引入对程序集IplugTypes的引用,导入System.Reflection的命名空间,该窗体类的代码如下:

1 using System; 2 using System.Collections.Generic; 3 using System.ComponentModel; 4 using System.Data; 5 using System.Drawing; 6 using System.Linq; 7 using System.Text; 8 using System.Windows.Forms; 9 using IplugTypes; 10 using System.Reflection; 11 using System.IO; 12 13 namespace WindowsFormMain 14 { 15 public partial class FrmAdd : Form 16 { 17 public FrmAdd() 18 { 19 InitializeComponent(); 20 } 21 /// <summary> 22 /// 插件加载路径 23 /// </summary> 24 public string Path { get; private set; } 25 26 private void btnBrowse_Click(object sender, EventArgs e) 27 { 28 29 if (this.openFileDialog1.ShowDialog() == DialogResult.OK) 30 { 31 if (this.openFileDialog1.SafeFileName.Split('.')[1].ToUpper() != "DLL") 32 { 33 MessageBox.Show("您选择的不是动态类型库,扩展名为.DLL!"); 34 return; 35 } 36 string strFilePath = this.openFileDialog1.FileName; 37 Path = strFilePath; 38 this.textBox1.Text = Path; 39 if (!LoadAssembly(strFilePath)) 40 { 41 MessageBox.Show("插件加载失败,请确认插件是否支持Iplug接口!"); 42 } 43 } 44 } 45 private bool LoadAssembly(string strFilePath) 46 { 47 bool isRight = false; 48 try 49 { 50 Assembly asm = Assembly.LoadFrom(strFilePath); 51 var types = from t in asm.GetTypes() 52 where t.IsClass && t.GetInterface("Iplug") != null 53 select t; 54 if (types.Count() <= 0) 55 { 56 return isRight; 57 } 58 foreach (Type item in types) 59 { 60 DisplayAssemblyInfo(item); 61 } 62 isRight = true; 63 } 64 catch (Exception ex) 65 { 66 MessageBox.Show(ex.Message); 67 return isRight; 68 } 69 return isRight; 70 } 71 private void DisplayAssemblyInfo(Type t) 72 { 73 var asmInfo = from n in t.GetCustomAttributes(false) 74 where n.GetType() == typeof(AssemblyInfoAndCompanyInfoAttribute) 75 select n; 76 foreach (AssemblyInfoAndCompanyInfoAttribute item in asmInfo) 77 { 78 string[] strItems = { t.Assembly.GetName().Name, item.AssemblyVersion, item.CompanyName }; 79 ListViewItem lv = new ListViewItem(strItems); 80 this.listView1.Items.Add(lv); 81 } 82 } 83 84 private void btnSub_Click(object sender, EventArgs e) 85 { 86 if (string.IsNullOrEmpty(Path)) 87 { 88 MessageBox.Show("没有任何可导入的插件程序!"); 89 return; 90 } 91 FileInfo fi = new FileInfo(Path); 92 fi.CopyTo(Application.StartupPath + "\\" + fi.Name, true); 93 DialogResult = DialogResult.OK; 94 } 95 96 private void btnCancel_Click(object sender, EventArgs e) 97 { 98 DialogResult = DialogResult.Cancel; 99 } 100 } 101 }

在主窗体Form1中的MenuScript控件的File->Add-in..菜单中实例话FrmAdd窗体并以模式窗体的方式显示出来,代码如下:

1 using System; 2 using System.Collections.Generic; 3 using System.ComponentModel; 4 using System.Data; 5 using System.Drawing; 6 using System.Linq; 7 using System.Text; 8 using System.Windows.Forms; 9 using IplugTypes; 10 using System.Reflection; 11 12 namespace WindowsFormMain 13 { 14 public partial class Form1 : Form 15 { 16 public Form1() 17 { 18 InitializeComponent(); 19 } 20 21 private void Form1_Load(object sender, EventArgs e) 22 { 23 24 } 25 26 private void addInToolStripMenuItem_Click(object sender, EventArgs e) 27 { 28 FrmAdd fm = new FrmAdd(); 29 fm.ShowDialog(); 30 } 31 } 32 }

现在,插件已导入到应用程序的启动目录下,那怎样在主窗体的MenuScript菜单中创建一个插件窗体的菜单并且单击该菜单会显示出插件窗体来? 我们接下来继续讨论:

我的设计思路是:维护一个XML文件,该XML文件用于记录主窗体MenuScript的菜单项,主窗体在启动时读取该XML文件,然后动态创建菜单。

当然为了演示,我这里只是手动创建一个名叫:Iplug.xml的文件,并且保存在应用程序的启动目录下。读者完全可以在导入插件时,用程序自动创建。该XML文件的格式如下:

1 <?xml version="1.0" encoding="gb2312"?> 2 <root> 3 <menu name="C#插件" assemblyName="WinFormIPlug"> 4 </menu> 5 </root>

当然如果有多个插件,可建立多个<menu>节点,这里<menu>节点的 name属性是该插件要在主程序中显示的菜单名,assemblyName属性是插件程序集的名称(不包括.dll的扩展名)。

建立好该XML文件后,保存到主程序的启动目录下,然后在主窗体启动时读取该XML文件,动态的创建菜单。主窗体的代码如下:

1 using System; 2 using System.Collections.Generic; 3 using System.ComponentModel; 4 using System.Data; 5 using System.Drawing; 6 using System.Linq; 7 using System.Text; 8 using System.Windows.Forms; 9 using IplugTypes; 10 using System.Reflection; 11 using System.Xml; 12 using System.Xml.Linq; 13 using System.IO; 14 15 namespace WindowsFormMain 16 { 17 public partial class Form1 : Form 18 { 19 public Form1() 20 { 21 InitializeComponent(); 22 } 23 24 private void Form1_Load(object sender, EventArgs e) 25 { 26 try 27 { 28 this.AddMenus(); 29 } 30 catch (Exception ex) 31 { 32 MessageBox.Show(ex.Message, "提示", MessageBoxButtons.OK); 33 } 34 } 35 /// <summary> 36 /// 加载程序菜单 37 /// </summary> 38 private void AddMenus() 39 { 40 string strFilePath = Application.StartupPath + "\\" + "Iplug.xml"; 41 if (!File.Exists(strFilePath)) 42 { 43 XmlDocument dom = new XmlDocument(); 44 XmlDeclaration declar = dom.CreateXmlDeclaration("1.0", "utf-8", null); 45 dom.AppendChild(declar); 46 XmlElement root = dom.CreateElement("root"); 47 dom.AppendChild(root); 48 dom.Save(strFilePath); 49 } 50 else 51 { 52 XDocument xd = XDocument.Load(strFilePath); 53 54 var menus = from n in xd.Descendants("menu") 55 select n; 56 if (menus.Count() <= 0) 57 { 58 return; 59 } 60 foreach (var item in menus) 61 { 62 string menuName = item.Attribute("name").Value; 63 ToolStripMenuItem ts = (ToolStripMenuItem)this.menuStrip1.Items.Add(menuName); 64 ts.Tag = item.Attribute("assemblyName").Value; 65 ts.Click += new EventHandler(ts_Click); 66 } 67 } 68 } 69 void ts_Click(object sender, EventArgs e) 70 { 71 try 72 { 73 ToolStripMenuItem tool = (ToolStripMenuItem)sender; 74 string assemblyName = tool.Tag.ToString(); 75 Assembly asm = Assembly.Load(assemblyName); 76 var types = from n in asm.GetTypes() 77 where n.IsClass && n.GetInterface("Iplug") != null 78 select n; 79 if (types.Count() <= 0) 80 { 81 return; 82 } 83 foreach (Type t in types) 84 { 85 Iplug plug = (Iplug)Activator.CreateInstance(t); 86 plug.FormShow(this); 87 } 88 } 89 catch (Exception ex) 90 { 91 MessageBox.Show(ex.Message); 92 } 93 //throw new NotImplementedException(); 94 } 95 96 private void addInToolStripMenuItem_Click(object sender, EventArgs e) 97 { 98 FrmAdd fm = new FrmAdd(); 99 fm.ShowDialog(); 100 } 101 } 102 }

到现在为止,可扩展的应用程序已经构建完毕,希望对大家有所帮助。如有疑问请发邮件suxinzh@gmail.com联系本人。

[原创]ASP.NET 站点 Compiler Error CS1583 解决方法

mikel阅读(1270)

最近ASP.NET 站点更新了个页面就提示:

编译错误

说明: 在编译向该请求提供服务所需资源的过程中出现错误。请检查下列特定错误详细信息并适当地修改源代码。

编译器错误消息: CS1583: “c:\WINDOWS\Microsoft.NET\Framework\v2.0.50727\Temporary ASP.NET Files\root\7c0dd8c9\8db797b3\bg0ziw-q.res”不是有效的 Win32 资源文件

源错误:

[没有相关的源行]


源文件: 行: 0

警告: CS0108: “ASP.master1_master.Profile”隐藏了继承的成员“master1.Profile”。如果是有意隐藏,请使用关键字 new。
源错误:

c:\WINDOWS\Microsoft.NET\Framework\v2.0.50727\Temporary ASP.NET Files\root\7c0dd8c9\8db797b3\App_Web_master1.master.cdcab7d2.95wr8rn5.0.cs
[没有相关的源行]

警告: CS0108: “ASP.master1_master.ApplicationInstance”隐藏了继承的成员“master1.ApplicationInstance”。如果是有意隐藏,请使用关键字 new。
源错误:

c:\WINDOWS\Microsoft.NET\Framework\v2.0.50727\Temporary ASP.NET Files\root\7c0dd8c9\8db797b3\App_Web_master1.master.cdcab7d2.95wr8rn5.0.cs
[没有相关的源行]

原因是c:\WINDOWS\Microsoft.NET\Framework\v2.0.50727\Temporary ASP.NET Files\文件夹路径权限没有指定Network_Services完全控制权限
指定权限即可解决

[转载]用到JQuery或想学JQuery的朋友请注意:36小时内有效的最新免费教程

mikel阅读(972)

[转载]用到JQuery或想学JQuery的朋友请注意:36小时内有效的最新免费教程 – 喜乐的ASP.NET(Alex Song) – 博客园.

我在Scott Guthrie的博客中看到这则消息,他发布的时候应该比我早几个钟头。

Pluralsight (一个非常好的 .NET 培训公司) 给大家提供一个免费观看他们教程 jQuery 基础课程 机会, 但是只有36小时,而且没有中文的翻译,不过英文好的或者可以阅读英文的朋友应该可以看看.

image

这个课程是由 Dan Wahlin 推出的,包含 5 小时的内容.  这个课程免费观看应该是截至到北京时间星期五早上.

下面是我翻译的目录:

JQuery的基础知识
35分33秒

简介 – 为什么使用JQuery
08:46

引用一个JQuery脚本
06:24

使用CDN
04:57

使用jQuery ready函数

07:03

了解jQuery的文档

05:53

综述

02:30

使用jQuery选择器
1时6分54秒

选择器是什么?
03:10

选择节点的标记名称
02:38

演示
08:41

通过ID节点选择
01:26

ID选择器演示
02:41

选择节点的类名
03:01

类名选择演示
03:55

选择节点的属性值
02:41

属性选择器演示
04:16

选择输入节点
02:34

输入选择器演示
12:44

选择附加功能
07:11

选择附加功能演示
07:50

综述
04:06

与DOM的配合

1时10分02秒

简介
02:41

遍历节点
03:22

遍历节点演示
08:04

修改属性和属性
09:02

修改属性和属性演示
09:08

添加和删除节点
08:05

添加和删除节点演示
10:42

修改样式
01:58

修改样式演示
02:39

修改类
05:56

修改类Demo
06:50

综述
1点35分

处理事件

1点25分01秒

简介
02:05

jQuery事件模型的好处
02:58

使用JavaScript处理事件演示
03:20

处理事件
05:04

Click事件演示
06:10

演示鼠标事件
09:11

更改事件演示
05:08

绑定事件
04:01

bind函数演示
06:23

life()和delegate()
09:00

life()和delegate()演示
17:35

悬停事件处理
03:18

悬停事件演示
07:26

综述
03:22

使用Ajax特性

1点14分43秒

简介
02:39

jQuery的Ajax功能
05:39

从服务器加载HTML内容

05:26

load()函数演示
08:38

制作GET请求
07:11

get()函数演示
06:58

制作POST请求
05:57

ajax()函数
06:10

ajax()函数演示
12:05

综述
1时41分

jQuery 1.5 Visual Cheat Sheet(Jquery 备忘单)

Scott 在他这篇博客中还给大家送一个Jquery 备忘单jQuery PDF “cheat sheet” ,适用于 jQuery 1.5 APIs.

image

可以从这里下载.

[转载]理解Android的AIDL原理之代理模式

mikel阅读(1118)

[转载]理解Android的AIDL原理之代理模式 – 宁 静 致 远 – 博客园.

Android系统中的AIDL是以JAVA的RMI和代理模式为理论基础的,若要灵活掌握AIDL,有必要重新理顺这些基础知识的,这里我们先了解代理模式的相关基础,
有关代理模式的知识,可以用下面这个思维导图来表示:
这里以一个代码实例来说明实际运用:
1、抽象类Role代码
1 package com.magc.proxy; 2 3 /** 4 * @author magc 5 *代理角色和真实角色的共同抽象类 6 */ 7 public abstract class Role { 8 9 //作为代理角色和真实角色的共同接口,方便代理角色对外代替真实角色来提供服务 10 public abstract void service(String user_id); 11 12 }
2、真实角色类RealRole代码
1 package com.magc.proxy; 2 3 /** 4 * @author magc 5 * 真实角色类 6 * 对外是不可访问 7 * 8 */ 9 public class RealRole extends Role { 10 11 /* (non-Javadoc) 12 * @see com.magc.proxy.Role#service() 13 * 提供服务 14 */ 15 @Override 16 public void service(String user_id) { 17 System.out.println("真实角色为你服务……"); 18 } 19 //验证用户身份 20 public boolean CheckUser(String user_id) 21 { 22 return true; 23 } 24 25 }
3、代理类ProxyRole代码:
1 package com.magc.proxy; 2 3 /** 4 * @author magc 5 * 代理角色类 6 * 对客户端开发其接口 7 * 内部可以直接引用真实角色实例,将客户端的请求转给真实角色实例 8 * 对转发请求的前或者后面可以增加一些额外操作 9 */ 10 public class ProxyRole extends Role { 11 private RealRole realrole = null; 12 13 /* (non-Javadoc) 14 * @see com.magc.proxy.Role#service() 15 */ 16 @Override 17 public void service(String user_id) { 18 System.out.println("代理角色为你服务……"); 19 //需要时才去创建真实角色实例 20 realrole = new RealRole(); 21 //增加额外操作:验证身份 22 System.out.println("验证身份……"); 23 if(!realrole.CheckUser(user_id)) 24 return; 25 System.out.println("去找真实角色实例帮忙处理事务……"); 26 realrole.service("magc"); 27 28 System.out.println("谢谢光临……"); 29 } 30 31 }
4、测试类RoleTest类代码
1 package com.magc.proxy; 2 3 /** 4 * @author magc 5 * 代理模式测试类 6 * 作为客户端去请求调用代理类的接口。 7 * 客户端只能访问代理类,而不能访问真实角色类 8 */ 9 public class ProxyTest { 10 11 /** 12 * @param args 13 */ 14 public static void main(String[] args) { 15 16 ProxyRole proxy = new ProxyRole(); 17 proxy.service("magc"); 18 } 19 20 }
运行测试类,控制台输出结果为:
由于时间仓促,错误难免,希望能给大家有所启示,也算是在这里抛砖引玉了,呵呵

[转载]避免使用count(*)获得表的记录数,解决其延迟问题

mikel阅读(907)

[转载]避免使用count(*)获得表的记录数,解决其延迟问题 – 追索 – 博客园.

今天遇到这样一个细节问题,有个同事为了提高SQL执行效率使用sysindexes.rows来快速的计算表的行数

结果发现取出来的行数根本就不是实际表中的行数

就好比这样

为了获得表中的记录数,一般都使用下面的SQL语句:

SELECT COUNT(*) FROM dbo.orders

但这条语句会执行全表扫描才能获得行数。

下面的SQL语句不会执行全表扫描一样可以获得行数:

SELECT rows FROM sysindexes

WHERE id = OBJECT_ID(‘表名’) AND indid < 2

网上很多优化文章都推荐这种做法,无可厚非,这种计算 sysindexes 中的rows,确实比计算实际表中的行数快。

但是由于像刚才那样发生问题的情况不多所以很容易被人们所忽略其实sysindexes 是以延迟的方式更新,rows计数可能会不准确

下面就是我用两种方法获取同一个表的行数所返回的值

可以清楚的看到两组返回值并不一致

不细心的人由此可闹出不少笑话

接下来给出解决这种延迟问题的方法:

在查询分析器里面执行 DBCC UPDATEUSAGE(0, orders) with COUNT_ROWS

使用DBCC UPDATEUSAGE报告sysindexes中的页数和行数错误并进行更正

0:表示当前数据库,

orders:需要进行报告和更正的表

COUNT_ROWS:指定使用表或视图中的行数的当前计数更新 row count 列

DBCC UPDATEUSAGE应用有很多,本文没做深挖

感兴趣的朋友可查阅更多相关资料

执行完毕后提示

———————————————————————

DBCC UPDATEUSAGE: 已更新表 orders的 sysindexes 行(索引 ‘PK_PND_ORDERS’,分区 1):

行计数: 已从(7775)行更改为(7849)行。

DBCC 执行完毕。如果 DBCC 输出了错误信息,请与系统管理员联系。

———————————————————————

这时就及时更新了sysindexes使其和实际表中的行数达到一致。

好了,今天就到这里文章以实用为主,希望能对你有帮助

[转载]ASP.NET MVC---项目中用到的扩展

mikel阅读(1084)

[转载]ASP.NET MVC—项目中用到的扩展 – 迭戈 – 博客园.

摘要:本人用ASP.NET MVC开发网站已经有半年的时间了(半年的web开发经验,之前没有做过web开发,呵呵),项目中摸爬滚打,多少也积累了一些经验。写出来,一是自己的总结,二是各位大拿给提提意见。

1、关于页面中有多个Submit按钮的实现。

如果您的view要显示一些列表,那么对应的URL可能是这样:/Product/List,view的名字就是List,如果您对应的 Action名称也使用List,显然不是很明智,因为这个Action使用一个动词的形式更好,比如:GetList,那么您就需要用到

ActionNameAttribute

,对于的Action写成这样

[ActionName("Test")] public ActionResult Index()

页面中有多个Submit按钮,提交的时候如何确定执行哪个Action呢?我们可以和ActionNameAttribute一样继承ActionNameSelectorAttribute,通过这个选择器来实现页面多个Submit按钮的提交。

因为被点击的Submit标签(name和value值)会post到服务器(可用状态下),所以在view里面给每一个Submit的name属性设置一个值即可。对于的Action写法如下:

[AcceptVerbs(HttpVerbs.Post), MultiSubmitButtonSelector("SearchTest")] public ActionResult SearchTest()

MultiSubmitButtonSelector的实现和MVC已有的ActionNameAttribute实现类似,具体代码如下:

[AttributeUsage(AttributeTargets.Method, Inherited = true, AllowMultiple = false)] public class MultiSubmitButtonSelectorAttribute : ActionNameSelectorAttribute { public string SubmitButtonName { private set; get; } public MultiSubmitButtonSelectorAttribute(string submitButtonName) { SubmitButtonName = submitButtonName; } public override bool IsValidName(ControllerContext controllerContext, string actionName, System.Reflection.MethodInfo methodInfo) { if (string.IsNullOrEmpty(SubmitButtonName)) { return false; } return controllerContext.HttpContext.Request.Form[SubmitButtonName] != null; } }

即:遍历Controller中所有具有ActionNameSelectorAttribute特性的Action,用其标注的 SubmitButtonName对post进来的数据进行取值操作,如果有值,说明Submit对应的正是这个Action。如果遍历结束,依然找不到 需要执行的Action,那么会执行该Form要提交到的Action。

这样就解决了,一个Form里面有多个submit的情况,需要注意的是,当submit被点击之后不能将其变为不可用,否则无法将该submit提交到服务器端,也就找不到对应的Action了。

2、生成并导出Excel(CSV)

这样的方法,默认的框架里面并没有提供,我们要自己动手。我在项目里面使用的生成Excel(CSV)的算法请看这里。你可以这样定义一个Action:

public void ExportExcel() { //生成Excel代码 }

然后输出Excel文件,这样做并不是很好,不利于单元测试。

而MVC框架非常容易扩展,我们只需要继承ActionResult,实现里面的方法:public override void ExecuteResult(ControllerContext context),和其它的ActionResult一样即可。实例代码如下:

ExcelResult

1 public class ExcelResult<T> : ActionResult 2 { 3 public IEnumerable<T> SourceList { set; get; } 4 5 public DataTable SourceDataTable { set; get; } 6 7 public Dictionary<string, string> dic { set; get; } 8 9 public string FileName { set; get; } 10 11 public override void ExecuteResult(ControllerContext context) 12 { 13 //具体代码 14   } 15 }

我这里定义一个泛型类是为了处理不同类型的数据源。您还可以为T指定一个约束,比如:class。做完这些,还要为Controller添加相应的ExportExcel方法,这里我们就用到了扩展方法。具体代码如下:

ExportExcel方法

1 public static class ControllerExtensions 2 { 3 /// <summary> 4 /// 生成Excel Will 5 /// </summary> 6 /// <typeparam name="T">数据源类型</typeparam> 7 /// <param name="source">数据源</param> 8 /// <returns></returns> 9   public static ExcelResult<T> ExcelExport<T>(this Controller controller, object source) 10 { 11 return ExcelExport<T>(controller, source, null, null); 12 } 13 /// <summary> 14 /// 生成Excel Will 15 /// </summary> 16 /// <typeparam name="T">数据源类型</typeparam> 17 /// <param name="source">数据源</param> 18 /// <param name="dic">要对应的Excel列头信息</param> 19 /// <returns></returns> 20   public static ExcelResult<T> ExcelExport<T>(this Controller controller, object source, Dictionary<string, string> dic) 21 { 22 return ExcelExport<T>(controller, source, dic, null); 23 } 24 25 /// <summary> 26 /// 生成Excel Will 27 /// </summary> 28 /// <typeparam name="T">数据源类型</typeparam> 29 /// <param name="source">数据源</param> 30 /// <param name="dic">要对应的Excel列头信息</param> 31 /// <param name="fileName">Excel名称</param> 32 /// <returns></returns> 33   public static ExcelResult<T> ExcelExport<T>(this Controller controller, object source, Dictionary<string, string> dic, string fileName) 34 { 35 var list = source as IEnumerable<T>; 36 var dt = source as DataTable; 37 return new ExcelResult<T>() 38 { 39 SourceDataTable = dt, 40 SourceList = list, 41 dic = dic, 42 FileName = fileName 43 }; 44 } 45 }

很简单,不是吗?

3、自定义错误处理类–HandleErrorAttribute

MVC中有一个错误处理类:HandleErrorAttribute,但是功能十分有限。我在项目里面扩展了一下,多出来的功能有:

1、增加错误日志记录并发送邮件提醒

2、增加对于AJAX错误的处理

3、暂时这么多了

代码示例如下:

HandleErrorExtensionsAttribute

1 public class HandleErrorExtensionsAttribute : HandleErrorAttribute 2 { 3 public override void OnException(ExceptionContext filterContext) 4 { 5 LogError(filterContext); 6 7 if (filterContext.HttpContext.Request.IsAjaxRequest()) 8 HandleAjaxError(filterContext); 9 else 10 base.OnException(filterContext); 11 } 12 13 /// <summary> 14 /// 记录错误日志 15 /// </summary> 16 /// <param name="filterContext"></param> 17   private void LogError(ExceptionContext filterContext) 18 { 19 ILog log = LogHelper.GetInstance(); 20 21 string errorMsg = string.Format("Controller: {0}|Action: {1}|id: {2}|Message: {3}|StackTrace:{4}", 22 filterContext.RouteData.Values["controller"], filterContext.RouteData.Values["action"], 23 filterContext.RouteData.Values["id"], filterContext.Exception.Message, filterContext.Exception.StackTrace); 24 25 log.AddLog(errorMsg, DateTime.Now); 26 } 27 28 /// <summary> 29 /// 处理Ajax请求的错误 30 /// </summary> 31 /// 多数代码来自MVC框架,只是将ActionResult改成json 32 /// <param name="filterContext"></param> 33   private void HandleAjaxError(ExceptionContext filterContext) 34 { 35 if (filterContext == null) 36 { 37 throw new ArgumentNullException("filterContext"); 38 } 39 40 // If custom errors are disabled, we need to let the normal ASP.NET exception handler 41 // execute so that the user can see useful debugging information. 42   if (filterContext.ExceptionHandled || !filterContext.HttpContext.IsCustomErrorEnabled) 43 { 44 return; 45 } 46 47 Exception exception = filterContext.Exception; 48 49 // If this is not an HTTP 500 (for example, if somebody throws an HTTP 404 from an action method), 50 // ignore it. 51   if (new HttpException(null, exception).GetHttpCode() != 500) 52 { 53 return; 54 } 55 56 if (!ExceptionType.IsInstanceOfType(exception)) 57 { 58 return; 59 } 60 61 filterContext.Result = new JsonResult() { Data = string.Format("系统发送错误, {0}", filterContext.Exception.Message) }; 62 filterContext.ExceptionHandled = true; 63 filterContext.HttpContext.Response.Clear(); 64 filterContext.HttpContext.Response.StatusCode = 500; 65 66 // Certain versions of IIS will sometimes use their own error page when 67 // they detect a server error. Setting this property indicates that we 68 // want it to try to render ASP.NET MVC's error page instead. 69   filterContext.HttpContext.Response.TrySkipIisCustomErrors = true; 70 } 71 }

对于代码:filterContext.HttpContext.Request.IsAjaxRequest()是MVC提供的判断一个请求是不 是AJAX请求的方法,代码很简单,自己看一下就行了。之所以这样判断是因为现在的JavaScript类库在进行AJAX请求的时候都会在head里面 加入表示是AJAX请求的信息。

其余代码很清楚,就不多解释了。

一期的东西就写这么多暂时,MVC是一个很灵活,扩展性很好的框架,只要需要,你完全可以自定义很多东西。

[原创]ASP.NET MVC项目重构1-项目结构重构

mikel阅读(1143)

“开发中不变的只有变化!”

网站随着运营的需要从C2C改版成为B2C+新闻门户,不可避免的网站程序要重构了!程序用的是ASP.NET MVC开发的,原有网站目录结构是按照默认项目结构开发的,目录结构如图:

ASP.NET MVC 默认目录结构图

ASP.NET MVC 默认目录结构图

现在项目需要将原有网站保留,同时增加了个新的B2C的网上商城系统,如果还和原有的系统混合在一个Controllers目录下,会让维护和开发更加混乱,现有系统又需要进行重构,因此决定首先进行项目结构的重构,目的只有一个让开发更加清晰,根据需求分成两部分,也就是两个项目进行重构和开发,于是将默认的Controllers抽离出站点,独立创建了个类库,并增加了目录News将原有的的Controller移动到这里便于日后的新闻资讯功能的开发和重构,Models也移动到独立的类库中,然后依次是Components、Filters,修改后的项目结构如下:

ASP.NET MVC 项目重构后的结构

ASP.NET MVC 项目重构后的结构

然后将NewTang.Controllers进行细分为两个目录:News和Store分别将资讯和商城的Controller保存在各自的目录下

后来发现有还是结构不太清晰,于是又将Controllers拆分成两个独立的类库Controllers.News和Controllers.Store,分别进行资讯和商城的业务开发,同时保留Controllers因为里面保存着封装通用操作的BaseController的类;同时将Models也拆分成了Entity类库和保留原有的Models用于编写业务逻辑。最终的项目结构如下:

ASP.NET MVC项目结构重构最终图

ASP.NET MVC项目结构重构最终图

好了,基本上结构清晰了,不过还是需要注意的就是避免出现类似的问题还是需要避免项目匆匆上马,会为后续的修改增加很大的麻烦,过去更新程序,只改动了Models,结果就要重新编译整个项目,来更新,很费时,现在只需要生成Models,然后更新对应的dll就行了,职责也清晰多了。

下一步要进行的就是业务逻辑剥离出Controller,实现真正的MVC

[转载]Delphi的IDHTTP的基本用法

mikel阅读(1054)

[转载]转贴:Delphi的IDHTTP的基本用法 百度空间_应用平台.

一、IDHTTP的基本用法

IDHttp和WebBrowser一样,都可以实现抓取远端网页的功能,但是http方式更快、更节约资源,缺点是需要手动维护cook,连接等

IDHttp的创建,需要引入IDHttp

procedure InitHttp();
begin
http := TIdHTTP.Create(nil);
http.ReadTimeout := 30000;
http.OnRedirect := OnRedirect;
http.Request.Accept := ‘image/gif, image/x-xbitmap, image/jpeg, image/pjpeg, application/x-shockwave-flash, */*’;
http.Request.AcceptLanguage := ‘zh-cn’;
http.Request.ContentType := ‘application/x-www-form-urlencoded’;
http.Request.UserAgent := ‘Mozilla/4.0 (compatible; MSIE 6.0; Windows NT 5.1; SV1; Maxthon; .NET CLR 1.1.4322)’;

http.ProxyParams.ProxyServer := ‘代理服务器地址’;
http.ProxyParams.ProxyPort := ‘代理服务器端口’;
end;

二、如何取得服务端返回的cookie信息,并添加到http的request对象中

procedure Setcookie;
var
i: Integer;
tmp, cookie: String;
begin
cookie := ”;
for i := 0 to http.Response.RawHeaders.Count – 1 do
begin
tmp := http.Response.RawHeaders[i];
if pos(‘set-cookie: ‘, LowerCase(tmp)) = 0 then Continue;
tmp := Trim(Copy(tmp, Pos(‘Set-cookie: ‘, tmp) + Length(‘Set-cookie: ‘), Length(tmp)));
tmp := Trim(Copy(tmp, 0, Pos(‘;’, tmp) – 1));
if cookie = ” then cookie := tmp else cookie := cookie + ‘; ‘ + tmp;
end;
if cookie <> ” then
begin
for i := 0 to http.Request.RawHeaders.Count – 1 do
begin
tmp := http.Request.RawHeaders[i];
if Pos(‘cookie’, LowerCase(tmp)) = 0 then Continue;
http.Request.RawHeaders.Delete(i);
Break;
end;
http.Request.RawHeaders.Add(‘cookie: ‘ + cookie);
end;
end;

三、如何取得网页中的所有连接,对代码做修改你也可以实现查找所有图片等等

function GetURLList(Data: String): TStringList;
var
i: Integer;
List: TStringList;
tmp: String;

function Split(Data, Node: String): TStringList;
var
Count, i, j: Integer;

function GetFieldCount(Data, Node: String): Integer;
var
i: Integer;
begin
Result := -1;
i := Pos(Node, Data);
if i = 0 then Exit;
Result := 0;
while i <> 0 do
begin
Inc(Result);
Delete(Data, 1, i + Length(Node) – 1);
i := Pos(Node, Data);
end;
end;
begin
Result := TStringList.Create;
Count := GetFieldCount(Data, Node);
for i := 0 to Count – 1 do
begin
j := Pos(Node, Data);
Result.Add(Copy(Data, 1, j – 1));
Delete(Data, 1, j + Length(Node) – 1);
end;
Result.Add(Data);
end;
begin
Result := TStringList.Create;
try
List := split(Data, ‘href=’);
for i := 1 to List.Count – 1 do
begin
tmp := List[i];
tmp := Copy(tmp, 0, Pos(‘</a>’, tmp) – 1);
tmp := Copy(tmp, 0, Pos(‘>’, tmp) – 1);
if Pos(‘ ‘, tmp) <> 0 then

tmp := Copy(tmp, 0, Pos(‘ ‘, tmp) – 1);
tmp := Q_ReplaceStr(tmp, Char(34), ”);
tmp := Q_ReplaceStr(tmp, Char(39), ”);
if not Compare(CI.Key, tmp) then Continue;
if Copy(tmp, 1, 7) <> ‘http://’ then
begin
if Copy(tmp, 1, 1) = ‘.’ then tmp := StringReplace(tmp, ‘.’, ”, []);
try
tmp := ‘http://’ + http.URL.Host + ‘:’ + http.URL.Port + http.URL.Path + tmp;
except
end;
end;
if Result.IndexOf(tmp) <> -1 then Continue;
Result.Add(tmp);
end;
FreeAndNil(List);
except

end;
end;

四、如何模拟http的get方法打开一个网页

function GetMethod(http: TIDhttp; URL: String; Max: Integer): String;
var
RespData: TStringStream;
begin
RespData := TStringStream.Create(”);
try
try
Http.Get(URL, RespData);
Http.Request.Referer := URL;
Result := RespData.DataString;
except
Dec(Max);
if Max = 0 then
begin
Result := ”;
Exit;
end;
Result := GetMethod(http, URL, Max);
end;
finally
FreeAndNil(RespData);
end;
end;

五、如何模拟http的post方法提交一个网页

function PostMethod(URL, Data: String; max: Integer): String;
var
PostData, RespData: TStringStream;
begin
RespData := TStringStream.Create(”);
PostData := TStringStream.Create(Data);
try
try
if http = nil then Exit;
Http.Post(URL, PostData, RespData);
Result := RespData.DataString;
http.Request.Referer := URL;
except
Dec(Max);
if Max = 0 then
begin
Result := ”;
Exit;
end;
Result := PostMethod(URL, Data, Max);
end;
finally
http.Disconnect;
FreeAndNil(RespData);
FreeAndNil(PostData);
end;
end;

六、伪造session

var
My_Cookie,tmpcookie:string;

begin
aIdHttp.Get(‘http://www.huochepiao.net/’);
tmpcookie:=aIdHttp.Request.CustomHeaders.Values[‘Set-Cookie’];
if Pos(‘;’,tmpcookie)>0 then
My_Cookie:=LeftBStr(tmpcookie,Pos(‘;’,tmpcookie)-1)
else
My_Cookie:= tmpcookie;
//
aIdHTTP.Request.CustomHeaders.Clear;
aIdHTTP.Request.CustomHeaders.Add(‘Cookie:’+My_COOKIE);

end;

Delphi多线程抓取网页信息简单示例代码:

unit Unit1;

interface

uses
Windows, Messages, SysUtils, Variants, Classes, Graphics, Controls, Forms,
Dialogs, StdCtrls, IdHTTP;

type
TForm1 = class(TForm)
Edit1: TEdit;
Button1: TButton;
Memo1: TMemo;
procedure Button1Click(Sender: TObject);
private
{ Private declarations }
public
{ Public declarations }
end;

var
Form1: TForm1;

implementation

Function Getwebs:Integer;stdcall;
Var
myhttp: TIdhttp;
cc:string;
begin
myhttp:=Tidhttp.Create(nil);
myhttp.ReadTimeout := 30000;
try
cc := myhttp.Get(form1.Edit1.Text);
except
showmessage(‘出错!!’);
end;
form1.Memo1.lines.Text :=cc;
myhttp.Free;
Result :=0;
end;

{$R *.dfm}

procedure TForm1.Button1Click(Sender: TObject);
var
ID: THandle;
begin
CreateThread(nil, 0, @Getwebs, nil, 0, ID);
end;
end.

[转载]Screen Capture with Flash (屏幕捕捉与FLASH)

mikel阅读(1111)

[转载]Screen Capture with Flash (屏幕捕捉与FLASH) « 岩屋(Flash/Flex Evangelist).

原文出处:http://cookbooks.adobe.com/post_Screen_Capture_with_Flash-18504.html

Problem 问题

While working on numerous projects I often had requirements for doing screen capture in AS3.0. Unfortunately I found none in Google search, but got some resources which helped me to develop a component for screen capture. With the hope that this will help someone out there, I have posted it here.

在工作中,我经常遇到一些在AS3.0中使用屏幕捕捉需求的项目。不幸的是我无法在Google搜索引擎中找到答案,但是我找到一些资源可以帮助我开发屏幕捕捉组件。希望我发布的这篇文章能够帮助一些人。

Solution 解决

The SWC takes snapshots of each frames and converts it to bytesArray for storing and displaying in the end as an FLV bytes stream.

SWC为每一祯进行照相并且转化这些内容为bytesArray以便于存储和显示在最终的FLV字节流当中。

Detailed explanation 详细解释

Below is the Main mxml page developed using Adobe Flash Builder, SDK 4.1, Flash Player version 10.1.0. In this example I am doing a screen capture of the stage.  I have added a video and placed 3 buttons, Record, Stop and Play.

下面是使用Adobe Flash Builder, SDK 4.1开发的Main mxml页面,需要Flash Player 版本 10.1.0。在这个例子中我使用了一个屏幕捕捉舞台。我添加了一个视频和3个按钮,分别是录制,停止,以及播放。

On clicking on the Record button, the recording of the page starts. Once you click on stop, it stops recording.

当点击录制按钮,这个页面开始被录制。一旦点击停止按钮,将会停止录制。
Then click on Play button to see the recorded version. You may have other things/animations on stage for recording too, I have just tried with an FLV.

然后点击播放按钮去查看录制的版本。你也可以录制舞台上的其它东西以及动画,我尝试录制FLV。

The recording play is basically bytesArray of an FLV created on run-time. You can save it to your server by passing this binary data to any back-end technology – ASP.NET or PHP, etc.

录制播放是基于一个实时创建的FLV中的字节流。你也可以通过传送二进制数据到任何后台技术例如ASP.NET 或者 PHP等,将它存储到自己的服务器,

//Main.mxml

01 <?xml version="1.0" encoding="utf-8"?>
02 <s:Application xmlns:fx="http://ns.adobe.com/mxml/2009"
05 width="955" height="600"
06 addedToStage="onInit();"
07 frameRate="24" >
08
09 <fx:Script>
10 <![CDATA[
11 import com.dd.screencapture.ScreenCapture;
12 import com.dd.screencapture.SimpleFlvWriter;
13
14 private var screenCapture:ScreenCapture;
15
16 private function onInit():void
17 {
18 screenCapture = ScreenCapture.getInstance();
19 screenCapture.source = stage;
20 screenCapture.fps = 12;
21 screenCapture.size( 400, 300 );
22 screenCapture.x = 400;
23 screenCapture.y = 250;
24 stage.addChild( screenCapture );
25 }
26
27 private function startRecord( event:MouseEvent ):void
28 {
29 screenCapture.record();
30 }
31
32 private function stopRecord( event:MouseEvent ):void
33 {
34 screenCapture.stop();
35 }
36
37 private function playVideo( event:MouseEvent ):void
38 {
39 screenCapture.play();
40 }
41 ]]>
42 </fx:Script>
43 <s:VideoDisplay width="400" height="300" source="assets/myVideo.flv" />
44
45 <mx:HBox >
46 <s:Button label="Record" click="startRecord( event );" />
47 <s:Button label="Stop" click="stopRecord( event );" />
48 <s:Button label="Play" click="playVideo( event );" />
49 </mx:HBox>
50 </s:Application>

Place the ScreenCapture.swc in lib folder of the flex project. You may also use this swc for any ActionScript 3.0 projects. Kindly note that this requires Flash Player 10.1 to run properly. No audio capabilities here.

放置ScreenCapture.swc 到flex项目中的lib文件夹中。你也可以在任何ActionScript 3.0中使用这个swc。请注意,其中项目需求在Flash Player 10.1下运行,并且无法使用音频捕捉。

Interestingly, you can save the screen capture as FLV format by using this piece of code below:

感兴趣的话,你可以保存屏幕捕捉文件作为FLV格式到本地通过下面的代码:

var saveFile:FileReference = new FileReference();
saveFile.save( screenCapture.data, "video.flv" );//screenCapture is the ScreenCapture instance created in the above code block.

Resources used: http://www.zeropointnine.com/blog/simpleflvwriteras-as3-class-to-create-flvs/

可用的资源:http://www.zeropointnine.com/blog/simpleflvwriteras-as3-class-to-create-flvs/
The links shows how to save BitmapData to an FLV in binary format and then save to dish using Adobe AIR, using FileStream. I have taken the part of writing the binary data for FLV and playing that FLV as stream on run-time

这个链接显示如何存储BitmapData到一个二进制的FLV格式,然后通过ADOBE AIR存储,使用FileStream。在代码中,我已经写了如何转换二进制数据到FLV并且如何实时播放FLV流媒体。

[转载]Developing Flex 4 Components: Using ActionScript & MXML to Extend Flex and AIR Applications

mikel阅读(1046)

[转载]Developing Flex 4 Components: Using ActionScript & MXML to Extend Flex and AIR Applications-RIABook.cn.

Download Developing Flex 4 Components: Using ActionScript & MXML to Extend Flex and AIR Applications

简介 Book Description:
The Complete Insider’s Guide to Building State-of-the-Art Components with Adobe’s Flex 4 Platform
Using Adobe’s Flex 4 framework, developers can build rich, immersive solutions more easily and quickly than ever. Much of Flex 4’s remarkable power is based on its component-based approach. Adobe provides many components “out of the box,” but you can accomplish even more by building your own. In Developing Flex 4 Components, world-renowned Flex and Flash developer Mike Jones thoroughly demystifies all facets of Flex component development, showing how to quickly create and deliver high-value components to the widest possible audience.
Jones introduces the Flex 4 component architecture, reviews its built-in components, and shows how they can be extended or incorporated into new components. Next, he walks through developing components from scratch, covering issues ranging from events to skinning. Finally, he turns to distribution, introducing best practices for everything from integration to documentation.
Jones draws on nearly 15 years’ experience developing with Flex and Flash. You’ll find extensive sample code, plus dozens of practical tips that are available nowhere else. After reading this book, you’ll be able to
* Set up your Flex and Flash Builder development environment
* Understand key differences between Flex 3 and Flex 4 component frameworks
* Learn how Flex components are typically structured, developed, and rendered
* Leverage ActionScript and MXML to quickly create components
* Implement view states, transitions, effects, and events
* Manipulate and store complex data collections
* Use Flex 4’s FXG and MXMLG to support skinning and styling
* Create components with Flash Professional CS5’s drawing tools
* Integrate components with Flash Builder
* Package components for easy distribution with or without source code
* Streamline implementation with manifests, design view extensions, and metadata
If you’re an experienced Flash, Flex, or AIR developer, this book will help you create any component you can imagine–and deliver solutions others can only dream about.
“So many Flex books gloss over the details of component development, or focus just on MXML. Mike Jones has bucked tradition and written a book that can actually help beginning as well as experienced Flex developers. Mike covers topics that are not found in other books. This book is not on my shelf, it’s on my desk next to my keyboard.”
–Adrian Pomilio, UX Developer, Railinc Corp., Cary NC
“Finally, a book that covers Flex components from the ground up. I’ve been working with Flex for several years, but I have to admit that I’ve never quite grasped component development fully, let alone their styling, packaging, and distribution. Thanks for this book, Mike; it was long overdue!”
–Stefan Richter, Editor, FlashComGuru.com; Founder, muchosmedia ltd

目录 Table of Contents:
PART I: OVERVIEW AND INSTALLATION
Chapter 1 Getting Started 3
Flex 3
What Is Flex? 4
Flex SDK 4
Flex Development Versus Flash Authoring 5
Flash Builder Has No Drawing Tools or Timeline 5
Flex SWFs Are Massive 6
Flash Builder Has No Symbol Library 6
Flash Builder 6
What Does This Actually Mean to You? 7
Wrapping the Flex SDK 7
Installing Flash Builder 7
Downloading Flash Builder 8
Starting the Installation of Flash Builder 8
Launching Flash Builder 12
Creating Your First Project 12
Summary 16
Chapter 2 The Flex 4 Components 17
Components: A Potted History 17
Using Flex Components 19
Component Family Tree 20
Control Components 23
Navigator Components 31
Layout Components 34
Charting Components 37
AIR-Specific Components 37
Summary 39
Chapter 3 Anatomy of a Component 41
Component Life Cycle 41
Understanding the Structure 43
Component Constructor 44
Inherit, Composite, or Rolling Your Own 51
UIComponent 51
Something for Nothing 52
UIComponent for MXML 53
IMXMLObject 55
Template Components 56
Deferring Instantiation 56
Summary 60
PART II: DEVELOPING COMPONENTS
Chapter 4 Creating Your First Component 63
MyFirstComponent 63
Creating the Class 65
Core Component Methods 66
Adding Some Form 66
Showing Yourself Off 68
Testing It Out 69
This Belongs to Me 70
Sibling Rivalry 73
MyFirstComponent (Revised) 74
Distilling MyFirstComponent (Halo) 74
Slimming Down with MXML (Halo) 76
Distilling MyFirstComponent Down (Spark) 80
Weapon of Choice 82
Summary 82
Chapter 5 Managing States 83
What Are States? 83
Flex’s View States 84
Creating States in MXML 86
Assigning States 87
stateGroups 87
Working with States in ActionScript 90
Overrides 91
Creating and Destroying View States 98
Adding States to Components 101
Worth Noting 103
Summary 103
Chapter 6 Effects and Transitions 105
Effects 105
Effect Types 105
Working with Effects 111
Declaring Effects 111
Triggering Effects 111
Orchestrating Effects 114
Working with MotionPath and Keyframe 117
Transitions 119
Summary 123
Chapter 7 Working with Metadata 125
What Is Metadata? 125
How Do I Use Metadata? 126
Working with Metadata 128
Exposing Information About Your Component 128
Describing Events 131
Exposing Styles and Effects 132
Embedding Assets 133
Binding Data 134
Setting Defaults 135
Working with Skins 137
Excluding Component Attributes 138
Altering and Deprecating Properties and Classes 139
Providing an Icon 140
And the Rest 140
Metadata in MXML 140
Creating Your Own Metadata Tags 141
Are Metadata Tags Classes? 141
Summary 145
Chapter 8 Events and Event Handling 147
Why Events? 147
Subscribers Versus Watchers 147
Asynchronicity 148
Event Flow 148
Dispatching Events 150
Adding Event Listeners 152
Custom Events 152
Extending the Event Class 153
Cloning Events 154
Dealing with Event Priority 155
Event Priority Constants 155
Countering Events 156
Event Propagation 157
Prevent Defaults 158
Summary 159
Chapter 9 Manipulating Data 161
Defining Component Data 161
Data Providers 161
KISS 162
Managing Data 163
Collections 165
Displaying Data 177
Data Renderers 177
Rendering the UI 178
Linking itemRenders to External Data 178
Summary 185
Chapter 10 Skinning and Styling 187
Spark Versus Halo 187
Spark Skin Life Cycle 187
Where Do I Start? 189
Working with SkinnableComponent 189
partAdded(), partRemoved() 189
getCurrentSkinState() 192
Creating Component Skins 193
FXG and MXMLG 194
Creating a Component Skin 194
Drawing Nonlinear Content 198
Spark Skins and Halo Components 200
Working with Properties and Styles 202
Using CSS 202
Custom Namespaces 202
Descendant Selectors 203
ID Selectors 204
Pseudo Selectors 204
Summary 205
Chapter 11 Creating Flex Components with Flash Professional CS5 207
Picking a Starting Point 207
Starting with Flash Professional 207
Starting with Flash Builder 4 209
Implementing States 212
Implementing Transitions 213
Controlling Component Resizing 215
Bounding Boxes 216
External Manipulation 216
Creating Component Visual Assets 218
Putting It All Together 219
Adding the Transition Animations 220
Properties and Methods 220
Metadata 221
Events 222
Externalizing Component Classes 223
Container Components 226
Summary 227
PART III: DISTRIBUTION
Chapter 12 The Flex Library Project 231
Packaging Your Component 231
SWC Format 231
library.swf 232
catalog.xml 232
Locale 233
Assets 234
Working with the Flex Library Project 234
Creating a Flex Library Project 234
What If It All Goes Wrong 242
compc 242
Summary 243
Chapter 13 Component Integration in Flash Builder 4 245
Why Integrate with Flash Builder? 245
What Can I Integrate With? 246
Panel Integration 246
Design View Extensions 253
Live Previews 261
Setting Default Styles 262
Summary 263
Chapter 14 Documentation 265
Why Should I Document Code? 265
Last to the Party, First to Leave 265
Documentation Is Boring 266
My Code Is Easy to Read 266
OK I Get It, Enough Already 266
Commenting Your Code 266
Basic Comment Types 267
ASDoc Comment Blocks 267
ASDoc Tags 268
HTML Formatting 272
Special Characters 273
Metadata Comments 274
Documenting MXML 274
Bypassing Documentation 275
Generating Your Documentation 276
Command-Line Document Generation 276
Generating Documentation in Flash Builder 277
Getting to Grips with Ant 281
Summary 288
Appendix A Flex Resources 291
Blogs 291
Adobe Blogs 291
Independent Blogs 292
Resource Sites 292
Frameworks 293
Useful Tools and Extensions 293
Adobe Tools 294
Third-Party Tools 294
Logwatcher 294
Regular Expression Tools 294

下载:
http download :

from hotfile.com