[转载]Screen Capture with Flash (屏幕捕捉与FLASH)

mikel阅读(1111)

[转载]Screen Capture with Flash (屏幕捕捉与FLASH) « 岩屋(Flash/Flex Evangelist).

原文出处:http://cookbooks.adobe.com/post_Screen_Capture_with_Flash-18504.html

Problem 问题

While working on numerous projects I often had requirements for doing screen capture in AS3.0. Unfortunately I found none in Google search, but got some resources which helped me to develop a component for screen capture. With the hope that this will help someone out there, I have posted it here.

在工作中,我经常遇到一些在AS3.0中使用屏幕捕捉需求的项目。不幸的是我无法在Google搜索引擎中找到答案,但是我找到一些资源可以帮助我开发屏幕捕捉组件。希望我发布的这篇文章能够帮助一些人。

Solution 解决

The SWC takes snapshots of each frames and converts it to bytesArray for storing and displaying in the end as an FLV bytes stream.

SWC为每一祯进行照相并且转化这些内容为bytesArray以便于存储和显示在最终的FLV字节流当中。

Detailed explanation 详细解释

Below is the Main mxml page developed using Adobe Flash Builder, SDK 4.1, Flash Player version 10.1.0. In this example I am doing a screen capture of the stage.  I have added a video and placed 3 buttons, Record, Stop and Play.

下面是使用Adobe Flash Builder, SDK 4.1开发的Main mxml页面,需要Flash Player 版本 10.1.0。在这个例子中我使用了一个屏幕捕捉舞台。我添加了一个视频和3个按钮,分别是录制,停止,以及播放。

On clicking on the Record button, the recording of the page starts. Once you click on stop, it stops recording.

当点击录制按钮,这个页面开始被录制。一旦点击停止按钮,将会停止录制。
Then click on Play button to see the recorded version. You may have other things/animations on stage for recording too, I have just tried with an FLV.

然后点击播放按钮去查看录制的版本。你也可以录制舞台上的其它东西以及动画,我尝试录制FLV。

The recording play is basically bytesArray of an FLV created on run-time. You can save it to your server by passing this binary data to any back-end technology – ASP.NET or PHP, etc.

录制播放是基于一个实时创建的FLV中的字节流。你也可以通过传送二进制数据到任何后台技术例如ASP.NET 或者 PHP等,将它存储到自己的服务器,

//Main.mxml

01 <?xml version="1.0" encoding="utf-8"?>
02 <s:Application xmlns:fx="http://ns.adobe.com/mxml/2009"
05 width="955" height="600"
06 addedToStage="onInit();"
07 frameRate="24" >
08
09 <fx:Script>
10 <![CDATA[
11 import com.dd.screencapture.ScreenCapture;
12 import com.dd.screencapture.SimpleFlvWriter;
13
14 private var screenCapture:ScreenCapture;
15
16 private function onInit():void
17 {
18 screenCapture = ScreenCapture.getInstance();
19 screenCapture.source = stage;
20 screenCapture.fps = 12;
21 screenCapture.size( 400, 300 );
22 screenCapture.x = 400;
23 screenCapture.y = 250;
24 stage.addChild( screenCapture );
25 }
26
27 private function startRecord( event:MouseEvent ):void
28 {
29 screenCapture.record();
30 }
31
32 private function stopRecord( event:MouseEvent ):void
33 {
34 screenCapture.stop();
35 }
36
37 private function playVideo( event:MouseEvent ):void
38 {
39 screenCapture.play();
40 }
41 ]]>
42 </fx:Script>
43 <s:VideoDisplay width="400" height="300" source="assets/myVideo.flv" />
44
45 <mx:HBox >
46 <s:Button label="Record" click="startRecord( event );" />
47 <s:Button label="Stop" click="stopRecord( event );" />
48 <s:Button label="Play" click="playVideo( event );" />
49 </mx:HBox>
50 </s:Application>

Place the ScreenCapture.swc in lib folder of the flex project. You may also use this swc for any ActionScript 3.0 projects. Kindly note that this requires Flash Player 10.1 to run properly. No audio capabilities here.

放置ScreenCapture.swc 到flex项目中的lib文件夹中。你也可以在任何ActionScript 3.0中使用这个swc。请注意,其中项目需求在Flash Player 10.1下运行,并且无法使用音频捕捉。

Interestingly, you can save the screen capture as FLV format by using this piece of code below:

感兴趣的话,你可以保存屏幕捕捉文件作为FLV格式到本地通过下面的代码:

var saveFile:FileReference = new FileReference();
saveFile.save( screenCapture.data, "video.flv" );//screenCapture is the ScreenCapture instance created in the above code block.

Resources used: http://www.zeropointnine.com/blog/simpleflvwriteras-as3-class-to-create-flvs/

可用的资源:http://www.zeropointnine.com/blog/simpleflvwriteras-as3-class-to-create-flvs/
The links shows how to save BitmapData to an FLV in binary format and then save to dish using Adobe AIR, using FileStream. I have taken the part of writing the binary data for FLV and playing that FLV as stream on run-time

这个链接显示如何存储BitmapData到一个二进制的FLV格式,然后通过ADOBE AIR存储,使用FileStream。在代码中,我已经写了如何转换二进制数据到FLV并且如何实时播放FLV流媒体。

[转载]Developing Flex 4 Components: Using ActionScript & MXML to Extend Flex and AIR Applications

mikel阅读(1046)

[转载]Developing Flex 4 Components: Using ActionScript & MXML to Extend Flex and AIR Applications-RIABook.cn.

Download Developing Flex 4 Components: Using ActionScript & MXML to Extend Flex and AIR Applications

简介 Book Description:
The Complete Insider’s Guide to Building State-of-the-Art Components with Adobe’s Flex 4 Platform
Using Adobe’s Flex 4 framework, developers can build rich, immersive solutions more easily and quickly than ever. Much of Flex 4’s remarkable power is based on its component-based approach. Adobe provides many components “out of the box,” but you can accomplish even more by building your own. In Developing Flex 4 Components, world-renowned Flex and Flash developer Mike Jones thoroughly demystifies all facets of Flex component development, showing how to quickly create and deliver high-value components to the widest possible audience.
Jones introduces the Flex 4 component architecture, reviews its built-in components, and shows how they can be extended or incorporated into new components. Next, he walks through developing components from scratch, covering issues ranging from events to skinning. Finally, he turns to distribution, introducing best practices for everything from integration to documentation.
Jones draws on nearly 15 years’ experience developing with Flex and Flash. You’ll find extensive sample code, plus dozens of practical tips that are available nowhere else. After reading this book, you’ll be able to
* Set up your Flex and Flash Builder development environment
* Understand key differences between Flex 3 and Flex 4 component frameworks
* Learn how Flex components are typically structured, developed, and rendered
* Leverage ActionScript and MXML to quickly create components
* Implement view states, transitions, effects, and events
* Manipulate and store complex data collections
* Use Flex 4’s FXG and MXMLG to support skinning and styling
* Create components with Flash Professional CS5’s drawing tools
* Integrate components with Flash Builder
* Package components for easy distribution with or without source code
* Streamline implementation with manifests, design view extensions, and metadata
If you’re an experienced Flash, Flex, or AIR developer, this book will help you create any component you can imagine–and deliver solutions others can only dream about.
“So many Flex books gloss over the details of component development, or focus just on MXML. Mike Jones has bucked tradition and written a book that can actually help beginning as well as experienced Flex developers. Mike covers topics that are not found in other books. This book is not on my shelf, it’s on my desk next to my keyboard.”
–Adrian Pomilio, UX Developer, Railinc Corp., Cary NC
“Finally, a book that covers Flex components from the ground up. I’ve been working with Flex for several years, but I have to admit that I’ve never quite grasped component development fully, let alone their styling, packaging, and distribution. Thanks for this book, Mike; it was long overdue!”
–Stefan Richter, Editor, FlashComGuru.com; Founder, muchosmedia ltd

目录 Table of Contents:
PART I: OVERVIEW AND INSTALLATION
Chapter 1 Getting Started 3
Flex 3
What Is Flex? 4
Flex SDK 4
Flex Development Versus Flash Authoring 5
Flash Builder Has No Drawing Tools or Timeline 5
Flex SWFs Are Massive 6
Flash Builder Has No Symbol Library 6
Flash Builder 6
What Does This Actually Mean to You? 7
Wrapping the Flex SDK 7
Installing Flash Builder 7
Downloading Flash Builder 8
Starting the Installation of Flash Builder 8
Launching Flash Builder 12
Creating Your First Project 12
Summary 16
Chapter 2 The Flex 4 Components 17
Components: A Potted History 17
Using Flex Components 19
Component Family Tree 20
Control Components 23
Navigator Components 31
Layout Components 34
Charting Components 37
AIR-Specific Components 37
Summary 39
Chapter 3 Anatomy of a Component 41
Component Life Cycle 41
Understanding the Structure 43
Component Constructor 44
Inherit, Composite, or Rolling Your Own 51
UIComponent 51
Something for Nothing 52
UIComponent for MXML 53
IMXMLObject 55
Template Components 56
Deferring Instantiation 56
Summary 60
PART II: DEVELOPING COMPONENTS
Chapter 4 Creating Your First Component 63
MyFirstComponent 63
Creating the Class 65
Core Component Methods 66
Adding Some Form 66
Showing Yourself Off 68
Testing It Out 69
This Belongs to Me 70
Sibling Rivalry 73
MyFirstComponent (Revised) 74
Distilling MyFirstComponent (Halo) 74
Slimming Down with MXML (Halo) 76
Distilling MyFirstComponent Down (Spark) 80
Weapon of Choice 82
Summary 82
Chapter 5 Managing States 83
What Are States? 83
Flex’s View States 84
Creating States in MXML 86
Assigning States 87
stateGroups 87
Working with States in ActionScript 90
Overrides 91
Creating and Destroying View States 98
Adding States to Components 101
Worth Noting 103
Summary 103
Chapter 6 Effects and Transitions 105
Effects 105
Effect Types 105
Working with Effects 111
Declaring Effects 111
Triggering Effects 111
Orchestrating Effects 114
Working with MotionPath and Keyframe 117
Transitions 119
Summary 123
Chapter 7 Working with Metadata 125
What Is Metadata? 125
How Do I Use Metadata? 126
Working with Metadata 128
Exposing Information About Your Component 128
Describing Events 131
Exposing Styles and Effects 132
Embedding Assets 133
Binding Data 134
Setting Defaults 135
Working with Skins 137
Excluding Component Attributes 138
Altering and Deprecating Properties and Classes 139
Providing an Icon 140
And the Rest 140
Metadata in MXML 140
Creating Your Own Metadata Tags 141
Are Metadata Tags Classes? 141
Summary 145
Chapter 8 Events and Event Handling 147
Why Events? 147
Subscribers Versus Watchers 147
Asynchronicity 148
Event Flow 148
Dispatching Events 150
Adding Event Listeners 152
Custom Events 152
Extending the Event Class 153
Cloning Events 154
Dealing with Event Priority 155
Event Priority Constants 155
Countering Events 156
Event Propagation 157
Prevent Defaults 158
Summary 159
Chapter 9 Manipulating Data 161
Defining Component Data 161
Data Providers 161
KISS 162
Managing Data 163
Collections 165
Displaying Data 177
Data Renderers 177
Rendering the UI 178
Linking itemRenders to External Data 178
Summary 185
Chapter 10 Skinning and Styling 187
Spark Versus Halo 187
Spark Skin Life Cycle 187
Where Do I Start? 189
Working with SkinnableComponent 189
partAdded(), partRemoved() 189
getCurrentSkinState() 192
Creating Component Skins 193
FXG and MXMLG 194
Creating a Component Skin 194
Drawing Nonlinear Content 198
Spark Skins and Halo Components 200
Working with Properties and Styles 202
Using CSS 202
Custom Namespaces 202
Descendant Selectors 203
ID Selectors 204
Pseudo Selectors 204
Summary 205
Chapter 11 Creating Flex Components with Flash Professional CS5 207
Picking a Starting Point 207
Starting with Flash Professional 207
Starting with Flash Builder 4 209
Implementing States 212
Implementing Transitions 213
Controlling Component Resizing 215
Bounding Boxes 216
External Manipulation 216
Creating Component Visual Assets 218
Putting It All Together 219
Adding the Transition Animations 220
Properties and Methods 220
Metadata 221
Events 222
Externalizing Component Classes 223
Container Components 226
Summary 227
PART III: DISTRIBUTION
Chapter 12 The Flex Library Project 231
Packaging Your Component 231
SWC Format 231
library.swf 232
catalog.xml 232
Locale 233
Assets 234
Working with the Flex Library Project 234
Creating a Flex Library Project 234
What If It All Goes Wrong 242
compc 242
Summary 243
Chapter 13 Component Integration in Flash Builder 4 245
Why Integrate with Flash Builder? 245
What Can I Integrate With? 246
Panel Integration 246
Design View Extensions 253
Live Previews 261
Setting Default Styles 262
Summary 263
Chapter 14 Documentation 265
Why Should I Document Code? 265
Last to the Party, First to Leave 265
Documentation Is Boring 266
My Code Is Easy to Read 266
OK I Get It, Enough Already 266
Commenting Your Code 266
Basic Comment Types 267
ASDoc Comment Blocks 267
ASDoc Tags 268
HTML Formatting 272
Special Characters 273
Metadata Comments 274
Documenting MXML 274
Bypassing Documentation 275
Generating Your Documentation 276
Command-Line Document Generation 276
Generating Documentation in Flash Builder 277
Getting to Grips with Ant 281
Summary 288
Appendix A Flex Resources 291
Blogs 291
Adobe Blogs 291
Independent Blogs 292
Resource Sites 292
Frameworks 293
Useful Tools and Extensions 293
Adobe Tools 294
Third-Party Tools 294
Logwatcher 294
Regular Expression Tools 294

下载:
http download :

from hotfile.com

[转载]ActionScript 3.0 Game Programming University, 2nd Edition

mikel阅读(1138)

[转载]ActionScript 3.0 Game Programming University, 2nd Edition-RIABook.cn.

Download ActionScript 3.0 Game Programming University 2nd Edition

简介 Book Description:
Learn ActionScript 3.0 the fun way, by creating 16 great games: real, robust games – not just “web toys”!

* Highly-rated ActionScript tutorial, now with seven new 3D and card games!
* Code and techniques easily adaptable to training, advertising, and more
* For Flash artists learning ActionScript, Flash programmers seeking to create games, and upgraders from ActionScript 1.0/2.0.
* Includes a chapter on developing games in Flash for the iPhone!

Gary Rosenzweig’s ActionScript 3.0 Game Programming University, Second Edition is the best hands-on tutorial for learning ActionScript 3.0, the programming language behind Flash Professional CS5. You will master all the basics of ActionScript programming by building 16 robust games. One step at a time, you’ll learn techniques (and get tested code) that can be adapted to virtually any project, from games to training and advertising. The first edition earned widespread raves; Rosenzweig has now updated it with seven brand-new games that teach even more valuable ActionScript 3.0 skills and techniques.

You will first learn how Flash and ActionScript 3.0 work together, the elements of an ActionScript program, and how to build a basic game framework with ActionScript. Next, Rosenzweig walks you through building the full spectrum of ActionScript games, including brain games, animation-based games, picture puzzles, games based on direction and movement, casual games, word games, Q and A games, action games, game worlds, and more. This edition adds new chapters on card games and 3D games, with High-Low, Video Poker, Blackjack, 3D Paddle Ball, 3D Scavenger Hunt, and two other new projects.

目录 Table of Contents:
Introduction
1. Using Flash and ActionScript 3.0
2. ActionScript Game Elements
3. Basic Game Framework: A Matching Game
4. Brain Games: Memory and Deduction
5. Game Animation: Shooting and Bouncing Games
6. Picture Puzzles: Sliding and Jigsaw
7. Direction and Movement: Space Rocks, and Balloon Pop
8. Casual Games: Match Three and Collapsing Blocks
9. Word Games: Hangman and Word Search
10. Questions and Answer: Trivia and Quiz Games
11. Action Games: Platform Game
12. Game Worlds: Driving and Exploration Game
13. Card Games: Higher or Lower, Video Poker, and Blackjack
14. 3D Games: Target Practice, Racing Game, and Dungeon
Adventure
15. Building Games for the iPhone
Index

下载:
http download :

from wowebook.comActionScript 3.0 Game Programming University 2nd Edition

from fileserver.comActionScript 3.0 Game Programming University 2nd Edition

from hotfile.comActionScript 3.0 Game Programming University 2nd Edition

[转载]Oxite2插件机制分析

mikel阅读(1006)

[转载]Oxite2插件机制分析 – xuefly – 博客园.

由于Oxite1ASP.NET MVC1还未发布的时候就早早地发布了,2009215日发布的Oxite1口碑不好,但是即将发布的经过重新开发的Oxite2已经不再羸弱了,有非常多的值得观察与学习的地方。本文讨论的内容是基于Oxite2的,你可以在这里下载到最新的Oxite源码:http://oxite.codeplex.com/SourceControl/ListDownloadableCommits.aspx

欢迎加入Oxite小组一起学习:博客园Oxite小组

Oxite2的插件机制分析

一般,插件机制是基于接口实现的。但是Oxite2的插件机制是基于“约定”的。既然接口的本意是必须履行的“契约”,即,签订者必须履行的约定(签订者指非抽象类,对契约补充条款还是契约,不是契约的签订者),那么,这样说的话Oxite2的插件机制也可以算是基于“接口”的啦。“契约”是必须履行的,“约定”是非强制履行的。

小组希望我写一些关于Oxite2的插件机制的文字。我以前没有接触过插件机制,因此答应介绍这个话题,因为我可以就着Oxite2的源码趁机学习一下哈。我们小组是Oxite2开源项目学习小组,这篇文章的内容主要是通过对Oxite2代码的学习得来的,所以文章谈论的内容局限于Oxite2的插件机制,并不是ASP.NET插件机制的总结性文章。我尽最大努力保证文章内容的正确性,对于不正确的地方一定要指出来。

您需要深入理解以下内容作为阅读本文的前提:

1, 程序集

2, 反射

3, 特性(Attribute

4, 最好了解:linq, 委托,lambda

另外您还需要一份Oxite2源码

l 使用System.Web.Compilation.BuildManager动态编译代码文件为程序集

首先,Oxite2的插件机制是使用BuildManager.GetCompiledAssembly(string virtualPath)方法“将文件编译为‘给定了虚拟路径的程序集’”的。双引号内的文字摘自MSDN,单引号内的内容实在难以理解(查英文MSDN原文为:Compiles a file into an assembly given its virtual path.)希望有理解单引号内的内容的朋友回复。我先不管这个,我们先通过实验熟悉一下该方法,在HomeController中书写如下代码:

public void Compile()

{

Assembly assembly = BuildManager.GetCompiledAssembly(Request.ApplicationPath + “Plugins/HelloWorld.cs”);

Response.Write(“assembly.FullName:<br />” + assembly.FullName);

Response.Write(“<br />”);

Response.Write(“assembly.Location:<br />” + assembly.Location);

}

è 请求http://localhost:2801/Home/Compile

è 输出结果:

assembly.FullName:
App_Web_helloworld.cs.3b296ce9.iicat0p2,Version=0.0.0.0,Culture=neutral, PublicKeyToken=null
assembly.Location:
C:”Windows”Microsoft.NET”Framework”v2.0.50727″Temporary ASP.NET Files”root”836b6d34″9df6dbcc”App_Web_helloworld.cs.3b296ce9.iicat0p2.dll

好了,对BuildManager的介绍就到这里,更详细的请查看MSDN。下面贴一张图:

说明:作为插件,TwitterPlugins.cs文件的编译选项被设置为Content而不是Compile,对它的编译由我们通过使用BuildManager编码进行而不是使用VS管理编译。

上图Plugins文件夹下的cs代码是和“.aspx”等文件中声明式的代码一样通过BuildManager编译的。区别是“.aspx”等文件是在第一次请求到他们时即时编译并缓存到“Temporary ASP.NET Files”系统目录的,而对插件代码文件的编译是由我们控制的,仅此区别。Oxite2的插件机制对Plugins文件夹递归并把每一个“.cs”或者“.vb”后缀的文件编译成相应的程序集,每一个代码文件对应一个程序集(每一个”.aspx”文件也是对应一个程序集,并且App_Code特殊对待,App_Code中的每一个文件夹编译成一个程序集,对于非App_Code文件夹中的代码WebSite项目和WebApp项目编译方式不同)。

在我们了解了如何通过使用BuildManager把代码文件编译为程序集之后,后面的内容就可以直接展开了。

Oxite2插件机制

首先是PluginAssemblyContainerPluginContainer。这两个具有继承关系的类分别是对“插件程序集”和该程序集中的“插件”封装的容器类。


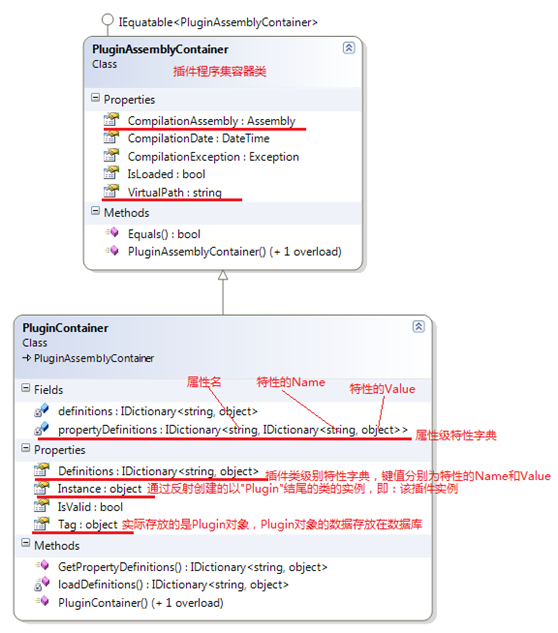
其中图上所说的“类级别特性”全都继承自DefinitionAttribute而“属性级别特性”全都继承自PropertyDefinitionAttribute

由于这两种类型的特性定义的实在太多了,并且Oxite2还有还有第二种方案——使用特定方式命名的属性和匿名类型的属性值取代特性。所以这里就不贴类图上来了。介绍一个我在学习中总结的方法,大家一看便知:比如现在我们要研究Oxite项目的ViewModels文件夹下的类:


我们首先建一个.cd文件,按照一定规则命名该类图文件,然后将ViewModels文件夹拖到该打开的类图文件上,VS就会自动给我们绘制好类图了,如下:


说明:VS绘出的ViewModels文件夹下的类的类结构图

另外VS绘制类图的功能不是仅仅支持源代码,对于dll文件照样是可以的。不过对于dll文件我们需要做的是拖放命名空间到打开的类图上,而不是拖放文件夹或者dll文件。现在你可以进去VS的对象浏览器对任何一个.NET Framework中的命名空间按照上面的说明操作一下试试了。如果有条件的话,把自己不是很熟悉的.NET命名空间下的类打印出来贴在墙上是一个不错的主意。

按照上面介绍的方法对Oxite项目中Plugins文件夹下的代码进行研究很多东西都是一目了然的啦,由于类文件太多,类图太大,大部分类仅仅是离散的用来封装数据的类,贴类图没有价值。所以这里只贴上来类文件列表并对列表上的类做一点说明:
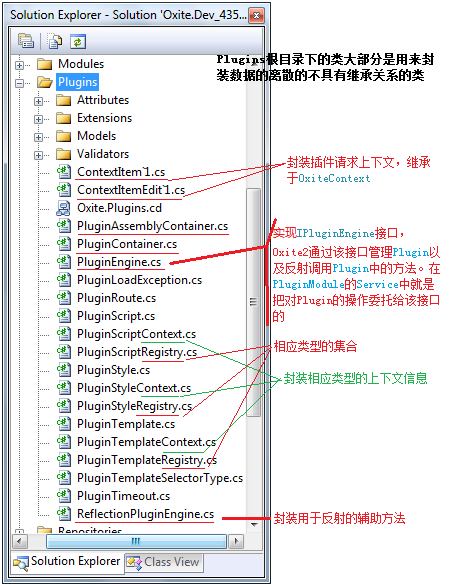

Plugins文件夹下的代码就是Oxite2的插件机制的基础构架,而Oxite项目的Modules文件夹下的Plugins文件夹中的代码正是基于该基础架构的Plugins系统模块的实现。


我们看上图中的Plugins系统模块,从类文件的组织结构看和《浅谈Oxite2的数据访问和数据验证》中所分析的结构完全一样。可以参考上一篇熟悉Plugins的数据访问和业务逻辑层。到这里应该差不多了,其实从通过使用BuildManager编译出程序集开始,下面就是很明显的方案了:加载程序集并维护一个插件程序集列表 => 通过反射反射出所有插件程序集中的插件并维护一个插件列表 => 通过反射调用插件中的约定命名的方法注册插件信息 => 通过反射“特性”或者特定命名的属性的匿名类型的属性值并使用上一步注册的模板显示数据。

下图:Oxite2中已有的Xbox Live Gamercard插件的效果


说明:可以在后台直接编辑cs源代码,重新编译代码文件,重新加载插件程序集,重新加载插件,应用程序不必重启。

[转载]Oxite 项目结构分析

mikel阅读(888)

[转载]Oxite 项目结构分析_知识库_博客园.

Oxite中有6个Project,每个项目各自作为项目架构中的不同的层。下面我们来各自的分析一下这6个项目。

我们可以看到这六个项目分别是Oxite,LinqToSQLDataProvider,MVC,Test,OxiteSite,(Oxite.Database 需要安装SQL Server2005)。

image

1. Oxite

该项目中包含了Routing的定义,Model和Services服务层的代码,还有Oxite运行时的后台服务类,配置类,同时,在该项目中也定义了数据访问层的接口,但并没有实现。

image

  • BackgroundServices 定义了插件的服务类,
  • Extensions 则是各种常用方法的扩展,如IP地址,字符串,以及反射。
  • Handlers 对HttpHandler进行重载的类。用于对用户请求进行操作。
  • Infrastructure 本目录中有大量的类,定义了公用方法,
  • Model 这个对OO来说最容易理解,就是对象的定义,在MVC中的M。
  • Repositoris Oxite的数据访问层接口,使用了Repository模式,和Linq2SQL配合。
  • Routing 对Routing规则的定义和扩展。,同时也有相应的约束。
  • Services Oxite的服务层,也就是传统三层架构中的中间服务层。内有服务的接口和具体实现。
  • Validation 一些常用的验证方法。

2. LinqToSqlDataProvider

This project contains implementations of all the repositories and uses LinqToSql for data access. Currently it doesn’t map the database directly to the entity objects but rather to an intermediate set of objects which are then translated into the standard Oxite entites. This is one of the areas we’re looking at changing in a future release.

该项目包据了数据访问层的实现,并用LinqToSql 进行数据库的操作。

image

这个Project中用到了LinqToSql,在项目架构中充当的是数据访问层的实现。

3. MVC

本项目中包含控制器和视图层的所有代码,用于Controllers到Views的数据通信,并包含用WCF所写的MetaWeblog API用于提供对外服务。

image

  • ActionFilters 定义了各种拦截器
  • Controllers 所有的Controllers都在这个目录下定义。
  • Extensions MVC框架中的一些方法扩展 BlogML,DateTime,HtmlHelper,HttpCookie
  • Infrastructure 基础类
  • ModelBinders 作用是将客户端提交的一个数据转化成Model,简单或复杂类型。为Action生成复杂对象参数
  • Results
  • Services 对外的一些服务接口。
  • Skinning 对主题皮肤操作的一些方法
  • ViewModels 从Controller中的数据绑定到View时所用到。
  • ContainerFactory 反射工厂
  • OxiteApplication.cs 将Globle中的方法转移到这里,将Site项目只负责项目的显示。

4.MVC.Test

该项目定义了整个解决方案的测试类,使用Xunit.net 测试框架。

5.Site

该项目包含视图,主题和Web.Config文件。并将所有的C#代码放在了Oxite.Mvc项目中。

image

  • Site项目中是没有C#代码的,只负责视图的显示。
  • Content 一些公用的内容,像公用图片,公用脚本,公用资源
  • Skins 皮肤。里面包含了主题所使用的样式文件和Scripts。 (我个人感觉将一些公用的Scripts放到Content下更合适。)
  • Views 视图Shared 公用的东东。像Error,MasterPage

6. Oxite.Database

数据库项目,方便数据库架构、数据的对比、更新与部署。

[转载]Discuz!NT中的Redis架构设计

mikel阅读(947)

[转载]Discuz!NT中的Redis架构设计 – 代震军BLOG – 博客园.

在之前的Discuz!NT缓存的架构方案中,曾说过Discuz!NT采用了两级缓存方式,即本地缓存+memcached方 式。在近半年多的实际运行环境下,该方案经受住了检验。现在为了提供多样式的解决方案,我在企业版里引入了Redis这个目前炙手可热的缓存架构产品,即 将memcached与Redis作为可选插件方式来提供了最终用户,尽管目前测试的结果两者的差异不是很大(毫秒级),但我想多一种选择对用户来说也是 好的。

闲话不多说了,开始今天的正文吧。

熟悉我们产品的开发者都知道,我们的产品在缓存设计上使用了策略模式(Stratety Pattern),之前在系统中就已实现了DefaultCacheStrategy和MemCachedStrategy,前者用于本地缓存方式,后者 顾名思义,就是memcached缓存方式。所以只要我们实现一个RedisStrategy策略,并适当修改加载缓存策略的代码,就可以将 memcached缓存方式替换成Redis,如下图:

下面我先将RedisStrategy的部分代码放上来,大家一看便知:

/// <summary>
/// 企业级Redis缓存策略类
/// </summary>
public class RedisStrategy : DefaultCacheStrategy
{
/// <summary>
/// 添加指定ID的对象
/// </summary>
/// <param name=”objId”></param>
/// <param name=”o”></param>
public override void AddObject(string objId, object o)
{
if (!objId.StartsWith(/Forum/ShowTopic/))
base.AddObject(objId, o, LocalCacheTime);

using (IRedisClient Redis = RedisManager.GetClient())
{
Redis.Set
<byte[]>(objId, new ObjectSerializer().Serialize(o));
}
}

/// <summary>
/// 加入当前对象到缓存中
/// </summary>
/// <param name=”objId”>对象的键值</param>
/// <param name=”o”>缓存的对象</param>
/// <param name=”o”>到期时间,单位:秒</param>
public override void AddObject(string objId, object o, int expire)
{
//凡是以”/Forum/ShowTopic/”为前缀不添加到本地缓存中,现类似键值包括: “/Forum/ShowTopic/Tag/{topicid}/” , “/Forum/ShowTopic/TopList/{fid}”
if (!objId.StartsWith(/Forum/ShowTopic/))
base.AddObject(objId, o, expire);

using (IRedisClient Redis = RedisManager.GetClient())
{
//永不过期
if (expire == 0)
Redis.Set
<byte[]>(objId, new ObjectSerializer().Serialize(o));
else
Redis.Set
<byte[]>(objId, new ObjectSerializer().Serialize(o), DateTime.Now.AddSeconds(expire));
}
}

/// <summary>
/// 移除指定ID的对象
/// </summary>
/// <param name=”objId”></param>
public override void RemoveObject(string objId)
{
//先移除本地cached,然后再移除memcached中的相应数据
base.RemoveObject(objId);
using (IRedisClient Redis = RedisManager.GetClient())
{
Redis.Remove(objId);
}
Discuz.EntLib.SyncCache.SyncRemoteCache(objId);
}

public override object RetrieveObject(string objId)
{
object obj = base.RetrieveObject(objId);

if (obj == null)
{
using (IRedisClient Redis = RedisManager.GetClient())
{
obj
= new ObjectSerializer().Deserialize(Redis.Get<byte[]>(objId));

if (obj != null && !objId.StartsWith(/Forum/ShowTopic/))//对ShowTopic页面缓存数据不放到本地缓存
{
if (objId.StartsWith(/Forum/ShowTopicGuestCachePage/))//对游客缓存页面ShowTopic数据缓存设置有效时间
base.TimeOut = GeneralConfigs.GetConfig().Guestcachepagetimeout * 60;
if (objId.StartsWith(/Forum/ShowForumGuestCachePage/))//对游客缓存页面ShowTopic数据缓存设置有效时间
base.TimeOut = RedisConfigs.GetConfig().CacheShowForumCacheTime * 60;
else
base.TimeOut = LocalCacheTime;

base.AddObject(objId, obj, TimeOut);
}
}
}
return obj;
}

/// <summary>
/// 到期时间,单位:秒
/// </summary>
public override int TimeOut
{
get
{
return 3600;
}
}

/// <summary>
/// 本地缓存到期时间,单位:秒
/// </summary>
public int LocalCacheTime
{
get
{
return RedisConfigs.GetConfig().LocalCacheTime;
}
}

/// <summary>
/// 清空的有缓存数据
/// </summary>
public override void FlushAll()
{
base.FlushAll();
using (IRedisClient Redis = RedisManager.GetClient())
{
Redis.FlushAll();
}
}
}

可以看出RedisStrategy类继承自DefaultCacheStrategy,这一点与MemCachedStrategy实现如出一辙,唯一不同是其缓存数据加载和设置的方式有所不同,而具体的用法可以参见我之前写的这篇文章中的“object序列化方式存储”  。

当然上面代码中有两个类未说明,一个是RedisConfigs,一个是RedisManager,前者是配置文件信息类,我们产品因为使用了统一的序列化接口实现方式(参见该文),所以其实现方式比较清晰,其序列化类的结构如下:

/// <summary>
/// Redis配置信息类文件
/// </summary>
public class RedisConfigInfo : IConfigInfo
{
private bool _applyRedis;
/// <summary>
/// 是否应用Redis
/// </summary>
public bool ApplyRedis
{
get
{
return _applyRedis;
}
set
{
_applyRedis
= value;
}
}

private string _writeServerList;
/// <summary>
/// 可写的Redis链接地址
/// </summary>
public string WriteServerList
{
get
{
return _writeServerList;
}
set
{
_writeServerList
= value;
}
}

private string _readServerList;
/// <summary>
/// 可读的Redis链接地址
/// </summary>
public string ReadServerList
{
get
{
return _readServerList;
}
set
{
_readServerList
= value;
}
}

private int _maxWritePoolSize;
/// <summary>
/// 最大写链接数
/// </summary>
public int MaxWritePoolSize
{
get
{
return _maxWritePoolSize > 0 ? _maxWritePoolSize : 5;
}
set
{
_maxWritePoolSize
= value;
}
}

private int _maxReadPoolSize;
/// <summary>
/// 最大读链接数
/// </summary>
public int MaxReadPoolSize
{
get
{
return _maxReadPoolSize > 0 ? _maxReadPoolSize : 5;
}
set
{
_maxReadPoolSize
= value;
}
}

private bool _autoStart;
/// <summary>
/// 自动重启
/// </summary>
public bool AutoStart
{
get
{
return _autoStart;
}
set
{
_autoStart
= value;
}
}

private int _localCacheTime = 30000;
/// <summary>
/// 本地缓存到期时间,该设置会与memcached搭配使用,单位:秒
/// </summary>
public int LocalCacheTime
{
get
{
return _localCacheTime;
}
set
{
_localCacheTime
= value;
}
}

private bool _recordeLog = false;
/// <summary>
/// 是否记录日志,该设置仅用于排查redis运行时出现的问题,如redis工作正常,请关闭该项
/// </summary>
public bool RecordeLog
{
get
{
return _recordeLog;
}
set
{
_recordeLog
= value;
}
}

private int _cacheShowTopicPageNumber = 5;
/// <summary>
/// 缓存帖子列表分页数(showtopic页数使用缓存前N页的帖子列表信息)
/// </summary>
public int CacheShowTopicPageNumber
{
get
{
return _cacheShowTopicPageNumber;
}
set
{
_cacheShowTopicPageNumber
= value;
}
}

/// <summary>
/// 缓存showforum页面分页数
/// </summary>
public int CacheShowForumPageNumber{set;get;}

/// <summary>
/// 缓存showforum页面时间(单位:分钟)
/// </summary>
public int CacheShowForumCacheTime{set;get;}
}

其序列化出来的xml文件格式形如:

<?xml version=1.0?>
<RedisConfigInfo xmlns:xsi=http://www.w3.org/2001/XMLSchema-instance>
<ApplyRedis>true</ApplyRedis>
<WriteServerList>10.0.4.210:6379</WriteServerList>
<ReadServerList>10.0.4.210:6379</ReadServerList>
<MaxWritePoolSize>60</MaxWritePoolSize>
<MaxReadPoolSize>60</MaxReadPoolSize>
<AutoStart>true</AutoStart>
<LocalCacheTime>180</LocalCacheTime>
<!–单位:秒–>
<RecordeLog>false</RecordeLog>
<!–缓存帖子列表分页数(showtopic页数使用缓存前N页的帖子列表信息)–>
<CacheShowTopicPageNumber>2</CacheShowTopicPageNumber>
<!–缓存showforum页面分页数–>
<CacheShowForumPageNumber>2</CacheShowForumPageNumber>
<!–缓存showforum页面时间(单位:分钟)–>
<CacheShowForumCacheTime>10</CacheShowForumCacheTime>
</RedisConfigInfo>

之前所说的RedisManager类则是一个RedisClient客户端实现的简单封装,主要为了简化基于链接池的Redis链接方式的使用。其结构如下:

using System.Collections;
using Discuz.Config;
using Discuz.Common;

using ServiceStack.Redis;
using ServiceStack.Redis.Generic;
using ServiceStack.Redis.Support;

namespace Discuz.EntLib
{
/// <summary>
/// MemCache管理操作类
/// </summary>
public sealed class RedisManager
{
/// <summary>
/// redis配置文件信息
/// </summary>
private static RedisConfigInfo redisConfigInfo = RedisConfigs.GetConfig();

private static PooledRedisClientManager prcm;

/// <summary>
/// 静态构造方法,初始化链接池管理对象
/// </summary>
static RedisManager()
{
CreateManager();
}

/// <summary>
/// 创建链接池管理对象
/// </summary>
private static void CreateManager()
{
string[] writeServerList = Utils.SplitString(redisConfigInfo.WriteServerList, ,);
string[] readServerList = Utils.SplitString(redisConfigInfo.ReadServerList, ,);

prcm = new PooledRedisClientManager(readServerList, writeServerList,
new RedisClientManagerConfig
{
MaxWritePoolSize
= redisConfigInfo.MaxWritePoolSize,
MaxReadPoolSize
= redisConfigInfo.MaxReadPoolSize,
AutoStart
= redisConfigInfo.AutoStart,
});
}

/// <summary>
/// 客户端缓存操作对象
/// </summary>
public static IRedisClient GetClient()
{
if (prcm == null)
CreateManager();

return prcm.GetClient();
}
}
}

上面的代码主要将redis.config的配置文件文件信息加载到程序里并实始化PooledRedisClientManager对象,该对象用于池化redis的客户端链接,具体方式参见这篇文章

好了,到这里主要的内容就介绍完了。

注:本文的部分代码位于企业版产品中,目前暂未开源所以大家可能没有拿到,我们计划今年开源企业版1.0的代码,包括本文中代码部分,以便从社区中获取更多经验和反馈,同时希望大家支持和关注我们的产品。

原文链接:http://www.cnblogs.com/daizhj/archive/2011/02/21/1959511.html

作者: daizhj, 代震军

[转载]Android开发基础3-开发注意点和相关参考

mikel阅读(885)

[转载]Android开发基础3-开发注意点和相关参考 – Thinker – 博客园.

界面工具和布局

界面设计规范

http://developer.android.com/guide/practices/ui_guidelines/index.html需翻墙

提到的几点人机界面指南,也只不过寥寥几笔而已

一个界面设计的连载

引言http://azero.tsang.blog.163.com/blog/static/47005201072022410157/

认识Android手机http://azero.tsang.blog.163.com/blog/static/47005201072372032555/

交互模式http://azero.tsang.blog.163.com/blog/static/470052010730622032/

后续的在该博主出书后可以看

界面设计工具

Eclipse插件

DroidDrawhttp://www.cnblogs.com/wanlipeng/archive/2010/08/18/1802715.html

这个工具比Eclipse插件包含的好一些,不过对于界面熟悉后Eclipse插件的版本涉及的更全一些

界面布局

Android自适应屏幕大小和layout布局(横屏|竖屏)

http://huangwuyi.javaeye.com/blog/842766

代码混淆

由于JAVA编译的程序是中间代码,使用工具可以很方便的反编译出来,因此对于程序需要进行混淆以增加保密性[实在有保密的核心代码可以使用NDK包装起来,由于是机器码,反编译的难度大增]

Proguard的使用参考http://www.devdiv.com/thread-41467-1-1.html

6个常用Java 源代码保护工具(混淆、加密、底层)

http://www.cmd100.com/bbs/thread-4471-1-1.html

真机调试

http://www.cnblogs.com/wanlipeng/archive/2010/08/11/1797202.html

android真机USB调试设置(新手观看)

http://wenku.baidu.com/view/0e6d5eef5ef7ba0d4a733bfb.html

http://blog.csdn.net/yihui8/archive/2010/05/26/5625350.aspx

Android模拟器调试与真机调试

一、模拟器调试与真机调试

1. 模拟器调试

运行源码或SDK中的emulator,加参数

2. 真机调试

1) 用usb线连接G1硬件和PC

2) 若是windows系统,则安装驱动

3) 用源码或SDK中的adb命令看硬件是否连接成功

$ adb devices正常调试

4) 注意:

a) 在Linux连接真机时需使用root权限

b) 如果之前连接过模拟器,最好连接前先杀掉adb后台进程

$ killalladb

3. Eclipse中调试

若连接真机,未打开模拟器时,直接连接真机调试

若未连接真机,已打开模拟器时,在当前模拟器中调试

若未连接真机,也未打开模拟器时,打开模拟器调试

若只开多个真机或多个模拟器时,同时有多个可连接的设备,弹出列表供用户选择

4. 命令行中使用adb工具调试

连接多个设备时,需要用命令行参数指示设备名或设备类型

$ adb–s 设备名shell 设备名由adb devices列出

本文来自CSDN博客,转载请标明出处:http://blog.csdn.net/yihui8/archive/2010/05/26/5625350.aspx

软件商店

把完成的软件发布到软件商店去的参考如下:

http://hi.baidu.com/lphack/blog/item/1c8f6f2ae87435e9e7cd407b.html

http://www.5y44.com/read.php?fid=2&tid=761

参考图书

Android In Action 这个图书介绍的很全面

[转载]构建高性能ASP.NET站点 第七章 如何解决内存的问题(前中篇)—托管资源优化—监测CLR性能

mikel阅读(809)

[转载]【原创】构建高性能ASP.NET站点 第七章 如何解决内存的问题(前中篇)—托管资源优化—监测CLR性能 – ASP.NET 架构 – 博客园.

CLR计数器的使用

我们使用系统自带的性能监测工具来跟踪和监测垃圾回收器。

下面,首先介绍几个常用的CLR性能监测计数器,我们一般查看.NET CLR Memory分类下的计数器:

Percent Time in GC 表明了从上次垃圾回收机制运行之后到现在这段时间内,运行垃圾回收机制所花的时间占总时间的百分比。不要超过10%
Gen 0 heap size 这个数值不是表明当前托管堆中Gen 0对象所占的大小,而是指:还可以分配的Gen 0对象的大小
Gen 1 heap size 表明当前Gen 1 对象所占的托管堆的空间大小
Gen 2 heap size 表明当前Gen 2 对象所占的托管堆的空间大小
Large Object Heap size 当前LOH的大小
# Byte in all Heaps 是上面Gen 0 heap sizeGen 1 heap sizeGen 2 heap sizeLarge Object Heap size所有的种和,也就是整个托管堆所占的空间大小
# Gen 0 Collections 从系统开启之后到现在,垃圾回收器回收Gen 0对象的次数
# Gen 1 Collections 从系统开启之后到现在,垃圾回收器回收Gen 1对象的次数
# Gen 2 Collections 从系统开启之后到现在,垃圾回收器回收Gen 2对象的次数

介绍完上面的一些计数器之后,大家可以运行perfmon命令,打开性能监测工具。

下面开始介绍CLR ProfilerCLR 透析器)

CLR Profiler

CLR Profiler是微软开发的一个工具,这个工具可以用来检测CLR所占用的内存详情。

大家可以去下面的链接去下载这个工具:

http://www.microsoft.com/downloads/details.aspx?familyid=a362781c-3870-43be-8926-862b40aa0cd0&displaylang=en

下面的链接详细的讲述这个工具的用法:

http://msdn.microsoft.com/zh-cn/magazine/ee309515.aspx#MtViewDropDownText

在这里,只是简单的介绍一下如何使用,至于详细的操作,还请大家去查看上面给出的链接。使用的步骤如下:

1. 运行CLR Proflier

2. 确保Profiling active, Allocations, Calls都勾选上。如下:

3. 选择File->Profile ASP.NET”.这个操作的背后会停止IIS的运行,然后插入一些指令,然后重启IIS,所以这个工具在生产环境中慎用。

4. 然后我们可以在VSF5运行我们的网站(确保在创建网站的时候是以IIS方式来建立站点的,而不是选择文件系统的方式建立)

5. 在界面上面点击Kill ASP.NET”.这个操作的背后会移除之前加入到IIS中的一些监视指令。点击按钮之后,会出现一些界面。这个界面上面显示了Gen0, Gen1 Gen2 ,LOH所占的大小,如下:

6. 我们还可以点击Histogram按钮。这个界面展示了不同大小以及不同类型的对象所占的比例。下面对看出,系统中有很多的string对象,也就说,系统中的string类型的对象占据了系统大部分的内存空间。

大家可以查看更多的信息,这里不再赘述了,下面我们来看看垃圾回收器的版本问题。

垃圾回收器版本

CLR中,垃圾回收器是有两个版本的:

1. 服务端版本。CLR中的这个垃圾回收器版本进行了一系列的内存,处理器优化,用来进一步的提高性能。

2. 工作组版本,这是相对服务端版本而言的,主要是用在桌面开发中,例如在WPFWinform中,就是采用的这个版本垃圾回收器。

ASP.NET中就是采用的CLR服务端版本的垃圾回收器。

OK,今天就暂时写到这里,下一篇讲述一些针对上述问题的一些优化措施。

[转载]GoogleReader用户登陆验证C#具体实现

mikel阅读(896)

[转载]GoogleReader用户登陆验证C#具体实现 – 编程点滴 – 博客园.

继前两篇文章

google reader api:http://www.cnblogs.com/mybear/archive/2011/02/18/1957704.html

GoogleReader用户登陆验证原理:http://www.cnblogs.com/mybear/archive/2011/02/18/1957769.html

相信大家对GoogleReader api已经有所认识,下面就讲下GoogleReader用户登陆验证C#具体实现

1.创建HttpWebRequest

private HttpWebRequest CreateRequest(string url) { HttpWebRequest webRequest = WebRequest.Create(url) as HttpWebRequest; IWebProxy defaultParoxy = HttpWebRequest.GetSystemWebProxy(); webRequest.Proxy = defaultParoxy; webRequest.UserAgent = "GoogleReader for Windows/"+Assembly.GetExecutingAssembly().GetName().Version; webRequest.CookieContainer = _CookieContainer; webRequest.ServicePoint.Expect100Continue = false; webRequest.Timeout = 20000; if (_isLoginIn) webRequest.Headers.Add("Authorization", "GoogleLogin auth=" + _LoginAuth[2].Split('=')[1]); return webRequest; }

2.使用HttpPost传递登陆参数

private string PostGoogleLogin(HttpWebRequest webRequest,string queryString) { string ResponseString = string.Empty; webRequest.ContentType = "application/x-www-form-urlencoded"; webRequest.Method = "POST"; byte[] QueryData = Encoding.UTF8.GetBytes(queryString); webRequest.ContentLength = QueryData.Length; try { using (Stream stream = webRequest.GetRequestStream()) { stream.Write(QueryData, 0, QueryData.Length); stream.Close(); ResponseString = GetResponseString(webRequest); } } catch (Exception ex) { LoginError += ex.ToString() + "\r\n"; } return ResponseString; }

3.传递用户名和密码实现登陆

public void GoogleLogin(string email,string password) { string SID_ID = string.Empty; string responseData = string.Empty; List<Parameter> queryParams = new List<Parameter>(); queryParams.Add(new Parameter("service", "reader")); queryParams.Add(new Parameter("Email", Uri.EscapeDataString(email))); queryParams.Add(new Parameter("Passwd", Uri.EscapeDataString(password))); queryParams.Add(new Parameter("source", "Mobile Newspaper/0.1")); queryParams.Add(new Parameter("continue", "http://www.google.com")); HttpWebRequest webRequest=CreateRequest("https://www.google.com/accounts/ClientLogin"); responseData = PostGoogleLogin(webRequest, HttpUtil.GetQueryParamters(queryParams)); string pattern="SID=(.*)"; Regex reg = new Regex(pattern, RegexOptions.IgnoreCase); if (reg.IsMatch(responseData)) { _isLoginIn = true; _LoginAuth = responseData.Split('\n'); SID_ID = reg.Match(responseData).Groups[1].Value; _CookieContainer.Add(new Cookie("SID",SID_ID,"/",".google.com")); } }

至此,google用户登陆验证完成了!我们可以根据googlereader提供的API打造一个属于自己的客户端RSS订阅器!

比如,我们要获得已阅读的20篇文章:可以用httpget的方法访问:http://www.google.com/reader/atom/user/[user ID]/state/com.google/read

[user ID]可以使用“-”来代表当前登陆的用户,返回的记录是XML数据格式:

[原创]Power Designer生成数据库表脚本时遇到sqlstate=37000错误,解决方案!

mikel阅读(1394)

因为设置脚本时,输入类型nvarchar(500 ,时少输入了右括号,导致数据库脚本提示“ 无法预定义语句” 因此不能创建表

同时未指定dbo用户时,也提示“不允许有扩展属性”错误,可以按照网上的解决办法解决,如下:

使用PowerDesigner 12 生成的SQL执行时,出现下面的错误:

execute sp_addextendedproperty ‘MS_Description’,
‘表名’,
‘user’, ‘’, ‘table’, ‘Groups’
go

服务器: 消息 15135,级别 16,状态 1,过程 sp_validatepropertyinputs,行 100. 对象无效。
不允许在 ‘.Groups’上使用扩展属性,或对象不存在。
google了半天终于找到了原因:原来是没有为表指定Owner而导致的错误。

execute sp_addextendedproperty ‘MS_Description’,
‘表名’,
‘user’, ‘dbo’, ‘table’, ‘Groups’
go

为表名指定所有这就行了:在PowerDesigner 中的表上单击右键,属性就会出来Owner先项,创建一个dbo即可

在生成扩展属性字段的注释的时候。生成了一个comment on column 在SQL server 中执行一直说commnet 关键字错误。查了一下原来SQL server  中没有这个。是甲骨文上的。

修改数据库的方式是:Tools–>Resources–>DBMS–>选择数据库就可以了。