[转载]ASP.NET MVC : 请求处理流程 (Request-Handling Pipeline)

mikel阅读(935)

[转载]ASP.NET MVC : 请求处理流程 (Request-Handling Pipeline) – 鹤冲天 – 博客园.

园子里有很多朋友都在写 ASP.NET MVC 的文章,但大多都是针对某个知识点,而对 ASP.NET MVC 的整个请求处理流程少有提及。对初学都来说也经常把学习重点放在了 Model 、View 和 Controller 上,而忽略了其它的知识点。幸好,《 Pro ASP.NET MVC Framework 》和作者 Steven Sanderson 为我们绘制一副完整的请求处理流程图(Request-Handling Pipeline Poster):

ASP.NET MVC Request-Handling Pipeline

Steven Sanderson 提供给我们的是一个 pdf 文件(点击下载博客园下载),上面的图片从该文件中截取。可以访问作者的文章:ASP.NET MVC learning resource: Request-Handling Pipeline Poster 来获取关于这幅图片的更多信息。

Steven Sanderson 编写的《 Pro ASP.NET MVC Framework 》和《 Pro ASP.NET MVC 2 Framework 》相当不错,推荐大家看一下(不过目前好像还没有中文版)。

最后,感谢 Steven Sanderson 为我们绘制了这幅图。

[转载]ASP.NET MVC 3 Beta初体验之超酷的Chart:3D效果

mikel阅读(946)

[转载]ASP.NET MVC 3 Beta初体验之超酷的Chart:3D效果 – 海纳百川 – 博客园.

在前一篇文章:ASP.NET MVC 3 Beta初体验之超酷的Chart中 介绍了Chart的使用,但是没有介绍到3D效果。这篇文章将介绍一下Chart的3D效果的展示。声明一点的是:这个Chart控件可能没有一些开源或 者不开源,收费或者不收费的组件那般强大,我相信未来这个控件会越来越强大的。废话不多说了,看下如何展示Chart的3D效果。

显示3D的效果,微软给了我们两种解决方案。一种是使用他自带的样式,一种是自己配置一个显示样式的XML。

第一种使用自带的样式:很简单,在上一篇文章中其实有提到过,我们将模版改成ChartTheme.Vanilla3D。代码如下:

代码

<p> @{ var key = new Chart(width: 600, height: 400,template: ChartTheme.Vanilla3D) .AddTitle("人员流动情况") .AddSeries(name: "Employee",xValue: new[] { "一月份", "二月份", "三月份", "四月份", "五月份", "六月份", "七月份", "八月份", "九月份"}, yValues: new[] { "2", "6", "4", "5", "3","4","9","2","5"}) .Write(); } </p>

效果:

第二种方式:自定义显示样式。MVC可以让我们自定通过XML自定义Chart的显示样式。

定义一个XML样式:

代码

<Chart Palette="BrightPastel" BackColor="#D3DFF0" BackGradientStyle="TopBottom" BackSecondaryColor="White" BorderColor="26, 59, 105" BorderWidth="2" BorderlineDashStyle="Solid"> <Series> <series _Template_="All" BorderColor="180, 26, 59, 105" CustomProperties="LabelStyle=Bottom" IsValueShownAsLabel="True"> </series> </Series> <ChartAreas> <ChartArea _Template_="All" BackColor="Orange" BackGradientStyle="TopBottom" BackSecondaryColor="White" ShadowColor="Transparent" BorderColor="64, 64, 64, 64" BorderDashStyle="Solid"> <Area3DStyle Enable3D="True" > </Area3DStyle> <AxisX ArrowStyle="Triangle" IsLabelAutoFit="False" LineColor="64, 64, 64, 64"> <MajorGrid LineColor="64, 64, 64, 64" /> <LabelStyle Font="Trebuchet MS, 10pt, style=Bold" IsStaggered="False" /> </AxisX> </ChartArea> </ChartAreas> <Titles> <Title _Template_="All" Font="Trebuchet MS, 14.25pt, style=Bold" ForeColor="26, 59, 105" ShadowOffset="3" ShadowColor="32, 0, 0, 0"> </Title> </Titles> <BorderSkin SkinStyle="Emboss" /> </Chart>

在创建Chart的代码修改一下:

代码

<p> @{ var key = new Chart(width: 600, height: 400,templatePath: "~/_ChartFiles/OrangeBlue3DTemplate.xml") .AddTitle("人员流动情况") .AddSeries(name: "Employee",xValue: new[] { "一月份", "二月份", "三月份", "四月份", "五月份", "六月份", "七月份", "八月份", "九月份"}, yValues: new[] { "2", "6", "4", "5", "3","4","9","2","5"}) .Write(); } </p>

效果:

通过这种方式,给了程序员很多的扩展空间。

总结:本文是对ASP.NET MVC 3 Beta初体验之超酷的Chart的一个补足。介绍了在ASP.NET MVC 3 Beta中Chart的3D效果。

作者:朱祁林
出处:http://zhuqil.cnblogs.com
本文版权归作者和博客园共有,欢迎转载,但未经作者同意必须保留此段声明,且在文章页面明显位置给出原文连接,否则保留追究法律责任的权利。

[转载]简单实用SQL脚本Part:sql多行转为一列的合并问题

mikel阅读(1312)

[转载]简单实用SQL脚本Part:sql多行转为一列的合并问题 – 我帅故我在 – 博客园.

一、数据库SQL Server列值链式合并

需求:原始表的数据的结构如图1所示,把相同guidcode值生成一个链式字符串。

(图1

目标:我们希望达到的效果如图2所示,这里的guid变成唯一的了,这行的记录中包含了这个guid所对应的code字段值的链式字符串。


(图2

分析与实现:要实现图1到图2的转变,这使用SQL Server 2005的新功能:XML,下面我们来讲讲具体的实现:

1. 首先我们先创建一个测试表,方便后面的效果展现;

创建表
if exists (select * from sysobjects where id = OBJECT_ID([TempTable_Base]) and OBJECTPROPERTY(id, IsUserTable) = 1)
DROP TABLE [TempTable_Base]

CREATE TABLE [TempTable_Base] (
[id] [int] IDENTITY (1, 1) NOT NULL,
[guid] [varchar] (50) NULL,
[code] [varchar] (50) NULL)

SET IDENTITY_INSERT [TempTable_Base] ON

INSERT [TempTable_Base] ([id],[guid],[code]) VALUES ( 1,91E92DCB-141A-30B2-E6CD-B59EABD21749,A)
INSERT [TempTable_Base] ([id],[guid],[code]) VALUES ( 2,91E92DCB-141A-30B2-E6CD-B59EABD21749,C)
INSERT [TempTable_Base] ([id],[guid],[code]) VALUES ( 3,91E92DCB-141A-30B2-E6CD-B59EABD21749,E)
INSERT [TempTable_Base] ([id],[guid],[code]) VALUES ( 4,91E92DCB-141A-30B2-E6CD-B59EABD21749,O)
INSERT [TempTable_Base] ([id],[guid],[code]) VALUES ( 5,91E92DCB-141A-30B2-E6CD-B59EABD21749,G)
INSERT [TempTable_Base] ([id],[guid],[code]) VALUES ( 6,79DD7AB9-CE57-9431-B020-DF99731FC99D,A)
INSERT [TempTable_Base] ([id],[guid],[code]) VALUES ( 7,79DD7AB9-CE57-9431-B020-DF99731FC99D,O)
INSERT [TempTable_Base] ([id],[guid],[code]) VALUES ( 8,79DD7AB9-CE57-9431-B020-DF99731FC99D,E)
INSERT [TempTable_Base] ([id],[guid],[code]) VALUES ( 9,79DD7AB9-CE57-9431-B020-DF99731FC99D,F)
INSERT [TempTable_Base] ([id],[guid],[code]) VALUES ( 10,79DD7AB9-CE57-9431-B020-DF99731FC99D,O)
INSERT [TempTable_Base] ([id],[guid],[code]) VALUES ( 11,79DD7AB9-CE57-9431-B020-DF99731FC99D,B)
INSERT [TempTable_Base] ([id],[guid],[code]) VALUES ( 12,79DD7AB9-CE57-9431-B020-DF99731FC99D,D)
INSERT [TempTable_Base] ([id],[guid],[code]) VALUES ( 13,79DD7AB9-CE57-9431-B020-DF99731FC99D,F)
INSERT [TempTable_Base] ([id],[guid],[code]) VALUES ( 14,D61651D9-1B0A-0362-EE91-A805AA3E08F2,O)
INSERT [TempTable_Base] ([id],[guid],[code]) VALUES ( 15,D61651D9-1B0A-0362-EE91-A805AA3E08F2,D)
INSERT [TempTable_Base] ([id],[guid],[code]) VALUES ( 16,D61651D9-1B0A-0362-EE91-A805AA3E08F2,F)
INSERT [TempTable_Base] ([id],[guid],[code]) VALUES ( 17,D61651D9-1B0A-0362-EE91-A805AA3E08F2,C)
INSERT [TempTable_Base] ([id],[guid],[code]) VALUES ( 18,D61651D9-1B0A-0362-EE91-A805AA3E08F2,U)
INSERT [TempTable_Base] ([id],[guid],[code]) VALUES ( 19,D61651D9-1B0A-0362-EE91-A805AA3E08F2,F)
INSERT [TempTable_Base] ([id],[guid],[code]) VALUES ( 20,4802F0CD-B53F-A3F5-1C78-2D7424579C06,A)
INSERT [TempTable_Base] ([id],[guid],[code]) VALUES ( 21,3CCBFF9F-827B-6639-4780-DA7215166728,O)
INSERT [TempTable_Base] ([id],[guid],[code]) VALUES ( 22,3CCBFF9F-827B-6639-4780-DA7215166728,M)
INSERT [TempTable_Base] ([id],[guid],[code]) VALUES ( 23,3CCBFF9F-827B-6639-4780-DA7215166728,C)
INSERT [TempTable_Base] ([id],[guid],[code]) VALUES ( 24,3CCBFF9F-827B-6639-4780-DA7215166728,M)

SET IDENTITY_INSERT [TempTable_Base] OFF

SELECT * FROM [TempTable_Base]

2. 使用SQL Server2005FOR XML PATH把记录数据以XML的格式组织起来,把同一个guid的数据进行字符串的拼凑。执行下面的SQL就可以达到图3所示的效果了。

列值链式合并
SELECT B.guid,LEFT(UserList,LEN(UserList)1) as paths FROM (
SELECT guid,
(
SELECT code+, FROM TempTable_Base WHERE guid=A.guid ORDER BY ID FOR XML PATH()) AS UserList
FROM TempTable_Base A
GROUP BY guid
) B

(图3

3. 上面的SQL语句的意思是:

假设以guid91E92DCB-141A-30B2-E6CD-B59EABD21749为例,那么guid=A.guid就是先找出值为91E92DCB-141A-30B2-E6CD-B59EABD21749的记录,并进行ORDER BY ID的排序,拿出了这5行记录以逗号的形式生成链式字符串(FOR XML PATH())。

二、参考文献

FOR XML PATH 语句的应用

sql多行转为一列的合并问题,并在sql2000和2005得到验证

——————-华丽分割线——————-

作者:听风吹雨
版权:本文版权归作者和博客园共有
转载:欢迎转载,不过记得留下买路钱
格言:不喜欢是因为你不会 && 因为会所以喜欢

[转载]关于ASP.NET与CLR相互关系的一些总结

mikel阅读(963)

[转载]关于ASP.NET与CLR相互关系的一些总结 – JasenKin – 博客园.

CLR(COM服务器)

CLR作为一个COM服务器实现在MSCorWks.dll文件中。安装.NET Framework时,表示CLR的COM服务器被注册到Windows的注册表里。

MSCorEE.dll(垫片)

MSCorEE.dll的职责是判断创建何种版本的CLR。 非托管应用程序宿主调用MSCorEE.dll(shim)中CorBindToRuntimeEx函数或者另一个相似的函数来创建CLR COM的实例。

一台机器可以安装多个版本的CLR,但在机器中只有一个版本的MSCorEE.dll文件。

以上两者之间的关系如下代码所示(c++):     MSCorEE.dll(垫片)—->CLR(COM服务器)

#include <Windows.h>
#include
<MSCorEE.h>
#include
<stdio.h>
#pragma comment(lib,”mscoree.lib”)
int main(int argc, CHAR* argv[])
{
ICLRRuntimeHost
*pClrHost;
//调用<MSCorEE.h>中的CorBindToRuntimeEx()生成COM服务器
HRESULT hr= CorBindToRuntimeEx(NULL, NULL, NULL, CLSID_CLRRuntimeHost, IID_ICLRRuntimeHost, (LPVOID*)&pClrHost);
//启动clr
pClrHost->Start();
//……………………….其他操作
//终止clr
pClrHost->Stop();
getchar();
return 0;
}

应用程序域(AppDomain)

一个应用程序域是一组程序集的一个容器。应用程序域的全部目的就是提供隔离性。

上图为一个单独的Windows进程,该进程中运行着一个CLR COM服务器。该CLR中每个应用程序域都有自己的加载器堆。(系统域,共享域,默认域#1,其他域#2)

一些特殊的程序集如MSCorLib.dll,它需要被所有的应用程序域共享,那么他就以一种对应用程序域保持中立的方式被加载,由CLR维护一个特殊的加载器堆。

线程与应用程序域的关系

线程与应用程序域没有一对一的关系。多个应用程序域可以位于一个Windows进程中,所以一个线程可以执行一个应用程序域中的代码,然后又执行另一个应用程序域中的代码。从CLR的角度看,线程每次只能执行一个应用程序域中的代码。线程可以通过Thead的静态方法GetDomain来请求CLR当前正在那个应用程序域中执行。

关于卸载的问题

一旦CLR加载到Windows的进程,就永远不会被卸载,要想卸载进程中的CLR,只能终止进程,导致Windows清理该进程使用的所有资源。

共享域的程序集永远不会被卸载,回收它们的唯一方式就是终止Windows进程。

卸载一个应用程序域(默认域#1,其他域#2)可以导致CLR卸载应用程序域中的所有程序集,并且释放应用程序域的加载器堆。

ASP.NET 应用程序

ASP.NET是一个ISAPI DLL(实现于ASPNET_ISAPI.DLL中)。

当客户端请求一个由ASP.NET ISAPI DLL处理的URL时(第一次),ASP.NET会创建一个工作进程(ASPNET_wp.exe / w3wp.exe即宿主,工作进程是一个寄宿有CLR COM服务器的Windows进程)

CLR为该Web程序创建一个新的应用程序域。(参考上面的图)

CLR将必要的程序集加载到新建的应用程序域中。

CLR创建一个Web应用程序类型的实例,调用其中方法响应客户端请求随着Web应用程序的运行,如果代码中引用到了更多类型,CLR会继续将必要的程序集加载到当前Web应用程序的应用程序域中。

当更多的客户端向一个已经运行的Web应用程序发出请求时,ASP.NET不会再去创建新的应用程序域,相反,它会使用现有的应用程序域,创建一个新的Web应用程序类型的实例,并调用其中的方法。这些方法被JIT编译成了本地代码,所以后续客户端的请求处理性能将会有所提高。

看下我们的工作进程,如下任务管理器截图中所示:

ASP.NET 应用程序生命周期的各个阶段
(一)用户从 Web 服务器请求应用程序资源(映射文件扩展名)

ASP.NET 应用程序的生命周期以浏览器向 Web 服务器发送请求为起点。ASP.NET 是 Web 服务器下的 ISAPI 扩展。Web 服务器接收到请求时,会对所请求的文件的文件扩展名进行检查,确定应由哪个 ISAPI 扩展处理该请求,然后将该请求传递给合适的 ISAPI 扩展。ASP.NET 处理已映射到其上的文件扩展名,如 .aspx、.ascx、.ashx 和 .asmx。

(二)ASP.NET 接收对应用程序的第一个请求。
当 ASP.NET 接收到对应用程序中任何资源的第一个请求时,名为 ApplicationManager 的类会(1创建一个应用程序域在应用程序域中,(2)将HostingEnvironment 类创建一个实例,该实例提供对有关应用程序的信息(如存储该应用程序的文件夹的名称)的访问。下面的关系图说明了这种关系:

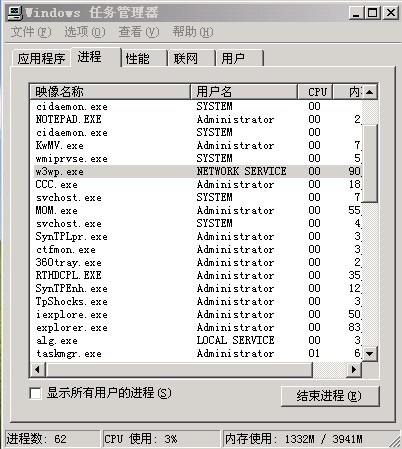
运行ASP.NET的进程为W3WP.EXE

编写下述代码,我们可以观察一下HostingEnvironment 的各种属性:

1 <script runat=server>
2 protected void Page_Load(object sender, EventArgs e)
3 {
4 StringBuilder sb = new StringBuilder();
5 sb.Append(System.Web.Hosting.HostingEnvironment.ApplicationID).Append(<br/>)
6 .Append(System.Web.Hosting.HostingEnvironment.ApplicationPhysicalPath).Append(<br/>)
7 .Append(System.Web.Hosting.HostingEnvironment.ApplicationVirtualPath).Append(<br/>)
8 .Append(System.Web.Hosting.HostingEnvironment.SiteName).Append(<br/>)
9 .Append(System.Web.Hosting.HostingEnvironment.ApplicationHost.ToString());
10 Response.Write(sb.ToString());
11 }
12 </script>

输出内容为:

a215d83d                                                   //ApplicationID
E:\MVC\Jasen\Jasen.Web\                                    //存储该应用程序的文件夹的名称
/
默认网站
System.Web.Hosting.SimpleApplicationHost

(三)为每个请求创建 ASP.NET 核心对象。
ASP.NET 创建并初始化核心对象,如 HttpContext、HttpRequest 和 HttpResponse。HttpContext 类包含特定于当前应用程序请求的对象,如 HttpRequest 和 HttpResponse 对象。HttpRequest 对象包含有关当前请求的信息,包括 Cookie 和浏览器信息。HttpResponse 对象包含发送到客户端的响应,包括所有呈现的输出和 Cookie。

(四)将 HttpApplication 对象分配给请求
初始化所有核心应用程序对象之后,将通过创建 HttpApplication 类的实例启动应用程序如果应用程序具有 Global.asax 文件,则 ASP.NET 会创建 Global.asax 类的一个实例,并使用该派生类表示应用程序。MVC  Global.asax文件内容如下:

1 public class MvcApplication : System.Web.HttpApplication
2 {
3 protected void Application_Start()
4 {
//AreaRegistration.RegisterAllAreas();
//RegisterGlobalFilters(GlobalFilters.Filters);
//ViewEngines.Engines.Add(new ViewEngine());
//RegisterRoutes(RouteTable.Routes);
5 //请求 ASP.NET 应用程序中第一个资源时调用。在应用程序的生命周期期间仅调用一次
6 //Application_Start 方法。可以使用此方法执行启动任务,如将数据加载到缓存中以及初始化静态值。
7
8 //在应用程序启动期间应仅设置静态数据。
9 }
10
11 public override void Init()
12 {
13 base.Init();//在创建了所有模块之后,对 HttpApplication 类的每个实例都调用一次。
14 }
15
16 public override void Dispose()
17 {
18 base.Dispose();//在销毁应用程序实例之前调用。可使用此方法手动释放任何非托管资源。
19 }
20
21 public void Application_End()
22 {
23 //在卸载应用程序之前对每个应用程序生命周期调用一次。
24 }
25 }

HttpApplication 进程的一个实例每次只处理一个请求。Application_Start 和 Application_End 方法,在应用程序域的生命周期期间,ASP.NET 仅调用这些方法一次,而不是对每个 HttpApplication 实例都调用一次。
(五)由 HttpApplication 管线处理请求。在处理该请求时将由 HttpApplication 类执行以下事件。

1.对请求进行验证,将检查浏览器发送的信息,并确定其是否包含潜在恶意标记。

2.如果已在 Web.config 文件的 UrlMappingsSection 节中配置了任何 URL,则执行 URL 映射。

3.引发 BeginRequest 事件。

4.引发 AuthenticateRequest 事件。引发 PostAuthenticateRequest 事件。

5.引发 AuthorizeRequest 事件。引发 PostAuthorizeRequest 事件。

6.引发 ResolveRequestCache 事件。引发 PostResolveRequestCache 事件。

7.根据所请求资源的文件扩展名(在应用程序的配置文件中映射),选择实现 IHttpHandler 的类,对请求进行处理。如果该请求针对从 Page 类派生的对象(页),并且需要对该页进行编译,则 ASP.NET 会在创建该页的实例之前对其进行编译。

8.引发 PostMapRequestHandler 事件。

———————————————————————————————————————–

9.引发 AcquireRequestState 事件。引发 PostAcquireRequestState 事件。

10.引发 PreRequestHandlerExecute 事件。

11.为该请求调用合适的 IHttpHandler 类的 ProcessRequest 方法。例如,如果该请求针对某页,则当前的页实例将处理该请求。 一般处理文件ashx的ProcessRequest():速度较快

12.引发 PostRequestHandlerExecute 事件。

13.引发 ReleaseRequestState 事件。引发 PostReleaseRequestState 事件。

———————————————————————————————————————–

14.如果定义了 Filter 属性,则执行响应筛选。

15.引发 UpdateRequestCache 事件。引发 PostUpdateRequestCache 事件。

16.引发 EndRequest 事件。

17.引发 PreSendRequestHeaders 事件。

18.引发 PreSendRequestContent 事件。

2年多了,回过来再重新温习一次,感觉不错。

作者:JasenKin
出处:http://www.cnblogs.com/jasenkin/
本文版权归作者和博客园共有,欢迎转载,但未经作者同意必须保留此段声明,且在文章页面明显位置给出原文连接,否则保留追究法律责任的权利。

[转载]Importing and Exporting Large WordPress Blogs

mikel阅读(938)

[转载]Importing and Exporting Large WordPress Blogs | Blink 7.

WordPress created the import and export admin functions to make the task of moving posts, comments and categories between blogs relatively simple. No longer did one have to be a database expert to cleanly transfer content from one blog to another, while creating backups of written content became a trivial exercise with WordPress’ custom XML files. While the import and export functions work fine with small to medium-sized blogs, extra configuration is often required to address the various errors that occur when working with data from blogs with a high volume of posts and/or comments.

This tutorial reviews the process of transferring content from one WordPress site to another with an emphasis on how to handle the import/export of larger blogs. Some of the solutions require PHP configuration (accomplished by changing the php.ini file on the server) or manipulation of the WordPress XML data file.

Pre-Requisites

Before attempting to follow this tutorial, please make sure you have the following.

  • Administrator access to both the source and destination WordPress sites. The destination site should be a freshly-installed copy of WordPress (v2.7 or higher)
  • FTP access to the destination site
  • If possible, FTP access to the source site (not available on wordpress.com sites)

Downloads

(download) Sample php.ini file
(link) Optional: Filezilla (free FTP client)
(link) Optional: Notepad++ (free text editor with xml support)

Exporting from the Source Site

Wordpress Tutorial - Importing and Exporting Data

Type in URL for the admin page
If your WordPress blog’s URL is www.mysite.com then your admin URL would be www.mysite.com/wp-admin/
Log in as an administrator.

Wordpress Tutorial - Importing and Exporting Data

Click on the Tools menu item (WordPress 2.7.x places the admin menu along the left side of the screen)
Click on the Export sub-menu item

Wordpress Tutorial - Importing and Exporting Data

(optional) If you want to export the posts by a single author, click on the drop-down box beside the “Restrict Author”. Select the author.

Wordpress Tutorial - Importing and Exporting Data

Click on the Download Export File button.

Wordpress Tutorial - Importing and Exporting Data

Ensure the “Save to Disk” radio option is selected.
Click OK to save the XML file to disk

Wordpress Tutorial - Importing and Exporting Data

Open the XML file in a text editor. Make sure the last lines in the file consist of the following tags:

</channel>
</rss>

These close tags suggest that the file has been fully downloaded.
If you do not see these tags at the end of your file or you see an HTML 500 Internal Server Error message embedded in the XML file, see the Troubleshooting section.

Importing to the Destination Site

Wordpress Tutorial - Importing and Exporting Data

Type in URL for the admin page
If your WordPress blog’s URL is www.mynewsite.com then your admin URL would be www.mynewsite.com/wp-admin/

Wordpress Tutorial - Importing and Exporting Data

Click on the Tools menu item (WordPress 2.7.x places the admin menu along the left side of the screen)
Click on the Import sub-menu item

Wordpress Tutorial - Importing and Exporting Data

Click on “Wordpress”

Wordpress Tutorial - Importing and Exporting Data

Verify that the maximum allowed file size for upload is larger than the size of your WordPress XML file. If not, proceed to the troubleshooting section.
Otherwise, click on the browse button

Wordpress Tutorial - Importing and Exporting Data

Select the XML file created during the import process. Click the Open button

Wordpress Tutorial - Importing and Exporting Data

Click the Upload and Import button. Processing may take a few minutes.
If the import was successful, the screen will eventually display a list of the posts in the xml, along with how many comments were associated with the post and how whether the post was successfully imported.

Click on the menu option Posts to verify that the import was successful.

Troubleshooting

Problem: The export File did not finish downloading

If the source website is a self-installed copy of WordPress, note the php.ini file can be altered to extend the amount of time PHP will allow for a script to be processed. To make this change, load the php.ini file into your text editor and set the variable max_execution_time to a higher value. Upload the updated .ini file to /wp-admin directory of the source website. Numeric values are in seconds. The .ini file provided with this tutorial is set to 500 seconds, which was sufficient for producing a 50MB XML file.

If your source website is on wordpress.com then simply try downloading the file again.

Problem: The XML file larger than the max file size on the import screen

The maximum upload file size is determined by the upload_max_filesize variable, located inside the php.ini file. The sample .ini file that comes with this tutorial has the max upload set to 100 megabytes, which should be enough for just about any site. If you already have a php.ini file then you can adjust the variable to be just larger than the file you wish to upload. Megabyte denominations are marked with a capital M – for instance, if you wanted the maximum upload size to be 60 megabytes, then you would set upload_max_filesize equal to 60M.

Alternatively, you could split the XML file into several XML files that are smaller than the upload limit. Note that splitting an XML file is not as simple as physically partitioning the file – the header and trailer must be present in each file. One relatively safe way to split the file is to make x copies of the file and strategically delete posts from the middle of each file (posts are enclosed in the and tags). For instance, to split the XML file into 2 pieces you could make a copy of the file then delete the first half of the posts from the first file and the second half of the posts from the second file. After importing both files you should have all your posts in the destination site. WordPress will ignore duplicate posts or channels during import, so there’s little risk in overlapping information between files.

Problem: During import, a 500 Internal Server Error appears

If you have an especially large import file (20MB or more) the server could running into a processing limit related to the amount of data being extracted from the source website. Most PHP installations place a cap on the amount of data that can be uploaded via a POST query.

Once again, this problem could be solved by splitting the XML file into several smaller files (smaller imports files means less data to be posted).

Alternatively, you could alter the php.ini file to allow more data to be uploaded via POST query. Find the variable post_max_size and increase its value. Megabyte denominations are marked with a capital M – for instance, if you wanted the maximum data processed to be 70 megabytes, then you would set post_max_size equal to 70M.

Problem: The uploaded php.ini file does not seem to be making any difference

To verify that this is the problem, change the value for variable post_max_size to some unusual value (e.g. 41M, which will be interpreted as 41 megabytes) and re-upload the file. Refresh the import interface. If the upload max size does not change, then PHP is not picking up the .ini file.

First, verify that the .ini file was uploaded to the /wp-admin sub-directory of the destination WordPress installation.

If the max file upload still isn’t changing, try uploading the same .ini file to the html root directory on your web server. Some shared hosting solutions, like those provided by BlueHost.com, require that you put a copy of a custom php.ini file in the html document root and then another of that file in any directory where you wish to use the custom settings. If you do not own the web account then you may have to provide the .ini file to the account owner to upload. Typically, root folder name is public_html.

If the max file upload still isn’t changing, then custom php.ini settings may be disabled on your server. Contact technical support for more assistance. Some hosts will even run the script for you.

[转载]WordPress数据备份与恢复的解决方案

mikel阅读(1313)

最 近想自己搞个空间,在其中搭建一个WordPress系统,这样就涉及到一个问题,那就是数据的安全性。现在我在Donews里写Blog感觉可能会轻松 些,毕竟安全的问题更多地由Donews工作人员去考虑,我只要“写”就行了。但这样也导致了整个WordPress系统框架的可自定义部分变得很少,这 对于Donews这样的提供者来说是应该的,因为系统自定义部分放得太开就难免会危及到整个Donews平台的安全性。而任何平台或服务,安全性我认为都 是应该放在第一位的,如果数据不安全,谈任何其它的都是多余。

闲话少说,回到WordPress的数据备份和恢复上来,这两天我在网上找了些资料研究,目前为止共找到三种解决方案,当然实际上远不止这三种,只是我不知道而已。

第一种:直接复制MySQL数据库中的数据表。

这种方法是最安全和完美的,但前提是你必须拥有服务器端足够的权限,比如服务器在本地,或者自己就是网络管理员。这种方法也是最简单的,直接复制整个数据库,放在与网络不联通的本地硬盘中,一旦需要恢复数据时,将整个数据库拷贝至MySQL数据库即可。

第二种:使用RSS备份与RSS导入工具。

使 用WordPress的博客们应该都知道在管理后台中的导入菜单中有很多选项,但一般默认的总会有这一项:“RSS—- 从RSS feed导入文章”。对,就是它了,RSS是导入文章的简单又实用的工具,如果在没有更好的条件下使用此工具不失为一种恢复数据的捷径。但缺点是目前的 RSS导入功能仅支持文章(Post)的导入,却不支持留言(Comments)的导入。这是比较缺憾的一点。

具 体使用方法是这样的。先备份自己博客的RSS文件;进入管理后台,进入[选项]–>[阅读],在同步Feeds中的显示最近文章中填入较大的数字, 比如你的文章共100篇,那么你填入的数字就一定要大于100,每篇文章显示选择[全文]。一般博客文章(Post)的RSS地址是这样的,http://your-wordpress-blog-url/feed/,而留言(Comments)的RSS地址是这样的,http://your-wordpress-blog-url/comments/feed/。 OK!在浏览器点中输入要备份的RSS地址,你会得到一个看上去有点杂乱的网页,密密码码的文字,这些你不要去管它,将此网页另存为一个xml文件,第一 步就完成了。然后打开你的另一个博客,选择[导入]菜单,点击RSS导入工具连接,会显示一个导入RSS的界面,点击选择,选择你刚才备份好的那个xml 文件,再点击[导入]按钮。OK!不出意外的话,应该会出现一长串的导入成功提示。RSS的导入速度很快,一会儿的功夫你的博客就已经完成了数据转移的工 作。

第三种:使用WordPress to WordPress插件。

这个插件共有两个文件,一个是wordpress.php文件,把它放在WordPress目录的wp-admin/import文件夹中;另一个是wp-xmlmigrate.php文件,这是一个插件,把它放在WordPress目录的wp-content/plugins文件夹中,然后在管理后台的插件页中激活此插件。

使 用方法是这样的。当插件被激活后,在菜单[管理]中会出现一个WP-EXPORT页面。通过此页面你可以备份WordPress数据,导出一个xml文 件,这一点跟RSS有点类似,但不同的是,通过此备份可以同时将文章(Post)和留言(Comments)一起导出。然后就是导入了,打开另一个博客的 管理后台,进入[导入]菜单,你会发现有一个wordpress导入工具,点击进入此工具,选择刚才备份的那个xml文件,选择[导入]。OK!不一会 儿,你的文章(Post)和留言(Comments)已经全部导入新博客了。

另外,使用这种方法导入数据时不会覆盖以前的数据,而只会合并数据。这一点也是比较好的一个特点。

我 自己选择的是第三种方案。因为我对MySQL的了解还不够多,对数据库的直接备份和恢复方案总感觉心里没底,而且在网上又看到在恢复过程中经常会发生乱码 事件。感觉好像是件很头疼的事,还是不直接去碰数据库比较好,使用插件工具,轻点几下鼠标就能完成同样的工作,何乐而不为呢?哈哈!

点击进入WordPress to WordPress插件下载页zip(共6.7K)(包含wp-xmlmigrate.php和wordpress.php文件)

[转载]WordPress链接导出备份和导入

mikel阅读(888)

WordPress是很强大,可以导入Blogger,Textpattern等博客里面的数据包括链接,可是再强大也不是非常完美,刚才就发现一个比较郁闷的问题,因为需要,用WordPress mu做了10多个博客,所有博客都要连入几个站,开始挺高兴的,可是手动填入链接手指都发麻了,而WordPress有没有提供导出接,难道我们只能手动了或者进入数据库复制数据字段,但是这样都非常麻烦,可操作性差!
正 题
虽然WordPress没有提供链接导出功能,不过我们输入以下地址就可以获得链接的实体文件了,地址:http://xueshen.net/wp-links-opml.php 如果你导出链接, 只要把你xueshen.net替换成你的域名,然后打开该url,就会出现如图所示的xml文本内容,因为你打开是php文件,如果直接另存为是不能用 的,WordPress的链接储存文件是OPML 文件,后缀为xml,所以你可以直接另存为文件为xml后缀!如果存在编码选项,一定要选择utf-8编码!
导出链接
关于导入WordPress链接的方法有两种,见截图:

导入链接
链接导入设置项:撰写——链接——导入链接
第一:可以直接通过url导入WordPress链接 ,例如雪深的链接,http://xueshen.net/wp-links-opml.php,填入该地址就可以导入所有链接了!
第二:就是直接上传已经保存的xml文件,导入链接成功,如果不成功,注意目录是是否可写!

转载雪深原创文章请注明文章转载自:雪深的blog

[转载]新浪微博OAuth认证总结

mikel阅读(1266)

[转载]新浪微博OAuth认证总结 – 梁星的专栏 – 博客园.

自从最近Twitter只支持OAuth认证方式以来,各大应用都纷纷转向OAuth认证方式,而新浪微博的开放平台也将在近日停止Base OAuth的认证方式。

为了能够继续使用新浪微博的开放平台,开始研究OAuth的认证方式,经过一段时间的实践,对于新浪微博开放平台的OAuth认证方式,有一定的经验。鉴 于网上对于这个平台的OAuth相关资料比较少,因此在此分享一下过程中积累的经验,希望可以帮助到一些要使用OAuth认证调用新浪微博接口的人~~

1.关于OAuth:

OAUth认证方式比于Base OAuth的认证方式最大的特点是,应用方并不需要保存用户的帐户与密码,只需要保存经过用户授权的Key与Secret组合即可对于平台上的所有接口资 源进行访问,在传输过程中也可以避免被不怀好意的人通过截包分析的方式获取到用户的帐号与密码。(有一说Twitter全面改用OAuth认证方式的原因 就是防止GFW通过截包获取到一些相关名人的帐号和密码)。具体的一些定义可以详细阅读OAuth的规范定义:OAuth规范

2.新浪微博开放平台:

新浪微博的开放平台基本上的接口,参数,返回格式都参考了Twitter的模式。当然,国内的另外一些开放平台都大量参考了Twitter的模式,因此基本上大同小异。要使用新浪微博的开放平台,当然必须先到它的网站上面进行注册:新浪微博API

注册之后,会得到Consumer Key 与 Consumer Secret这两个关键的字段,好好保存下来吧。

新浪微博的这个开发平台上面有充分的文档,能够很快的上手调用这些接口,除了个别较为难办的接口,我们下面再讨论。

3.对新浪使用OAuth:

使用OAuth,必须先让用户进行授权,一般来说授权的过程如下:
(1)由应用向新浪开发平台发出请求,获得未授权的Request Token与Request Secret,这个时候Request Secret暂时用不到,好好保存下来。

(2)将上一步获得的Request Token作为参数,引导用户浏览器跳至新浪微博的授权页面,用户进入这个页面登录新浪微博,进行Token的授权。如果在(1)中已经向服务器设置了浏览器的回调地址的话,则用户的浏览器将会被重定向至该地址,该地址将会新增一个参数:oauth_verifier,这个参数将在后面用到,好好保存。

(3)OAuth认证过程的最后一步,向服务器请求真正的 Token,将(1)中得到的Request Token,Request Secret和(2)中得到的oauth_verifier作为参数,传递给新浪微博服务器,服务器将会返回真正的Access Token与Access Secret,新浪微博还会返回用户在新浪微博中的userid。有了用户的Access Token与Access Secret就可以自由便利地调用新浪微博的开放接口了。

每个调用中,都必须带有OAuth的认证信息,作为OAuth的认证信息,基本上有两种方法可以加入到请求包中:

(1)最推荐的方法,采用HTTP的Authorization Header,这个头部的定义在RFC2617里面有相关定义。

例如:

(2)或者可以采用,参数传递的方式,将OAuth的参数与正常的参数一样放置
与Get的URL中,或者POST的包体内容中,都是可以的,
但遇到一些特殊情况就较难解决这个问题了。
4.OAuth认证参数解析:
 在上面可以看到,一个正常的OAuth认证中,包含以下若干参数:
  (1)oauth_consumer_key: 即是注册时,新浪给你的conusmer key,明文传输
  (2)oauth_token: 即是用户完成OAuth认证后的Access Token,在进行OAuth
认证第三步的时候,为Request Token,
 第一步时不需要这个参数
  (3)oauth_signature_method:加密的方法,提供HMAC-SHA1RSA-SHA1,
PLAINTEXT 几种方法
  (4)oauth_signature: 对于全部参数进行加密后的字符串,包括
consumer secret和access secret
  (5)oauth_timestamp:发请求的时间戳
  (6)oauth_version:可选的参数,基本上置为1.0,否则会出错的。
  (7)oauth_nonce:随机的值,防止重复调用
      
5.上传图片OAuth之痛:
  使用上面的方法,基本上可以解决所有的接口调用。但遇到难搞的上传图片这样的请求时,
就需要一些方法取巧了。
  新浪微博的开放平台,要求上传图片时必须使用multipart/form-data的方式进行上传,但OAuth协议在定义时,描述Content-Type为
application/x-www-form-urlencoded, 而并没有提及如何在multipart/form-data使用。
  在网上基本上找不到任何一个地方有提及在新浪微博的开放平台上以OAuth的方式上传图片,
经过一个晚上的尝试与借鉴Twitter上的做法后,
终于发现了解决方法。
  基本上,在协议上没有说明的内容,就必须由民间采用较为直观的方式进行解决。要在新浪
微博的接口中进行图片上传,必须使用multipart/
form-data作为Content-Type,而OAuth的认证参数不能放入form-data中,必须使用
Authorization Header来处理,而这时,必须将除了文
件的参数,在这个接口中为status加入到oauth的加密中,但并不出现在Authorization
 Header中,而是后续加入到fom-data中,这样就能够
正常的上传图片并发表微博了。通过这个简单而麻烦的方法,终于能够安全地上传图片到新浪
微博。
6.最后
  至此,本人已成功调用新浪微博绝大多数的接口,并开始将应用覆盖搜狐微博,网易
微博等开放平台,希望可以通过这篇文章,记录下一些经
验与教训。

7.参考资料

[RFC5849] E. Hammer-Lahav, Ed. The OAuth 1.0 Protocol”,RFC5849

[RFC1867] E. Nebel,L. Masinter,Form-based File Upload in HTML”,RFC1867

[RFC2616] Fielding,R.,Gettys,J,e “Hypertext Transfer Protocol — HTTP/1.1” , RFC2616

[RFC2617] Franks,J.“HTTP Authentication: Basic and Digest Access Authentication”, RFC2617

新浪微博开放平台:http://open.t.sina.com.cn/wiki/index.php/Oauth

[转载]Red5总结

mikel阅读(1216)

[转载]Red5总结 – 青青豆(QQingDou) – 博客园.

网站开发已经几年有余了,最近终于忙完了自己的青青豆,以前始终没有抽出时间自己写点什么,偶尔拿起偶尔放下,终究是空,希望自己多多坚持,也希望博友的多多支持,分享自己一些积累的经验!

前一段时间公司鉴于首页不错的流量,希望增加一些格外的收入或者做些视频推广,需要增加一个FLASH流媒体服务器播放视频,本来对于做C#.NET我来 说,这个项目应该不是我来接的,最后可能是各位博友想的那样,”梦里花落知多少” 落到了我的怀里,‘杯具’还是这样发生了。

Red5的主要功能 和Macromedia公司的FMS类似,提供基于Flash的流媒体服务的一款基于Java的开源流媒体服务器。它由Java语言编写,使用RTMP作 为流媒体传输协议,这与FMS完全兼容。它具有流化FLV、MP3文件,实时录制客户端流为FLV文件,共享对象,实时视频播放、Remoting等功 能。用Red5替换FMS后,客户端不用更改可正常运行。

Red5竟然是用JAVA编写,我.NET,  无语了,那么用FMS吧,对于一个试用型项目,几千元的RMB似乎不可能,只能硬着头皮继续研究Red5。

准备工作:

一、JAVA环境配置:

下载的JDK安装包,我选择的是jdk-6u10-rc2-bin-b32-windows-i586-p-12_sep_2008.exe,参考地址http://aben328.javaeye.com/blog/341499

二、确认你的安装环境并选择RED5安装包:

如果是Windows操作系统,可以下载对应的安装文件Red5 0.9.0 Final (27 January 2010) ,不是最新的(不一定是最好的),也可以下载对应的源代码自己进行研究Source,其他的操作可以参考该页面http://code.google.com/p/red5/

准备工作完成,一切就绪。

安装工作:

步骤一:首先安装上面下载的JDK安装包(备注:如果你先安装RED5,会提示找不到JDK,你必须先完成步骤一在继续以下操作), 安装时首先会安装JDK,必须记住安装路径,保持默认即可,默认是C:\Program Files\Java\jdk1.6.0_10,然后安装JRE,保持默认即可,默认是C:\Program Files\Java\jre6,安装完成后,必须配置环境变量,我的电脑–>属性–>高级 选项卡–>环境变量(N)–>找到 系统变量(S) 下 新建(W),然后输入 变量名(N):JAVA_HOME,变量值(V):上面JDK安装路径C:\Program Files\Java\jdk1.6.0_10,确定即可,JDK准备就绪。

步骤二:安装RED5,安装RED5时,会要求输入外网可访问的IP,比如101.23.45.67,然后输入可访问的端口(Port),一般是5080,最后安装完成即可。

测试工作:

a) 一切安装就绪,现在应该体验一下RED5的真实面目了,首先启动RED5服务:重启电脑然后 我的电脑–>系统服务–>启动 RED5服务 或者 直接在安装目录下找到Red5.bat启动即可,接着在IE输入http://101.23.45.67:5080/,(你刚刚输入的IP地址和Port),没有忘吧,回车进行测试,

会出现RED5欢迎页面,如果出现以下页面,说明RED5安装成功,如果不成功,请确认IP是否正确和可访问,Port是否正确且没有被占用。

b)安装 DEMO

点击 Install,进入安装页面,连接成功出现一下页面:

选中要安装的 DEMO,然后点击 Install即可,比如说 SOSample。

返回上个页面,点击 DEMO连接进行测试,然后点击上一步安装的DEMO,比如Shares Ball View demo,进行测试,注意必须把rtmp://localhost/SOSample 改为 rtmp://101.23.45.67/SOSample,点击Connect TO Red5按钮,右边会变成绿色,否则请检查是否连接成功。在不同页面进行同样操作,如果拉动其中一个的页面的red5图标, 另外一个页面的RED5图标也按照相同轨迹移动,说明安装RED5成功。

配置站点:

打开RED5的安装目录下的webapps目录,新建自己需要的目录,如MyStream,r然后复制SOSample下的全部文件到MyStream,修改两个文件:

一、red5-web.properties

webapp.contextPath=/MyStream

二、web.xml

<param-value>/FlvStream</param-value>

保存即可。

下一步在MyStream目录下放置.FLV文件的即可。重启服务


RTMP服务测试:

下载 RTMP播放器测试 http://www.longtailvideo.com/players/jw-flv-player/,配置playlist.xml,将

<location>rtmp://101.23.45.67/MyStream</location>
<identifier>FileName</identifier>//你FLV文件名称,不需要扩展名

OK,IE浏览mediaplayer.html 文件,出现视频播放,恭喜你,一切成功!更多介绍,请详见参考资料。

参考资料http://osflash.org/red5

http://code.google.com/p/red5/

http://labs.influxis.com/?p=47

http://developer.longtailvideo.com/trac/wiki/Player5FlashVars

[转载]ASP.NET MVC的全球化方案

mikel阅读(987)

[转载]ASP.NET MVC的全球化方案 – P_Chou Go deep and Keep learning – 博客园.

由于项目需要最近在学习ASP.NET MVC。在实践中,网站要支持多语言,需要全球化。在MVC下我实现了一个全球化框架,在这里与各位分享一下,不足之处也请各位看官指教。

让URL支持全球化

经常上微软网站的朋友可能很熟悉类似包含..\zh-cn\..、..\en-us\..的url形式,这就是本文要使用的全球化方案。当然还有使用QueryString传递参数的方案,基本思路我想是类似的。

由于MVC天生的URL路由原理,使得这个方案很容易被接受。

基本思路

这个方案的基本思路是:

1.当用户访问的url含有合法的culture参数时,能够直接路由到对应的controller,在controller初始化时设置线程的Culture;

2.当用户访问的url不包含culture参数时,同样被路由到对应的controller,但controller在执行action前,重定向到包含Culture的url。这里的Culture按照先检测cookie,再检测语言浏览器设置,最后使用默认值的优先级顺序实施。

先看下效果演示,注意url,点击下载例子

image

image

Resource.resx

在接下去之前先回顾一下资源文件。在ASP.NET web应用程序(winform同样)中定义的资源文件.resx实际上是一个xml配置文件,通常我们只关心其中的key\value配置;我们可以建 立一个或多个.resx,这些.resx会对应生成一个cs文件,这个cs文件会定义一个类(可能是Resource类,取决于你的资源文件的命名),通 过访问这个类的静态属性即可访问这些key,而选择哪个.resx读取的关键就是CultureInfo,只要我们设置当前线程的 CultureInfo,Resource便会自动识别对应的.resx配置文件。而在.resx的命名上,需要按照这样的规则:

Resource.zh-cn.resx(对应简体中文资源文件)

Resource.en-us.resx(对应美国英语资源文件)

中间的Culture名字很重要。

通常在开发时,只要一个默认的Resource.resx,当开发完成之后,拷贝一个相同的Resource.resx,并改名字成上面的样子,然后手动或自动将其中的所有value都翻译成对应的语言。

解决路由问题

在这个方案中,首先要考虑的是url路由配置。首先,理想情况下,我们所有的url都是domain/culture/controller /action/param1/..这种形式,那么只要一份以culture开头的路由就可以了。但是事实上并非这么简单,如果用户不知道这个规则,他手 动输入了domain/controller/action/param1..那么这种url将不能被正确路由。这种情况在初次访问网站的时候最为常见 (通常我们都会键入www.microsoft.com而不会在后面加 上任何的culture参数)。那么难道我们要为了这种场景写两份路由吗?显然不是,或者说不用手动做这件事。这里要解决的第一个问题出现了。我的方案 是:只为domain/controller/action/param1..这种路由手动写代码配置,这也比较符合习惯;然后通过一个方法,遍历 route表中的所有路由,并在每个url规则前面加上一个参数ci表示culture,生成一份新的路由加到路由表中即可。这样做尽管没有减少路由规 则,但是至少不用手动一个个写了,要不然没人会同意这个方案的。下面是代码和解释:

1 protected void Application_Start()
2 {
3 AreaRegistration.RegisterAllAreas();
4 RegisterRoutes(RouteTable.Routes);
5 RegisterGlobalizationRoutes();
6 ...
7 }
01 private void RegisterGlobalizationRoutes()
02 {
03 //RouteTable.Routes即路由表
04 if (RouteTable.Routes == null)
05 return;
06 //创建一个新的路由集合,存放将要添加到路由
07 RouteCollection rc = new RouteCollection();
08
09 //这里需要跳过routes.IgnoreRoute("{resource}.axd/{*pathInfo}");
10 //由于IgnoreRouteInternal是个私有类,所以这里只能反射
11 //skip IgnoreRouteInternal
12 var routes = RouteTable.Routes.SkipWhile(p => (p.GetType().Name == "IgnoreRouteInternal"));
13
14 int insertpoint = RouteTable.Routes.Count() - routes.Count();
15
16 //遍历所有需要处理的路由
17 foreach (var r in routes)
18 {
19 Route item = (r as Route);
20 //下面的代码创建一个新的路由对象,在url规则前面加上ci参数,并拷贝其他设置
21 Route newitem = new Route(
22 //string.Format(@"{ci}/{0}",item.Url),
23 @"{ci}/" + item.Url,
24 new MvcRouteHandler());
25 newitem.Defaults = new RouteValueDictionary(item.Defaults);
26 newitem.Constraints = new RouteValueDictionary(item.Constraints);
27 //ci参数需要验证,因为只有合法的culture才能被接受
28 newitem.Constraints.Add("ci", new CulturePrefixRule());
29 newitem.DataTokens = new RouteValueDictionary();
30 newitem.DataTokens["Namespaces"] = item.DataTokens["Namespaces"];
31 rc.Add(newitem);
32 }
33 //带ci参数的路由应当靠前放,所以这里插入到前面
34 foreach (var c in rc)
35 {
36 RouteTable.Routes.Insert(insertpoint++, c);
37 }
38 }
01 //实现IRouteConstraint的一个类
02 private class CulturePrefixRule : IRouteConstraint
03 {
04 IEnumerable<string> cultureConllection = CultureInfo.GetCultures(CultureTypes.SpecificCultures).Select(p => p.Name.ToLower());
05 public bool Match(HttpContextBase httpContext, Route route, string parameterName, RouteValueDictionary values, RouteDirection routeDirection)
06 {
07 if (values[parameterName] != null)
08 return cultureConllection.Contains(values[parameterName].ToString().ToLower());
09 else
10 return false;
11 }
12 }

这里要注意几点:

1.routes.IgnoreRoute(“{resource}.axd/{*pathInfo}”);会在路由表中添加一条IgnoreRouteInternal类型的路由,只不过这条是需要被跳过的而已。三个类的关系是:

RouteBase->Route->IgnoreRouteInternal

而不巧的是IgnoreRouteInternal是个私有类,因此,只能借助反射了。

2.为路由设置Constraints属性时,实际上是为其指 定一个IRouteConstraint。MVC内部有一个实现了IRouteConstraint的接受正则表达式的类,我们在MapRoute方法中 用一个string初始化Constraints,实际上就是实例化了这个类。而这里我们的需求显然要复杂点:需要判断ci参数是否是支持的,所以也就有 了CulturePrefixRule实现IRouteConstraint。

3.带有ci参数的路由更“特殊”,所以最好还是放在路由表前面。原因我就不再累述了。

在Controller的Action执行前跳转

所有的Controller都应该具有一个相同的行为:能够针对没有ci参数的url实施跳转。因此自然想到实现一个基类Controller,这里我命名为BaseController,代码如下:

01 public class BaseController : Controller
02 {
03 protected string redirectUrl;
04
05 protected override void Initialize(System.Web.Routing.RequestContext requestContext)
06 {
07 base.Initialize(requestContext);
08 object cultureValue;
09 //检测ci参数
10 if (requestContext.RouteData.Values.TryGetValue("ci", out cultureValue))
11 {
12 //设置当前线程的culture
13 try
14 {
15 Thread.CurrentThread.CurrentUICulture = CultureProvider.GetCultureInfo(cultureValue.ToString());
16 Thread.CurrentThread.CurrentCulture = CultureProvider.GetCultureInfo(cultureValue.ToString());
01 Response.Cookies.Add(new HttpCookie(CultureProvider.culturecookiekey,cultureValue.ToString()));
02 }
03 catch { throw new Exception("Culture Error!"); }
04 }
05 else //如果没有ci参数
06 {
07 //check cookie
08 HttpCookie cLang = requestContext.HttpContext.Request.Cookies[CultureProvider.culturecookiekey];
09 if (cLang != null)
10 {
11 cultureValue = cLang.Value;
12 }
13 else //check brower setting
14 {
15 string[] langs = requestContext.HttpContext.Request.UserLanguages;
16 if (langs != null && langs.Length > 0)
17 {
18 cultureValue = langs[0].Split(';').First();
19 }
20 }
21
22 if (cultureValue == null)
23 {
24 cultureValue = CultureProvider.culturedefault;
25 }
26 //设置redirectUrl,如果不需要重定向到化redirectUrl 为null
27 redirectUrl = string.Format(@"/{0}{1}",
28 cultureValue.ToString(),
29 requestContext.HttpContext.Request.RawUrl);
30
31 }
32 }
33
34 protected override IActionInvoker CreateActionInvoker()
35 {
36 return new CustomControllerActionInvoker(redirectUrl);
37 }
38 }
39
40 //一个IActionInvoker 的实现,MVC默认使用ControllerActionInvoker,因为在
41 //redirectUrl != null 的时候需要在action执行之前执行重定向
42 internal class CustomControllerActionInvoker : ControllerActionInvoker
43 {
44 string redirectUrl;
45 public CustomControllerActionInvoker(string url)
46 : base()
47 {
48 redirectUrl = url;
49 }
50 protected override ActionResult InvokeActionMethod(ControllerContext controllerContext, ActionDescriptor actionDescriptor, IDictionary<string, object> parameters)
51 {
52 object returnValue;
53 //ChildAction内部不能重定向
54 if (!string.IsNullOrEmpty(redirectUrl) && !controllerContext.IsChildAction)
55 returnValue = new RedirectResult(redirectUrl);
56 else
57 returnValue = actionDescriptor.Execute(controllerContext, parameters);
58 ActionResult result = CreateActionResult(controllerContext, actionDescriptor, returnValue);
59 return result;
60 }
61 }
62
63 public static class CultureProvider
64 {
65 public const string culturecookiekey = "Lang";
66 public const string culturedefault = "en-US";
67
68 public static CultureInfo GetCultureInfo(string ci)
69 {
70 try
71 {
72 return new CultureInfo(ci);
73 }
74 catch
75 {
76 return null;
77 }
78 }
79 }

只要所有的Controller继承这个BaseController即可。

这里需要重点指出的是 CustomControllerActionInvoker类,事实上发现从这个类入手解决重定向问题花了我不少时间,为此我不得不调试MVC的源码。 当然最初的想法是在每个action执行时手动判断redirectUrl,从而指导重定向,但显然,没人愿意将自己已经写好的action都拿出来一个 个改,所以也就有了这个小小的探索。

页面中的链接、跳转

最后令我感到即高兴又担心的问题是:当我使用这个框架后,页面 中的所有链接和跳转因素几乎都能自动在url前面加上ci参数!虽然我知道类似Html.ActionLink之类的helper有从路由表中产生url 的能力,但是能够自动添加上ci,还是让我感到有点始料未及。不过,链接的url是否正确,还是要注意,有一些特殊情况。

页面中使用资源

在页面中引用资源可以直接在C#脚本中引用Resource类。这里提供一个helper。这个Html的扩展方法。

01 public static class ResourceExtensions
02 {
03 public static string Resource(this Controller controller, string expression, params object[] args)
04 {
05 ResourceExpressionFields fields = GetResourceFields(expression, "~/");
06 return GetGlobalResource(fields, args);
07 }
08
09 public static string Resource(this HtmlHelper htmlHelper, string expression, params object[] args)
10 {
11 string path = "~/";
12 ResourceExpressionFields fields = GetResourceFields(string.Format("Resource,{0}", expression), path);
13 return GetGlobalResource(fields, args);
14 }
15
16 static string GetGlobalResource(ResourceExpressionFields fields, object[] args)
17 {
18 return string.Format((string)HttpContext.GetGlobalResourceObject(fields.ClassKey, fields.ResourceKey, CultureInfo.CurrentUICulture), args);
19 }
20
21 static ResourceExpressionFields GetResourceFields(string expression, string virtualPath)
22 {
23 var context = new ExpressionBuilderContext(virtualPath);
24 var builder = new ResourceExpressionBuilder();
25 return (ResourceExpressionFields)builder.ParseExpression(expression, typeof(string), context);
26 }
27 }

需要注意的是这个方法默认认为Resource是资源的类名,所以必要的话需要修改

ResourceExpressionFields fields = GetResourceFields(string.Format(“Resource,{0}”, expression), path); 中的”Resource,{0}”

结语

初学MVC,甚至可以说是初学web开发。以上是我个人提出的一种方案,不知道有没有什么不足之处,还请各位看官提出见解,探讨一下。

点击下载例子

其他相关资源:

http://blog.miniasp.com/post/2010/01/ASPNET-MVC-Developer-Note-Part-15-Globalization-and-Localization.aspx