前言
因为咱们的.NET EF Core快速入门实战教程经常会用到 LINQ 去查询和操作 MySQL 中的数据,因此我觉得很有必要对 LINQ 的一些使用技巧、常用方法、特性做一个详细的介绍,让大家在后续的课程中不迷茫。
LINQ介绍
LINQ语言集成查询是一系列直接将查询功能集成到 C# 语言的技术统称。数据查询历来都表示为简单的字符串,没有编译时类型检查或 IntelliSense 支持。此外,需要针对每种类型的数据源了解不同的查询语言:SQL 数据库、XML 文档、各种 Web 服务等。然而,LINQ的出现改变了这一现状,它使查询成为了与类、方法和事件同等重要的高级语言构造。通过LINQ,开发者能够以声明性的方式查询和操作数据,极大地提高了开发效率和代码的可维护性。
LINQ具有以下特性
- 强类型:编译时验证查询逻辑,减少运行时错误。
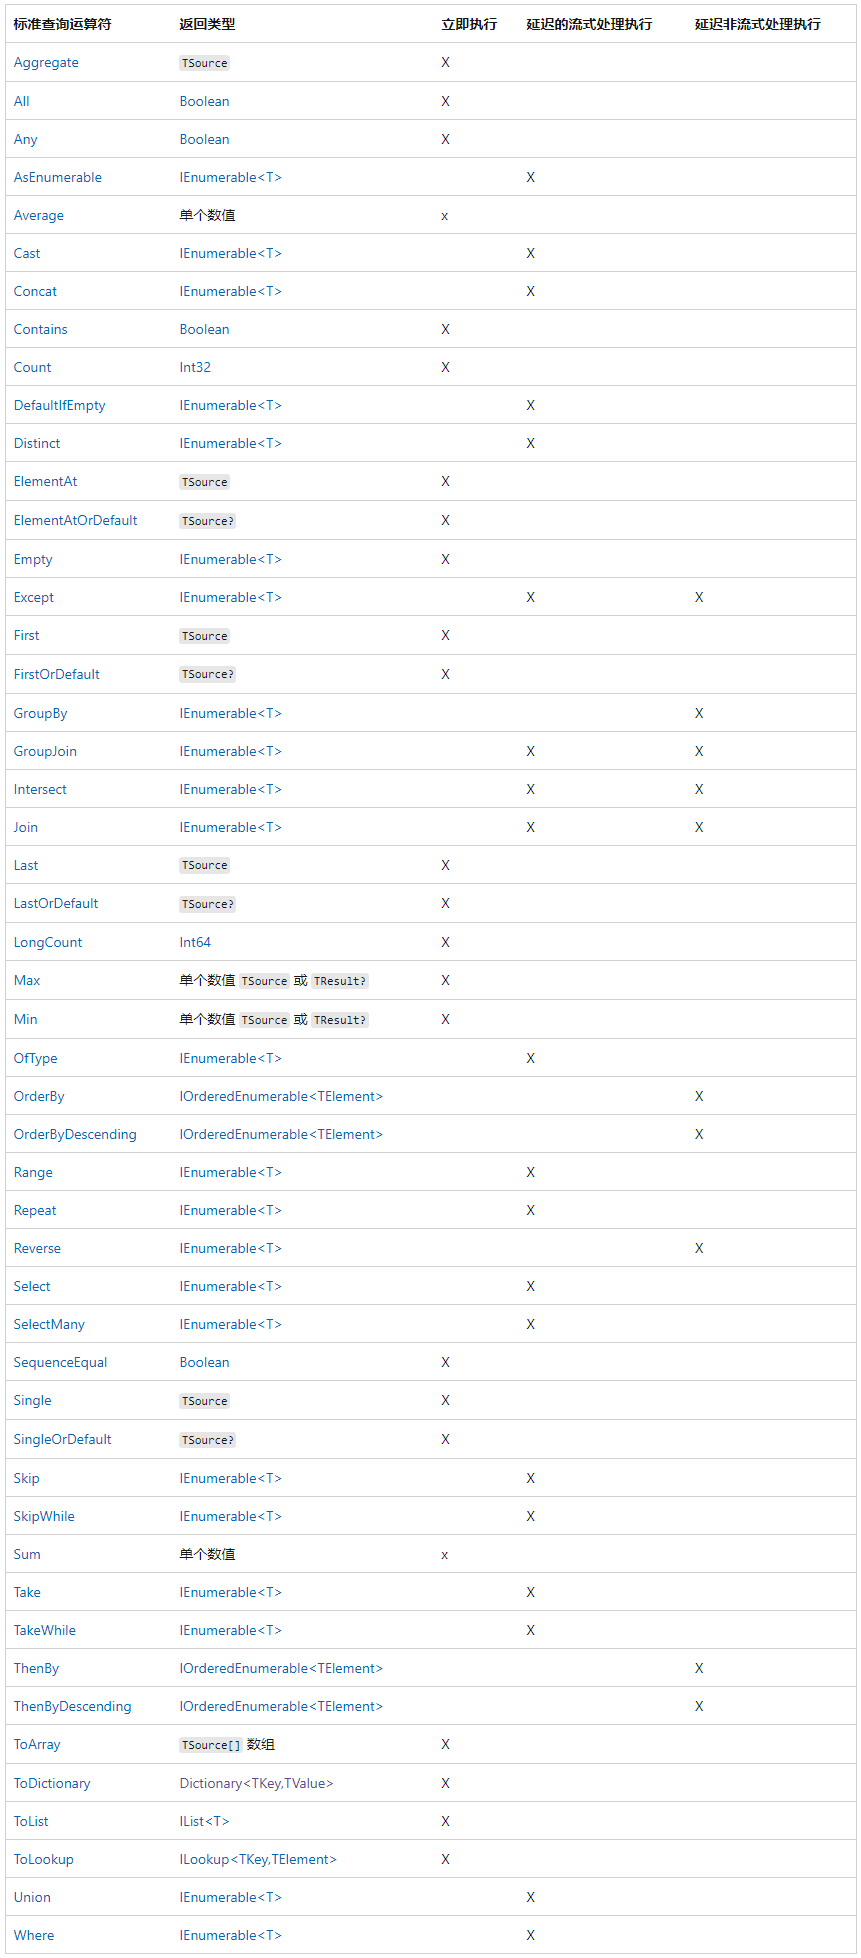
- 延迟执行:LINQ查询通常是延迟执行的,即查询表达式本身不会立即执行,直到实际遍历结果时才触发查询。使用
ToList()、ToArray()、ToDictionary()、FirstOrDefault()等方法可立即执行。
- 支持多种数据源:LINQ可以用于查询多种数据源,如
LINQ to Objects、LINQ to XML、LINQ to SQL、LINQ to Entities(Entity Framework)等。
LINQ中常用方法
操作示例数据
        public class StudentInfo
        {
            public int StudentID { get; set; }
            public string StudentName { get; set; }
            public DateTime Birthday { get; set; }
            public int ClassID { get; set; }
            public string Address { get; set; }
            public List<Course> Courses { get; set; } = new List<Course>();
        }

        public class Course
        {
            public int CourseID { get; set; }
            public string CourseName { get; set; }
        }

        static List<StudentInfo> students = new List<StudentInfo>
        {
            new StudentInfo
            {
                StudentID=1,
                StudentName="大姚",
                Birthday=Convert.ToDateTime("1997-10-25"),
                ClassID=101,
                Courses = new List<Course>
                {
                    new Course { CourseID = 101, CourseName = "语文" },
                    new Course { CourseID = 102, CourseName = "数学" }
                }
            },
            new StudentInfo
            {
                StudentID=2,
                StudentName="李四",
                Birthday=Convert.ToDateTime("1998-10-25"),
                ClassID=101,
                Courses = new List<Course>
                {
                    new Course { CourseID = 101, CourseName = "语文" },
                    new Course { CourseID = 102, CourseName = "数学" }
                }
            },
            new StudentInfo
            {
                StudentID=3,
                StudentName="王五",
                Birthday=Convert.ToDateTime("1999-10-25"),
                ClassID=102,
                Address="广州",
                Courses = new List<Course>
                {
                    new Course { CourseID = 101, CourseName = "语文" },
                    new Course { CourseID = 102, CourseName = "数学" }
                }
            },
            new StudentInfo
            {
                StudentID=4,
                StudentName="时光者",
                Birthday=Convert.ToDateTime("1999-11-25"),
                ClassID=102,
                Address="深圳" ,
                Courses = new List<Course>
                {
                    new Course { CourseID = 104, CourseName = "历史" },
                    new Course { CourseID = 103, CourseName = "地理" }
                }
            }
        };
基本查询方法
- Where:用于过滤集合中的元素。
- Select:用于将集合中的每个元素投影(转换)为新形式。
- SelectMany:用于将多个集合
展平为一个集合。
            var femaleStudents = students.Where(s => s.StudentName == "时光者");
            var studentNames = students.Select(s => s.StudentName);

            // 使用SelectMany展平所有学生的课程列表
            var allCourses = students.SelectMany(student => student.Courses).ToList();

            // 输出所有课程的名称
            foreach (var course in allCourses)
            {
                Console.WriteLine(course.CourseName);
            }
转换方法
- ToList:将实现了
IEnumerable<T>接口的集合转换为一个List<T>类型的对象,属于将集合转换为特定类型列表的方法。
- ToArray:将一个实现了
IEnumerable<T>接口的集合转换为一个数组,属于将集合转换为数组类型的方法。
- ToDictionary:将一个集合转换为一个字典(
Dictionary<TKey, TValue>),其中集合的元素作为字典的键或值(通过提供的键选择器和值选择器函数)。属于将集合转换为键值对集合(字典)的方法。
- ToLookup:将一个序列分组并返回一个
ILookup<TKey, TElement>对象,这是一个one-to-many集合,即一个键可以对应多个值。属于将集合转换为分组集合(查找表)的方法。
            var studentList = students.ToList();
            var studentArray = students.ToArray();
            var studentDictionary = students.ToDictionary(s => s.StudentID, s => s.StudentName);
            var studentLookup = students.ToLookup(s => s.ClassID, s => s.StudentName);
元素操作方法
- First:返回集合中的第一个元素。
- FirstOrDefault:返回集合中的第一个元素,如果集合为空则返回默认值。
- Single:返回集合中的单个元素,如果集合为空或包含多个元素则抛出异常。
- SingleOrDefault:返回集合中的单个元素,如果集合为空或包含多个元素则返回默认值。
- Last:返回集合中的最后一个元素。
- LastOrDefault:返回集合中的最后一个元素,如果集合为空则返回默认值。
- ElementAt:返回集合中指定索引处的元素。
- ElementAtOrDefault:返回集合中指定索引处的元素,如果索引超出范围则返回默认值。
- DefaultIfEmpty:如果集合为空,则返回一个包含默认值的集合。
            var firstStudent = students.First();
            var firstAdult = students.FirstOrDefault(s => s.Birthday <= DateTime.Now.AddYears(-18));
            var onlyWangWu = students.Single(s => s.StudentName == "王五");
            var wangWuOrDefault = students.SingleOrDefault(s => s.StudentName == "王六");
            var lastStudent = students.Last();
            var lastAdult = students.LastOrDefault(s => s.Birthday <= DateTime.Now.AddYears(-18));
            var secondStudent = students.ElementAt(1);
            var tenthStudentOrDefault = students.ElementAtOrDefault(9);
            var nonEmptyStudents = students.DefaultIfEmpty(new StudentInfo { StudentID = 0, StudentName = "默认Student", Address = "默认" });
排序方法
- OrderBy:用于对集合进行升序排序。
- OrderByDescending:用于对集合进行降序排序。
- ThenBy:用于在已排序的集合上应用次要排序。
- ThenByDescending:用于在已排序的集合上应用次要降序排序。
            var sortedByBirthdayAsc = students.OrderBy(s => s.Birthday);
            var sortedByClassIDDesc = students.OrderByDescending(s => s.ClassID);
            var sortedByNameThenClassID = students.OrderBy(s => s.StudentName).ThenBy(s => s.ClassID);
            var sortedThenByDescending = students.OrderBy(s => s.StudentName).ThenBy(s => s.ClassID).ThenByDescending(x => x.Birthday);
聚合方法
- Count:返回集合中的元素数量。
- Sum:返回集合中数值类型元素的和。
- Average:返回集合中数值类型元素的平均值。
- Min:返回集合中的最小值。
- Max:返回集合中的最大值。
- Aggregate:对集合进行自定义聚合操作。
            int studentCount = students.Count();
            int totalClassID = students.Sum(s => s.ClassID);
            double averageAge = students.Average(s => DateTime.Now.Year - s.Birthday.Year);
            int minClassID = students.Min(s => s.ClassID);
            int maxClassID = students.Max(s => s.ClassID);
            string concatenatedNames = students.Aggregate("", (acc, s) => acc == "" ? s.StudentName : acc + ", " + s.StudentName);
集合操作方法
- Distinct:返回集合中的唯一元素。
- Union:返回两个集合的并集。
- Intersect:返回两个集合的交集。
- Except:返回在第一个集合中存在但不在第二个集合中存在的元素。
- Concat:连接两个或多个集合,并返回一个新的序列。
            var uniqueClassIDs = students.Select(s => s.ClassID).Distinct();
            var unionClassIDs = uniqueClassIDs.Union(new[] { 103, 104 });
            var intersectClassIDs = uniqueClassIDs.Intersect(new[] { 101, 103 });
            var exceptClassIDs = uniqueClassIDs.Except(new[] { 101 });
            var concatClassIDs = uniqueClassIDs.Concat(new[] { 103, 104 });
分组与连接方法
- GroupBy:根据键对集合进行多级分组。
- Join:根据匹配键连接两个集合。
  var groupedByClassID = students.GroupBy(s => s.ClassID);
  var otherStudent = new List<StudentInfo>
  {
     new StudentInfo
     {
         StudentID=4,
         StudentName="摇一摇",
         Birthday=Convert.ToDateTime("2997-10-25"),
         ClassID=101,
         Courses = new List<Course>
         {
             new Course { CourseID = 101, CourseName = "语文" },
             new Course { CourseID = 102, CourseName = "数学" }
         }
     }
  };
  var listJoin = students.Join(
      otherStudent, // 要连接的第二个序列
      s1 => s1.StudentID, // 从第一个序列中提取键
      s2 => s2.StudentID, // 从第二个序列中提取键
      (s1, s2) => new // 结果选择器,指定如何从两个匹配元素创建结果
      {
          StudentID = s1.StudentID,
          StudentName = s1.StudentName,
          Birthday = s1.Birthday,
          ClassID = s1.ClassID,
          Address = s1.Address,
          Courses = s1.Courses,
          OtherStudentName = s2.StudentName //假设我们想要包含第二个序列中学生的名称
      });
跳过与获取指定数量的元素(常用作分页)
- Skip:用于跳过集合中指定数量的元素,并返回剩余的元素序列。
- Take:用于从集合的开头获取指定数量的元素,并返回一个新的序列。
            var skippedStudents = students.Skip(1);
            var takenStudents = students.Take(2);

            //数据分页查询(Skip + Take)
            int pageNumber = 2;
            int pageSize = 10;
            var pagedUsers = skippedStudents
                .OrderBy(u => u.ClassID) // 必须排序
                .Skip((pageNumber - 1) * pageSize)
                .Take(pageSize)
                .ToList();
条件判断方法
- All:用于判断集合中的所有元素是否都满足指定条件。
- Any:检查集合是否包含任何元素,或用于判断集合中是否存在至少一个满足指定条件的元素。
- Contains:用于判断集合中是否包含指定的元素。
            bool allAdults = students.All(s => s.Birthday <= DateTime.Now.AddYears(-18));
            bool anyAdults = students.Any(s => s.Birthday <= DateTime.Now.AddYears(-18));
            bool containsWangWu = students.Contains(students.First(s => s.StudentName == "王五"));
更多方法查询
查询语法
LINQ提供了类似于SQL的查询语法,允许开发者以几乎相同的方式对不同类型的数据源进行查询。查询语法使用from、where、select、orderby等关键字。
            var querySyntaxResult = from student in students
                                    where student.ClassID == 101
                                    orderby student.StudentName ascending
                                    select student;

            Console.WriteLine("查询语法结果:");
            foreach (var student in querySyntaxResult)
            {
                Console.WriteLine($"{student.StudentName}, ClassID: {student.ClassID}");
            }
查询关键字:
- from: 指定数据源和范围变量(类似于迭代变量)。
- where: 基于由逻辑 AND 和 OR 运算符(&& 或 ||)分隔的一个或多个布尔表达式筛选源元素。
- select: 指定执行查询时,所返回序列中元素的类型和形状。
- group: 根据指定的密钥值对查询结果分组。
- into: 提供可作为对 join、group 或 select 子句结果引用的标识符(简单理解用于将配对的结果收集到一个临时序列)。
- orderby: 根据元素类型的默认比较器对查询结果进行升序或降序排序。
- join: 基于两个指定匹配条件间的相等比较而联接两个数据源(简单理解根据指定的键将两个序列中的元素配对)。
- let: 引入范围变量,在查询表达式中存储子表达式结果。
- in: join子句中的上下文关键字。
- on: join子句中的上下文关键字。
- equals: join子句中的上下文关键字。
- by: group 子句中的上下文关键字。
- ascending: orderby子句中的上下文关键字。
- descending: orderby子句中的上下文关键字。
方法语法
方法语法也称为扩展方法语法,使用点号“.”和一系列扩展方法来构建查询。
            var methodSyntaxResult = students
                                    .Where(student => student.ClassID == 101)
                                    .OrderBy(student => student.StudentName)
                                    .ToList();


            Console.WriteLine("方法语法结果:");
            foreach (var student in methodSyntaxResult)
            {
                Console.WriteLine($"{student.StudentName}, ClassID: {student.ClassID}");
            }
混合查询和方法语法
            var mixedResult = (from student in students
                               where student.ClassID == 101
                               where student.Courses.Any(course => course.CourseName == "数学")
                               orderby student.StudentName ascending
                               select student)
                       .Take(2)
                       .ToList();

            // 输出结果
            Console.WriteLine("混合查询结果:");
            foreach (var student in mixedResult)
            {
                Console.WriteLine($"{student.StudentName}, ClassID: {student.ClassID}");
            }
参考文章